The AutoCompleteBox control enables you to populate a list of items in your text box such that when you type in the first or first few characters of an item, you will be able to see a list. For example, consider that you have a text box on the user interface and want to display a set of names starting from N for the user to choose from. But this set of names would not be visible initially. It appears only when the user types N in the text box. This functionality can be achieved through the AutoCompleteBox control in Silverlight 3. The easiest way of populating the list is by creating it in the code-behind file. This would be a hard-coded approach though and every time you want to change the list, you will need to edit your code. A more flexible (and sometimes complex) approach would be to get the list populated from a database, an XML file or a Web service.
For the sake of this article, however, we shall see a simple example wherein we create the list in the code-behind file.
Create a Silverlight 3 application and replace the Grid tag with the Canvas tag. Drag and drop the AutoCompleteBox from the Toolbox into your XAML code (between the Grid tags). Also add a TextBlock.
Configure the properties of the three controls as shown below.
<UserControl xmlns:input="clr-namespace:System.Windows.Controls;assembly=System.Windows.Controls.Input" x:Class="AutoCompleteDemo.MainPage"
xmlns="http://schemas.microsoft.com/winfx/2006/xaml/presentation"
xmlns:x="http://schemas.microsoft.com/winfx/2006/xaml"
xmlns:d="http://schemas.microsoft.com/expression/blend/2008" xmlns:mc="http://schemas.openxmlformats.org/markup-compatibility/2006"
mc:Ignorable="d" d:DesignWidth="640" d:DesignHeight="480">
<Canvas x:Name="LayoutRoot" Width="640" Height="480">
<TextBlock Text="Please Enter a Name" Canvas.Left="100" Canvas.Top="20"></TextBlock>
<input:AutoCompleteBox x:Name="Names" Background="Transparent" Canvas.Left="100" Canvas.Top="40" Height="20" Width="100"></input:AutoCompleteBox>
</Canvas>
</UserControl>
Then open the MainPage.xaml.cs (code-behind) file and add the code as shown below:
public MainPage()
{
InitializeComponent();
List<string> names = new List<string>();
names.Add("Nimish");
names.Add("Nitin");
names.Add("Nilesh");
names.Add("Nilkanth");
names.Add("Nitesh");
Names.ItemsSource = names;
}
This creates a collection and assigns it as a data source to the AutoCompleteBox.
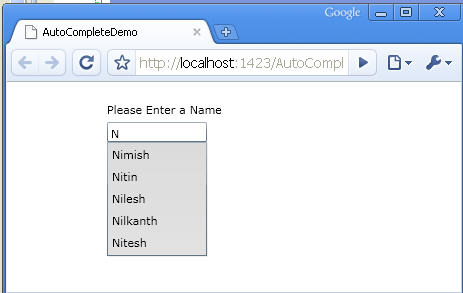
When you build and execute your solution and type N in the AutoCompleteBox, you would see a list of suggestions beginning with N for the names.

Figure 1: Output of the application
Conclusion: This article explored how to use AutoCompleteBox in Silverlight 3.