This article has been excerpted from book "Graphics Programming with GDI+".
Here are the steps we will cover:
- Creating a Window application
- Adding reference to the GDI+ library
- Obtaining the graphics surface
- Setting the graphics surface properties (optional)
- Drawing or filling graphics shapes
- Releasing objects
- Building and running the application
Creating a Windows Application
The first step of this tutorial is to create a Windows application using Visual Studio .NET
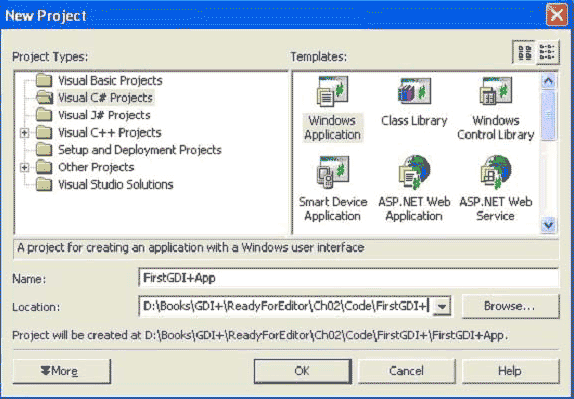
- Open Visual Studio .NET, select File | New | Project, and then choose Visual C# Projects under Project Types and Windows Application under Templates, as shown in Figure 2.5.
- Enter the application name, "FirstGDI+App", and click OK.
Note
Clicking the OK button creates a Windows application with a form and opens the Form Designer, in which you can build Windows applications.
Adding a Reference to GDI+
GDI+ functionality resides in the System.Drawing.dll namespace and is defined in the System.Drawing namespace. Hence the System.Drawing namespace must be included in the application. Visual Studio .NET automatically adds a reference to this namespace, which you can see in the beginning of the class. If the namespace is not defined there, you must add a reference manually. To add a reference to the GDI+ library use the Add Reference dialog.
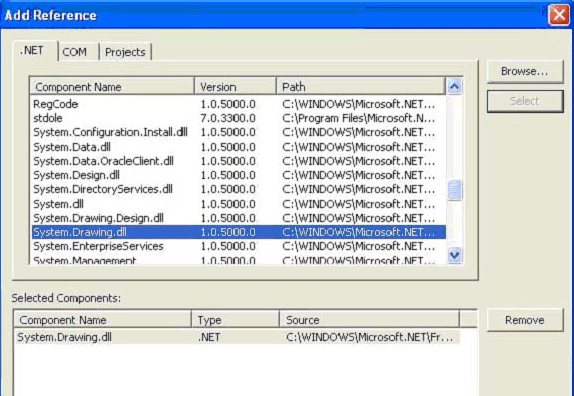
1. Open the Add Reference dialog by selecting Project | Add Reference.
2. Select the System.Drawing.dll assembly from the libraries listed under the .NET tab.
3. Click the Select button to add the library to the Selected Components list, as showing in Figure 2.6

FIGURE 2.5: Creating a Windows Application
4. Click the OK button to add the System.Drawing namespace reference to your project.
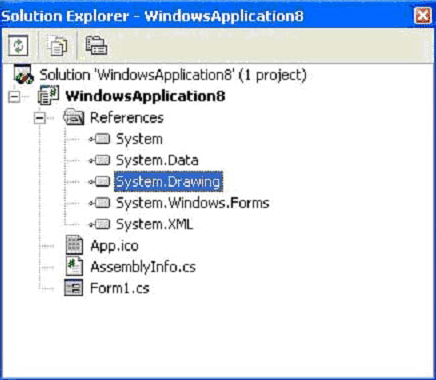
5. Got to the Solution Explorer window and expand the Reference node. The System.Drawing namespace is listed there (Figure 2.7).

FIGURE 2.6: Adding a reference to System.Drawing.dll

FIGURE 2.7: The System.Drawing namespace in a project
6. After adding a reference to System.Drawing.dll, you must import System.Drawing and other related namespaces, depending on the classes your application will use. For now, we will import the System.Drawing and System. Drawing.Drawing2D namespace. We add the following two line to the top of our class:
using System.Drawing;
using System.Drawing.Drawing2D;
You can also qualify a namespace reference by directly adding it as a prefix of the class. For example, if you don't want to use the using statement defined here, you can define a class as follows:
System.Drawing.Graphics g = e.Graphics;
Getting a Graphics Object in an Application
After adding a GDI+ library reference to the project, the next step is to decide on a drawing surface. In a Windows application, a form is a drawing surface. Every form has a Graphics object associated with it, which provides the drawing functionality.
In the .NET Framework, the Graphics class represents a GDI+ Graphics objects, which defines methods and properties to draw and fill graphics objects. Whenever an application needs to draw anything, it must go through the Graphics object.
There is no way to create a Graphics object using the new operator. For example, if you write the following code, you will get a compiler error:
Graphics g = new Graphics ()
There are several ways to obtain a Graphics object associated with a form.
Using the Paint Event of a Form
You can get a Graphics object corresponding to a form using the PaintEventArgs property of the form's paint event. For example, the following code gets a Graphics object from PaintEventArgs:
Private void form1_Paint(object sender, PaintEventArgs e)
{
Graphics g = e.Graphics;
}
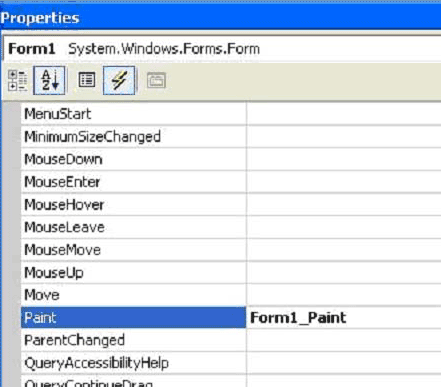
You can add the form's paint event handler using the Properties window. As Figure 2.8 shows, we add Form1_Paint (the default name) as the paint event handler:

FIGURE 2.8: Adding the Form_Paint event handler
Double-clicking in the paint event drop-down menu in the Properties window also adds the event handler.
Overriding the OnPaint Method
Another way to get a Graphics object associated with a form is to override the OnPaint method of the form, which uses PaintEventArgs in a manner similar to the Form1_Paint event. The following code snippet overrides the OnPaint method of a form.
protected override void OnPaint (PaintEventArgs e)
{
Graphics g = e.Graphics;
}
Using Other Methods
Sometimes you don't want to use the OnPaint method. For example, you might want to draw something on a button or a menu click event handler. The Form class provides the CreateGraphics method, which returns a Graphics object. The following code snippet creates a Graphics object using the CreateGraphics method and calls a method of the Graphics class:
Graphics g = this.CreateGraphics();
g.Clear (this.BackColor);
g.Dispose();
As this snippet shows, we call the Clear method of the Graphics class, which sets the background color of the surface as the background color of the form.
When you create a Graphics object using the CreateGraphics method, you must dispose of that object explicitly by calling the Dispose method to release the resources associated with it.
You can also use the FromImage, FromHwnd, and FromHdc static methods of the Graphics class to create Graphics objects from images, window handles, and window handles to device contexts, respectively.
The following code creates a Bitmap Object as an input parameter, which returns a Graphics object.
Bitmap bmp = new Bitmap(600,400, PixelFormat.Format32bppArgb);
Graphics g = Graphics.FromImage(bmp);
The following code creates a Graphics object from a window handle. In the example, this refers to a Windows Form. You can even pass Form1.Handle if your form is Form1.
Graphics g = Graphics.FromHwnd (this.Handle);
Creating Pens and Brushes
Once you have a Graphics object, the next step is to decide what you're going to draw on the surface. You may need one or more of the three objects: pen, brush, or image. In this article we will concentrate on pens and brushes only.
In GDI+ the Pen and Brush classes represent a pen and a brush, respectively. The abstract Brush class functionality is accessed through its derived classes: SolidBrush and HatchBrush, among others. Pens are used when you need to draw lines, rectangles, and curve boundaries Brushes are used when you need to fill graphics objects.
The Pen class constructor takes as argument the color and width of the pen. The following code creates a red pen with a width of 3 pixels and a black pen with a width of 1 pixel. The Pens class provides static members, each of which represents a pen with a particular color.
Pen redPen = new Pen (Color.Red, 3);
Pen blackPen = Pens.Black;
The SolidBrush class represents a solid brush in GDI+. The class's constructor takes a color as an argument. The following code creates a green solid brush.
SolidBrush greenBrush = new SolidBrush (Color.Green)
Conclusion
Hope the article would have helped you in writing your first GDI+ application. Read my other articles on GDI+ on the website.