For developing this Silverlight application you need Expression Blend in your system.
Step 1: Create a new Silverlight Project named "InsertData".
Now in the "Insertdata.Web" Project create a new LINQ to SQL page by clicking add new Item.
Give the new file name "silverlight.dbml".
Step 2:
Now click the Database explorer and connect to your database. For mine I have connected to the database. After that
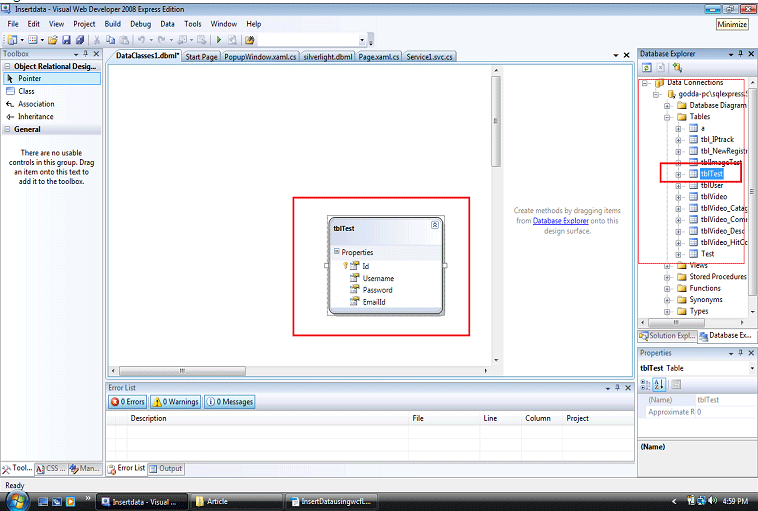
I have the table name "tblTest". I drag this table into the "silverlight.dbml". Just like Fig 1 marked with red.
Fig 1:

You can create your own table with your database and drag and drop your table here. But remember your table must have a primary key. Otherwise the LINQ to SQL file will not work.
Step 3:
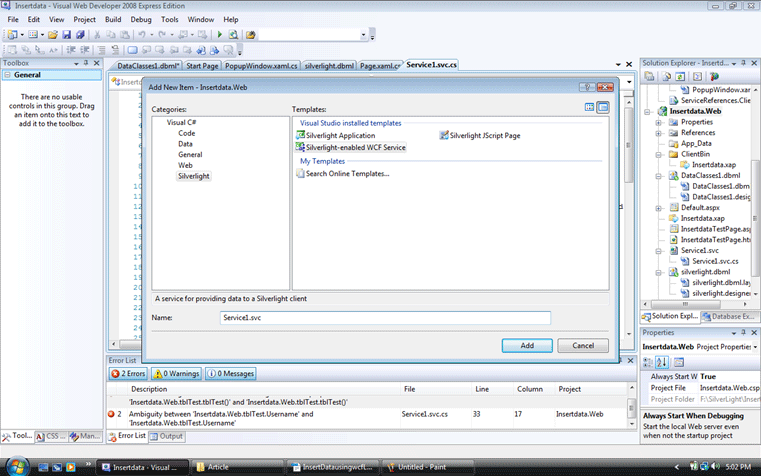
Now create a new Silverlight WCF file in the "Insertdata.web" Project and give it the name "servicerference1.svc"
just like fig 2.

Fig 2:
Step 4:
Now in the "Service1.svc.cs" file inder the Operation contract section write the method to insert data.
The code for that method is:
public void InsertData(string Username, string Password, string EmailId)
{
silverlightDataContext db = new silverlightDataContext();
//tblUser row = new tblUser()
//{
// UserName =Username ,
// PassWord =Password ,
//};
tblTest row = new tblTest()
{
Username =Username ,
passWord =Password ,
EmaidId =EmailId ,
};
//db.tblUsers.InsertOnSubmit(row);
//db.SubmitChanges();
db.tblTests.InsertOnSubmit(row);
db.SubmitChanges();
}
Here we create the object of our LINQ to SQL class; that means the silverlight.dbml. In here it will create like SilverlightdataContext.
After that we have to create the object of our table where we are to insert our data.
For my case my table is tbltest. We have to create the object of the table and have to add the column name. This method is for inserting the data into the database. Actually this WCF is for a business layer.
Here the full code of the WCF file is:
using System;
using System.Linq;
using System.Runtime.Serialization;
using System.ServiceModel;
using System.ServiceModel.Activation;
using System.Collections.Generic;
using System.Text;
namespace Insertdata.Web
{
[ServiceContract(Namespace = "")]
[AspNetCompatibilityRequirements(RequirementsMode = AspNetCompatibilityRequirementsMode.Allowed)]
public class Service1
{
[OperationContract]
public void DoWork()
{
// Add your operation implementation here
return;
}
[OperationContract]
public void InsertData(string Username, string Password, string EmailId)
{
silverlightDataContext db = new silverlightDataContext();
//tblUser row = new tblUser()
//{
// UserName =Username ,
// PassWord =Password ,
//};
tblTest row = new tblTest()
{
Username =Username ,
passWord =Password ,
EmaidId =EmailId ,
};
//db.tblUsers.InsertOnSubmit(row);
//db.SubmitChanges();
db.tblTests.InsertOnSubmit(row);
db.SubmitChanges();
}
// Add more operations here and mark them with [OperationContract]
}
}
In my next article I will describe how to use this WCF insert function in the Silverlight UI page.