Description: In this article I will describe how to insert and fetch data by WCF REST Service using the Jquery Post and Get methods.
Content:
Step 1:
Here in this application I will insert a Username and his corresponding phone number into a list using the Jquery Post method and retrieve the phone number by giving the Username using the Get Method.
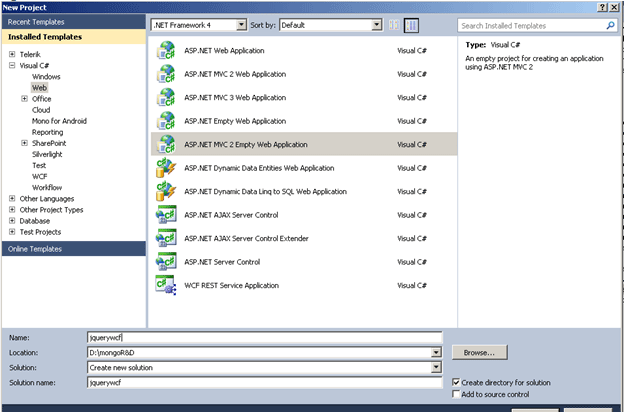
First Open VS 2010. After that File -> New -> Project -> Select ASP.Net MVC2 Web Application Template. Give it the name "JQueryWcf" like in Figure 1:

Figure 1
Step 2:
After that check "No don't create a unit test project".
Step 3:
Create a new WCF REST service.
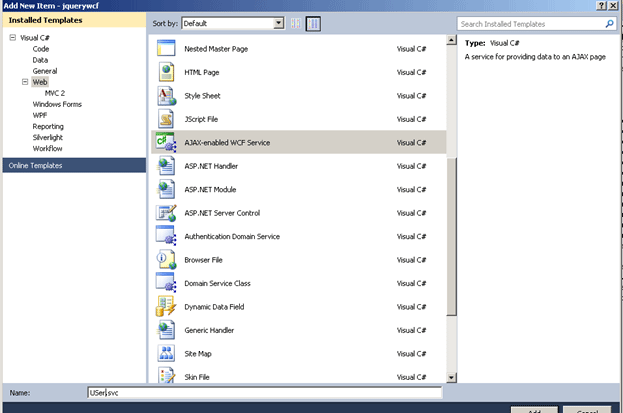
Right Click Solution -> Add -> New Item -> Select "AJAX-enabled WCF Service" -> Give it the name "User".

Figure 2
Step 4:
Now in the service write the setuser method under the Web Invoke Method.
[OperationContract]
[WebInvoke(
BodyStyle = WebMessageBodyStyle.WrappedRequest,
RequestFormat = WebMessageFormat.Json,
ResponseFormat = WebMessageFormat.Json)]
public void SetUser(string usertype, string phNo)
{
lstUsers.Add(new User() { Name = usertype, PhNo = phNo });
}
Here in this method we are adding the user type and phone number in to the List name lstUsers.
Now we have to define the lstUsers also.
public static List<User> lstUsers = new List<User>()
{
new User() { Name="shir", PhNo="9945529260"},
new User() { Name="dash", PhNo="9852639852"},
new User() { Name="santosh", PhNo="25689999"},
};
See in this list I hardcoded some data. So while running the application by giving this user Name you can see the Phone Number.
The whole WCF part code is:
using System;
using System.Collections.Generic;
using System.Linq;
using System.Runtime.Serialization;
using System.ServiceModel;
using System.ServiceModel.Activation;
using System.ServiceModel.Web;
using System.Text;
namespace jquerywcf
{
[ServiceContract(Namespace = "")]
[AspNetCompatibilityRequirements(RequirementsMode = AspNetCompatibilityRequirementsMode.Allowed)]
public class USer
{
// To use HTTP GET, add [WebGet] attribute. (Default ResponseFormat is WebMessageFormat.Json)
// To create an operation that returns XML,
// add [WebGet(ResponseFormat=WebMessageFormat.Xml)],
// and include the following line in the operation body:
// WebOperationContext.Current.OutgoingResponse.ContentType = "text/xml";
[OperationContract]
public void DoWork()
{
// Add your operation implementation here
return;
}
public static List<User> lstUsers = new List<User>()
{
new User() { Name="shir", PhNo="9945529260"},
new User() { Name="dash", PhNo="9852639852"},
new User() { Name="santosh", PhNo="25689999"},
};
// We have two service methods - SetUser and GetUser, which sets and gets
// user from fake repository.
[OperationContract]
[WebInvoke(
BodyStyle = WebMessageBodyStyle.WrappedRequest,
RequestFormat = WebMessageFormat.Json,
ResponseFormat = WebMessageFormat.Json)]
public void SetUser(string usertype, string phNo)
{
lstUsers.Add(new User() { Name = usertype, PhNo = phNo });
}
[OperationContract]
[WebGet(
ResponseFormat = WebMessageFormat.Json)]
public User GetUser(string name)
{
User op = lstUsers.Where(p => p.Name == name).FirstOrDefault();
return op;
}
// Add more operations here and mark them with [OperationContract]
}
[DataContract]
public class User
{
[DataMember]
public string Name { get; set; }
[DataMember]
public string PhNo { get; set; }
}
}
Step 4:
Now we have to create the JavaScript function for saving and retrieving the data.
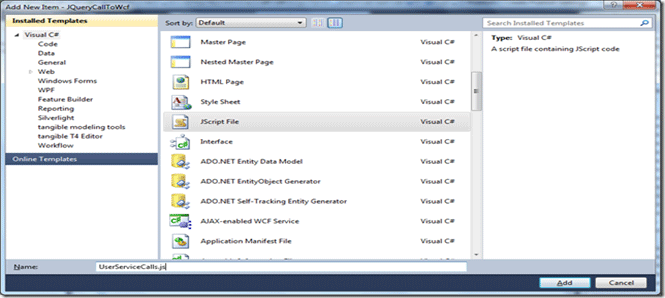
For that right-click the Scripts folder, then select Add -> New Item -> Select JScript File -> Give it the name "UserServiceCalls.js".

Fig 3:
Step 5:
Paste the code shown below under the JavaScript file.
$(document).ready(function () {
$(".btnSubmit").click(function () {
$.ajax({
cache: false,
async: true,
type: "POST",
dataType: "json",
url: "../User.svc/SetUser",
data: '{ "usertype": "' + $("#txtuserName").val() + '", "email" : "' + $("#txtuserEmail").val() + '" }',
contentType: "application/json;charset=utf-8",
success: function (r) { alert("Successfully Registered!!!"); },
error: function (e) { alert(e.statusText); }
});
});
$(".btnRetrieve").click(function () {
$.ajax({
cache: false,
async: true,
type: "GET",
dataType: "json",
url: "../User.svc/GetUser",
data: { name: $("#find").val() },
contentType: "application/json;charset=utf-8",
success: function (r) { if (r != null) $("#DisplayResult").html(r.Email); },
error: function (e) { alert(e.statusText); }
});
});
});
Step 6:
Now go to the "site.master" under the "Shared" folder. After that paste the 3 codes shown below under the header part for referring to the js script file under the source part.
<script src="../../Scripts/jquery-1.4.1.js" type="text/javascript"></script>
<script src="../../Scripts/jquery-1.4.1.min.js" type="text/javascript"></script>
<script src="../../Scripts/UserServiceCalls.js" type="text/javascript"></script>
Step 7:
Now go to the "Index.aspx" under the Home Folder. After that paste the code shown below:
<%@ Page Language="C#" MasterPageFile="~/Views/Shared/Site.Master" Inherits="System.Web.Mvc.ViewPage" %>
<asp:Content ID="Content1" ContentPlaceHolderID="TitleContent" runat="server">
Home Page
</asp:Content>
<asp:Content ID="Content2" ContentPlaceHolderID="MainContent" runat="server">
<h2><%: ViewData["Message"] %></h2>
<p>
</p>
<strong>Enter Registration Details</strong>
<p>
Enter User Name -
<input
type="text"
id="txtuserName" /><br />
Enter Phone NUmber -
<input
type="text"
id="txtuserEmail" /><br />
</p>
<a
href="#"
class="btnSubmit">
Post
</a>
<br /><br />
<strong>Enter User Name to Retrieve</strong>
<p>
Enter User Name:- -
<input
type="text"
id="find" />
</p>
<a
href="#"
class="btnRetrieve">
Get
</a>
<div
id="DisplayResult">
</div>
</asp:Content>
Step 8:
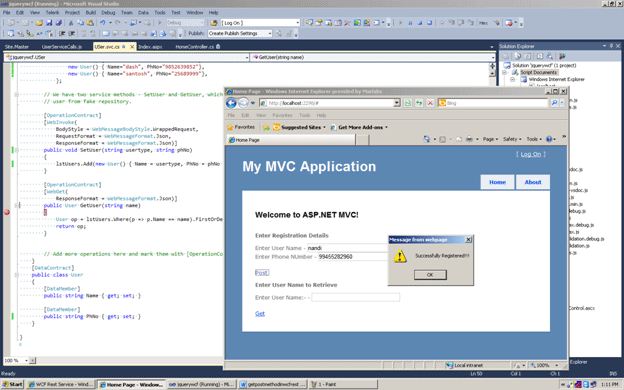
Now run the application. It will look like the figure shown below:

Conclusion: So in this article we have seen how to insert and fetch data using WCF REST and a js file using the get and post method.