Using LinearGradientBrush by hand is a very tedious job especially when we have many colors. Here the color picker will be very useful. Let's talk about how to work with this.
To work with the color picker, select the third tab which allows visual editing of gradient brushes. The gradient brush editor is fully based on the GradientStop slider. Look at below:

In the above image, we have used 5 stoppers and each has a different color gradient. A stopper location is known as an Offset point. An Offset value always varies between 0 to 1. Each stopper has an offset value which locates the position on the slider.

By using the point marked with a red circle we can reverse the gradient stopper. By using the point marked with a blue circle we can convert the brush in a radial or linear form. If you wish to change the gradient color of any point (stopper) then select the stopper first and then pick the color.
We can inset the new stopper in slider by just clicking on slider and we can even delete the stopper by dragging the stopper icon.
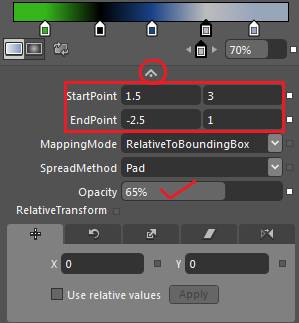
If we unhide the advanced properties of brushes then we will find some more stuff. Look at the image below:

In above image,
StartPoint
This gets or sets the two dimensional coordinates for the start point of the linear gradient.
EndPoint
This gets or sets the two dimensional coordinates for the end point of the linear gradient.
MappingMode
This gets or sets the value that specifies whether the gradient brush positioning coordinates are absolute or relative to the output area.
SpreadMethod
This gets or sets the type of spread method that specifies how to drag a gradient that starts or ends inside the bounds of the object to be painted.
Opacity
This is a very useful option by which we can get or set the opacity of the brush.

The above icons are very useful, by which we can make transformation in a brush. This will create an interesting color output in our art.
Be tuned for the next article.
HAVE A HAPPY CODING!!