SQL INSERT INTO Statement
Introduction
In this chapter, we’ll learn how to INSERT INTO SQL Statement works and different options used with the INSERT statement.
Insert INTO Statement in SQL
The SQL INSERT INTO statement is used to insert a single record or multiple records into a database table using SQL.
SQL INSERT INTO statement adds data of one or more records to a database. Either all the rows can be inserted, or a subset may be chosen using a condition.
Here is the syntax of the INSERT INTO statement. The INSERT INTO is followed by a table name with its columns and followed by VALUES and the values of the respective columns.
Syntax
- INSERT INTO table
- (column1, column2, ... )
- VALUES
- (expression1, expression2, ... ),
- (expression1, expression2, ... ),
- ...;
Insert a single row in a table
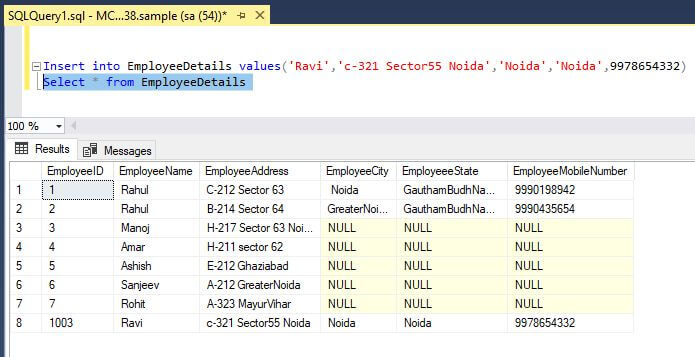
The following example inserts one row into the EmployeeDetails table in the sample database.
The columns in this table are EmpId, EmpName, EmpAddress, and EmpCity. Because values for all columns are supplied and are listed in the same order as the columns in the table, the column names do not have to be specified in the column list.
Syntax
- Insert into EmployeeDetails values('Ravi','c-321 Sector55 Noida','Noida','Noida',9978654332)
Example
Insert multiple rows in a table
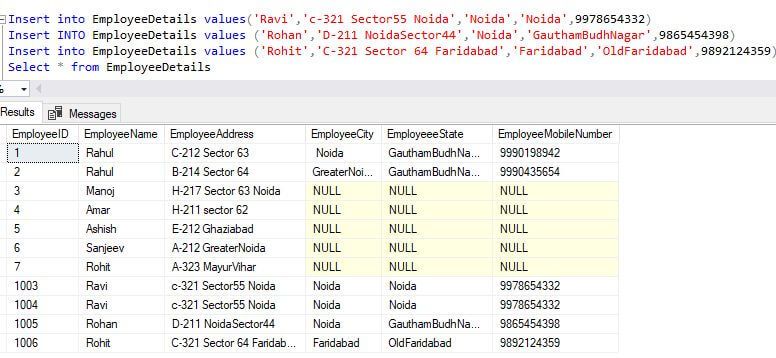
The INSERT INTO statement can be used to insert multiple rows by grouping the statement. The following SQL inserts three rows into the EmployeeDetail table in the sample database. Because values for all columns are supplied and are listed in the same order as the columns in the table, the column names do not have to be specified in the column list.
Syntax
- Insert into EmployeeDetails values('Ravi','c-321 Sector55 Noida','Noida','Noida',9978654332,'Rohan',
- 'D-211 NoidaSector44','Noida','GauthamBudhNagar',9865454398,
- 'Rohit','C-321 Sector 64 Faridabad','Faridabad','OldFaridabad',9892124359)
Example
Insert data that is not in the same order as the table columns
This example uses a column list to explicitly specify the values that are inserted into each column.
The column order in the EmployeeDetail table in the Sample database is EmpName, EmpAddress, EmpCity; however, the columns are not listed in that order in column_list.
Syntax
- Insert into EmployeeDetails values('PriyanK','Indrapuram,','Ghaziabd', 'Ghaziabad',9055345544, GETDATE());
Insert data into a table with columns that have a default value
This statement shows inserting rows into a table with columns that automatically generate a value or have a default value. Column_1 is a computed column that automatically generates value by concatenating a string with the value inserted into column_2. Column_2 is defined with a default constraint.
If a value is not specified for this column, the default value is used.
Column_3 is defined with the row version data type, which automatically generates a unique, incrementing binary number.
Column_4 does not automatically generate a value. When a value for this column is not specified, NULL is inserted. The INSERT statements insert rows that contain values for some of the columns but not all. In the last INSERT statement, no columns are specified and only the default values are inserted by using the DEFAULT VALUES clause.
Syntax
- CREATE TABLE Employee
- (
- column_1 AS 'Computed column ' + column_2,
- column_2 varchar(30)
- CONSTRAINT default_name DEFAULT ('my column default'),
- column_3 rowversion,
- column_4 varchar(40) NULL
- );
- GO
- INSERT INTO Employee (column_4)
- VALUES ('Explicit value');
- INSERT INTO Employee (column_2, column_4)
- VALUES ('Explicit value', 'Explicit value');
- INSERT INTO Employee (column_2)
- VALUES ('Explicit value');
- INSERT INTO Employee DEFAULT VALUES;
- GO
- SELECT column_1, column_2, column_3, column_4
- FROM Employee;
- GO
Insert data into a table with an identity column
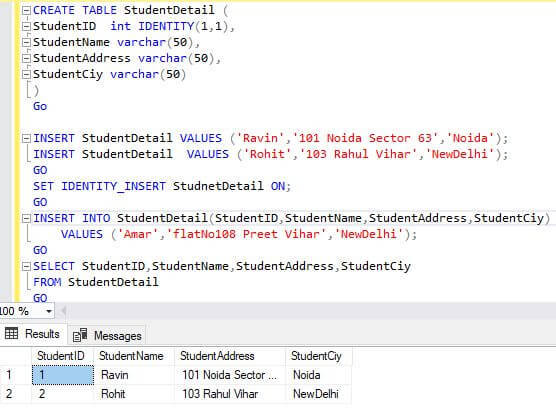
INSERT data into an identity column. The first two INSERT statements allow identity values to be generated for new rows.
The third INSERT statement overrides the IDENTITY property for the column with the SET IDENTITY_INSERT statement and inserts an explicit value into the identity column.
Syntax
- CREATE TABLE StudentDetail (
- StudentID int IDENTITY(1,1),
- StudentName varchar(50),
- StudentAddress varchar(50),
- StudentCiy varchar(50)
- )
- Go
- INSERT StudentDetail VALUES ('Ravin','101 Noida Sector 63','Noida');
- INSERT StudentDetail VALUES ('Rohit','103 Rahul Vihar','NewDelhi');
- GO
- SET IDENTITY_INSERT StudnetDetail ON;
- GO
-
- INSERT INTO StudentDetail(StudentID,StudentName,StudentAddress,StudentCiy)
- VALUES ('Amar','flatNo108 Preet Vihar','NewDelhi');
- GO
- SELECT StudentID,StudentName,StudentAddress,StudentCiy
- FROM StudentDetail
- GO
Example
Insert data into a uniqueidentifier column by using NEWID()
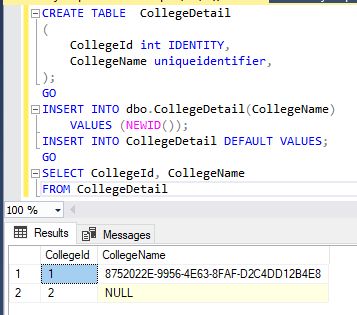
The uniquidentifier column uses the NEWID() function to obtain a GUID for column_2. Unlike for identity columns, the Database Engine does not automatically generate values for columns with the uniqueidentifier data type, as shown by the second INSERT statement.
Syntax
- CREATE TABLE CollegeDetail
- (
- CollegeId int IDENTITY,
- CollegeName uniqueidentifier,
- );
- GO
- INSERT INTO dbo.CollegeDetail(CollegeName)
- VALUES (NEWID());
- INSERT INTO CollegeDetail DEFAULT VALUES;
- GO
- SELECT CollegeId, CollegeName
- FROM CollegeDetail
Example
INSERT INTO with SELECT and EXECUTE options to insert data from other tables
The following example shows how to insert data from one table into another table by using the INSERT...SELECT or INSERT...EXECUTE. Each is based on a multi-table SELECT statement that includes an expression and a literal value in the column list.
The first INSERT statement uses a SELECT statement to derive the data from the source tables (Employee, EmployeeDetails, and EmployeeDetail) in the Sample database and store the result set in the EmployeeDetails table. The second INSERT statement uses the EXECUTE clause to call a stored procedure that contains the SELECT statement, and the third INSERT uses the EXECUTE clause to reference the SELECT statement as a literal string.
- CREATE TABLE NewEmployeeDetail
- (
- Id int Primary kei Identity(1,1),
- DataSource varchar(20) NOT NULL,
- BusinessEntityID varchar(11) NOT NULL,
- LastName varchar(40) NOT NULL,
- SalesDollars money NOT NULL
- );
- GO
- CREATE PROCEDURE dbo.uspGetEmployeeSales
- AS
- SET NOCOUNT ON;
- SELECT 'PROCEDURE', sp.BusinessEntityID, c.LastName,
- sp.SalesYTD
- FROM Sales.SalesPerson AS sp
- INNER JOIN Person.Person AS c
- ON sp.BusinessEntityID = c.BusinessEntityID
- WHERE sp.BusinessEntityID LIKE '2%'
- ORDER BY sp.BusinessEntityID, c.LastName;
- GO
- --INSERT...SELECT example
- INSERT INTO dbo.EmployeeSales
- SELECT 'SELECT', sp.BusinessEntityID, c.LastName, sp.SalesYTD
- FROM Sales.SalesPerson AS sp
- INNER JOIN Person.Person AS c
- ON sp.BusinessEntityID = c.BusinessEntityID
- WHERE sp.BusinessEntityID LIKE '2%'
- ORDER BY sp.BusinessEntityID, c.LastName;
- GO
- --INSERT...EXECUTE procedure example
- INSERT INTO dbo.EmployeeSales
- EXECUTE dbo.uspGetEmployeeSales;
- GO
- --INSERT...EXECUTE('string') example
- INSERT INTO dbo.EmployeeSales
- EXECUTE
- ('
- SELECT ''EXEC STRING'', sp.BusinessEntityID, c.LastName,
- sp.SalesYTD
- FROM Sales.SalesPerson AS sp
- INNER JOIN Person.Person AS c
- ON sp.BusinessEntityID = c.BusinessEntityID
- WHERE sp.BusinessEntityID LIKE ''2%''
- ORDER BY sp.BusinessEntityID, c.LastName
- ');
- GO
- --Show results.
- SELECT DataSource,BusinessEntityID,LastName,SalesDollars
- FROM dbo.EmployeeSales;
Insert the common table expression to define data
The INSERT statement creates the NewEmployee table in the Sampledatabase. A common table expression (EmployeeDetails) defines the rows from one or more tables to be inserted into the NewEmployee table. The INSERT statement references the columns in the common table expression.
Syntax
- CREATE TABLE NewEmployee
- (
- EmployeeID int NOT NULL,
- LastName nvarchar(50) NOT NULL,
- FirstName nvarchar(50) NOT NULL,
- PhoneNumber Phone NULL,
- AddressLine1 nvarchar(60) NOT NULL,
- City nvarchar(30) NOT NULL,
- State nchar(3) NOT NULL,
- PostalCode nvarchar(15) NOT NULL,
- CurrentFlag Flag
- );
- GO
- WITH EmployeeTemp (EmpID, LastName, FirstName, Phone,
- Address, City, StateProvince,
- PostalCode, CurrentFlag)
- AS (SELECT
- e.BusinessEntityID, c.LastName, c.FirstName, pp.PhoneNumber,
- a.AddressLine1, a.City, sp.StateProvinceCode,
- a.PostalCode, e.CurrentFlag
- FROM HumanResources.Employee e
- INNER JOIN Person.BusinessEntityAddress AS bea
- ON e.BusinessEntityID = bea.BusinessEntityID
- INNER JOIN Person.Address AS a
- ON bea.AddressID = a.AddressID
- INNER JOIN Person.PersonPhone AS pp
- ON e.BusinessEntityID = pp.BusinessEntityID
- INNER JOIN Person.StateProvince AS sp
- ON a.StateProvinceID = sp.StateProvinceID
- INNER JOIN Person.Person as c
- ON e.BusinessEntityID = c.BusinessEntityID
- )
- INSERT INTO NewEmployee
- SELECT EmpID, LastName, FirstName, Phone,
- Address, City, StateProvince, PostalCode, CurrentFlag
- FROM EmployeeTemp;
- GO
INSERT TOP to limit the data inserted from the source table
INSERT creates the table Employee and inserts the name and year-to-date sales data for the top 5 random employees from the table EmployeeDetails.EmployeeId in the Sample database. The INSERT statement chooses any 5 rows returned by the SELECT statement.
The OUTPUT clause displays the rows that are inserted into the EmployeeDetails table. Notice that the ORDER BY clause in the SELECT statement is not used to determine the top 5 employees.
Syntax
- CREATE TABLE Employee
- ( EmployeeID nvarchar(11) NOT NULL,
- LastName nvarchar(20) NOT NULL,
- FirstName nvarchar(20) NOT NULL,
- YearlySales money NOT NULL
- );
- GO
- INSERT TOP(5)INTO employeeDetails
- OUTPUT inserted.EmployeeID, inserted.FirstName,
- inserted.LastName, inserted.YearlySales
- SELECT sp.BusinessEntityID, c.LastName, c.FirstName, sp.SalesYTD
- FROM Employee AS sp
- INNER JOIN Person.Person AS c
- ON sp.BusinessEntityID = c.BusinessEntityID
- WHERE sp.SalesYTD > 250000.00
- ORDER BY sp.SalesYTD DESC;
Insert data by specifying a view in SQL
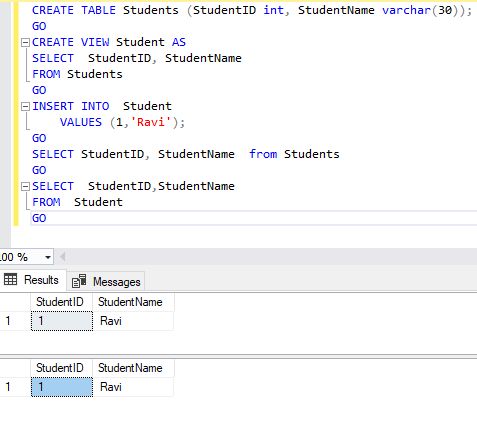
INSERT specifies a view name as the target object; however, the new row is inserted in the underlying base table. The order of the values in the INSERT statement must match the column order of the view.
Syntax
- CREATE TABLE Students (StudentID int, StudentName varchar(30));
- GO
- CREATE VIEW Student AS
- SELECT StudentID, StudentName
- FROM Students
- GO
- INSERT INTO Student
- VALUES (1,'Ravi');
- GO
- SELECT StudentID, StudentName from Students
- GO
- SELECT StudentID,StudentName
- FROM Student
- GO
Example
Insert data into a table variable
The INSERT data specifies a table variable as the target object in the Sample database.
Syntax
- -- Create the table variable.
- DECLARE @MyTableVar table(
- LocationID int NOT NULL,
- CostRate smallmoney NOT NULL,
- NewCostRate AS CostRate * 1.5,
- ModifiedDate datetime);
- -- Insert values into the table variable.
- INSERT INTO @MyTableVar (LocationID, CostRate, ModifiedDate)
- SELECT LocationID, CostRate, GETDATE()
- FROM Production.Location
- WHERE CostRate > 0;
- -- View the table variable result set.
- SELECT * FROM @MyTableVar;
- GO
Insert Rows into a Remote Table
This section demonstrates how to insert rows into a remote target table by using a linked server or a rowset function to reference the remote table.
Insert data into a remote table by using a linked server
This INSERTs rows into a remote table. The example begins by creating a link to the remote data source by using sp_addlinkedserver. The linked server name, MyLinkServer, is then specified as part of the four-part object name in the form server.catalog.schema.object.
Syntax
- USE master;
- GO
- -- Create a link to the remote data source.
- -- Specify a valid server name for @datasrc as 'server_name'
- -- or 'server_nameinstance_name'.
- EXEC sp_addlinkedserver @server = N'MyLinkServer',
- @srvproduct = N' ',
- @provider = N'SQLNCLI',
- @datasrc = N'server_name',
- @catalog = N'Sample';
- GO
Insert data into a remote table by using the OPENQUERY function
INSERT a row into a remote table by specifying the OPENQUERY rowset function.
The linked server name created in the previous example is used in this example.
Syntax
- INSERT OPENQUERY (MyLinkServer,
- 'SELECT EmployeeName, EmployeeAddress
- FROM Sample.EmployeeDetails')
- VALUES ('Ravi', 'Noida');
- GO
Inserts data into a remote table by using the OPENDATASOURCE function
Syntax
- INSERT INTO OPENDATASOURCE('SQLNCLI',
- 'Data Source= <server_name>; Integrated Security=SSPI')
- EmployeeDetail (EmpName, EmpAddress)
- VALUES ('Rahul', 'Noida63');
- GO
Insert into an external table created using PolyBase
The INSERT can be used to Export data from SQL Server to Hadoop or Azure Storage. First, we create an external table that points to the destination file or directory.
Then, use INSERT INTO to export data from a local SQL Server table to an external data source. The INSERT INTO statement creates the destination file or directory if it does not exist and the results of the SELECT statement are exported to the specified location in the specified file format.
Syntax
- CREATE EXTERNAL TABLE [dbo].[CustomerDetails] (
- [FirstName] char(25) NOT NULL,
- [LastName] char(25) NOT NULL,
- [YearlyIncome] float NULL,
- [MaritalStatus] char(1) NOT NULL
- )
- WITH (
- LOCATION='/old_data/2009/customerdata.tbl',
- DATA_SOURCE = HadoopHDP2,
- FILE_FORMAT = TextFileFormat,
- REJECT_TYPE = VALUE,
- REJECT_VALUE = 0
- );
- -- Export data: Move old data to Hadoop while keeping
- -- it query-able via an external table.
- INSERT INTO CustomerDetails
- SELECT T.* FROM Insured_Customers T1 JOIN CarSensor_Data T2
- ON (T1.CustomerKey = T2.CustomerKey)
- WHERE T2.YearMeasured = 2009 and T2.Speed > 40;
Insert data using the OPENROWSET function with BULK to bulk load data into a table
The INSERT statement inserts rows from a data file into a table by specifying the OPENROWSET function. The IGNORE_TRIGGERS table hint is specified for performance optimization. For more examples, see Import Bulk Data by Using BULK INSERT or OPENROWSET(BULK...) (SQL Server).
Syntax
- INSERT INTO HumanResources.Department WITH (IGNORE_TRIGGERS) (Name, GroupName)
- SELECT b.Name, b.GroupName
- FROM OPENROWSET (
- BULK 'C:SQLFilesDepartmentData.txt',
- FORMATFILE = 'C:SQLFilesBulkloadFormatFile.xml',
- ROWS_PER_BATCH = 15000)AS b ;
The TABLOCK hint to specify a locking method
The following specifies that an exclusive (X) lock is taken on the EmployeeDetail and is held until the end of the INSERT statement.
Syntax
- INSERT INTO Production.Location WITH (XLOCK)
- (Name, CostRate, Availability)
- VALUES ( N'Final Inventory', 15.00, 80.00);
Insert data using the SELECT option
Syntax
- CREATE TABLE EmployeeData
- ( EmployeeKey INT NOT NULL,
- LastName varchar(40) NOT NULL,
- Title varchar(50) NOT NULL
- );
- INSERT INTO EmployeeData
- SELECT EmployeeKey, LastName, Title
- FROM EmployeeData
- WHERE EndDate IS NULL;
Summary
Author
Naresh Beniwal
Tech Writter
7.1k
1.9m
