

In this post, we will learn how to integrate RecyclerView with Android Data Binding.
Step 1
Enable Data Binding in your module level gradle. Here is how your build.gradle should look.
- apply plugin: 'com.android.application'
- android {
- compileSdkVersion 24
- buildToolsVersion "23.0.3"
- defaultConfig {
- applicationId "com.androidgig.recyclerviewbinding"
- minSdkVersion 15
- targetSdkVersion 24
- versionCode 1
- versionName "1.0"
- dataBinding {
- enabled true
- }
- }
- buildTypes {
- release {
- minifyEnabled false
- proguardFiles getDefaultProguardFile('proguard-android.txt'), 'proguard-rules.pro'
- }
- }
- }
- dependencies {
- compile fileTree(dir: 'libs', include: ['*.jar'])
- compile 'com.android.support:appcompat-v7:23.4.0'
- compile 'com.android.support:recyclerview-v7:23.4.0'
- compile 'com.squareup.picasso:picasso:2.5.2'
- }
Create POJO/Model class called User with 3 parameters i.e. name, profile_image & age.
- public class User {
- private String name, profile_image;
- private int age;
- public User(String name, String profile_image, int age) {
- this.name = name;
- this.profile_image = profile_image;
- this.age = age;
- }
- public String getName() {
- return name;
- }
- public void setName(String name) {
- this.name = name;
- }
- public String getProfile_image() {
- return profile_image;
- }
- public void setProfile_image(String profile_image) {
- this.profile_image = profile_image;
- }
- public int getAge() {
- return age;
- }
- public void setAge(int age) {
- this.age = age;
- }
- }
Create a layout for Recycler list items
- <?xml version="1.0" encoding="utf-8"?>
- <layout xmlns:android="http://schemas.android.com/apk/res/android"
- xmlns:app="http://schemas.android.com/apk/res-auto"
- xmlns:tools="http://schemas.android.com/tools">
- <data>
- <variable
- name="user"
- type="com.androidgig.recyclerviewbinding.User" />
- </data>
- <LinearLayout android:layout_width="match_parent"
- android:layout_height="wrap_content"
- android:orientation="horizontal">
- <LinearLayout android:layout_width="match_parent"
- android:layout_height="wrap_content"
- android:layout_margin="5dp"
- android:background="@drawable/round_corner_view"
- android:orientation="horizontal"
- android:padding="10dp">
- <ImageView android:layout_width="50dp"
- android:layout_height="50dp"
- tools:src="@mipmap/ic_launcher"
- app:url="@{user.profile_image}" />
- <LinearLayout android:layout_width="match_parent"
- android:layout_height="wrap_content"
- android:layout_gravity="center_vertical"
- android:layout_marginLeft="10dp"
- android:orientation="vertical">
- <TextView android:layout_width="wrap_content"
- android:layout_height="wrap_content"
- android:text="@{user.name}"
- android:textAppearance="?android:attr/textAppearanceMedium"
- android:textColor="@android:color/black"
- tools:text="Name" />
- <TextView android:layout_width="wrap_content"
- android:layout_height="wrap_content"
- android:text="@{`` + user.age}"
- android:textColor="@android:color/black"
- tools:text="Age" />
- </LinearLayout>
- </LinearLayout>
- </LinearLayout>
- </layout>
Step 4
Create an adapter for RecyclerView called UserAdapter.
- public class UserAdapter extends RecyclerView.Adapter<UserAdapter.ViewHolder> {
- private ArrayList<User> list;
- public UserAdapter(ArrayList<User> list) {
- this.list = list;
- }
- @Override
- public UserAdapter.ViewHolder onCreateViewHolder(ViewGroup parent, int viewType) {
- View statusContainer = LayoutInflater.from(parent.getContext()).inflate(R.layout.recycler_item, parent, false);
- return new UserAdapter.ViewHolder(statusContainer);
- }
- @Override
- public void onBindViewHolder(ViewHolder holder, int position) {
- User status = list.get(position);
- holder.bindUser(status);
- }
- @Override
- public int getItemCount() {
- return list.size();
- }
- class ViewHolder extends RecyclerView.ViewHolder {
- private RecyclerItemBinding binding;
- public ViewHolder(View itemView) {
- super(itemView);
- binding = DataBindingUtil.bind(itemView);
- }
- public void bindUser(User user) {
- binding.setUser(user);
- }
- }
- }
binding = DataBindingUtil.bind(itemView); will create binding for your recycler_item layout and return view.
binding.setUser(user); will set the user data to recycler items.
Step 5
Write XML code for your activity/fragment layout.
- <layout xmlns:android="http://schemas.android.com/apk/res/android"
- xmlns:app="http://schemas.android.com/apk/res-auto">
- <RelativeLayout android:layout_width="match_parent"
- android:layout_height="match_parent">
- <android.support.v7.widget.RecyclerView android:id="@+id/recycler"
- android:layout_width="match_parent"
- android:layout_height="wrap_content"
- app:layoutManager="android.support.v7.widget.LinearLayoutManager" />
- </RelativeLayout>
- </layout>
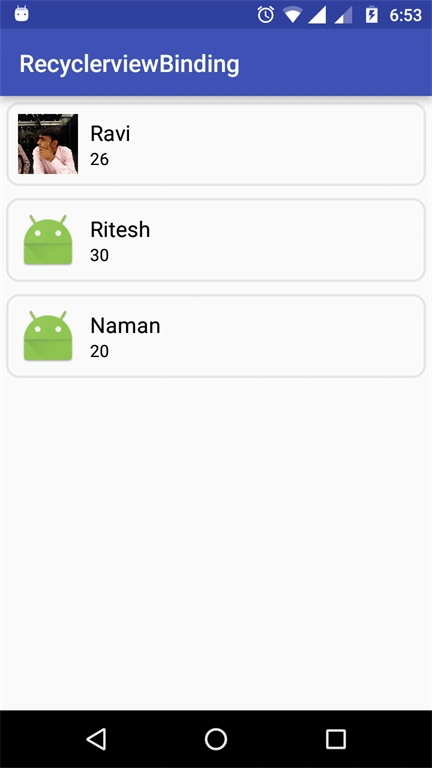
Write your code in the activity/fragment to attach adapter to RecyclerView.
- public class MainActivity extends AppCompatActivity {
- private ActivityMainBinding binding;
- private ArrayList<User> userList = new ArrayList<>();
- private UserAdapter adapter;
- @Override
- protected void onCreate(Bundle savedInstanceState) {
- super.onCreate(savedInstanceState);
- binding = DataBindingUtil.setContentView(this, R.layout.activity_main);
- fillData();
- adapter = new UserAdapter(userList);
- binding.recycler.setAdapter(adapter);
- }
- private void fillData() {
- userList.add(new User("Ravi", "https://pbs.twimg.com/profile_images/446522135721164800/pdVA44as.jpeg", 26));
- userList.add(new User("Ritesh", "", 30));
- userList.add(new User("Naman", "", 20));
- }
- @BindingAdapter({
- "bind:url"
- })
- public static void setImage(ImageView imageView, String url) {
- if (url != null & amp; & amp; url.trim().length() & gt; 0) {
- Picasso.with(imageView.getContext()).load(url).error(R.mipmap.ic_launcher).into(imageView);
- } else
- imageView.setImageResource(R.mipmap.ic_launcher);
- }
- }
This article was originally posted on AndroidGig.com.
Join the conversation! Your thoughts help the community grow.