

Introduction
In this blog, I am going to explain how to develop a soil moisture detecting device using an UNO microcontroller board and a soil moisture sensor. This device can measure real-time soil moisture levels. These devices are mostly used in fields for agriculture farms, construction, cotton spinning industries, etc.... It helps to monitor the real-time moisture level of soil, implement an auto irrigation system in agriculture areas and auto cotton moisture level during the spinning process.
The following prerequisites are required for implementation:
- Arduino UNO or Mega
- Soil moisture sensor
- LCD crystal display [16 X 2 ]
- Breadboard
- 10K Potentiometer
- 220 Ohm resistor
- Connecting wires
Step by step implementation of the soil moisture device
Connection diagram
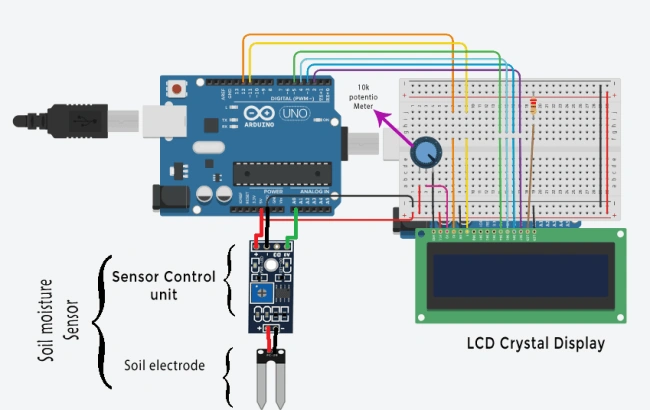
Step 1
In the first step connect a soil electrode and sensor control unit using the positive and negative terminal. This control unit contains 4 terminals on the bottom side.
(+) --> Positive terminal
(-) --> Negative terminal
(AO) --> Analog signal output
(DO) --> Digital signal output
Next, make a connection between the sensor control unit and Arduino as above the connection diagram
Sensor control unit Arduino
(+) -------------------------------> 5V
(-) -------------------------------> GND
AO --------------------------------> A0
Now that the soil moisture sensor has been successfully connected to Arduino, the next step is to connect the LCD crystal to an Arduino UNO Board.
Step 2
Fix the LCD crystal display in the breadboard for easy installation setup. Before installation, refer to the below LCD crystal pin diagram
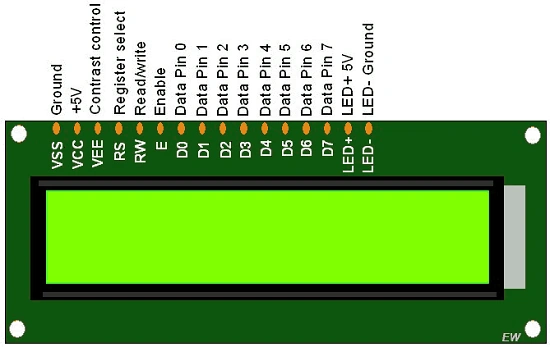
Place a 10K ohm potentiometer near LCD crystal display. It can adjust the contrast of the LCD screen and create a power connection from Arduino +5V and the GND right and left end of the potentiometer. Make a connection from the center terminal of the potentiometer to VEE (contrast control) LCD crystal display. (Refer to the connection diagram)
Place an 220-ohm resistor in the breadboard and make a connection to (LCD crystal LED +5V Pin)
Step 3
To start a connection with Arduino to LCD crystal display:
PinConfiguration
Arduino BreadBoard LCD Crystal Display
Pin 2 ---------------------------------------------------------------------------> Data pin 7
Pin 3 ---------------------------------------------------------------------------> Data pin 6
Pin 4 ---------------------------------------------------------------------------> Data pin 5
Pin 5 ----------------------------------------------------------------------------> Data pin 4
Pin 11 ----------------------------------------------------------------------------> Register select
Pin 12 ----------------------------------------------------------------------------> Enable
+ 5V -----------------> Potentiometer Center Terminal--------> VEE(Contrast Control)LCD crystal
+5V ---------------------------> 220 ohm Resistor --------------------> LED +5V pin [LCD Crystal]
GND -------------------------------------------------------------------------------> Ground pin & LED - Ground pin [Connect to both pin]
All Connections are perfectly done :)
Let's start with the code:
Step 3
In this step, write code for Arduino using the Arduino IDE.
- Download Arduino software using this link here.
- Install and open an Arduino IDE in your PC/Laptop
- Connect your Arduino board to your computer using a USB data cable
- Copy and paste below the code into the Arduino IDE
- #include <LiquidCrystal.h>
- LiquidCrystal lcd(7, 6, 5, 4, 3, 2);
- int sensorPin = A0;
- int sensorValue = 0;
- int percentValue = 0;
- void setup() {
- Serial.begin(9600);
- lcd.begin(16, 2);
- }
- void loop() {
- sensorValue = analogRead(sensorPin);
- Serial.print("\n\nAnalog Value: ");
- Serial.print(sensorValue);
- percentValue = map(sensorValue, 1023, 200, 0, 100);
- Serial.print("\nPercentValue: ");
- Serial.print(percentValue);
- Serial.print("%");
- lcd.setCursor(0, 0);
- lcd.print("Soil Moisture");
- lcd.setCursor(0, 1);
- lcd.print("Percent: ");
- lcd.print(percentValue);
- lcd.print("%");
- delay(1000);
- lcd.clear();
- }
After the sketch upload is completed, the soil moisture detecting device should start working
Output
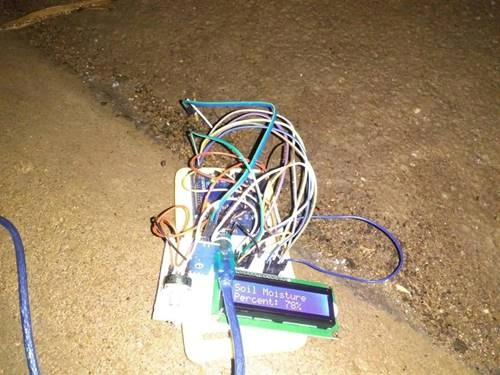
Here is one of the soil moisture detecting devices working perfectly on farmland.
kamalakannan chandrasekaranPosted Dec 16, 2019, 6:06 PM
Yeah! that was really awesome