

I strongly encourage everyone to watch these suggested videos before reading this blog.
- Suggested Video : EPPLUS Library - Beginners Guide Part-8
- Suggested Video : EPPLUS Library - Beginners Guide Part-9(A)
- Suggested video : EPPLUS Library - Beginners Guide Part-10(B)
- Suggested video : EPPLUS Library - Beginners Guide Part-11(C)
Different types of Format for Excel Comment?
ExcelRichTextCollection class is a collection, containing the ExcelRichText objects. This class belongs to OfficeOpenXml.Style namespace.
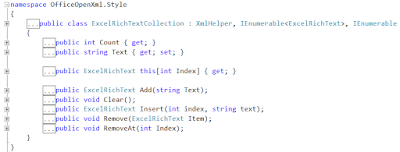
This class has five important methods, these are,
- Resize/Auto fit of Comment. (We already discussed in Part 9(A))
- Add Text a Background Color in Comment. (We already discussed in Part(A))
- Set Text Alignments in Comment. (We already discussed in Part 10(B))
- Set Font Style in Excel Comment (We already discussed in Part 10(B))
- Add Rich Text in Excel Comment. (We already discussed in Part 11(C))
- Add Multiple Rich Text in Excel Comment. (We already discussed in Part 11(C))
- Remove Rich Text in Excel Comment. (We already discussed in Part 11(C))
- Multi Style Excel Cell & Comment Text using ExcelRichTextCollection Class.
- Set Line or Border Style in a Comment. (We will discuss on Part 13(E))
ExcelRichTextCollection class is a collection, containing the ExcelRichText objects. This class belongs to OfficeOpenXml.Style namespace.

This class has five important methods, these are,
- Add(String Text)
- Insert(Integer Index, String Text)
By using these two above methods, we can add or insert an ExcelRichText object in ExcelRichTextCollection class.
- Remove(ExcelRichText Item)
- RemoveAt(int index)
by using these two above methods, we can remove ExcelRichText objects by object name & Index position in ExcelRichTextCollection class.
- Clear()
by using this method, we can remove all ExcelRichText objects within this ExcelRichTextCollection class.
- Count (Read only Property)
It returns integer count value of how many ExcelRichText object present in a single ExcelRichTextCollection class at runtime.
- Text (Read & Write Both)
By using this property, we assign string text in ExcelRichTextCollection object.
- ExcelRichText this [int Index]
This is a very important property. Here, [int Index] is the indexer.
By using this property, we assign specific ExcelRichText object by it's index position.
How to Add Multi Style Text in Excel Cell using EPPlus?
ExcelRange Class has property RichText (if you don't know what is ExcelRange Class, please watch my previous video Part-1 first). This RichText property is the type of ExcelRichTextCollection class.
First, we assign Rng.RichText property to the object of ExcelRichTextCollectionClass. Here, Rng is the object of ExceRange class & RichTxtCollection is the object of ExcelRichTextCollection class.
*After that, we use Add() method of ExcelRichTextCollection class for adding String text for individually applied each RichText style. We assign this Collection object to the ExcelRichText class object. Here, RichText is the object of ExcelRichText class. Using this object property, we set different styles in the text.
Please see this below code.
How to Add Multi Style in Excel Comment Text Using EPPlus?
We have seen in Part-11(C) of this video series that the RichText property of ExcelComment class object can create individual ExcelRichText class object & add those objects as a collection object. This Collection Object is nothing but an ExcelRichTextCollection class because the RichText property is the type of ExcelRichTextCollecion class. So, ExcelRichTextCollecion class is indirectly involved by the ExcelComment class.
How to Add Multi Style Text in Excel Cell using EPPlus?
ExcelRange Class has property RichText (if you don't know what is ExcelRange Class, please watch my previous video Part-1 first). This RichText property is the type of ExcelRichTextCollection class.
First, we assign Rng.RichText property to the object of ExcelRichTextCollectionClass. Here, Rng is the object of ExceRange class & RichTxtCollection is the object of ExcelRichTextCollection class.
*After that, we use Add() method of ExcelRichTextCollection class for adding String text for individually applied each RichText style. We assign this Collection object to the ExcelRichText class object. Here, RichText is the object of ExcelRichText class. Using this object property, we set different styles in the text.
Please see this below code.
- using(ExcelRange Rng = wsSheet1.Cells["B5"]) {
- Rng.Style.Font.Size = 20;
- //How to add multi style text in excel cell text
- ExcelRichTextCollection RichTxtCollection = Rng.RichText;
- ExcelRichText RichText = RichTxtCollection.Add("H");
- RichText.Color = Color.Red;
- RichText.Italic = true;
- //RichTxtCollection.Remove(RichText);
- RichText = RichTxtCollection.Add("2");
- //RichText = RichTxtCollection.Insert(1, "2");
- RichText.Color = Color.Red;
- RichText.Italic = true;
- RichText.VerticalAlign = ExcelVerticalAlignmentFont.Subscript;
- RichText = RichTxtCollection.Add("O");
- RichText.Color = Color.Red;
- RichText.Italic = false;
- RichText = RichTxtCollection.Add(" & ");
- RichText.Color = Color.Black;
- RichText.Italic = false;
- RichText = RichTxtCollection.Add("E=MC");
- RichText.Color = Color.Blue;
- RichText.Italic = false;
- RichText = RichTxtCollection.Add("2");
- RichText.Color = Color.Blue;
- RichText.Italic = false;
- RichText.VerticalAlign = ExcelVerticalAlignmentFont.Superscript;
- //RichTxtCollection.Clear();
- }
We have seen in Part-11(C) of this video series that the RichText property of ExcelComment class object can create individual ExcelRichText class object & add those objects as a collection object. This Collection Object is nothing but an ExcelRichTextCollection class because the RichText property is the type of ExcelRichTextCollecion class. So, ExcelRichTextCollecion class is indirectly involved by the ExcelComment class.
Please see the below code.
- using(ExcelRange Rng = wsSheet1.Cells["B5"]) {
- //Apply ExcelRichTextCollection Class on Excel Comment
- ExcelComment cmd = Rng.AddComment("Water Symbol : ", "Rajdip");
- ExcelRichTextCollection RichTxtCollectionComment = cmd.RichText;
- cmd.RichText[0].PreserveSpace = false;
- cmd.Font.Bold = true;
- cmd.Font.Color = Color.Blue;
- ExcelRichText RichTextComment = RichTxtCollectionComment.Add("H");
- RichTextComment.Color = Color.Red;
- RichTextComment = RichTxtCollectionComment.Add("2");
- RichTextComment.Color = Color.Red;
- RichTextComment.VerticalAlign = ExcelVerticalAlignmentFont.Subscript;
- RichTextComment = RichTxtCollectionComment.Add("O");
- RichTextComment.Color = Color.Red;
- RichTextComment = RichTxtCollectionComment.Add(" & \n");
- RichTextComment.Color = Color.Purple;
- RichTextComment = RichTxtCollectionComment.Add("Formula : ");
- RichTextComment.Bold = true;
- RichTextComment.Color = Color.Blue;
- RichTextComment = RichTxtCollectionComment.Add("E=MC");
- RichTextComment.Color = Color.Red;
- RichTextComment = RichTxtCollectionComment.Add("2");
- RichTextComment.VerticalAlign = ExcelVerticalAlignmentFont.Superscript;
- RichTextComment.Color = Color.Red;
- cmd.Visible = true;
- }

Full Source code
- using OfficeOpenXml;
- using System.IO;
- using System.Drawing;
- using OfficeOpenXml.Style;
- using OfficeOpenXml.Drawing.Vml;
- namespace EpplusDemo {
- class Program {
- static void Main(string[] args) {
- //Code download from: https://everyday-be-coding.blogspot.in/p/epplus-library-part-12.html
- //Author: Rajdip Sarkar.
- //Date : 16th July 2017.
- //My YouTube Channel Link : https://www.youtube.com/channel/UCpGuQx5rDbWnc7i_qKDTRSQ
- ExcelPackage ExcelPkg = new ExcelPackage();
- ExcelWorksheet wsSheet1 = ExcelPkg.Workbook.Worksheets.Add("Sheet1");
- using(ExcelRange Rng = wsSheet1.Cells[2, 2, 2, 2]) {
- Rng.Value = "Everyday Be Coding - Excel COMMENTS Formatting using EPPlus .Net Library";
- Rng.Style.Font.Size = 16;
- Rng.Style.Font.Bold = true;
- Rng.Style.Font.Italic = true;
- }
- //How to add multiple Style text in Excel Cell & Excel Comment
- using(ExcelRange Rng = wsSheet1.Cells["B5"]) {
- Rng.Style.Font.Size = 20;
- ExcelRichTextCollection RichTxtCollection = Rng.RichText;
- ExcelRichText RichText = RichTxtCollection.Add("H");
- RichText.Color = Color.Red;
- RichText.Italic = true;
- //RichTxtCollection.Remove(RichText);
- RichText = RichTxtCollection.Add("2");
- //RichText = RichTxtCollection.Insert(1, "2");
- RichText.Color = Color.Red;
- RichText.Italic = true;
- RichText.VerticalAlign = ExcelVerticalAlignmentFont.Subscript;
- RichText = RichTxtCollection.Add("O");
- RichText.Color = Color.Red;
- RichText.Italic = false;
- RichText = RichTxtCollection.Add(" & ");
- RichText.Color = Color.Black;
- RichText.Italic = false;
- RichText = RichTxtCollection.Add("E=MC");
- RichText.Color = Color.Blue;
- RichText.Italic = false;
- RichText = RichTxtCollection.Add("2");
- RichText.Color = Color.Blue;
- RichText.Italic = false;
- RichText.VerticalAlign = ExcelVerticalAlignmentFont.Superscript;
- //RichTxtCollection.Clear();
- //Apply ExcelRichTextCollection Class on Excel Comment
- ExcelComment cmd = Rng.AddComment("Water Symbol : ", "Rajdip");
- ExcelRichTextCollection RichTxtCollectionComment = cmd.RichText;
- cmd.RichText[0].PreserveSpace = false;
- cmd.Font.Bold = true;
- cmd.Font.Color = Color.Blue;
- ExcelRichText RichTextComment = RichTxtCollectionComment.Add("H");
- RichTextComment.Color = Color.Red;
- RichTextComment = RichTxtCollectionComment.Add("2");
- RichTextComment.Color = Color.Red;
- RichTextComment.VerticalAlign = ExcelVerticalAlignmentFont.Subscript;
- RichTextComment = RichTxtCollectionComment.Add("O");
- RichTextComment.Color = Color.Red;
- RichTextComment = RichTxtCollectionComment.Add(" & \n");
- RichTextComment.Color = Color.Purple;
- RichTextComment = RichTxtCollectionComment.Add("Formula : ");
- RichTextComment.Bold = true;
- RichTextComment.Color = Color.Blue;
- RichTextComment = RichTxtCollectionComment.Add("E=MC");
- RichTextComment.Color = Color.Red;
- RichTextComment = RichTxtCollectionComment.Add("2");
- RichTextComment.VerticalAlign = ExcelVerticalAlignmentFont.Superscript;
- RichTextComment.Color = Color.Red;
- }
- wsSheet1.Cells[wsSheet1.Dimension.Address].AutoFitColumns();
- ExcelPkg.SaveAs(new FileInfo(@ "D:\FormatCell&Comments.xlsx"));
- }
- }
- }
Now, build & execute this code. File is (FormatCell&Comments.xlsx) stored on D: drive of the computer.
Thank you for reading this article.
Thank you for reading this article.
Join the conversation! Your thoughts help the community grow.