

Azure Virtual Desktop is a desktop and app virtualization service that runs on Azure. Here are some of the key highlights
- Deliver a full Windows experience with Windows 11, Windows 10, or Windows Server. Use single-session to assign devices to a single user, or use multi-session for scalability.
- Offer full desktops or use RemoteApp to deliver individual apps.
- Present Microsoft 365 Apps for enterprise and optimize them to run in multi-user virtual scenarios.
- Install your line-of-business or custom apps you can run from anywhere, including apps in the formats Win32, MSIX, and Appx.
- Deliver Software-as-a-service (SaaS) for external usage.
- Replace existing Remote Desktop Services (RDS) deployments.
- Manage desktops and apps from different Windows and Windows Server operating systems with a unified management experience.
- Host desktops and apps on-premises in a hybrid configuration with Azure Stack HCI.
In our setup, we create a resource group, AD-RG, for deploying Active Directory VM and do the following
- Create an Azure VM inside the AD-VNET virtual network with the base image as Windows 11 23H2, Enterprise Multi-session with Microsoft Apps
- Install ADDS role
- Promote it to the Domain Controller
- Create users and groups, assign the right permissions, and
- Install the AAD Connect tool to synchronize on-premises user objects to Microsoft 365 Cloud
We also create a resource group, AVD-RG, for Azure Virtual Desktop
- First, create an AVD-VNET separately and perform a VNET Peering between AD-VNET and AVD VNET
- Also, create the storage account and create file share which will store the FSLogix User profile container and MSIX applications using the CIM format.
- After which, we create a session host with a pooled desktop type, which will then be joined to the AD domain
- Assign the security group (synced from on-premises to cloud) permissions under the Fileshare Resource Group, which has the AVD hosts and AVD Application group.
Post which we will be able to access the pooled session host and access the applications published using Remote Desktop Client from Microsoft.
Sizing of session hosts
Microsoft provides a general guideline on how to choose the right sizing depending on your workload.
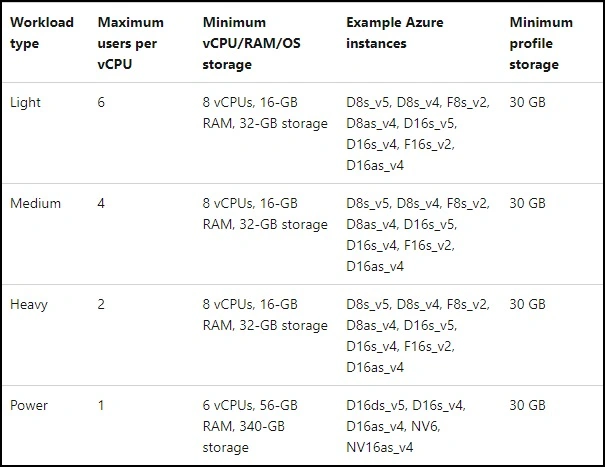
For example, if we have a medium usage (like browsing, using office apps, etc.) session host, we can choose the second row as our baseline.
Since we can have a maximum of 4 users per vCPU, effectively, it is 4*8 = 32 Users (since the Azure Instance has 8 vCPUs)
Prerequisite and Assumptions
- Availability of a user account with Azure Global Admin and subscription owner-level credentials to deploy services in a respective subscription.
- Admin access to install and configure applications within AVD.
- Users have devices capable of running remote desktop clients.
- Microsoft 365 Subscription with a domain added, and the licenses eligible for Azure Virtual Desktop are purchased.
- Licensing Azure Virtual Desktop | Microsoft Learn
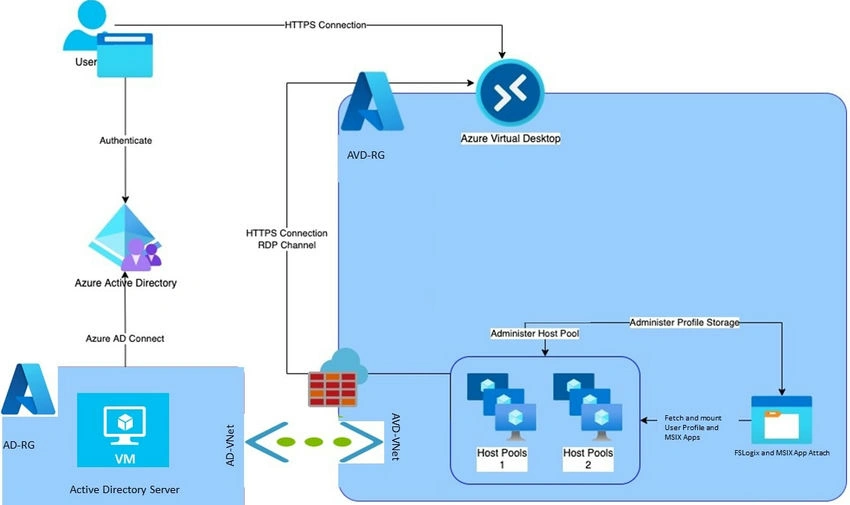
Azure Virtual Desktop Architecture
Active Directory Domain Services Setup
Azure infrastructure setup
- Resource Group Creation
- Create an Azure resource group named ActiveDirectory-RG to organize and manage Active Directory VM resources.
- Create an Azure resource group named AVD-RG to organize and manage AVD session hosts.
- Virtual Network Design: Design a secure virtual network with subnets for Active Directory VM and AVD hosts. We will create a VNET peering between AD and AVD VNets
Active Directory (AD) deployment
- VM Selection: We use a Standard B2ms (2 vcpus, 8 GiB memory) with Windows Server 2019 Datacentre Edition.
- Domain Controller Setup: Install and configure the AD server VM, promote it to the domain controller, and create organizational units (OUs) for users and devices.
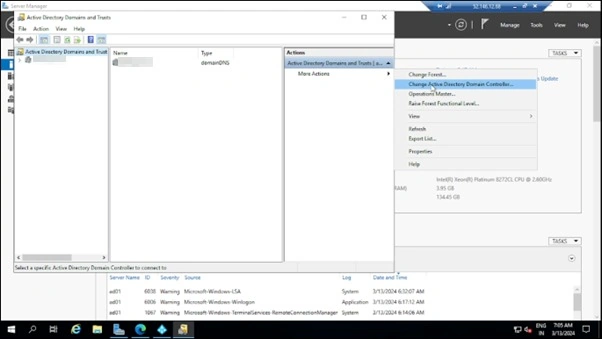
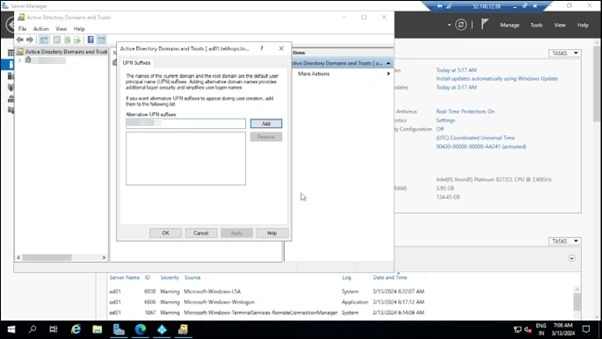
- We also add UPN suffixes from Active Directory Domains and Trusts à Properties à Add yourdomain.com to match the domain in use and modify the UPN of users from User properties.
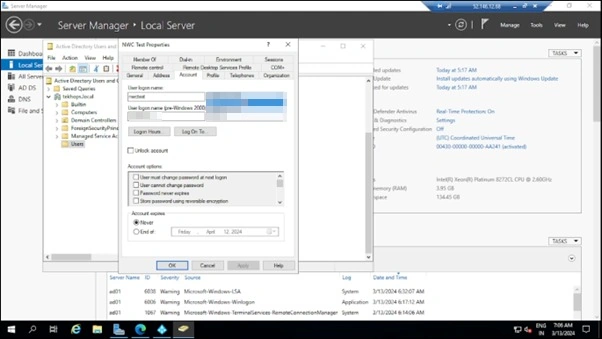
- After setting up the ADDS with your domain. local domain, we create the following users and add them to a security group with Remote Desktop user permissions.
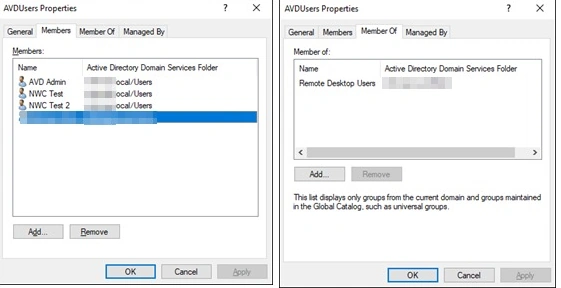
Azure AD Connect setup
- After downloading the AAD Tool from the below link:
- https://www.microsoft.com/en-us/download/details.aspx?id=47594
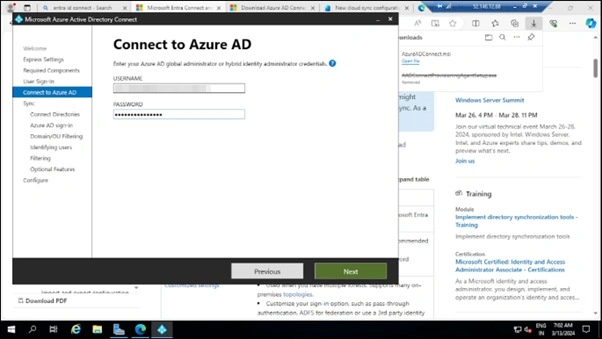
- We follow the procedure to set up Azure AD Connect to view users and groups in the Microsoft 365 Portal.
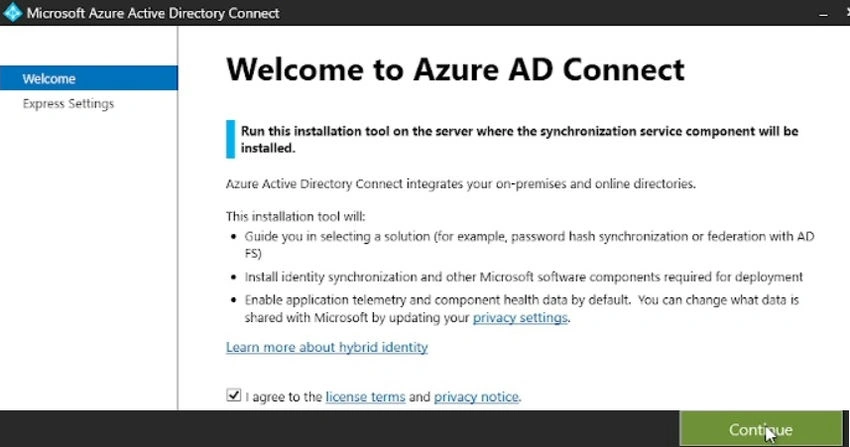
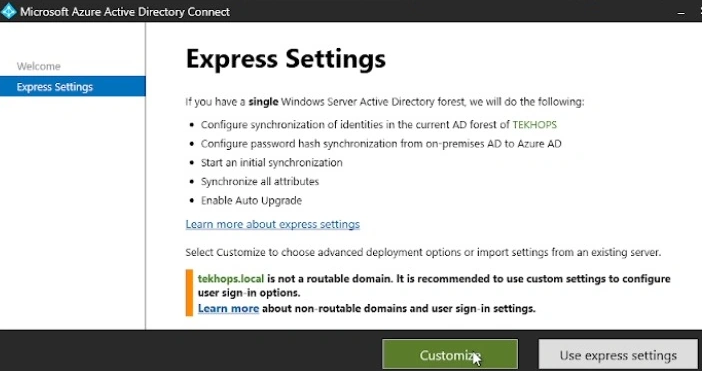
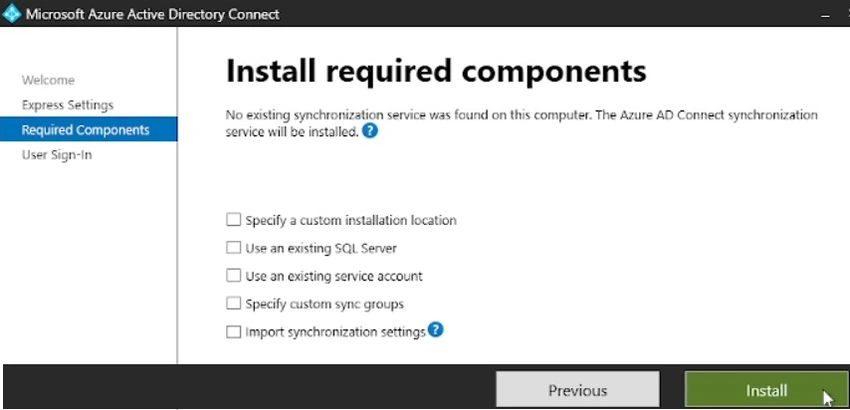
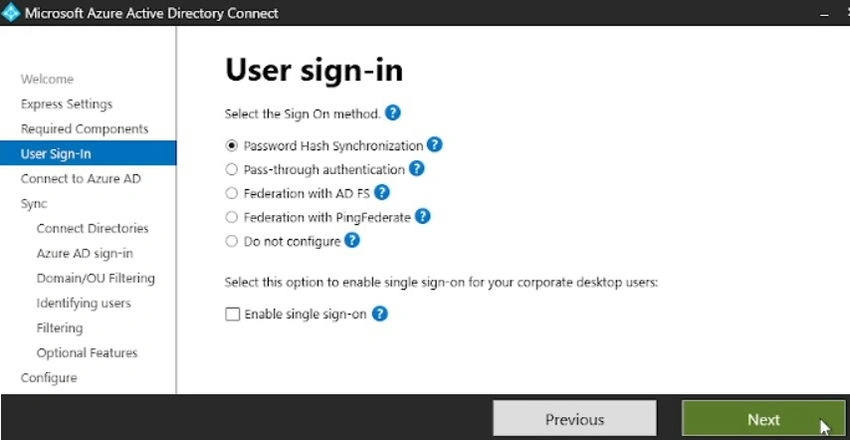
- Enter the Microsoft 365 Global Admin Credentials
- Select Add directory and choose the directory to sync from:
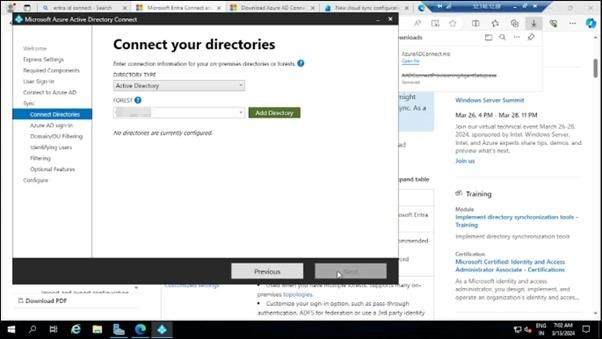
- We will create a service account that will be responsible for synchronizing the on-premises user objects.
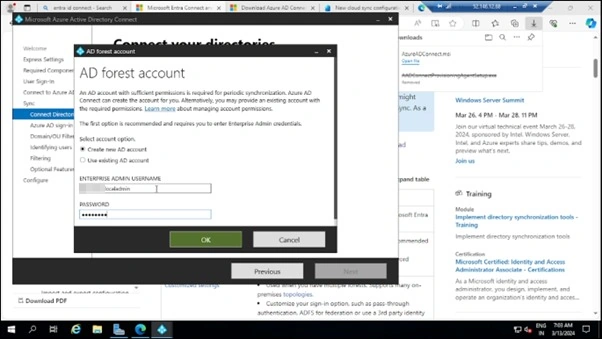
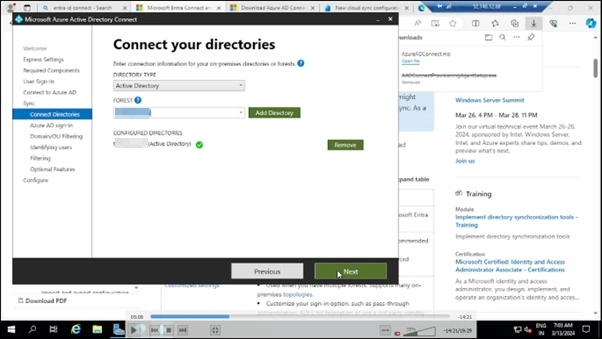
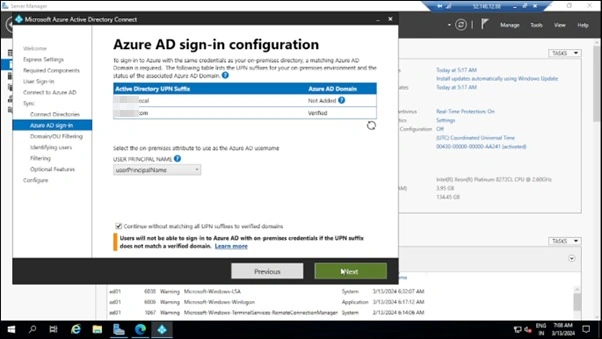
- Since we have added the UPN suffix in the AD Server for the domain verified in Microsoft 365 Online, we can view that verified against that domain.
- The local domain will show not added and for users with a local domain suffix, the default domain will be assigned. (eg: yourdomain.onmicrosoft.com)
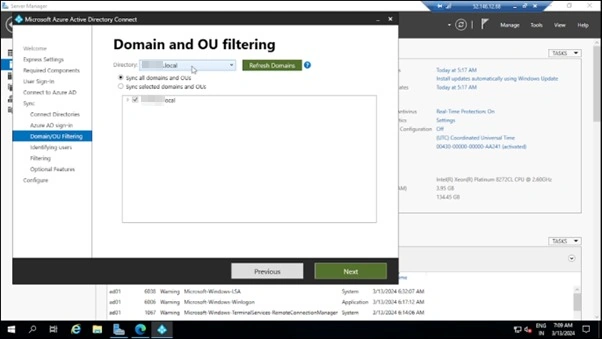
- We are choosing all the OU and domains in our AD Forest
- If you want to test it for a subset of users, you can filter them
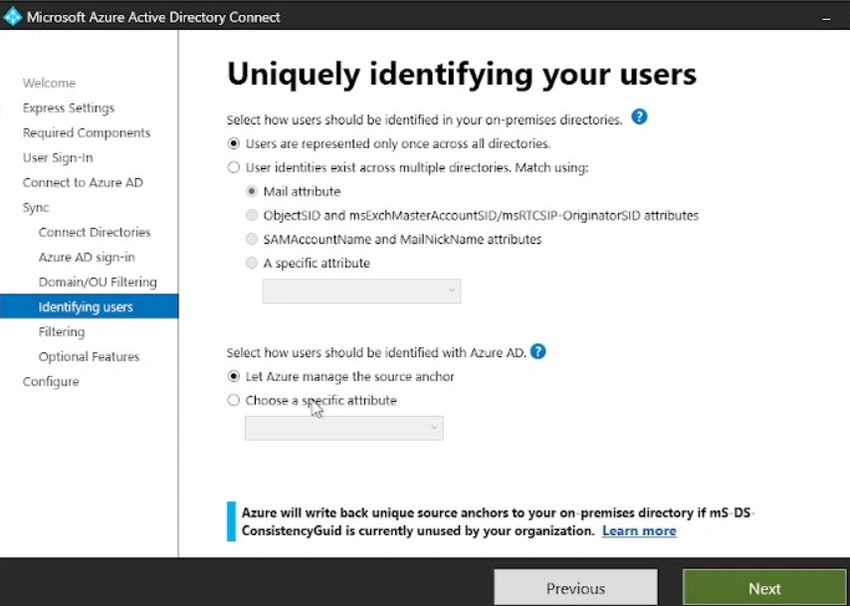
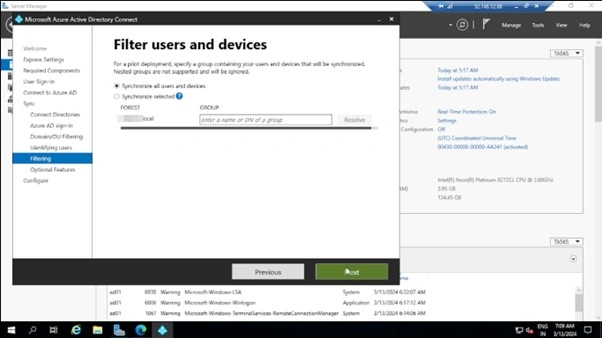
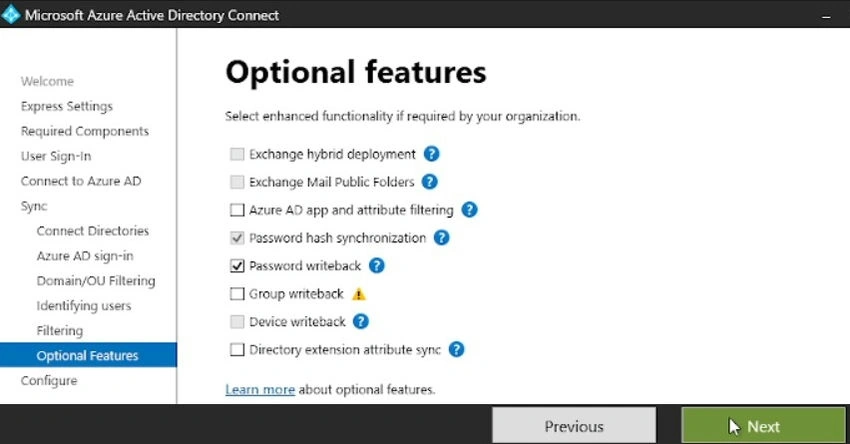
- We’ll enable password writeback as an optional feature
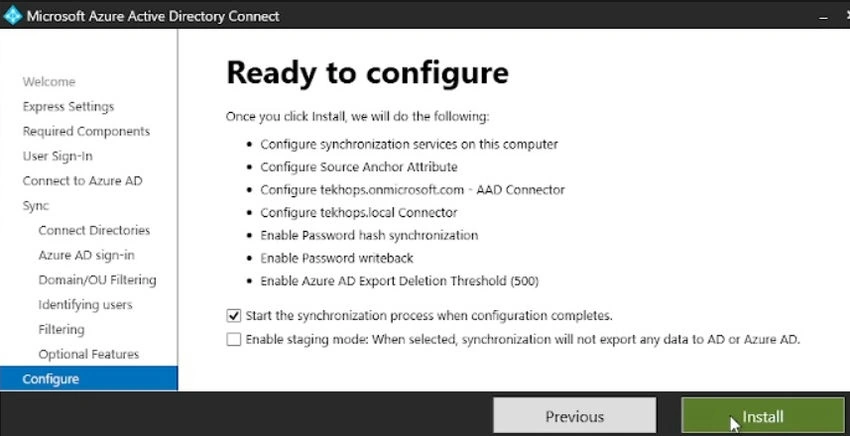
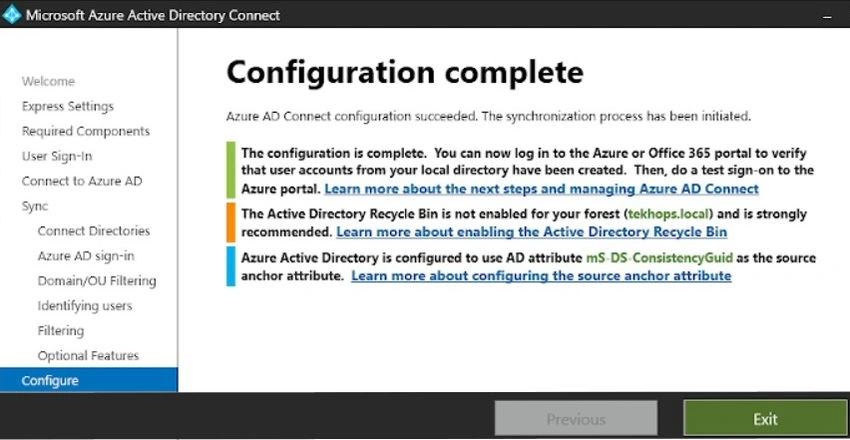
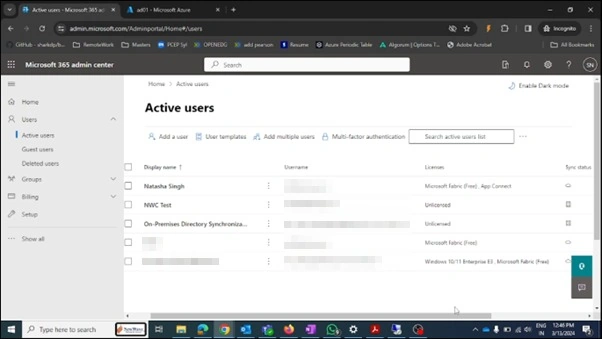
- Post the installation, we must be able to view the users and groups created in AD visible in the Microsoft 365 Online portal.
- We also assign the Windows E3 Enterprise license to the users to access the Azure Virtual Desktop.
Azure virtual desktop configuration
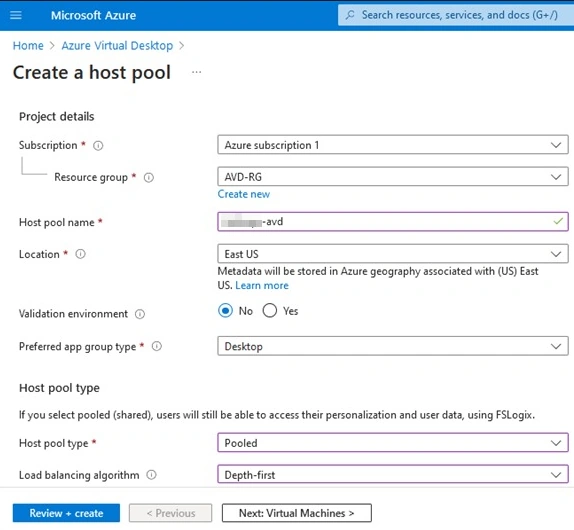
- Host pool creation: Choose a multi-session desktop pool using Windows 10 Enterprise multi-session or Windows 11 Enterprise multi-session with Microsoft 365 Apps.
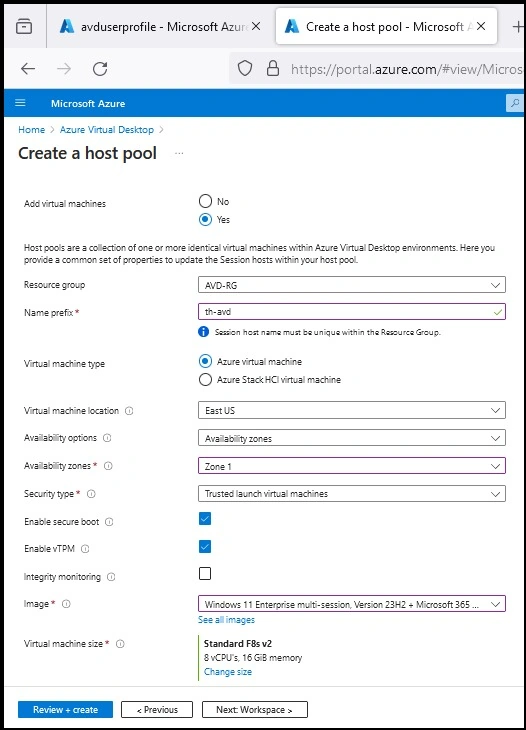
- VM size selection: For desktops with moderate browsing and office software usage, consider Standard F8s_v2 (vCPU: 8, RAM: 16 GiB)
- Application installation: Install Google Chrome, Edge Browser, Firefox Browser, Zoho Mail, Zoho Cliq, Zoho Workdrive, and Notepad++.
Virtual network setup
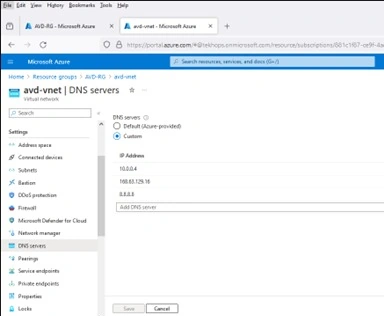
- We create a Virtual Network named and-vnet and change the DNS servers to private IP addresses of the Active Directory VM and Azure DNS servers as mentioned below:
- 10.0.0.4
- 168.63.129.16
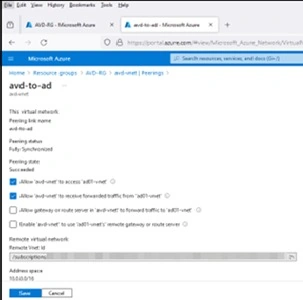
- Also, we create a Virtual Network peering to make sure the Active Directory VM and AVD session host can communicate.
Storage account creation
- We create a storage account named: your choice
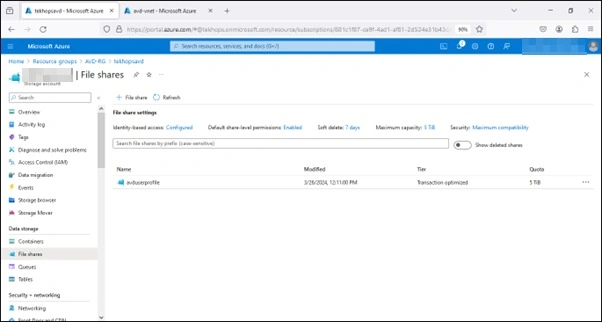
- Add a file share named avduserprofiles with maximum capacity to store user profile data and MSIX applications.
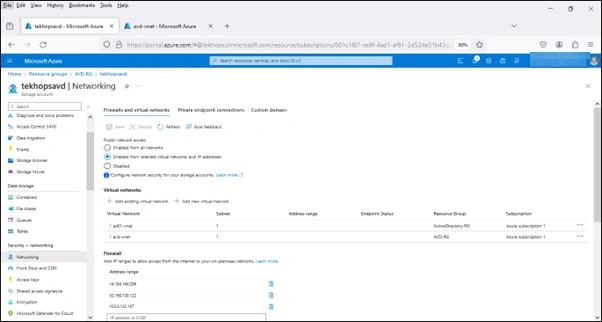
- We visit the Storage account, Security and Networking, Firewall, and Virtual Network tab and add both ad-vnet, avd-vnet, and their subnets as well.
- Optionally, we can also allow our client device IP address to access the storage account from the Azure Portal.
Connect the storage account with the active directory
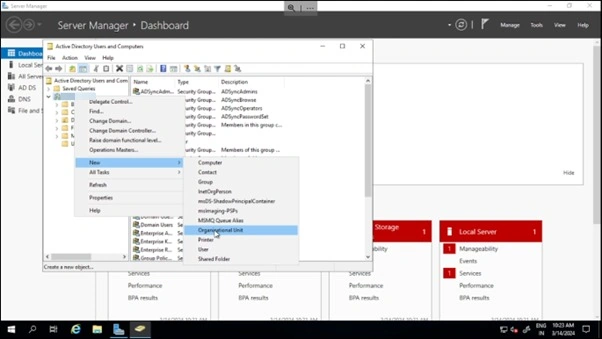
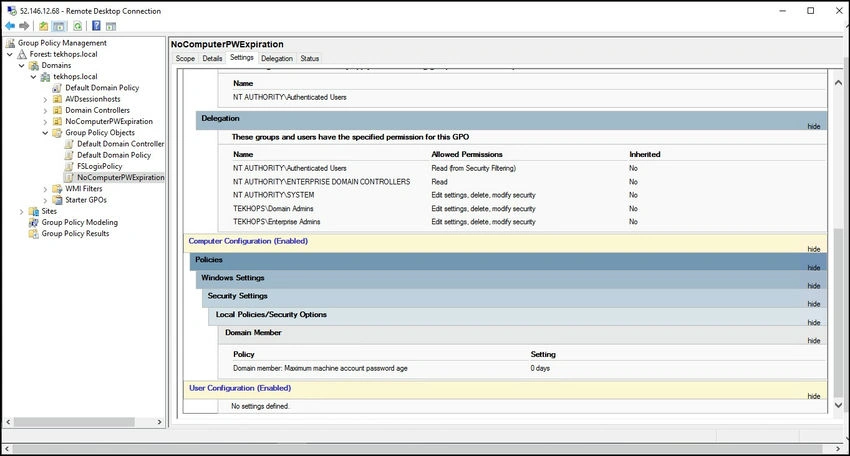
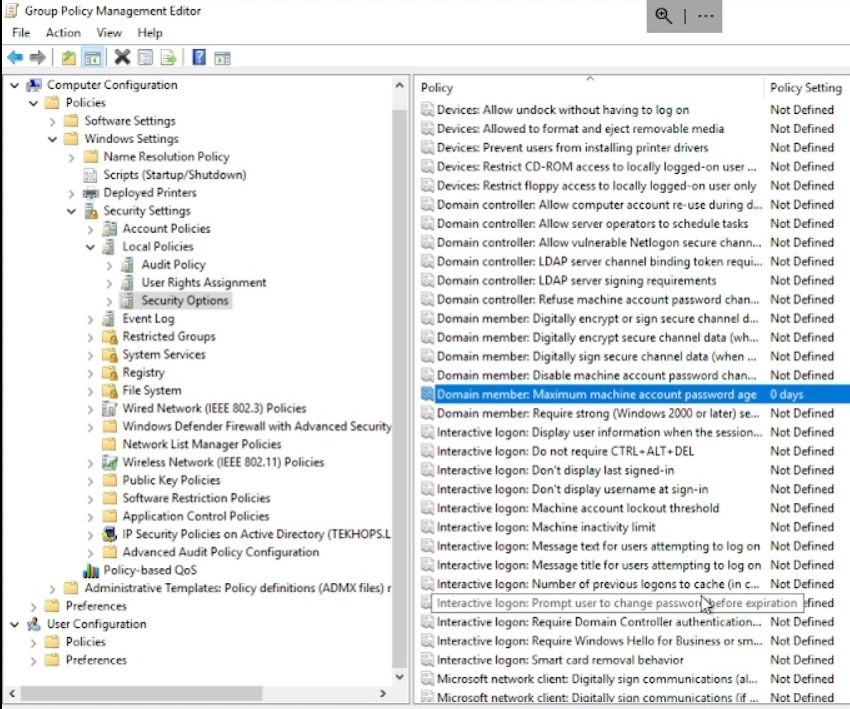
- We create a new OU named NoComputerPWExpiration, and that OU will contain a computer object to connect with the Azure Storage Account.
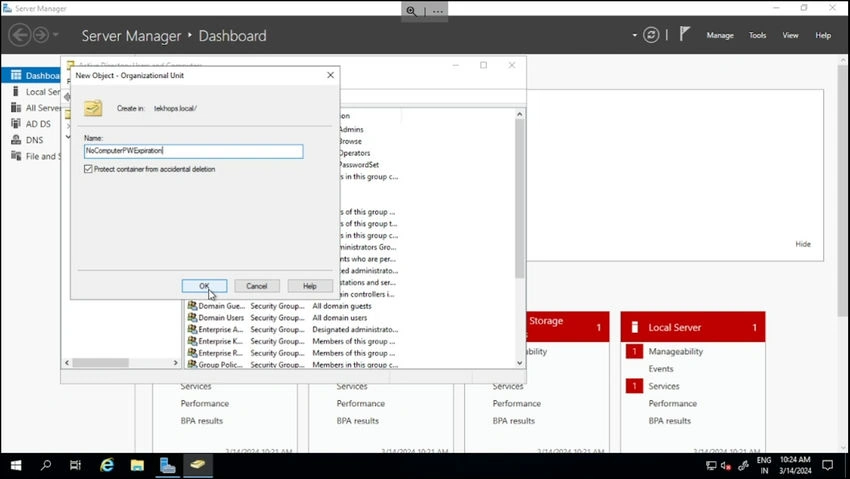
- We then create a Group Policy Object named NoComputerPWExpiration with the below configuration and attach it to the OU created above.
- Let’s open PowerShell as an Administrator and install the following:
- Install-WindowsFeature -Name "RSAT-AD-PowerShell" -IncludeAllSubFeature
- Get-Module -Name ActiveDirectory -ListAvailable
- Import-Module -Name ActiveDirectory
- Download the AzFilesHybrid module from the reference article attached below
- Use the cd command to navigate to the folder where we extracted the files and run the following PowerShell script
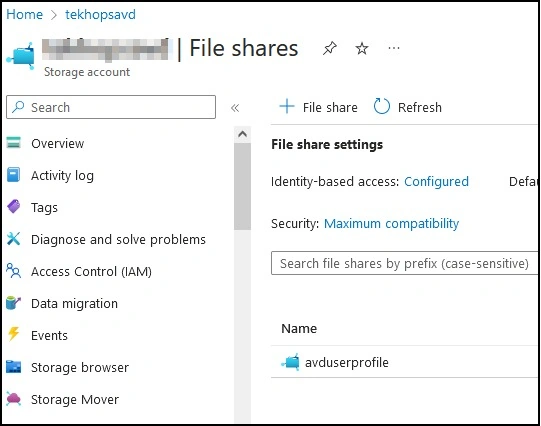
# Change the execution policy to unblock importing AzFilesHybrid.ps1 module Set-ExecutionPolicy -ExecutionPolicy Unrestricted -Scope CurrentUser # Navigate to where AzFilesHybrid is unzipped and stored and run to copy the files into your #path .\CopyToPSPath.ps1 # Import AzFilesHybrid module Import-Module -Name AzFilesHybrid # Login to Azure using a credential that has either storage account owner or contributor #Azure role assignment. Connect-account # Define parameters $SubscriptionId = "88******-****-****-****-***************" $ResourceGroupName = "AVD-RG" $StorageAccountName = "your choice" $SamAccountName = "localadmin" $DomainAccountType = "ComputerAccount" # Default is set as ComputerAccount $OuDistinguishedName = "OU=NoComputerPWExpiration,DC=yourdomain,DC=local" # Select the target subscription for the current session Select-AzSubscription -SubscriptionId $SubscriptionId # Register the target storage account with your active directory environment under the #target OU Join-AzStorageAccount ` -ResourceGroupName $ResourceGroupName ` -StorageAccountName $StorageAccountName ` -SamAccountName $SamAccountName ` -DomainAccountType $DomainAccountType ` -OrganizationalUnitDistinguishedName $OuDistinguishedName # You can run the Debug-AzStorageAccountAuth cmdlet to conduct a set of basic checks on your AD configuration # with the logged-on AD user. This cmdlet is supported on AzFilesHybrid v0.1.2+ version. For more details on # the checks performed in this cmdlet, see Azure Files Windows troubleshooting guide. Debug-AzStorageAccountAuth -StorageAccountName $StorageAccountName -ResourceGroupName $ResourceGroupName -Verbose $resourceGroupName = "AVD-RG" $storageAccountName = "yourchoice" (Get-AzStorageAccount -ResourceGroupName $resourceGroupName -Name $storageAccountName).AzureFilesIdentityBasedAuth.DirectoryServiceOptions; (Get-AzStorageAccount -ResourceGroupName $resourceGroupName -Name $storageAccountName).AzureFilesIdentityBasedAuth.ActiveDirectoryProperties - Once the above script is completed, we then navigate to the Azure Portal à Storage Accounts à FileShare and we can view that the Identity-based Access is Configured. We click and set share-level permissions as shown.
- Reference: Enable ADDS Authentication for Azure File Share
Configure required permissions in the Azure portal and File Share permission
- Virtual Machine User Login under the AVD-RG
- Storage File Data SMB Share Contributor under storage account à your choice/default/avduserprofile
- Desktop Virtualization User under the AVD Application Group
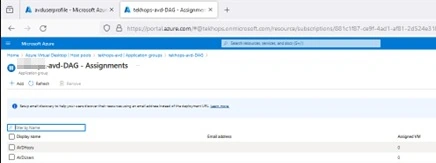
- We also map the file share in Active Directory using the path: \\yourchoice.file.core.windows.net\avduserprofile
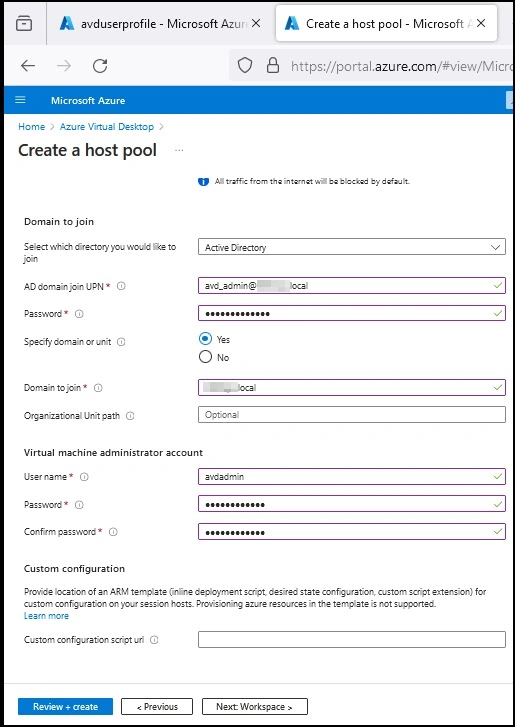
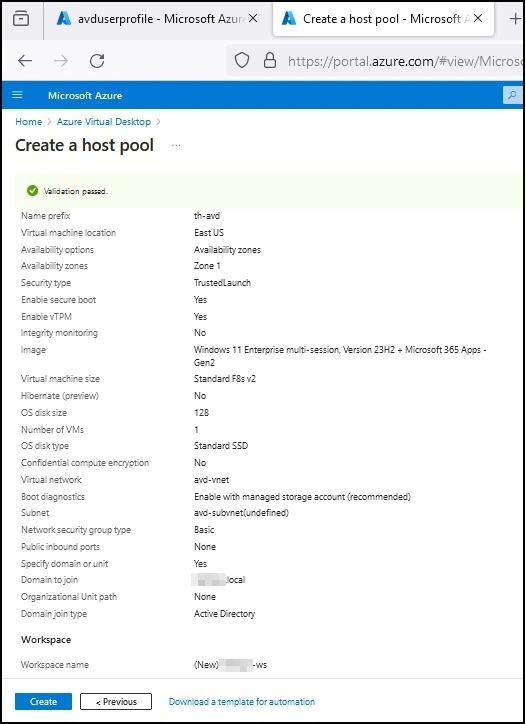
Create a session host
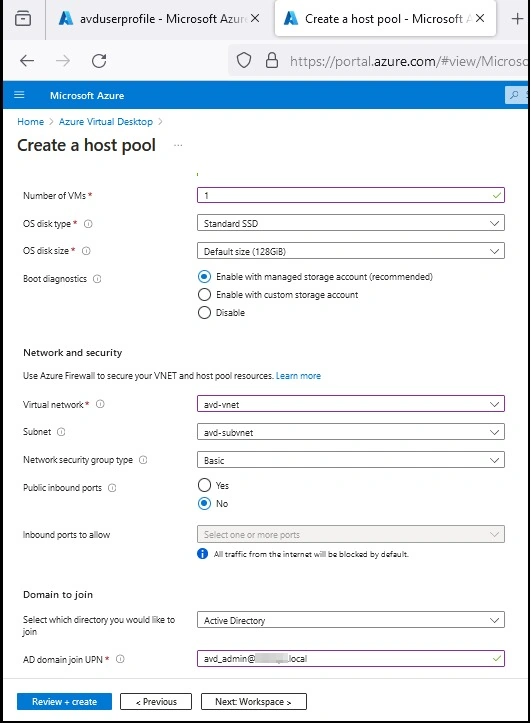
Enter the domain administrator UPN and Password. It will be used to join the session hosts to the Active Directory Server.
- Optionally, we mention the domain to be joined (yourdomain.local)
- Here, we choose the AVD-VNET and respective subnet which must be created and peered with Active Directory VNET before creating a session host.
Connect to the session host via the AD server (using a private IP address) and use the File Share
Open Command Prompt as an Administrator and enter the following cmdlets
net use z: \\yourchoice.file.core.windows.net\avduserprofile N6Qeq3g4tp6G8BOKsIeTTMb8OrvGxIEwe6c0loGDcTofFeEVz09TgxqDdCRGdBpdHaUk111YSkVV+AStQFnyXw== /user:Azure\yourchoice
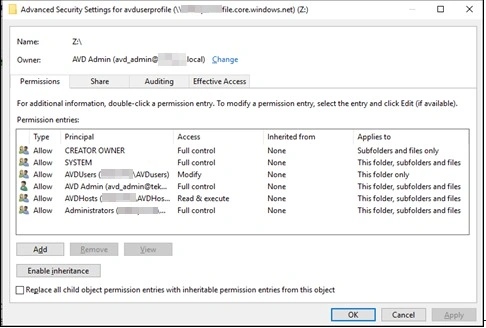
icacls z: /grant "yourdomain\AVDUsers:(M)"
icacls z: /grant "Creator Owner:(OI)(CI)(IO)(M)"
icacls z: /remove "Authenticated Users"
icacls z: /remove "Builtin\Users"
Open PowerShell as an Administrator to add FSLogix profile container permissions
$regPath = "HKLM:\SOFTWARE\FSLogix\profiles"
New-ItemProperty -Path $regPath -Name Enabled -PropertyType DWORD -Value 1 -Force
New-ItemProperty -Path $regPath -Name VHDLocations -PropertyType MultiString -Value \\yourchoice.file.core.windows.net\avduserprofile -Force
Reference: FSLogix Profile Container Configuration
Connect to the session host via the AD server and create a self-signed certificate
$cert = New-SelfSignedCertificate `
    -CertStoreLocation Cert:\LocalMachine\My `
    -DnsName "YOURDOMAIN" `
    -Type CodeSigningCert `
    -Subject "MSIXApps" `
    -notafter (Get-Date).AddYears(20) `
    -Verbose
$cert
$secPassword = ConvertTo-SecureString -String 'yourpassword' -Force -AsPlainText
$certPath = "Cert:\LocalMachine\My\$($Cert.Thumbprint)"
Export-PfxCertificate -Cert $certPath -FilePath 'C:\tools\MSIX-CodeSigning.pfx' -Password $secPassword
Upload the certificate to the Session Host
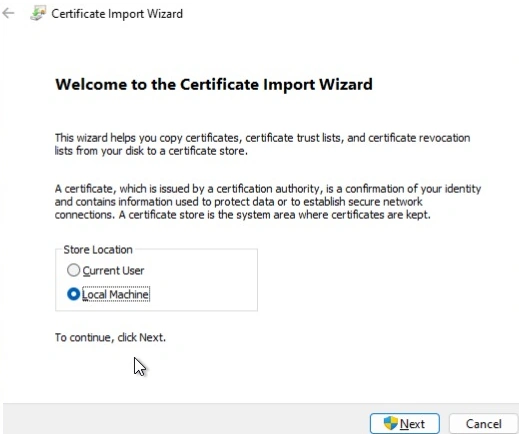
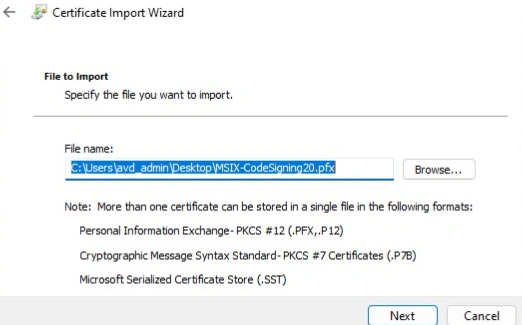
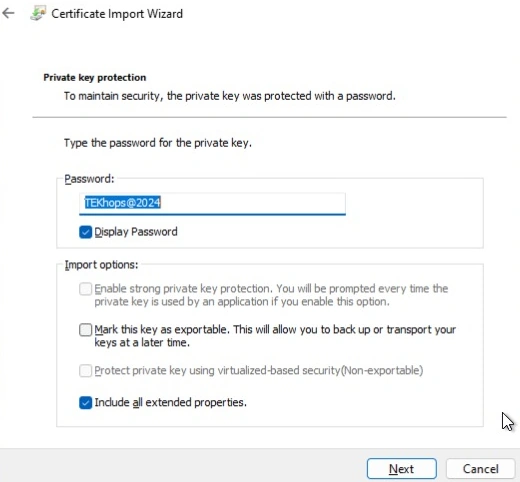
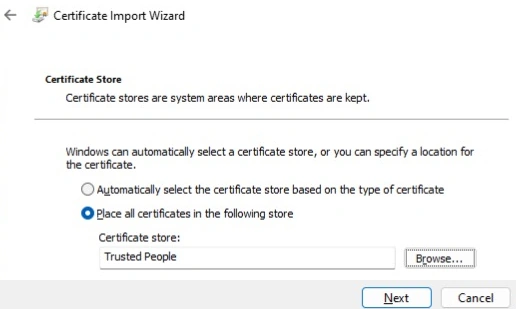
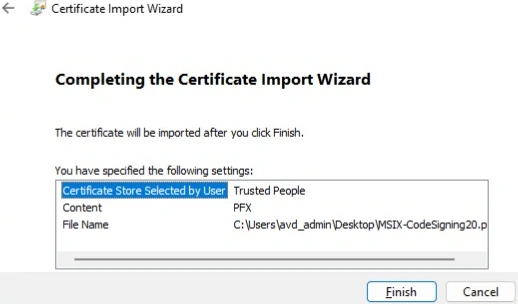
Connect the session host to the Fileshare for accessing the application package
- Visit the file share, click on “Connect” at the top, and copy the script as shown below.
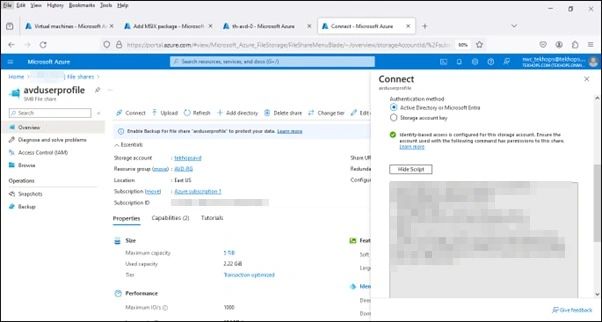
- Open a normal PowerShell Window and paste the script.
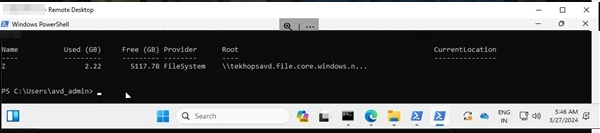
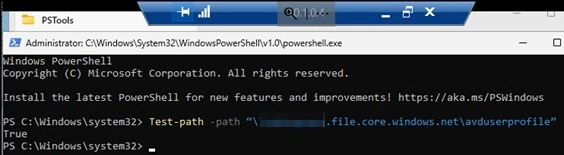
This can be validated by
- Downloading the PSExec
- Next, open CMD as an administrator and type the following command:
- psexec.exe -s -i powershell.exe
- Once the new window appears, type this command:
- Test-path -path “\\yourchoice.file.core.windows.net\avduserprofile”
- It should return True
We must also disable the automatic updates by
# Disable Microsoft Store automatic update
If (!(Test-Path "HKLM:\Software\Policies\Microsoft\WindowsStore")) {
    New-Item -Path "HKLM:\Software\Policies\Microsoft\WindowsStore" -Force
}
New-ItemProperty -Path "HKLM:\Software\Policies\Microsoft\WindowsStore" -Name AutoDownload -PropertyType DWORD -Value 2 -Force
# Disable content delivery automatic download
If (!(Test-Path "HKCU:\Software\Microsoft\Windows\CurrentVersion\ContentDeliveryManager")) {
    New-Item -Path "HKCU:\Software\Microsoft\Windows\CurrentVersion\ContentDeliveryManager" -Force
}
New-ItemProperty -Path "HKCU:\Software\Microsoft\Windows\CurrentVersion\ContentDeliveryManager" -Name PreInstalledAppsEnabled -PropertyType DWORD -Value 0 -Force
# Disables content delivery automatic download
If (!(Test-Path "HKLM:\SOFTWARE\Microsoft\Windows\CurrentVersion\ContentDeliveryManager\Debug")) {
    New-Item -Path "HKLM:\SOFTWARE\Microsoft\Windows\CurrentVersion\ContentDeliveryManager\Debug" -Force
}
New-ItemProperty -Path "HKLM:\SOFTWARE\Microsoft\Windows\CurrentVersion\ContentDeliveryManager\Debug" -Name ContentDeliveryAllowedOverride -PropertyType DWORD -Value 2 -Force

Use the MSIX Packaging tool and MSIXMgr
- To convert application installer to MSIX bundle via packaging tool and use MSIXmgr to convert MSIX to AVD supported type (CIM). Post that we will upload the package to File share created.
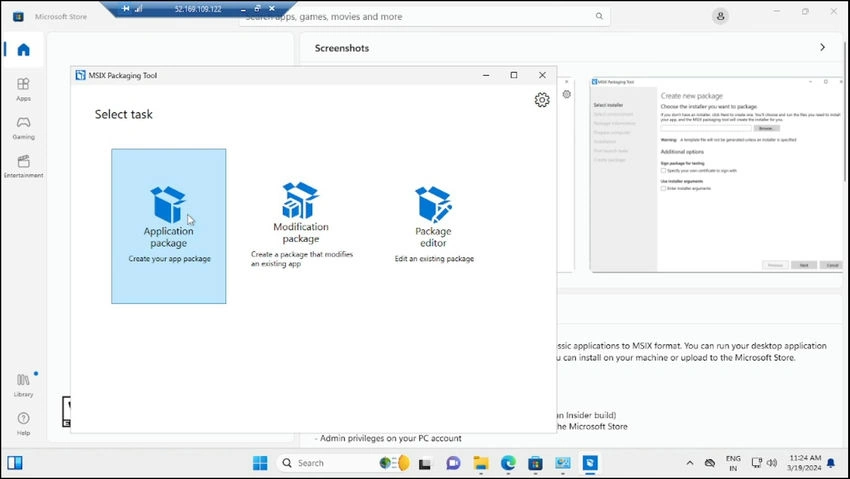
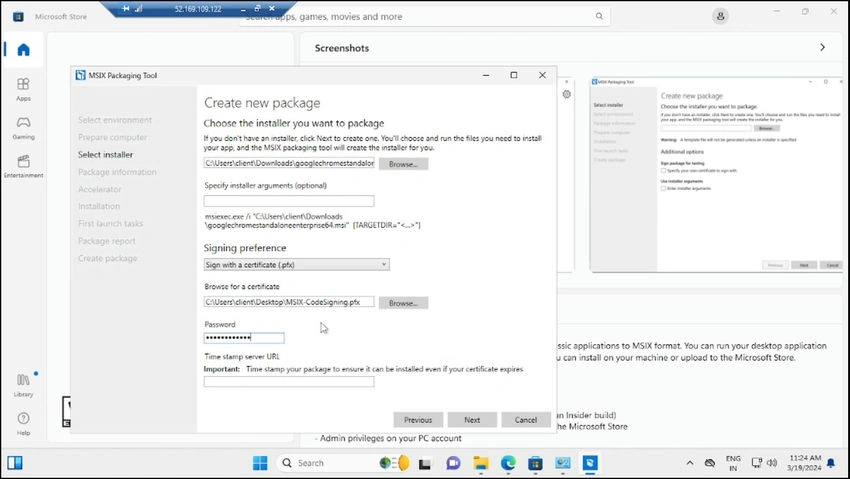
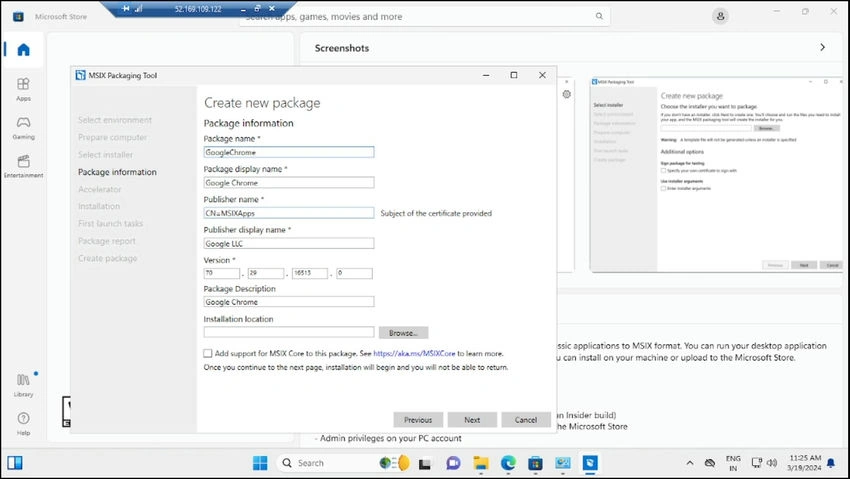
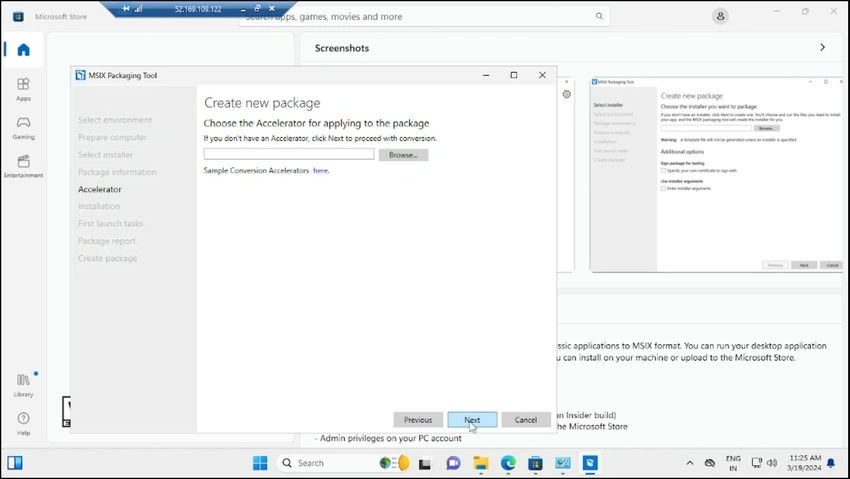
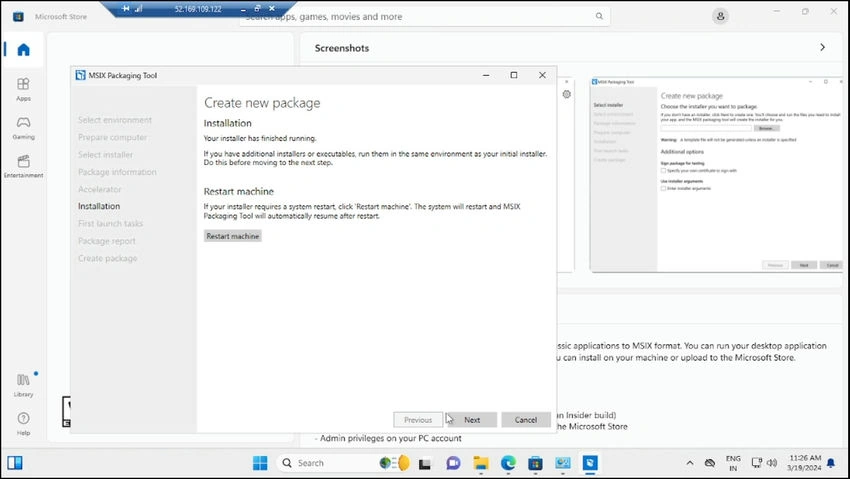
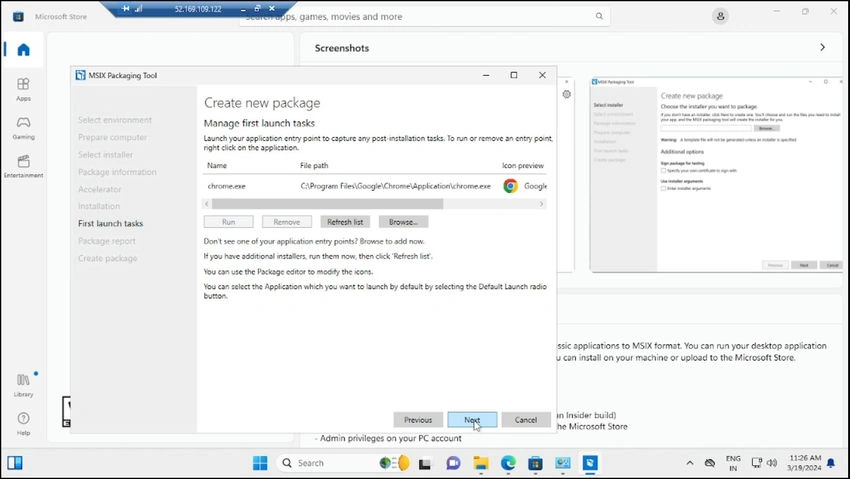
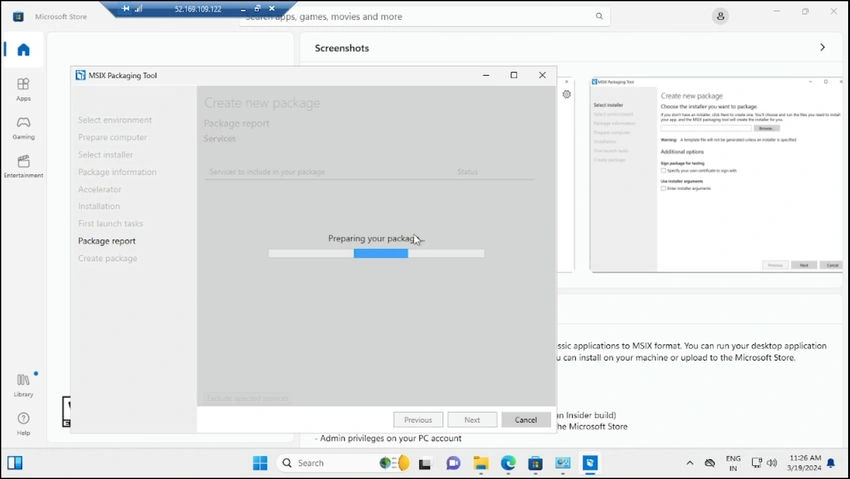
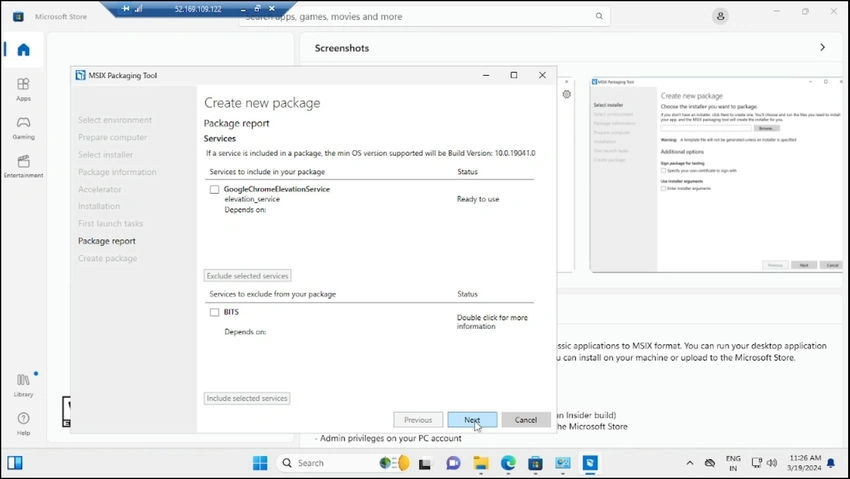
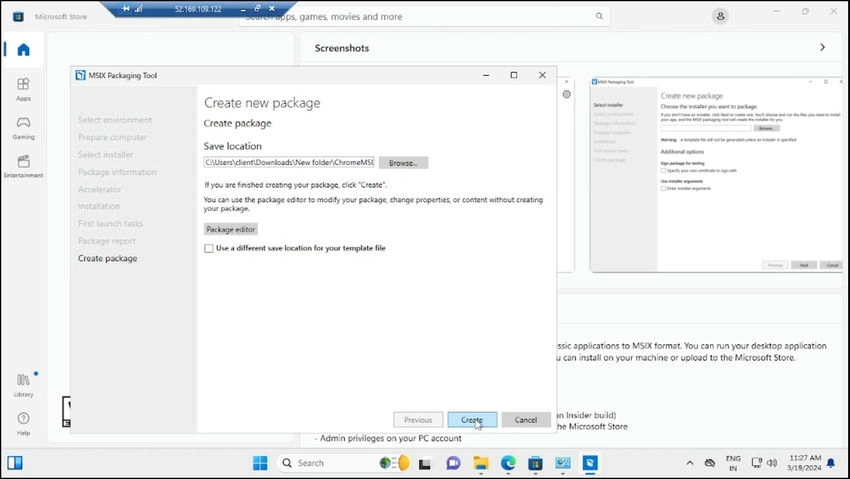
- Download the MSIXmgr open PowerShell from inside that folder and run the following cmd to convert MSIX to CIM package. Remember to replace -packagePath and -destination as required.
- msixmgr.exe -Unpack -package path "C:\Users\client\Desktop\New folder\Chrome.mix" -destination "C:\Users\client\Desktop\New folder\cmi\Chrome.cim" -applyACLs -create -fileType cim -rootDirectory apps
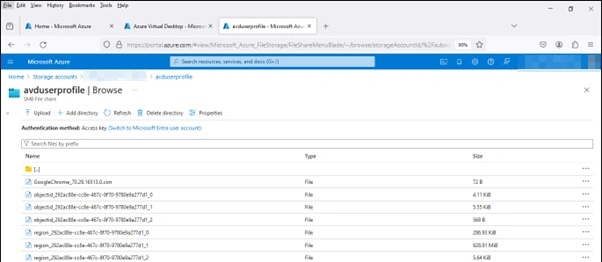
- We then proceed to upload the CIM file along with dependencies to the File Share created earlier.
Reference
Pre-requisite to install: Latest downloads for the Windows App SDK
Adding the Application from File Share to the Session Hosts
- From Azure portal à Select Azure Virtual Desktop à Session Hosts à MSIX Packages and Click on +Add
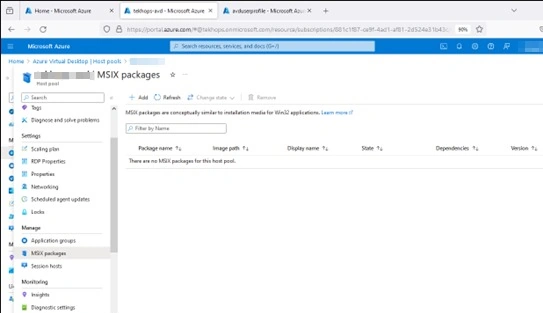
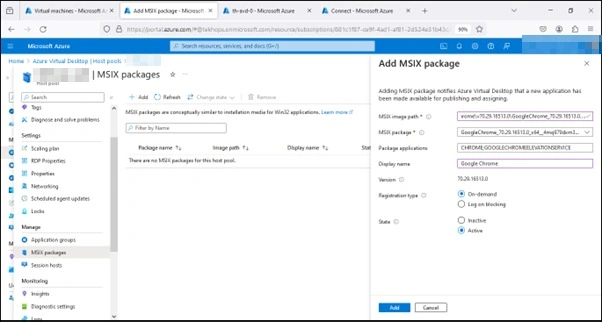
Below are the file paths added for various applications
- \\yourchoice.file.core.windows.net\avduserprofile\MSIX\Chrome\v70.29.16513.0\GoogleChrome_70.29.16513.0.cim
- \\yourchoice.file.core.windows.net\avduserprofile\MSIX\Firefox\v124.0\MozillaFirefox124.0.cim
- \\yourchoice.file.core.windows.net\avduserprofile\MSIX\Notepad++\v8.6.4.0\NotepadPlusPlus_8.6.4.0.cim
- \\yourchoice.file.core.windows.net\avduserprofile\MSIX\Zoho Cliq\v1.7.1\Cliq_1.7.1.0.cim
- \\yourchoice.file.core.windows.net\avduserprofile\MSIX\Zoho Mail\v1.6.1.0\ZohoMail_1.6.1.0.cim
- \\yourchoice.file.core.windows.net\avduserprofile\MSIX\Zoho WorkDrive\v2.7.31\ZohoWorkDrive2.7.31.cim
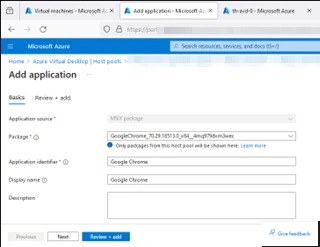
Connecting to Session Host
- Download the Remote Desktop Client from the below URL
- Once opened, Click on Subscribe
- Enter the Email ID and Password
- Once added, Click on the Session Desktop Icon
- If it is not visible, then mostly it would be a permission issue:
- Check if the user has a license assigned, the right permissions are added
- If it is not visible, then mostly it would be a permission issue:
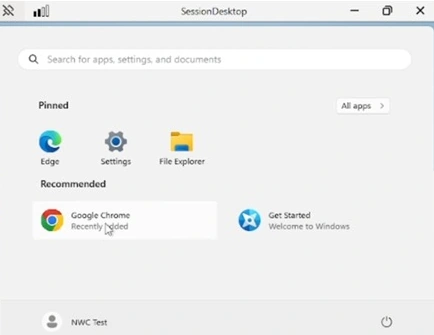
- Once opened, you will find all the apps pre-loaded and ready to use
Join the conversation! Your thoughts help the community grow.