

Introduction
In this article, I shall show you how to make a To Do List app in Xamarin.Android.
The prerequisite
- Android Support Library v7 AppCompat
The steps given below are required to be followed in order to create a To Do List App in Xamarin.Android, using Visual Studio.
Step 1 - Create Android Project
Create your Android solution in Visual Studio or Xamarin Studio. Select Android and from the list, choose Android Blank App. Give it a name, like ToDoList.
Step 2 - Add Android Support v7 AppCompat Library
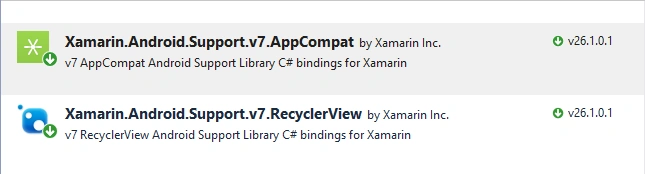
First of all, in References, add a reference of Android.Support.v7. AppCompat using NuGet Package Manager, as shown below.
Step 3 - Main Layout
Open Solution Explorer-> Project Name-> Resources-> Layout-> Main.axml. Open this main layout file and add the following code.
(File Name: Main.axml , Folder Name: Layout)
XML Code
- <?xml version="1.0" encoding="utf-8"?>
- <LinearLayout xmlns:android="http://schemas.android.com/apk/res/android"
- android:orientation="vertical"
- android:layout_width="match_parent"
- android:layout_height="match_parent">
- <ListView
- android:id="@+id/lstTask"
- android:layout_width="match_parent"
- android:layout_height="match_parent"/>
- </LinearLayout>
Step 4 - Add New Layout
Next, add a new layout by going to Solution Explorer-> Project Name-> Resources-> Layout. Right-click to add a new item, select Layout, and give it a name, such as row.axml. Open this layout file and add the following code.
(Folder Name: Layout , File Name: row.axml)
XML Code
- <?xml version="1.0" encoding="utf-8"?>
- <RelativeLayout xmlns:android="http://schemas.android.com/apk/res/android"
- android:layout_width="match_parent"
- android:layout_height="match_parent">
- <TextView
- android:id="@+id/task_title"
- android:text="Example"
- android:textSize="20sp"
- android:textColor="@android:color/black"
- android:layout_alignParentLeft="true"
- android:layout_alignParentStart="true"
- android:layout_width="wrap_content"
- android:layout_height="wrap_content"/>
- <Button
- android:id="@+id/btnDelete"
- android:text="DELETE"
- android:textSize="20sp"
- android:textColor="@android:color/black"
- android:layout_alignParentRight="true"
- android:layout_alignParentEnd="true"
- android:layout_width="wrap_content"
- android:layout_height="wrap_content"/>
- </RelativeLayout>
Step 5 - Add Menu
Next, add a new folder by going to Solution Explorer-> Project Name-> Resources-> Right-click to add a new folder. Give it a name, like Menu, and right-click on menu folder to add a new item. Select XML, and give it a name as menu_item.xml. Open this XML file and add the following code.
(Folder Name: menu , File Name: menu_item.xml)
XML Code
- <?xml version="1.0" encoding="utf-8" ?>
- <menu xmlns:android="http://schemas.android.com/apk/res/android">
- <item
- android:id="@+id/action_add"
- android:icon="@android:drawable/ic_menu_add"
- android:title="Add New Task"
- android:showAsAction="always"/>
- </menu>
Step 6 - Writing DbHelper Class
Before you go further, you need to write your DbHelper Class. For this, go to Solution Explorer-> Project Name and right-click. Select Add -> New Item-> Class. Give it a name like DbHelper.cs and write the following code with appropriate namespaces.
(File Name: DbHelper.cs)
C# Code
- using Android.Content;
- using Android.Database;
- using Android.Database.Sqlite;
- using System;
- using System.Collections.Generic;
- namespace ToDoList.Helper
- {
- public class DbHelper : SQLiteOpenHelper
- {
- private static String DB_NAME = "Ahsan";
- private static int DB_VERSION = 1;
- private static String DB_TABLE = "Task";
- private static String DB_COLUMN = "TaskName";
- public DbHelper(Context context) : base(context, DB_NAME, null, DB_VERSION)
- {
- }
- public override void OnCreate(SQLiteDatabase db)
- {
- string query = $"CREATE TABLE {DbHelper.DB_TABLE} (ID INTEGER PRIMARY KEY AUTOINCREMENT, {DbHelper.DB_COLUMN} TEXT NOT NULL);";
- db.ExecSQL(query);
- }
- public override void OnUpgrade(SQLiteDatabase db, int oldVersion, int newVersion)
- {
- string query = $"DELETE TABLE IF EXISTS {DB_TABLE}";
- db.ExecSQL(query);
- OnCreate(db);
- }
- public void InsertNewTask(String task)
- {
- SQLiteDatabase db = this.WritableDatabase;
- ContentValues values = new ContentValues();
- values.Put(DB_COLUMN, task);
- db.InsertWithOnConflict(DB_TABLE, null, values, Android.Database.Sqlite.Conflict.Replace);
- db.Close();
- }
- public void deleteTask(String task)
- {
- SQLiteDatabase db = this.WritableDatabase;
- db.Delete(DB_TABLE, DB_COLUMN + " = ?", new String[] { task });
- db.Close();
- }
- public List<string> getTaskList()
- {
- List<string> taskList = new List<string>();
- SQLiteDatabase db = this.ReadableDatabase;
- ICursor cursor = db.Query(DB_TABLE, new string[] { DB_COLUMN }, null, null, null, null, null);
- while (cursor.MoveToNext())
- {
- int index = cursor.GetColumnIndex(DB_COLUMN);
- taskList.Add(cursor.GetString(index));
- }
- return taskList;
- }
- }
- }
Step 7 - Writing CustomAdapter Class
Similarly, add a new class - CustomAdapter.cs and add the following code with appropriate namespaces.
(File Name: CustomAdapter.cs)
C# Code
- using Android.Content;
- using Android.Views;
- using Android.Widget;
- using System.Collections.Generic;
- namespace ToDoList.Helper
- {
- public class CustomAdapter : BaseAdapter
- {
- private MainActivity mainActivity;
- private List<string> taskList;
- private DbHelper dbHelper;
- public CustomAdapter(MainActivity mainActivity, List<string> taskList, DbHelper dbHelper)
- {
- this.mainActivity = mainActivity;
- this.taskList = taskList;
- this.dbHelper = dbHelper;
- }
- public override int Count { get { return taskList.Count; } }
- public override Java.Lang.Object GetItem(int position)
- {
- return position;
- }
- public override long GetItemId(int position)
- {
- return position;
- }
- public override View GetView(int position, View convertView, ViewGroup parent)
- {
- LayoutInflater inflater = (LayoutInflater)mainActivity.GetSystemService(Context.LayoutInflaterService);
- View view = inflater.Inflate(Resource.Layout.row, null);
- TextView txtTask = view.FindViewById<TextView>(Resource.Id.task_title);
- Button btnDelete = view.FindViewById<Button>(Resource.Id.btnDelete);
- txtTask.Text = taskList[position];
- btnDelete.Click += delegate
- {
- string task = taskList[position];
- dbHelper.deleteTask(task);
- mainActivity.LoadTaskList(); // Reload Data
- };
- return view;
- }
- }
- }
Step 8 - Main Activity Class
Now, go to Solution Explorer-> Project Name-> MainActivity and add the following code with appropriate namespaces.
(FileName: MainActivity)
C# Code
- using Android.App;
- using Android.Widget;
- using Android.OS;
- using Android.Support.V7.App;
- using Android.Views;
- using Android.Content;
- using System;
- using ToDoList.Helper;
- using System.Collections.Generic;
- namespace ToDoList
- {
- [Activity(Label = "ToDoList", MainLauncher = true , Theme ="@style/Theme.AppCompat.Light")]
- public class MainActivity : AppCompatActivity
- {
- EditText edtTask;
- DbHelper dbHelper;
- CustomAdapter adapter;
- ListView lstTask;
- public override bool OnCreateOptionsMenu(IMenu menu)
- {
- MenuInflater.Inflate(Resource.Menu.menu_item, menu);
- return base.OnCreateOptionsMenu(menu);
- }
- public override bool OnOptionsItemSelected(IMenuItem item)
- {
- switch (item.ItemId)
- {
- case Resource.Id.action_add:
- edtTask = new EditText(this);
- Android.Support.V7.App.AlertDialog alertDialog = new Android.Support.V7.App.AlertDialog.Builder(this)
- .SetTitle("Add New Task")
- .SetMessage("What do you want to do next?")
- .SetView(edtTask)
- .SetPositiveButton("Add", OkAction)
- .SetNegativeButton("Cancel", CancelAction)
- .Create();
- alertDialog.Show();
- return true;
- }
- return base.OnOptionsItemSelected(item);
- }
- private void CancelAction(object sender, DialogClickEventArgs e)
- {
- }
- private void OkAction(object sender, DialogClickEventArgs e)
- {
- string task = edtTask.Text;
- dbHelper.InsertNewTask(task);
- LoadTaskList();
- }
- public void LoadTaskList()
- {
- List<string> taskList = dbHelper.getTaskList();
- adapter = new CustomAdapter(this, taskList, dbHelper);
- lstTask.Adapter = adapter;
- }
- protected override void OnCreate(Bundle savedInstanceState)
- {
- base.OnCreate(savedInstanceState);
- // Set our view from the "main" layout resource
- SetContentView(Resource.Layout.Main);
- dbHelper = new DbHelper(this);
- lstTask = FindViewById<ListView>(Resource.Id.lstTask);
- //Load Data
- LoadTaskList();
- }
- }
- }
Output

After a few seconds, the app will start running on your Android Emulator. You will see that your app is working successfully.
Summary
This was the process of creating a To Do List app in Xamarin.Android, using Visual Studio. Please share your comments and feedback.
christian espirituPosted Jun 14, 2020, 10:35 AM
THANKYOU SO MUCH
Tamilan SPosted Mar 31, 2018, 1:58 AM
Good one, very useful
Sagar Pandurang KapPosted Dec 28, 2017, 12:10 AM
Nice article.Keep posting..