

Representational State Transfer (REST) is a Service, which is based on REST architecture to build the Services on the Web. REST requests are made in HTTP, using the same HTTP verbs that the Web Browsers use to retrieve the Web pages and send the data to the Servers. The verbs are given below.
- GET - It is used to retrieve the data from the Web Service.
- POST - It is used to create a new data item in the Web Service.
- PUT - It is used to update a data item in the Web Service.
- PATCH - It is used to update a data item in the Web Service, describing a set of instructions on how the item should be modified.
- DELETE - It is used to delete a data item in the Web Service.
Web Service APIs that adhere to REST are called RESTful APIs and are defined using
- A base URL.
- HTTP methods, such as GET, POST, PUT, PATCH or DELETE.
- A media type for the data, such as JavaScript Object Notation (JSON).
The simplicity of REST has helped to make it the primary method for accessing Web services in the mobile Applications.
To show how we can consume a REST Service, I'll create a simple example that accesses REST Services available at the addresses given below.
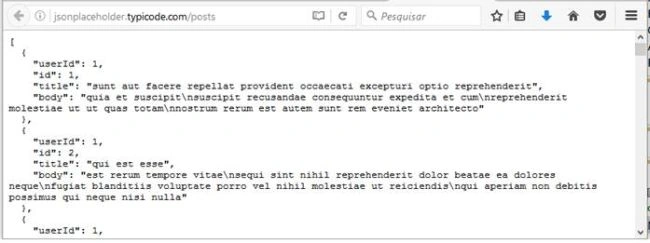
- http://jsonplaceholder.typicode.com/posts - Returns the data in JSON format.
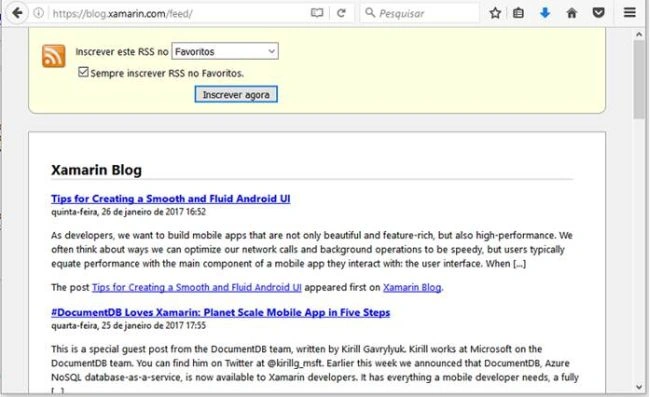
- https://blog.xamarin.com/feed/ - Returns the data in XML format.
In addition to sending the requests to get information (GET), we will also post the information using POST.
In this article, I'll perform these tasks, using the HttpClient class.
The HttpClient class is the main class used to send and receive HTTP messages through HttpRequestMessage and HttpResponseMessage. If you have previously used the WebClient and HttpWebRequest classes, you will notice that the HttpClient class has important diferences, namely
- An HttpClient instance is used to configure the extensions, set default headers, cancel the requests and more.
- You can issue as many requests as you want through a single HttpClient instance.
- HttpClients are not bound to a particular HTTP or host Server. You can send any HTTP request, using the same HttpClient instance.
- You can derive from HttpClient to create the specialized clients for the certain Websites or the standards.
- The HttpClient class uses the new task-oriented standard (Task) to handle asynchronous requests. Thus, it makes it easier to manage and coordinate the pending requests.
The steps are given below to create the example.
Step 1
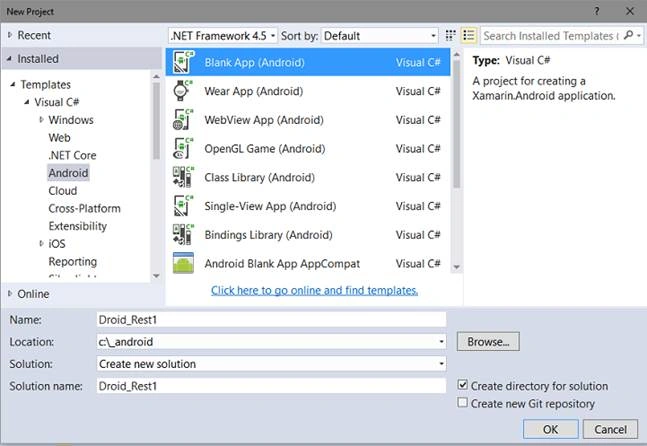
- Open VS 2015 Community and click New Project.
- Select Visual C# language in an Android template and Blank App (Android).
- Enter a suitable name for your project and I'll use the name Droid_Rest1. Now, click OK button.
Step 2
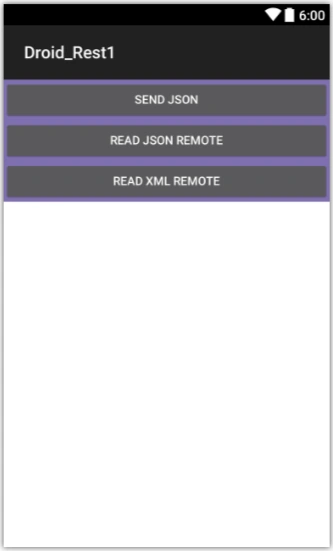
- Open Main.axml file in the Resources/Layout folder in Designer mode and add the controls given below from the ToolBox:
- 3 Buttons - sendData, readJson and readXml.
- 1 TextView - textView.
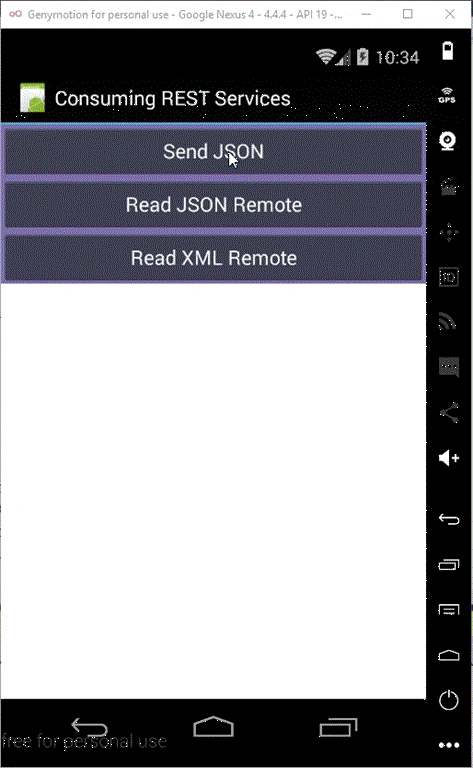
We can see the screenshot of the layout given below in Xamarin emulator.
AXML code of the layout is shown below.
Main.axml
- <?xml version="1.0" encoding="utf-8"?>
- <LinearLayout xmlns:android="http://schemas.android.com/apk/res/android"
- android:orientation="vertical"
- android:background="#7f6faf"
- android:layout_width="match_parent"
- android:layout_height="match_parent">
- <Button
- android:text="@string/sendData"
- android:layout_width="match_parent"
- android:layout_height="wrap_content"
- android:id="@+id/sendData" />
- <Button
- android:text="@string/readJson"
- android:layout_width="match_parent"
- android:layout_height="wrap_content"
- android:id="@+id/readJson" />
- <Button
- android:text="@string/readXml"
- android:layout_width="match_parent"
- android:layout_height="wrap_content"
- android:id="@+id/readXml" />
- <TextView
- android:textAppearance="?android:attr/textAppearanceSmall"
- android:background="@android:color/white"
- android:textColor="@android:color/black"
- android:layout_width="match_parent"
- android:layout_height="wrap_content"
- android:id="@+id/textView"
- android:layout_weight="1" />
- </LinearLayout>
Open Strings.xml file at the Resources/value folder and include the code given below.
- <?xml version="1.0" encoding="utf-8"?>
- <resources>
- <string name="ApplicationName">Consuming REST Services</string>
- <string name="sendData">Send JSON</string>
- <string name="readJson">Read JSON Remote</string>
- <string
Step 4
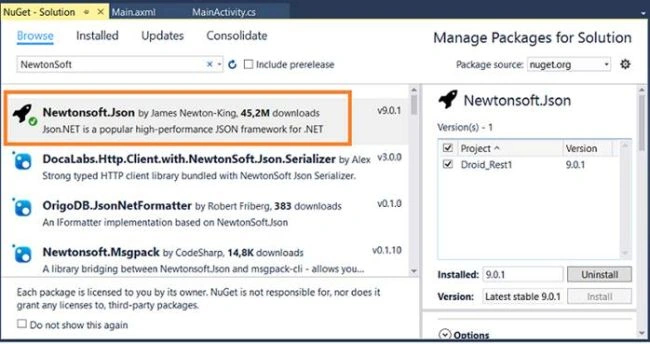
On the Tools menu, click NuGet Package Manager and then click Manage Nuget Packages for the solution;
Select the Browse tab and type NewtonSoft. Locate the library and install it in the project.
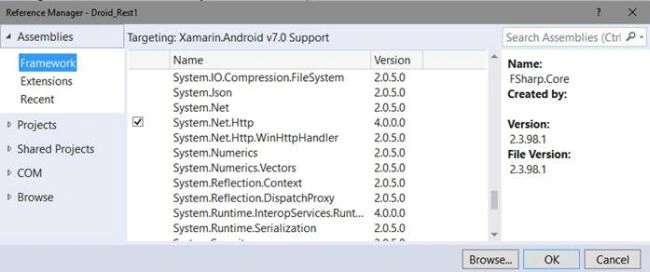
Now, right click on the project and click Add References.
Select the Assemblies item, check the System.Net.http item and click OK.
Step 5
Let's create the Post and Rss classes, which defines the data according to the structure, which we will receive via JSON and XML.
On the Project menu, click Add class and enter the name Post. Now, enter the code given below in this class.
Post.cs
- using Newtonsoft.Json;
- namespace Droid_Rest1
- {
- public class Post
- {
- public int Id { get; set; }
- public int UserId { get; set; }
- public string Title { get; set; }
- [JsonProperty("body")]
- public string Content { get; set; }
- public override string ToString()
- {
- return string.Format(
- "Post Id: {0}\nTitle: {1}\nBody: {2}",
- Id, Title, Content);
- }
- }
- }
Rss.cs
- using System.Collections.Generic;
- using System.Net;
- using System.Xml;
- using System.Xml.Serialization;
- namespace Droid_Rest1
- {
- [XmlRoot(ElementName = "rss")]
- public class Rss
- {
- [XmlElement("channel")]
- public Channel Channel { get; set; }
- }
- [XmlRootAttribute(ElementName = "channel")]
- public class Channel
- {
- [XmlElement("title")]
- public string Title { get; set; }
- [XmlElement(ElementName = "item", Type = typeof(Item))]
- public List<Item> Items { get; set; }
- }
- [XmlRootAttribute(ElementName = "item")]
- public class Item
- {
- [XmlElement("guid")]
- public string Guid { get; set; }
- [XmlElement("title")]
- public string Title { get; set; }
- [XmlElement("description")]
- public XmlCDataSection DescriptionCData { get; set; }
- public string Content
- {
- get { return WebUtility.HtmlDecode(DescriptionCData.Data); }
- }
- public override string ToString()
- {
- return string.Format(
- "Post Url: {0}\nTitle: {1}\nBody: {2}",
- Guid, Title, Content);
- }
- }
- }
Open the MainActivity file at the root of the project and include the code given below.
MainActivity.cs
- using System.Collections.Generic;
- using System.Linq;
- using System.Net.Http;
- using System.Text;
- using System.Xml.Serialization;
- using Android.App;
- using Android.Widget;
- using Android.OS;
- using Newtonsoft.Json;
- namespace Droid_Rest1
- {
- [Activity(Label = "Consuming REST Services", MainLauncher = true, Icon = "@drawable/icon")]
- public class MainActivity : Activity
- {
- protected override void OnCreate(Bundle bundle)
- {
- base.OnCreate(bundle);
- SetContentView (Resource.Layout.Main);
- Button readJson = FindViewById<Button>(Resource.Id.readJson);
- Button readXml = FindViewById<Button>(Resource.Id.readXml);
- Button sendData = FindViewById<Button>(Resource.Id.sendData);
- TextView textView = FindViewById<TextView>(Resource.Id.textView);
- readJson.Click += async delegate
- {
- using (var client = new HttpClient())
- {
- // send a GET request
- var uri = "http://jsonplaceholder.typicode.com/posts";
- var result = await client.GetStringAsync(uri);
- //handling the answer
- var posts = JsonConvert.DeserializeObject<List<Post>>(result);
- // generate the output
- var post = posts.First();
- textView.Text = "First post:\n\n" + post;
- }
- };
- readXml.Click += async delegate
- {
- using (var client = new HttpClient())
- {
- // send a GET request
- var uri = "http://blog.xamarin.com/feed";
- var result = await client.GetStreamAsync(uri);
- //handling the answer
- var serializer = new XmlSerializer(typeof(Rss));
- var feed = (Rss)serializer.Deserialize(result);
- // generate the output
- var item = feed.Channel.Items.First();
- textView.Text = "First Item:\n\n" + item;
- }
- };
- sendData.Click += async delegate
- {
- using (var client = new HttpClient())
- {
- // Create a new post
- var novoPost = new Post
- {
- UserId = 12,
- Title = "My First Post",
- Content = "Macoratti .net - Quase tudo para .NET!"
- };
- // create the request content and define Json
- var json = JsonConvert.SerializeObject(novoPost);
- var content = new StringContent(json, Encoding.UTF8, "application/json");
- // send a POST request
- var uri = "http://jsonplaceholder.typicode.com/posts";
- var result = await client.PostAsync(uri, content);
- // on error throw a exception
- result.EnsureSuccessStatusCode();
- // handling the answer
- var resultString = await result.Content.ReadAsStringAsync();
- var post = JsonConvert.DeserializeObject<Post>(resultString);
- // display the output in TextView
- textView.Text = post.ToString();
- }
- };
- }
- }
- }
Let's understand the code.
We are using the methods given below of HttpClient class.
- GetStringAsync - It is used to send a GET request.
- GetStreamAsync - It is used to send a GET request.
- PostAsync - It is used to send a POST request.
Now, we deserialize the received data, using the DeserializeObject method of the Newtonsoft class for JSON data and the Deserialize method for the XML. We will display the result in the TextView.
Running the project, using the Genymotion emulator, we will get the result given below.
Summary
In this article, we learned how to consume REST Services, using HttpClient in Xamarin with Visual Studio 2015.
Starlord MuscuttPosted Jul 8, 2019, 5:15 AM
Thanks for that. I have been Designing/Dev in ASP.NET since 2006 and this example shows a simple crossover from ASP.NET web forms (and MVC with the mention of JavaScript to Xamarin. Very useful thank you.
Wa'ed AlshiyyabPosted Aug 14, 2018, 5:37 AM
Thank this is really helpful, it saves my life,, but can I ask about how after posting the data I can check the status code so if it was 200 I can do something
Roy HPosted Jul 2, 2018, 5:03 AM
Hi Jose thank you for the Example, actually i am trying to use REST service in the Xamarin Android Using MVVMCROSS, due to lack of resources i am unable to do it, so can you please post an example based on MVVMCROSS..
Pedro Enrique Diaz RiosPosted May 25, 2018, 10:26 AM
Hi Sir, I wanto to try to executed this example in vs ws2017 and result this error , please do you help me ,,,,,Implementando C:\VS2017\XamarinDroidRest1\Droid_Rest1\Droid_Rest1\Droid_Rest1.csproj...Se obtuvo informaci?n del dispositivo: LGE LG-D855 Player (Android) @ 192.168.1.9:37847 Sincronizando los archivos... Compilando y ejecutando... Compilaci?n con 5 mensajes. C:\VS2017\XamarinDroidRest1\Droid_Rest1\Droid_Rest1\MainActivity.cs(1,1): error: 'Resource.Layout' does not contain a definition for 'Main' C:\VS2017\XamarinDroidRest1\Droid_Rest1\Droid_Rest1\MainActivity.cs(1,1): error: 'Resource.Id' does not contain a definition for 'readJson' C:\VS2017\XamarinDroidRest1\Droid_Rest1\Droid_Rest1\MainActivity.cs(1,1): error: 'Resource.Id' does not contain a definition for 'readXml' C:\VS2017\XamarinDroidRest1\Droid_Rest1\Droid_Rest1\MainActivity.cs(1,1): error: 'Resource.Id' does not contain a definition for 'sendData' C:\VS2017\XamarinDroidRest1\Droid_Rest1\Droid_Rest1\MainActivity.cs(1,1): error: 'Resource.Id' does not contain a definition for 'textView' No se pudo depurar la aplicaci?n.
Anas AhmedPosted Jul 26, 2017, 5:48 PM
Hello Jose. I downloaded the zip file attached. It is throwing me this error. How to resolve this? Can you help.Could not load assembly 'System.Runtime.Serialization.Formatters, Version=4.0.1.0, Culture=neutral, PublicKeyToken=b03f5f7f11d50a3a'. Perhaps it doesn't exist in the Mono for Android profile?
Mohammed AdamuPosted May 8, 2017, 1:23 AM
Hi Sir am developing a xamarin android app and will like to connect to MS sql server to insert, update, select etc. please can i use this tutorial for that project and what do i need to know in advance thanks.
usman mirzaPosted Mar 4, 2017, 3:11 AM
Very nice post with example..(y)