

In the previous article about Angular 2, we covered what the pipes are and how to create the custom pipes in Angular 2. Now, in this article, we will learn about Angular 2 components and we will also see how to create a nested component and how parent and child components communicate with each other.
Angular 2 Components
We all know that Angular 2 is a component based framework because everything is a component in Angular 2. Basically, components are the basic building blocks of Angular 2 application. It also allows us to create reusable UI templates.
A component in Angular 2 is a class with a template and a decorator. There are basically the following parts of Angular 2 component –
- Class
It is very similar to the C# class or java class etc. It contains the constructor, variables and methods code which is required for the template/user interface.
- Decorator
A decorator is used to store the metadata about the class. Basically, the decorator provided by Angular makes a class an Angular component when it is decorated with the component decorator.
Angular 2 provides us basically 4 types of decorators,
- Class Decorators
For Ex. @NgModule, @Component & @Directive
- Property Decorators
For Ex. @Input & @Output
- Method Decorators
For Ex. @HostListener
- Parameter Decorators
For Ex. @Inject
I am not going to define the types of decorators here in detail. We will discuss in detail about them in later articles.
Each decorator has a basic configuration using several properties. We are taking a look at some possible configuration properties right here, that you can use when creating a component,
- Selector – This is used for identifying this component in templates.
- Template – This is used for defining HTML template inline for the view.
- TemplateUrl – This is used for defining a URL to an external file containing a template for the view.
- Styles – This is used for defining inline CSS to be applied to the template of this component.
- StyleUrls – This is used for defining URLs to external style sheets to be applied to the templates of this component.
- viewProviders – This is used for defining a list of providers available for this component and its view children
For all configurations, click here.
Let’s understand the component and its parts with the help of below screenshot and component code.
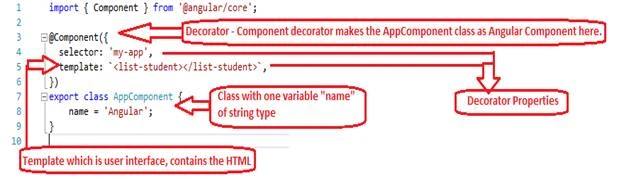
This shows where the decorators are actually applied to a class and how they are actually responsible for making a class an Angular component.
App.component.ts
- import { Component } from '@angular/core';
- @Component({
- selector: 'my-app',
- template: `<list-student></list-student>`,
- })
- export class AppComponent {
- name = 'Angular';
- }
Nested Components
Now, we will look how to create a nested component (parent component and child component) in Angular 2 applications and how parent and child components will communicate with each other.
I am using the same student project which I have been using in my previous articles so far. You can download it from here. We will create search bar component and search functionality to the existing student list component.
Let’s understand it with the following steps –
Since we want to make search-bar component as a shared component, we will keep related files in a new folder i.e. shared/searchbar.
Step 1. Add the search bar component TypeScript file
Add a new folder named “Shared” inside app folder and create another folder “SearchBar” inside this “Shared” folder to add the component files. And now, create a TypeScript file “searchbar.component.ts” under this “SearchBar” folder.
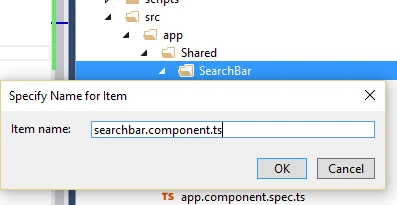
Add the below code into the “searchbar.component.ts” file.
searchbar.component.ts
- import { Component, Output, EventEmitter } from '@angular/core'
- @Component({
- selector: 'search-bar',
- templateUrl: 'searchbar.component.html',
- moduleId: module.id
- })
- export class SearchBarComponent {
- @Output()
- Search = new EventEmitter<string>();
- OnStudentSearch(searchTerm:string): void {
- this.Search.emit(searchTerm);
- }
- }
In the above code, we imported two components, Output and EventEmitter, from Angular core module. With the help of these two, we will inform the parent component when OnStudentSearch method will be called. We created a custom event “Search” which will emit when OnStudentSearch method will be called, so parent component will know about the event. The emit function has been used to fire this custom event.
We have mentioned the search bar template URL in templateUrl property, which we will create in a little bit.
Step 2. Add the search bar template file
Add an html searchbar.component.html file inside the same app -> Shared -> “SearchBar” folder and add the below code into this file,
- <div class="form-group">
- <div class="md-col-4">
- <label>Enter Student Name:</label>
- </div>
- <div class="md-col-4">
- <input class="form-control" #searchInput type="text" />
- </div>
- </div>
- <button type="submit" class="btn btn-default" (click)="OnStudentSearch(searchInput.value)">
- Search
- </button>
Now our searchbar component is complete to nest inside the existing StudentList component.
Step 3. Nest the SearchBar component inside the StudentList component
Open the existing student.component.html file from app -> student folder and added the below code as highlighted,
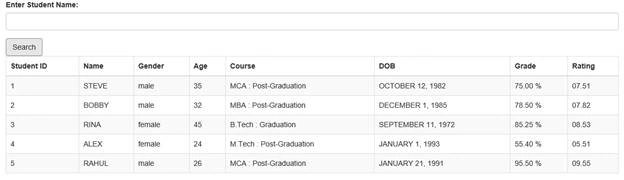

Victor IghaloPosted Dec 23, 2017, 1:09 AM
Thanks. This was enlightening.
Neeraj SinghPosted Jul 27, 2017, 2:29 PM
Nice article :) @Angular2