

The article will show an example of webview in Flutter. I will create a simple application using Flutter embedded in webview.
First, we must create a project using Visual Studio Code software with the name "webview". Let's create a new project using Visual Studio Code.
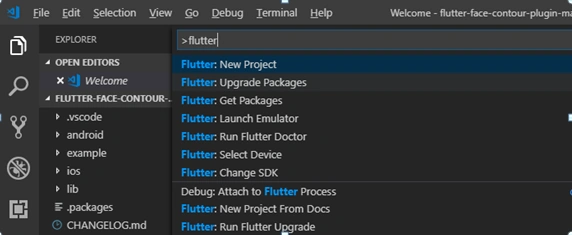
- Invoke View > Command Palette.
- Type “flutter”, and select the Flutter: New Project.
- Enter a project name, example such as "webview", and press Enter.
- Create or select the parent directory for the new project folder.
- Wait for project creation progress to complete and the main.dart file to appear.
Below is an example using webview flutter plugin webview_flutter: ^0.3.3. Edit the file pubspec.yaml in your directory and it should look something like below, and then update the webview flutter package.
- name: webview
- description: A new Flutter project.
- # The following defines the version and build number for your application.
- # A version number is three numbers separated by dots, like 1.2.43
- # followed by an optional build number separated by a +.
- # Both the version and the builder number may be overridden in flutter
- # build by specifying --build-name and --build-number, respectively.
- # In Android, build-name is used as versionName while build-number used as versionCode.
- # Read more about Android versioning at https://developer.android.com/studio/publish/versioning
- # In iOS, build-name is used as CFBundleShortVersionString while build-number used as CFBundleVersion.
- # Read more about iOS versioning at
- # https://developer.apple.com/library/archive/documentation/General/Reference/InfoPlistKeyReference/Articles/CoreFoundationKeys.html
- version: 1.0.0+1
- environment:
- sdk: ">=2.1.0 <3.0.0"
- dependencies:
- flutter:
- sdk: flutter
- # The following adds the Cupertino Icons font to your application.
- # Use with the CupertinoIcons class for iOS style icons.
- cupertino_icons: ^0.1.2
- webview_flutter: ^0.3.3
- dev_dependencies:
- flutter_test:
- sdk: flutter
- # For information on the generic Dart part of this file, see the
- # following page: https://www.dartlang.org/tools/pub/pubspec
- # The following section is specific to Flutter.
- flutter:
- # The following line ensures that the Material Icons font is
- # included with your application, so that you can use the icons in
- # the material Icons class.
- uses-material-design: true
- # To add assets to your application, add an assets section, like this:
- # assets:
- # - images/a_dot_burr.jpeg
- # - images/a_dot_ham.jpeg
- # An image asset can refer to one or more resolution-specific "variants", see
- # https://flutter.dev/assets-and-images/#resolution-aware.
- # For details regarding adding assets from package dependencies, see
- # https://flutter.dev/assets-and-images/#from-packages
- # To add custom fonts to your application, add a fonts section here,
- # in this "flutter" section. Each entry in this list should have a
- # "family" key with the font family name, and a "fonts" key with a
- # list giving the asset and other descriptors for the font. For
- # example:
- # fonts:
- # - family: Schyler
- # fonts:
- # - asset: fonts/Schyler-Regular.ttf
- # - asset: fonts/Schyler-Italic.ttf
- # style: italic
- # - family: Trajan Pro
- # fonts:
- # - asset: fonts/TrajanPro.ttf
- # - asset: fonts/TrajanPro_Bold.ttf
- # weight: 700
- #
- # For details regarding fonts from package dependencies,
- # see https://flutter.dev/custom-fonts/#from-packages
You must use Flutter webview container for custom widget, so create a file with the name web_view_container.dart like below,
- import 'package:flutter/material.dart';
- import 'package:webview_flutter/webview_flutter.dart';
- class WebViewContainer extends StatefulWidget {
- final url;
- WebViewContainer(this.url);
- @override
- createState() => _WebViewContainerState(this.url);
- }
- class _WebViewContainerState extends State<WebViewContainer> {
- var _url;
- final _key = UniqueKey();
- _WebViewContainerState(this._url);
- @override
- Widget build(BuildContext context) {
- return Scaffold(
- appBar: AppBar(),
- body: Column(
- children: [
- Expanded(
- child: WebView(
- key: _key,
- javascriptMode: JavascriptMode.unrestricted,
- initialUrl: _url))
- ],
- ));
- }
- }
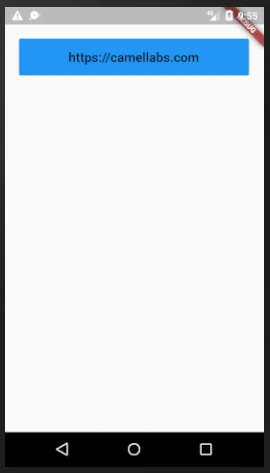
We need the home screen to show a single button that opens a URL. Create a file with the name Home.dart and you can put your link in this file.
- import 'package:flutter/material.dart';
- import 'web_view_container.dart';
- class Home extends StatelessWidget {
- final _links = ['https://camellabs.com'];
- @override
- Widget build(BuildContext context) {
- return Scaffold(
- body: SafeArea(
- child: SingleChildScrollView(
- child: Column(
- mainAxisAlignment: MainAxisAlignment.center,
- crossAxisAlignment: CrossAxisAlignment.stretch,
- children: _links.map((link) => _urlButton(context, link)).toList(),
- ))));
- }
- Widget _urlButton(BuildContext context, String url) {
- return Container(
- padding: EdgeInsets.all(20.0),
- child: FlatButton(
- color: Theme.of(context).primaryColor,
- padding: const EdgeInsets.symmetric(horizontal: 50.0, vertical: 15.0),
- child: Text(url),
- onPressed: () => _handleURLButtonPress(context, url),
- ));
- }
- void _handleURLButtonPress(BuildContext context, String url) {
- Navigator.push(context,
- MaterialPageRoute(builder: (context) => WebViewContainer(url)));
- }
- }
And then modify file main.dart like below,
- import 'package:flutter/material.dart';
- import 'home.dart';
- void main() => runApp(MyApp());
- class MyApp extends StatelessWidget {
- @override
- Widget build(BuildContext context) {
- return MaterialApp(
- title: 'Flutter Web Views',
- theme: ThemeData(
- primarySwatch: Colors.blue,
- fontFamily: "Arial",
- textTheme: TextTheme(
- button: TextStyle(color: Colors.white, fontSize: 18.0),
- title: TextStyle(color: Colors.red))),
- home: Home(),
- );
- }
- }
After you finish copying the main.dart, running the application will show the below output,
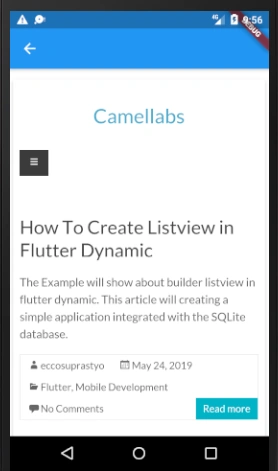
You can see a webview in flutter example in Here.
Thank you for reading this article, I hope it is useful for you. Visit My Github about Flutter Here.
PRAMOD YADAVPosted Mar 10, 2021, 4:54 PM
Thank you so much for these awesome tutorials. I have a problem with HTTP & HTTPS means https://pkbhai.com is working but not http://pkbhai.com. please help me to so that I can use it on HTTP.
Olivia LundyPosted Jun 23, 2020, 5:11 AM
Is it possible to add hyperliink text like "My Web Site" button and how to do it ?
Rushi MehtaPosted Feb 7, 2020, 8:35 AM
Nicely explained..Thanks for sharing