
Introduction
Today, we have numerous Grid Controls used in MVC applications. Here, in this article, I will share with you a new control named jqxTreeGrid that allow us to create Nested Grid with the data provided from the database.
Create Table
You will find the table used in our application, here.
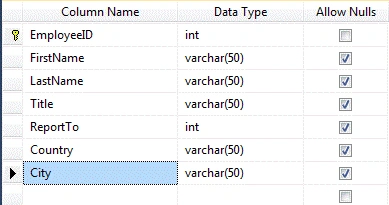
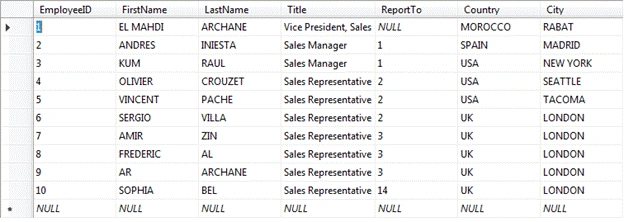
After creating the table, you can fill it using data, as shown below:
Create your MVC application
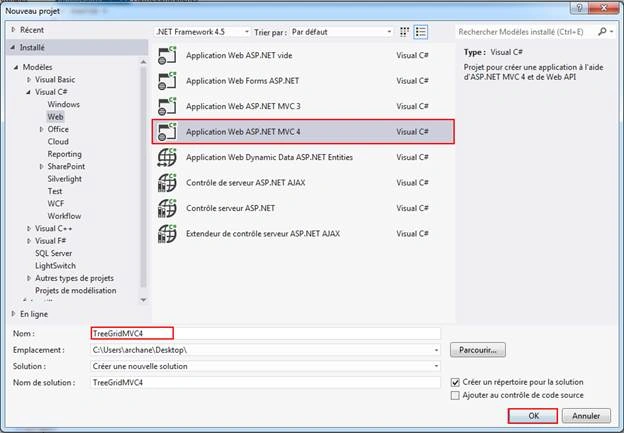
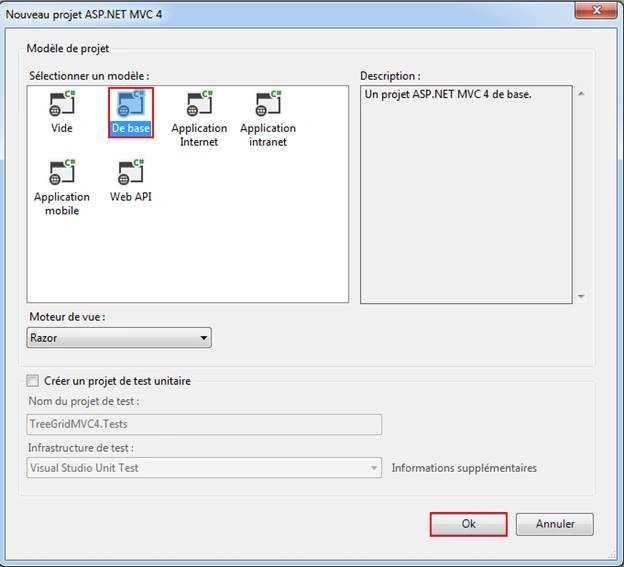
First, open Visual Studio. Then, click on file > New > project and name your project, as follows:
Creating ADO.NET Entity Data Model
You need to follow the necessary steps, as described below, for having the same result.
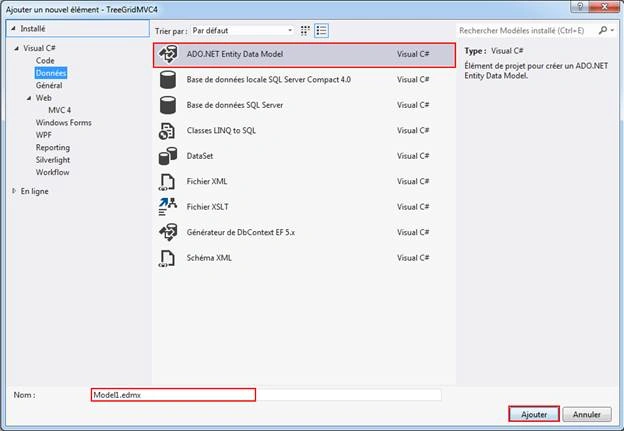
Right click on project name. Then, click Add > Add New Item. In the dialog box displayed, select Data > click on Add button.
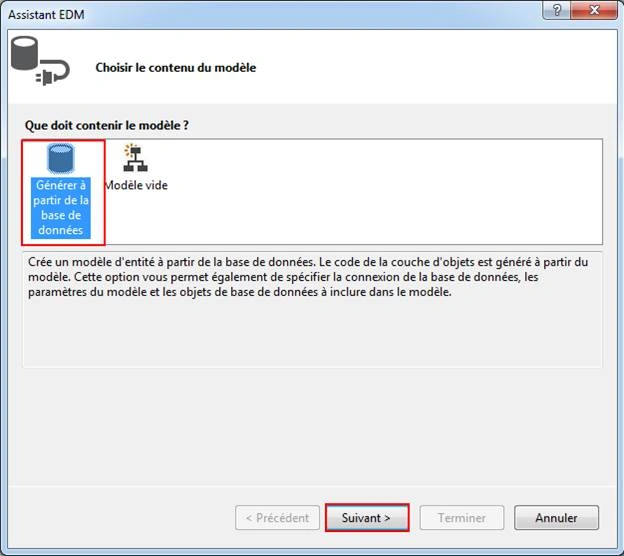
Click on next button. You will have the dialog box, as shown below. You need to choose your server name and select your database. Finally, click on OK.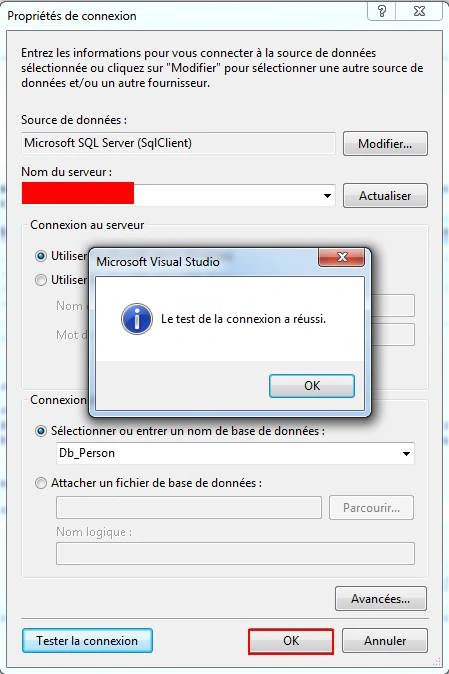
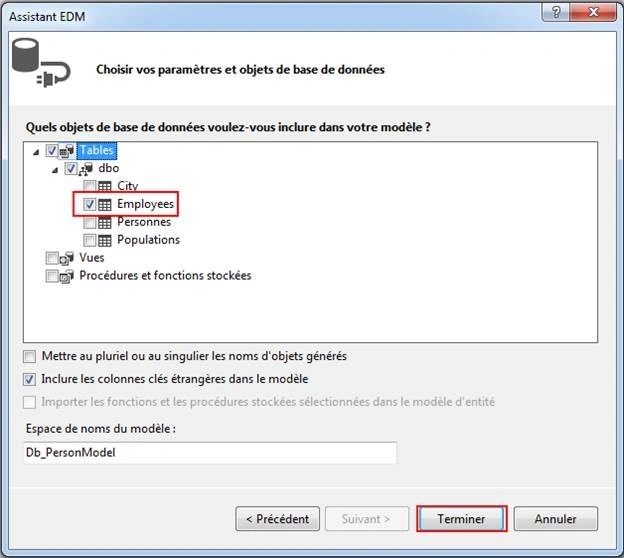
Here, we select the table (in our case, Employees) that we have created and click on finish button.
Finally, we see that the EDMX model will generate Employees class.
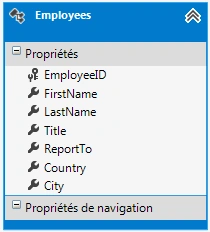
Create a controller
Now, we proceed to create a Controller. Right click on Controller folder > Add > Controller > Enter Controller name (in our case ‘HomeController’).
HomeController.cs
- using System;
- using System.Collections.Generic;
- using System.Linq;
- using System.Web;
- using System.Web.Mvc;
- namespace TreeGridMVC4.Controllers
- {
- public class HomeController : Controller
- {
- // DbContext
- private Db_PersonEntities db = new Db_PersonEntities();
- //
- // GET: /Home/
- public ActionResult Index()
- {
- return View();
- }
- public JsonResult GetEmployees()
- {
- var employees = db.Employees.ToList();
- return Json(employees, JsonRequestBehavior.AllowGet);
- }
- }
- }
Create a strongly typed view
Now, we are going to create a strongly typed view.
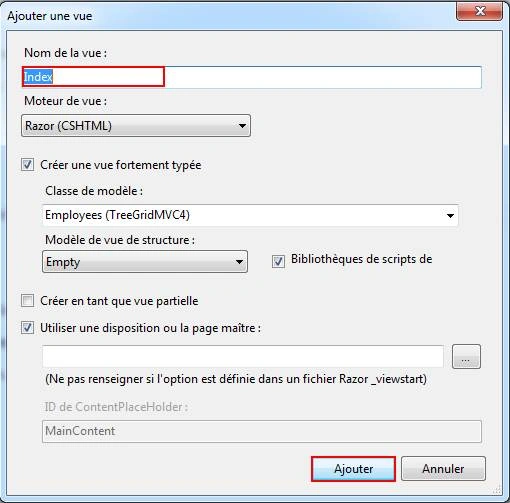
When our view has been created, we need to add some references, first, as shown below:
- <!-- CSS Link -->
- <link rel="stylesheet" href="http://jqwidgets.com/jquery-widgets-demo/jqwidgets/styles/jqx.base.css" type="text/css" />
- <!-- Js Scripts -->
- <script type="text/javascript" src="http://jqwidgets.com/jquery-widgets-demo/scripts/jquery-1.11.1.min.js"></script>
- <script type="text/javascript" src="http://jqwidgets.com/jquery-widgets-demo/jqwidgets/jqxcore.js"></script>
- <script type="text/javascript" src="http://jqwidgets.com/jquery-widgets-demo/jqwidgets/jqxdata.js"></script>
- <script type="text/javascript" src="http://jqwidgets.com/jquery-widgets-demo/jqwidgets/jqxbuttons.js"></script>
- <script type="text/javascript" src="http://jqwidgets.com/jquery-widgets-demo/jqwidgets/jqxscrollbar.js"></script>
- <script type="text/javascript" src="http://jqwidgets.com/jquery-widgets-demo/jqwidgets/jqxdatatable.js"></script>
- <script type="text/javascript" src="http://jqwidgets.com/jquery-widgets-demo/jqwidgets/jqxtreegrid.js"></script>
- jqxTreeGrid implementation
- <script type="text/javascript">
- $(document).ready(function () {
- var source =
- {
- dataType: "json",
- dataFields: [
- { name: 'EmployeeID', type: 'number' },
- { name: 'FirstName', type: 'string' },
- { name: 'LastName', type: 'string' },
- { name: 'Title', type: 'string' },
- { name: 'ReportTo', type: 'number' },
- { name: 'Country', type: 'string' },
- { name: 'City', type: 'string' }
- ],
- hierarchy:
- {
- keyDataField: { name: 'EmployeeID' },
- parentDataField: { name: 'ReportTo' }
- },
- id: 'EmployeeID',
- url: "Home/GetEmployees"
- };
- var dataAdapter = new $.jqx.dataAdapter(source);
- // call jqxTreeGrid
- $("#treeGrid").jqxTreeGrid(
- {
- width: 700,
- source: dataAdapter,
- pageable: true,
- sortable: true,
- ready: function () {
- $("#treeGrid").jqxTreeGrid('expandRow', '2');
- },
- //choose the columns you wish to display on screen
- columns: [
- { text: 'First Name', dataField: 'FirstName', width: 150 },
- { text: 'Last Name', dataField: 'LastName', width: 150 },
- { text: 'Title', dataField: 'Title', width: 200 },
- { text: 'Country', dataField: 'Country', width: 200 }
- ]
- });
- });
- </script>
- Data type: json - to use the data received from action as json format.
- Data Fields: specify all fields that are involved.
- Hierarchy: is an object that has two members’ keyDataField and parentDataField.
- URL: call your action method (Home/GetEmployees).
Note: Set the "keyDataField" and "parentDataField" to point to the data fields in the data source that contain information about the parent-child relationships.
Index.cshtml
- @model IEnumerable<TreeGridMVC4.Employees>
- @{
- ViewBag.Title = "Index";
- }
- @section scripts {
- <!-- CSS Link -->
- <link rel="stylesheet" href="http://jqwidgets.com/jquery-widgets-demo/jqwidgets/styles/jqx.base.css" type="text/css" />
- <!-- Js Scripts -->
- <script type="text/javascript" src="http://jqwidgets.com/jquery-widgets-demo/scripts/jquery-1.11.1.min.js"></script>
- <script type="text/javascript" src="http://jqwidgets.com/jquery-widgets-demo/jqwidgets/jqxcore.js"></script>
- <script type="text/javascript" src="http://jqwidgets.com/jquery-widgets-demo/jqwidgets/jqxdata.js"></script>
- <script type="text/javascript" src="http://jqwidgets.com/jquery-widgets-demo/jqwidgets/jqxbuttons.js"></script>
- <script type="text/javascript" src="http://jqwidgets.com/jquery-widgets-demo/jqwidgets/jqxscrollbar.js"></script>
- <script type="text/javascript" src="http://jqwidgets.com/jquery-widgets-demo/jqwidgets/jqxdatatable.js"></script>
- <script type="text/javascript" src="http://jqwidgets.com/jquery-widgets-demo/jqwidgets/jqxtreegrid.js"></script>
- <script type="text/javascript">
- $(document).ready(function () {
- var source =
- {
- dataType: "json",
- dataFields: [
- { name: 'EmployeeID', type: 'number' },
- { name: 'FirstName', type: 'string' },
- { name: 'LastName', type: 'string' },
- { name: 'Title', type: 'string' },
- { name: 'ReportTo', type: 'number' },
- { name: 'Country', type: 'string' },
- { name: 'City', type: 'string' }
- ],
- hierarchy:
- {
- keyDataField: { name: 'EmployeeID' },
- parentDataField: { name: 'ReportTo' }
- },
- id: 'EmployeeID',
- url: "Home/GetEmployees"
- };
- var dataAdapter = new $.jqx.dataAdapter(source);
- // call jqxTreeGrid
- $("#treeGrid").jqxTreeGrid(
- {
- width: 700,
- source: dataAdapter,
- pageable: true,
- sortable: true,
- ready: function () {
- $("#treeGrid").jqxTreeGrid('expandRow', '2');
- },
- //choose the columns you wish to display on screen
- columns: [
- { text: 'First Name', dataField: 'FirstName', width: 150 },
- { text: 'Last Name', dataField: 'LastName', width: 150 },
- { text: 'Title', dataField: 'Title', width: 200 },
- { text: 'Country', dataField: 'Country', width: 200 }
- ]
- });
- });
- </script>
- }
- <h2>TreeGrid - MVC 4</h2>
- <div id="treeGrid"></div>
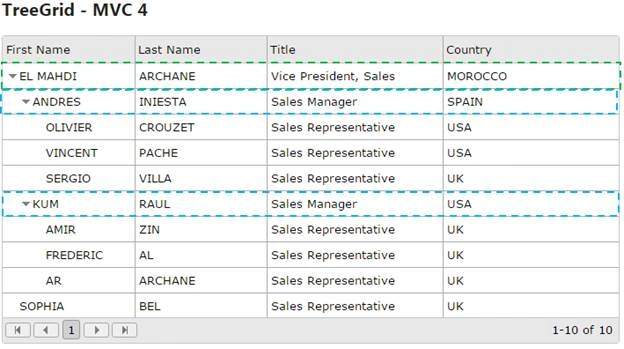
Abhishek AroraPosted Jul 17, 2016, 1:31 PM
Good one. thanks for sharing.
Bhavik PatelPosted Jul 16, 2016, 5:27 AM
Nive
Manas MohapatraPosted Jul 16, 2016, 1:08 AM
Belle rticle
Bhuvanesh MohankumarPosted Jul 15, 2016, 2:05 PM
Good one