

Introduction
In this guide, we'll jump into Azure Storage Accounts, which are like secure digital lockers for storing files and data in the cloud. Just as we keep our valuables safe, Azure Storage Accounts help us safeguard our digital assets online. We'll simplify the process of creating these accounts to make data management easier for everyone.
What is a storage account in Azure?
Imagine you have a lot of digital files - documents, photos, videos, and more - and you want a secure place to store them where you can access them from anywhere. That's where the Azure Storage Account comes in. It's like renting a safe and spacious digital locker in the cloud provided by Microsoft's Azure platform.
Official Definition
According to Microsoft Azure documentation, a Storage Account is defined as follows.
Azure Storage is Microsoft's cloud storage solution for modern data storage scenarios. Azure Storage offers a massively scalable object store for data objects, a file system service for the cloud, a messaging store for reliable messaging, and a NoSQL store. Azure Storage is:
- Durable and highly available: Redundancy ensures that your data is safe in the event of transient hardware failures.
- Secure: All data written to Azure Storage is encrypted by the service.
- Scalable: Azure Storage is designed to be massively scalable to meet the data storage and performance needs of today's applications.
Services provided by Azure storage account
- Blob Storage: Azure Blob Storage is optimized for storing massive amounts of unstructured data like documents, images, videos, and logs. It's suitable for serving content directly to web browsers or as storage for files and data.
- File Storage: Azure File Storage offers fully managed file shares in the cloud that can be accessed via the industry-standard SMB protocol. It's like having a network file share in the cloud, making it easy to migrate legacy applications to Azure or to share files across multiple virtual machines.
- Queue Storage: Azure Queue Storage provides a reliable message queuing solution for asynchronous communication between application components. It's commonly used to decouple different parts of an application, making them more scalable and resilient.
- Table Storage: Azure Table Storage is a NoSQL data store that provides key/attribute storage with a schema-less design. It's suitable for storing structured data sets and is often used for storing semi-structured data like logs, metrics, and telemetry.
- Disk Storage: Azure Disk Storage provides scalable and highly available block storage for virtual machines and applications running in Azure. It offers both Premium and Standard SSD disks to meet different performance and cost requirements.
- Azure Data Lake Storage: Azure Data Lake Storage is a scalable and secure data lake solution for big data analytics. It's optimized for high-performance analytics and provides features like fine-grained access control, hierarchical namespace, and integration with Azure services like Azure Databricks and Azure Synapse Analytics.
How to create a storage account?
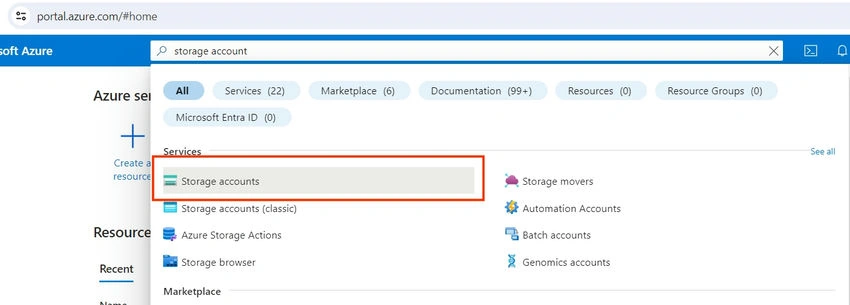
Step 1. Open your Azure Portal and search for Storage Account.
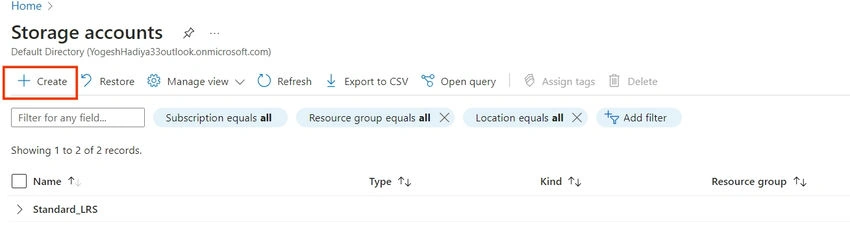
Step 2. Click on the Create button to create a new storage account.
Step 3. Basic Details
In this tab, you have to provide basic details of your storage account which are below.
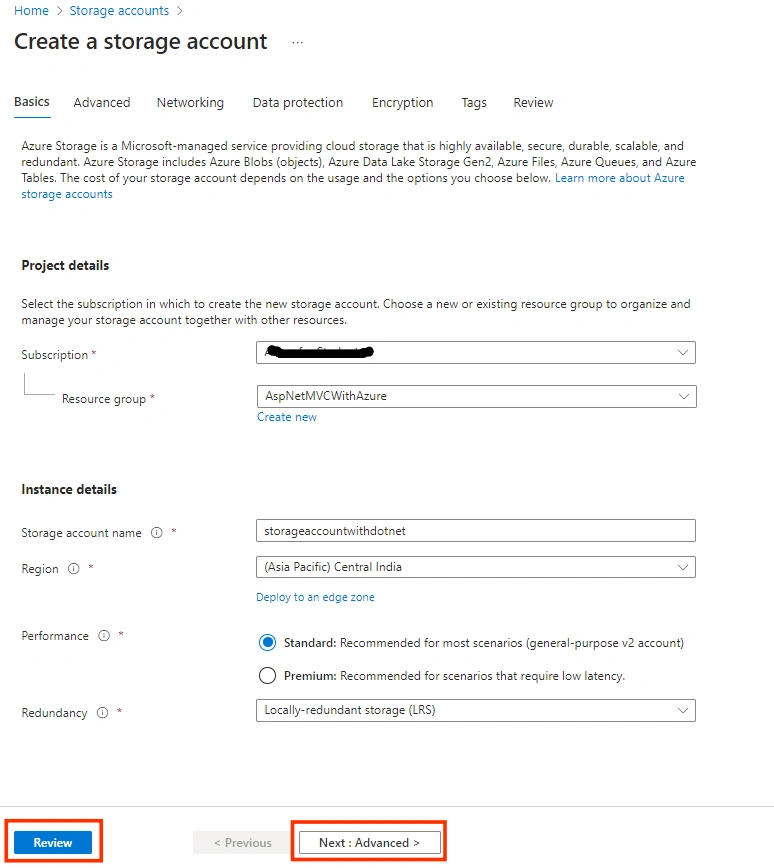
- Subscription: Choose your subscription from the drop-down. If you have more than one subscription you have to choose the right one. Otherwise, If you have only one subscription it will selected by default.
- Resource Group: Select your existing resource group or create a new one for this resource. It is just a group where you can manage multiple resources so you can apply common policies to all of them.
- Storage Account Name: Provide the name of your storage account. This name will also show in your storage account endpoint URL.
- Region: Select a region according to your requirements. Choose the nearest region of your app traffic. For example, if all of your traffic comes from India then choose any region of India which reduces the response time of the user’s request.
- Performance: Select performance options out of standard and premium. Standard is used for general operations which not require high-end configurations like blob, queue, etc.
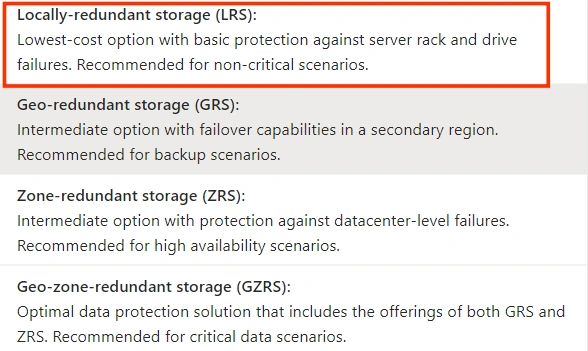
- Redundancy: The data in your Azure storage account is always replicated to ensure durability and high availability. Choose a replication strategy that matches your durability requirements. There are mainly four main types of replication which are shown in the below image. Choose according to your requirements.
If you want to configure other settings also you can go to the next steps otherwise you can directly go to the review page where you can review your default settings and create a storage account.
Step 4. Advance Details
In this tab, you have to provide some advanced details/configuration of your storage account which are as below.
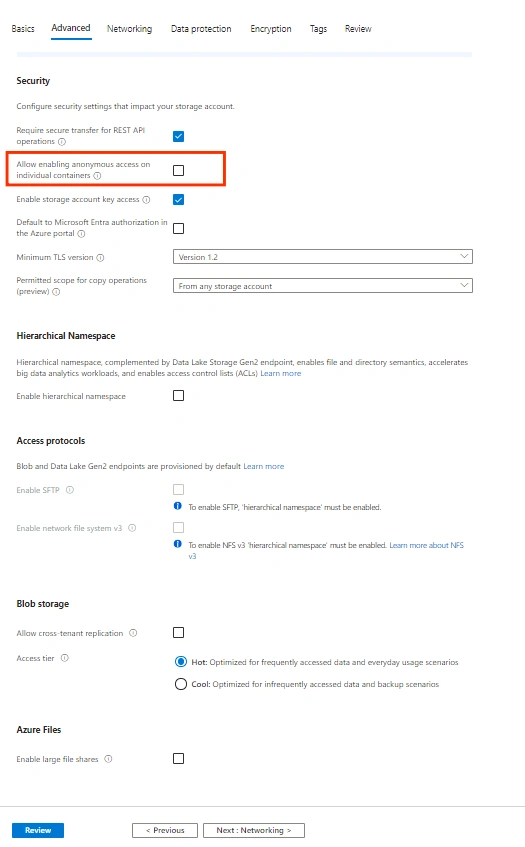
- Require secure transfer for REST API operations: This setting mandates SSL/TLS encryption for all REST API interactions, ensuring data security during communication.
- Allow enabling anonymous access on individual containers: It enables selective anonymous access to designated containers within the storage account, facilitating public access scenarios while maintaining control over data visibility. This configuration needs to be enabled if you want to store the blob in your storage account.
- Enable storage account key access: This option enables access to the storage account using access keys, which serve as primary or secondary authentication credentials.
- Default to Microsoft Entra authorization in the Azure portal: By default, it configures Microsoft Entra as the primary authentication method within the Azure portal, ensuring standardized access control.
- Minimum TLS version: Sets the lowest acceptable TLS version for secure communication, enhancing security compliance and protocol standards.
- Permitted scope for copy operations (preview): Defines the permissible scope for copy operations within the storage account, allowing fine-grained control over data replication.
- Enable hierarchical namespace: Activation of hierarchical namespace enables structured file and directory management within Azure Blob Storage, promoting efficient data organization and accessibility.
- Enable SFTP: Activation of SFTP enables the Secure File Transfer Protocol for secure and encrypted file transfers, enhancing data security during transit.
- Enable network file system v3: Activation of NFS v3 enables the Network File System version 3 for file sharing, providing compatibility with NFS-based applications and environments.
- Allow cross-tenant replication: Allows replication of data across tenants, ensuring data redundancy and disaster recovery capabilities across diverse organizational boundaries.
- Access tier: Selection between Hot and Cool access tiers defines the storage performance and cost characteristics, aligning with the frequency of data access patterns.
- Enable large file shares: Authorization to create large file shares up to 100 TiB accommodates large-scale storage requirements and facilitates efficient management of extensive file datasets within Azure Files.
Step 5. Networking Details
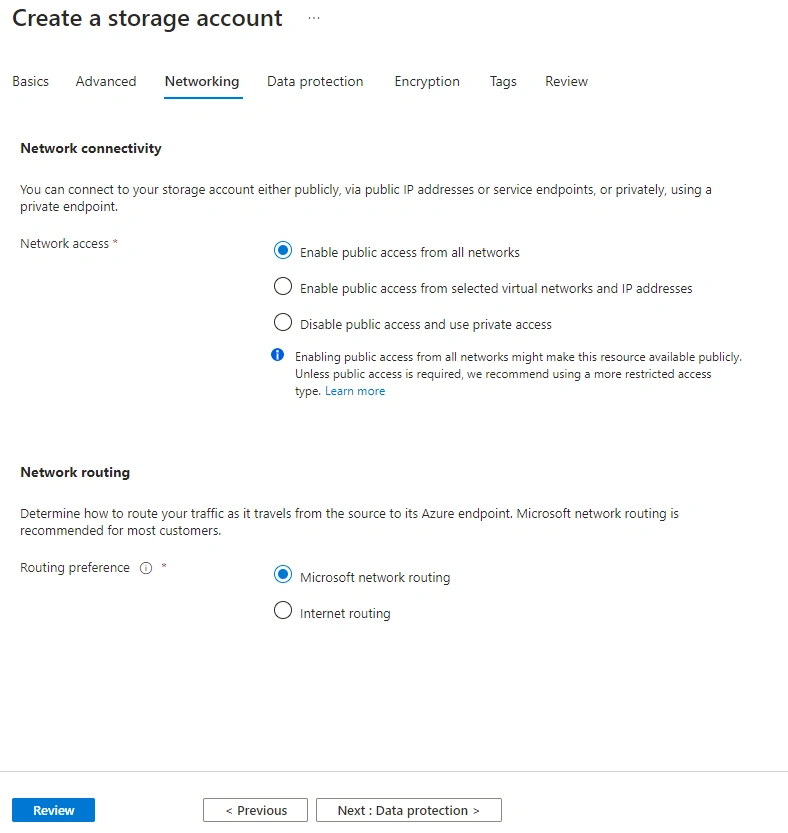
In this tab, you have to define the network configuration of your storage account. These are as follows.
- Network Access: Determines if the storage account is accessible from all networks.
- Routing Preference: Allows choosing the preferred routing method for network traffic. Options usually include "Microsoft network routing" or "Internet routing", with Microsoft network routing generally recommended for reliability and optimized performance.
Step 6. Data Protection
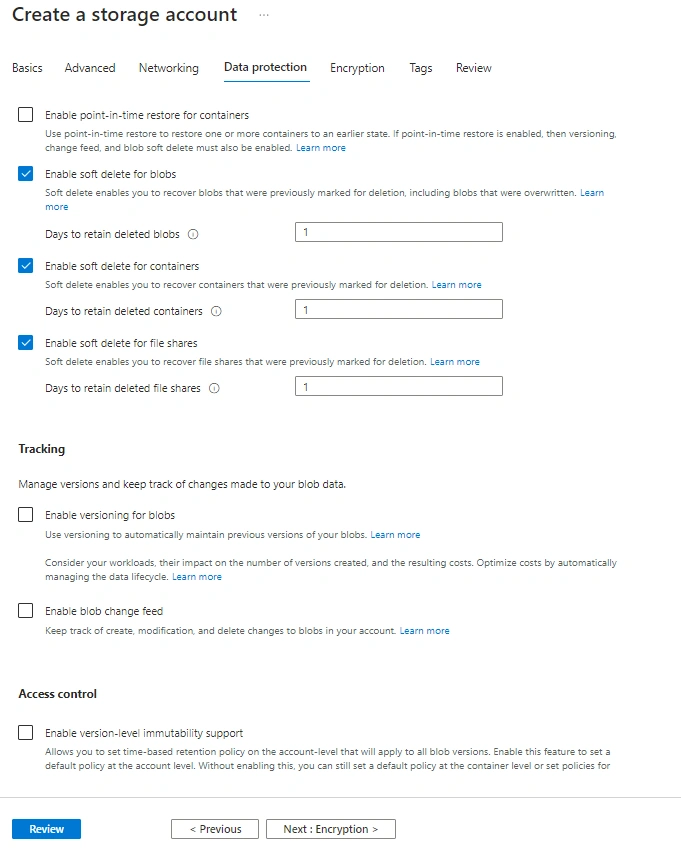
The Data Protection enables data recovery and tracking features to safeguard your storage. Following is the configuration of this tab.
- Enable point-in-time restore for containers: This allows you to go back to an earlier state of your containers, kind of like a "time machine" for your storage. However, to use this feature, you need to enable versioning, change feed, and blob soft delete.
- Enable soft delete for blobs: Think of this like a recycle bin for your blobs. When you delete a blob, it's not permanently gone right away. You can recover it within a certain period, which you can set here.
- Enable soft delete for containers: Similar to blobs, this allows you to recover containers you've deleted for a certain period of time. It's like having a safety net in case you accidentally delete a container.
- Enable soft delete for file shares: Just like blobs and containers, this feature gives you the ability to recover file shares you've deleted within a specified time frame.
- Enable versioning for blobs: Versioning keeps track of changes made to your blobs over time. It's like having a history of your blob's changes, which can be useful for tracking and reverting to previous versions if needed.
- Enable blob change feed: This feature lets you keep tabs on any changes made to your blobs, including creations, modifications, and deletions. It's a way to stay informed about what's happening with your data.
- Enable version-level immutability support: Immutability means your blob versions can't be changed or deleted for a specified period, ensuring data integrity. This feature lets you set time-based retention policies for your blob versions, ensuring they remain unchanged for as long as needed.
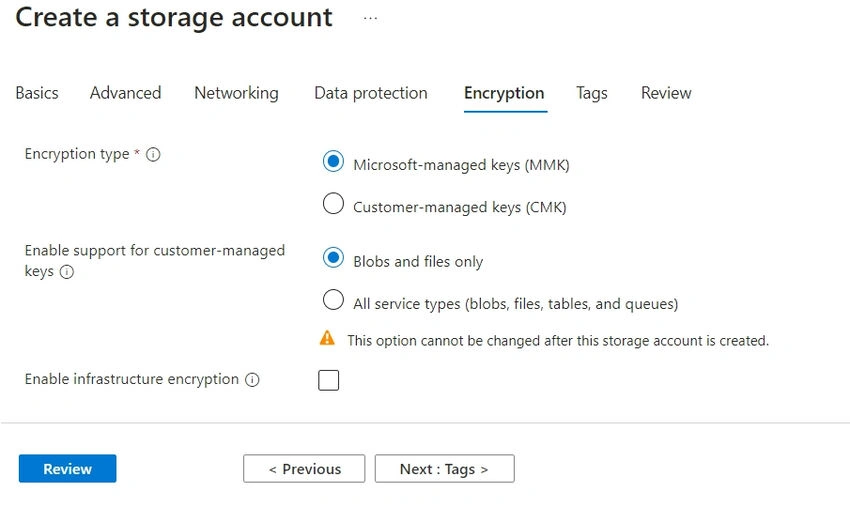
Step 7. Encryption
In this tab, you can configure the encryption of your storage account.
Step 8. Tags
Tags are name/value pairs that enable you to categorize resources and view consolidated billing by applying the same tag to multiple resources and resource groups.
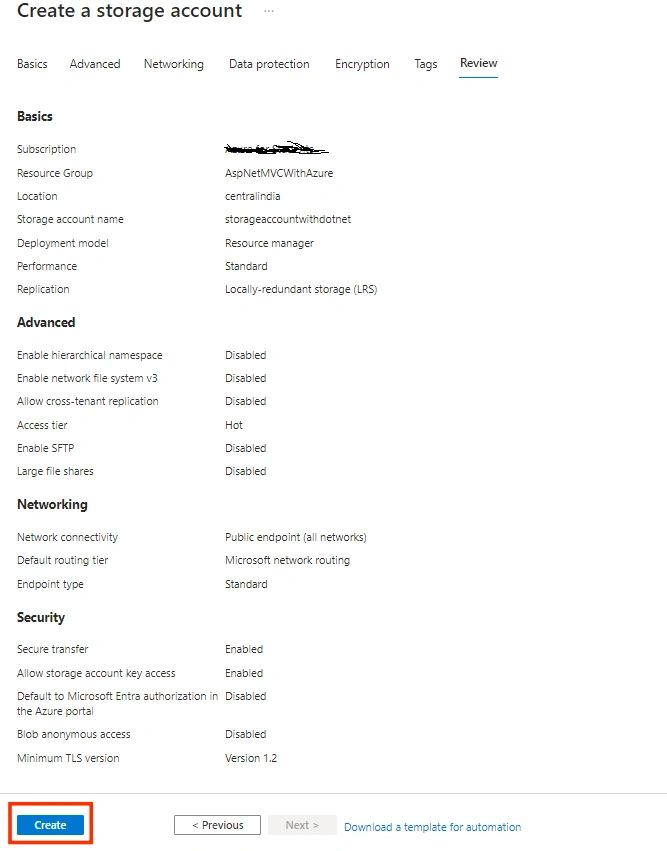
Step 9. Review
In the review tab, you can review all the default or changed configurations that you enable/disable for your storage account. Review all the configurations and if all is good then click on the Create button to create a storage account.
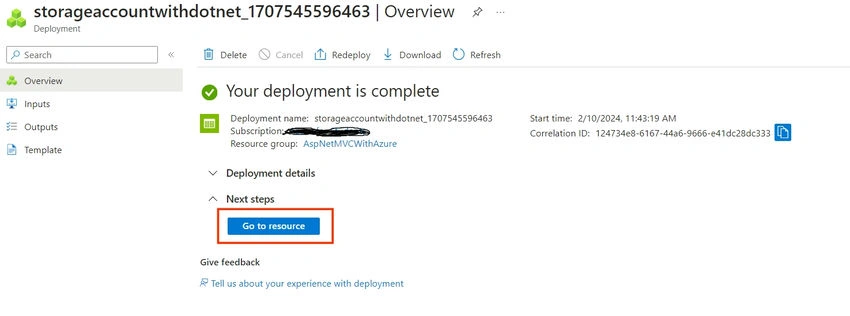
Step 10. It will take some time to set up your storage account. Once it is configured you can go to your storage account by clicking on the Go to Resource button. You can also find this in the storage account from the dashboard.
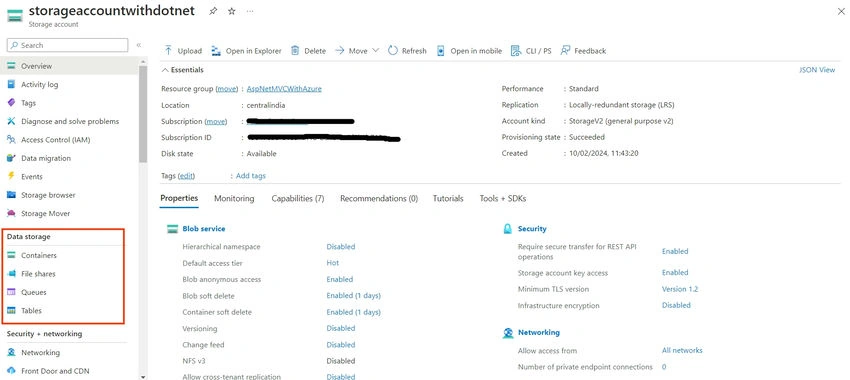
You can now create and access all the services provided by storage accounts like Blob Storage, File Storage, Table Storage, Service Queues, etc.
Join the conversation! Your thoughts help the community grow.