

We know that testing is an essential part of any development process. Prior to every release of a software project/product, it is mandatory to test it end to end and make sure that everything is working as expected. So, Smoke and Regression tests are standards for every new version of a software project/product. Imagine how many resources' efforts are required each time we release a new software project/product. We can reduce resource count and time by automating the process instead of doing it manually, at the times when we plan for a new release of a project/product.
In this article, I am going to show you:
- What is Selenium?
- How Selenium helps you automate your software project/product testing.
- Selenium setup and configuration process.
- Writing sample automation test cases.
- Test the written test cases.
What is Selenium?
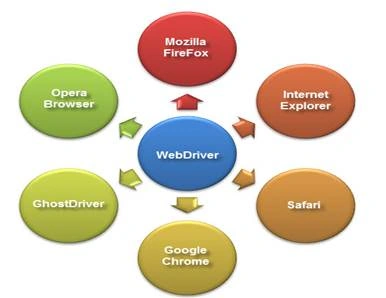
- .NET
- Java
- PHP
- Python
- Perl
- Ruby etc.
Now, let's understand the list of tools used in Selenium test cases and their usages.
Selenium IDE: Selenium IDE is a tool that facilitates testers to write and test their Selenium test cases.
Selenium RC: It is a tool that facilitates you to write Selenium automated test cases for web applications irrespective of any programming language and any HTTP websites for the JavaScript-enabled browsers.
Selenium WebDriver: It makes direct calls to the web browser and retrieves results.
Selenium Grid: It allows you to run your test cases across different browsers in different machines, simultaneously.
Advantages of Selenium Test:
- Open-source.
- Can be extended with various technologies that expose DOM.
- Can execute scripts across multiple browsers.
- It supports multiple OS platforms.
- It is compatible with mobile devices too.
- Test executes within the browsers, so focus is not needed while executing the script.
- Using Selenium Grids, you can execute tests in parallel.
- Web Driver is faster than Selenium RC because it has simpler architecture.
- Web Driver directly talks to the web browser whereas Selenium RC needs the help of the RC Server in order to do the same.
Disadvantages of Selenium Test:
- It supports only web-based apps.
- It does not provide any facility for Object Repository.
- It does not provide any facility for Recovery Scenario.
- QTP is still dominating Selenium.
- There is no report generation for test methods by default.
- Users need to depend on a programming language for parameterization.
- It can't readily support new browsers but Selenium RC supports.
How to Install Selenium Webdriver:
Before going to write automation of Selenium test cases, first we have to set up the infrastructure.
In the Visual Studio tool, create a sample test project and integrate Selenium WebDriver in C#.
Step 1: Open Visual Studio.
Step 2: Click on Create a new project, select a Test project from the right panel, and then select the Unit Test Project.
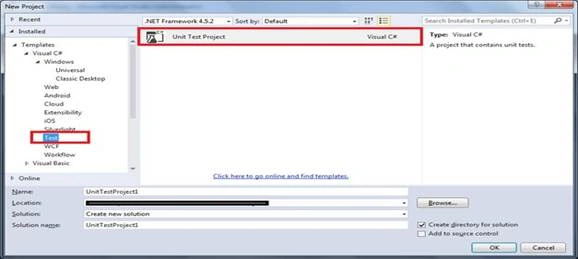 Step 3: Add Selenium references or drivers into the newly created Unit Test C# project.
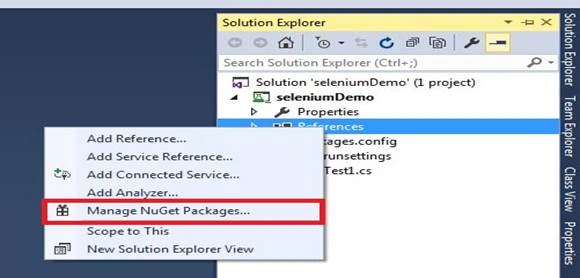
- First, open Solution Explorer.
- Then, expand the Project.
- Right-click on References and select the Manage NuGet Packages option.
- Search for Selenium WebDriver.
- Select Selenium WebDriver.
- Click on Install.
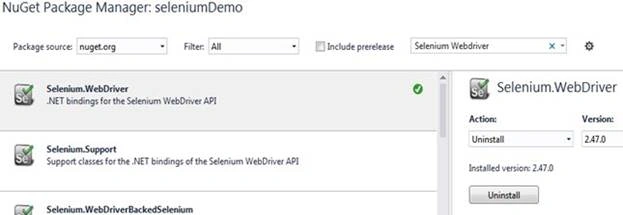
For reference, find the below screenshots:
Screenshot-1,
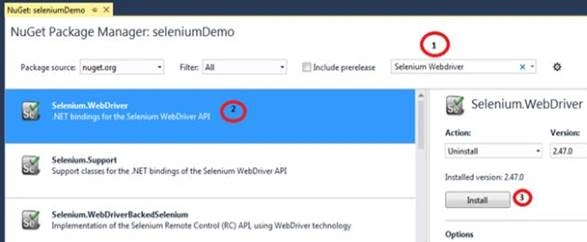 After successfully installing the WebDriver, you can see the below screenshot:
Screenshot-2:
After successfully installing the WebDriver, you can see the below screenshot:
Screenshot-2:
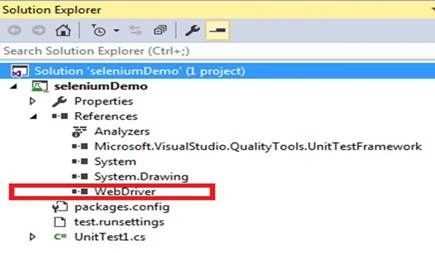
 And in the references section, you can see the highlighted below:
 Now, open the UnitTest1.cs (if you want you can rename the file name) file to start actual coding for automating the test cases for your C# Web application.
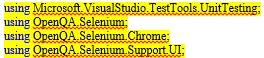 The above references can provide all classes and properties required to integrate the Selenium WebDriver.
How to Install Chrome Driver in your Web App?
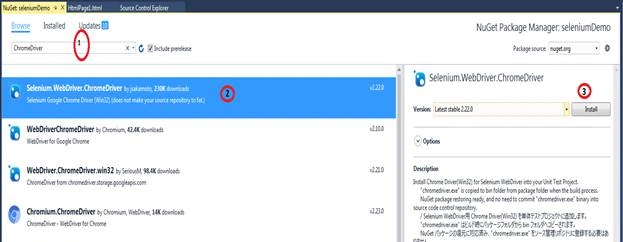
Follow the below steps to add ChromeDriver into the web application C# project.
The above references can provide all classes and properties required to integrate the Selenium WebDriver.
How to Install Chrome Driver in your Web App?
Follow the below steps to add ChromeDriver into the web application C# project.
- Firstly, open the 'Solution Explorer'.
- Then, expand the 'Project'.
- Right-click on References and select the 'Manage NuGet Packages' option.
- Search 'ChromeDriver'.
- Select 'ChromeDriver'.
- Click on 'Install'.
Screenshot-1,
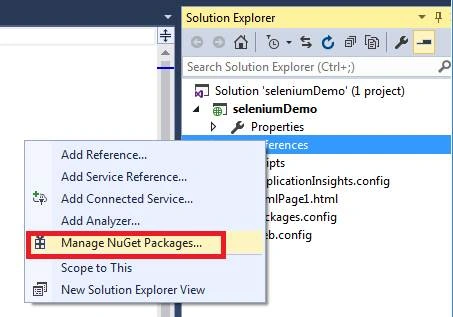 Screenshot-2,
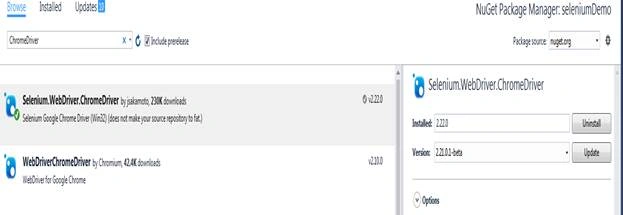
 After successfully installed ChromeDriver, for reference you can see the below screenshot:
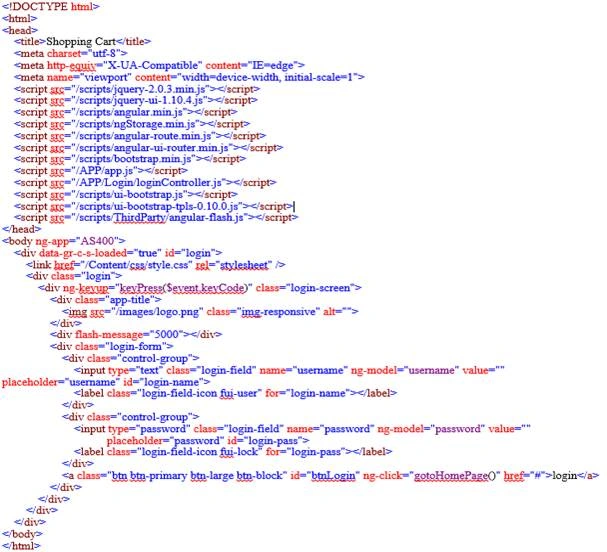
 Now, to write the Selenium test cases, we need a web page. Let's take the below sample code for your webpage to write Selenium test cases:
Example: Login.html
Now, to write the Selenium test cases, we need a web page. Let's take the below sample code for your webpage to write Selenium test cases:
Example: Login.html
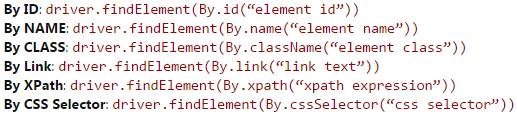
 Before start writing test methods, we have to understand the below elements and their usages:
- By Id
Finds the Webpage element by its unique control id.
- By Name
Finds the Webpage element by the control name.
- By Class
Finds the Webpage element by the Class name.
- By LinkText
Finds the link element by its exact text it displays
- By partialLinkText
Finds webpage element that contains the given text
- By TagName
Finds the Webpage element by the Tag name.
- By XPath
This is most popular and majorly used for locating webpage element in a easiest way.
- By CSS selector
Finds Webpage element by the CSS selectorEx:
 For more details, you can go through this link.
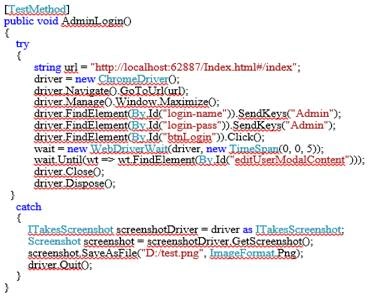
Now, it's time to write Selenium Test cases for the above login page:
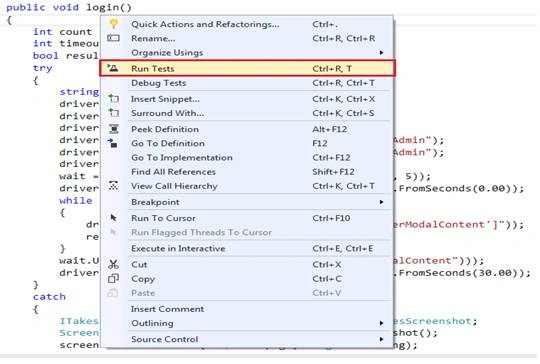
 Now, to run the written Test method, right-click on the Test method and click on Run Tests or Debug Tests options, as shown below:
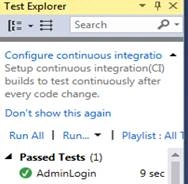
 If the test method runs successfully without any error, then you will get Passed Tests in your left panel of Visual Studio (Test Explorer), as shown below:
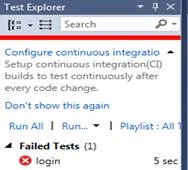
 If the Test method fails with errors, then you will get Failed Tests in your left panel of Visual Studio (Test Explorer), as shown below:
Joseph DonnellyPosted May 8, 2021, 1:12 AM
Hi Santosh, can you provide the Visual Studio solution on Github? Thanks So Much Santosh, Joe
Devendra PathakPosted Sep 4, 2018, 3:23 AM
You said that Selenium also works with mobile environment. i wish to know if a mobile application is possible which uses Selenium and chromedriver?
Amiet ShiravadekarPosted Aug 14, 2018, 3:57 AM
I really like the way you have written the article of automation testing.The SQL is also important to do the automation testing so that the following article is also good to learn SQL testing interview questions: http://www.complexsql.com/sql-interview-questions-for-testersYou may like this article..Keep writing such a beautiful articles... APPRECIATED!!!!!!
ARJUN GULATIPosted Oct 3, 2017, 8:37 AM
Please provide more example of test cases
Anu VPosted Aug 23, 2016, 12:37 AM
Nice..
kaveri teraPosted Aug 16, 2016, 1:27 AM
Nice very clear