

Introduction
This article will explain the role-based authentication in ASP.NET MVC, with examples. I strongly recommended reading my previous articles before proceeding to this article as it is a continuation part of my previous article.
- Authentication And Authorization In Asp.Net MVC
- Authorization Filter In Asp.Net MVC
- Forms Authentication In ASP.Net MVC
Step 1
Open your favourite SQL Server database with any version. It really doesn’t matter what version it is. Create the following database data tables.
- create table Employee
- (
- EmpId int primary key identity (1,1),
- Name nvarchar(50),
- Gender char(10),
- Age int,
- Position nvarchar(50),
- Office nvarchar(50),
- HireDate datetime,
- Salary int,
- DepartmentId int
- )
- create table Department
- (
- DeptId int primary key identity(1,1),
- DepartmentName nvarchar(50)
- )
- create table Users
- (
- Id int primary key identity(1,1),
- Username nvarchar(50),
- Password nvarchar(50)
- )
- create table Roles
- (
- Id int primary key identity(1,1),
- RoleName nvarchar(50)
- )
- create table UserRoleMapping
- (
- Id int primary key identity(1,1),
- UserId int,
- RoleId int
- )
- alter table Employee Add foreign key
- (DepartmentId) references Department(DeptId)
- alter table UserRoleMapping Add foreign key(UserId)
- references Users(Id)
- alter table UserRoleMapping Add foreign key(RoleId)
- references Roles(id)
Step 2
Open Visual Studio 2015 or an editor of your choice and create a new project.
Step 3
Choose "web application" project and give an appropriate name to your project.
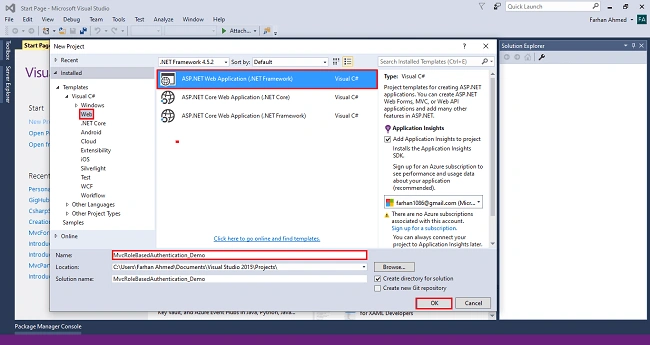
Step 4
Select "empty" template, check on the MVC box, and click OK.
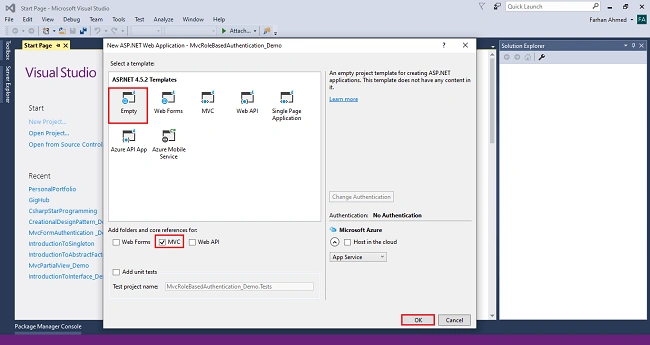
Step 5
Right-click on the Models folder and add a database model. Add Entity Framework now. For that, right-click on Models folder, select Add, then select New Item.
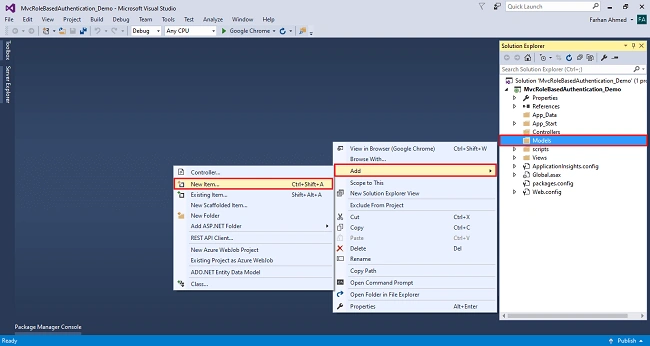
You will get a window; from there, select Data from the left panel and choose ADO.NET Entity Data Model, give it the name EmployeeModel (this name is not mandatory, you can give any name) and click "Add".
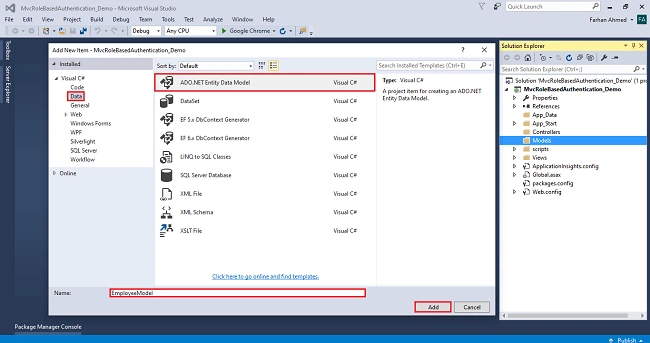
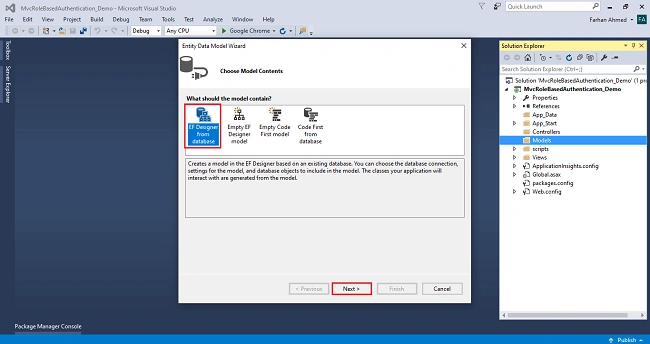
After you click on "Add a window", the wizard will open. Choose EF Designer from the database and click "Next".
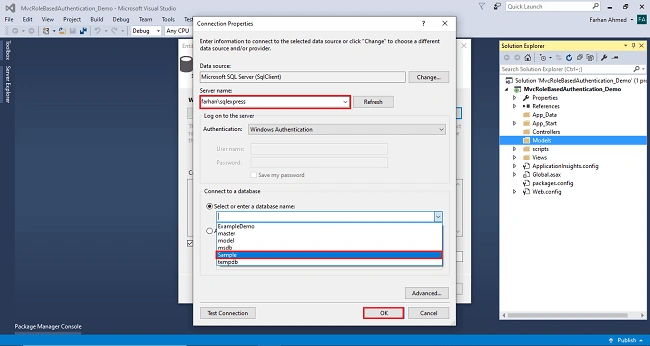
After clicking on "Next", a window will appear. Choose New Connection. Another window will appear. Add your server name - if it is local, then enter a dot (.). Choose your database and click "OK".
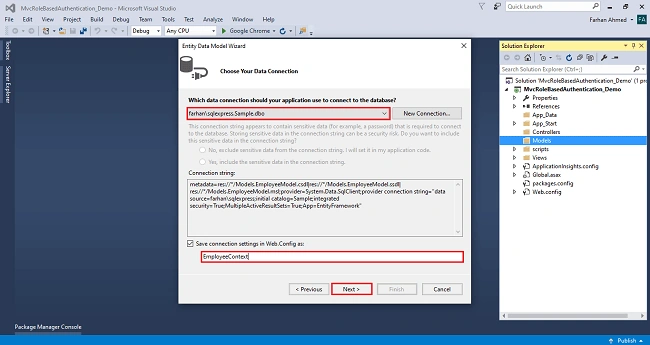
The connection will be added. If you wish, save the connection name as you want. You can change the name of your connection below. It will save the connection in the web config. Now, click "Next".
After clicking on NEXT, another window will appear. Choose the database table name as shown in the below screenshot and click "Finish".
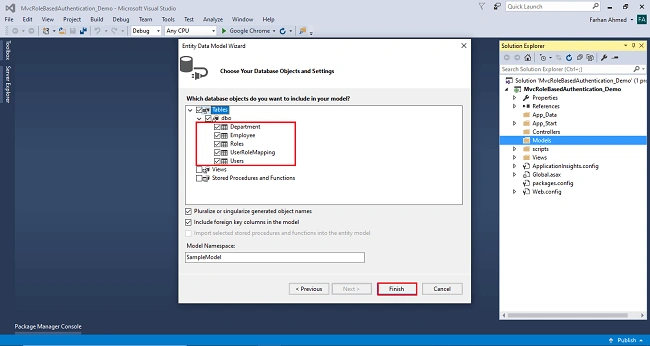
Entity Framework gets added and the respective class gets generated under the Models folder.
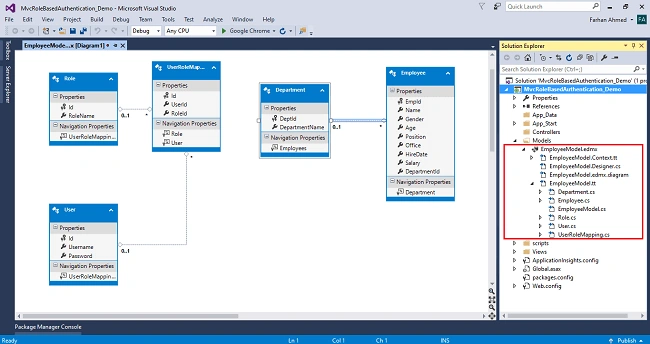
Step 6
Right-click on Controllers folder and add a controller.
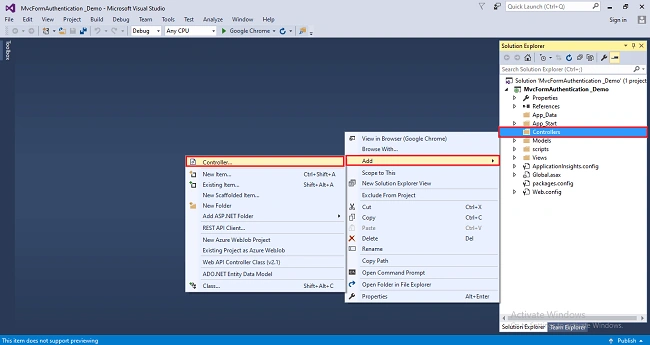
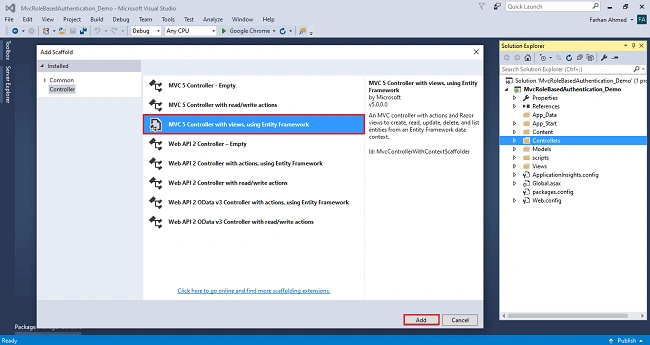
A window will appear. Choose MVC5 Controller with views, using Entity Framework and click "Add".
After clicking on "Add", another window will appear. Choose Model Class and data context class and click "Add". The EmployeesController will be added under the Controllers folder with respective views.
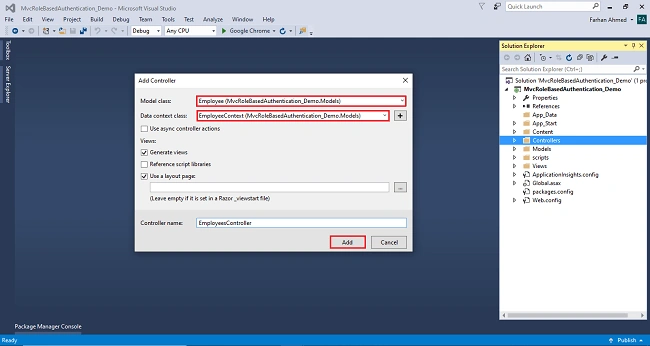
Modify Employees Controller Code
- using MvcRoleBasedAuthentication_Demo.Models;
- using System.Data.Entity;
- using System.Linq;
- using System.Net;
- using System.Web.Mvc;
- namespace MvcRoleBasedAuthentication_Demo.Controllers
- {
- public class EmployeesController : Controller
- {
- private EmployeeContext db = new EmployeeContext();
- [Authorize(Roles ="Admin,Employee")]
- public ActionResult Index()
- {
- var employees = db.Employees.Include(e => e.Department);
- return View(employees.ToList());
- }
- [Authorize(Roles = "Admin,Employee")]
- public ActionResult Details(int? id)
- {
- if (id == null)
- {
- return new HttpStatusCodeResult(HttpStatusCode.BadRequest);
- }
- Employee employee = db.Employees.Find(id);
- if (employee == null)
- {
- return HttpNotFound();
- }
- return View(employee);
- }
- [Authorize(Roles = "Employee")]
- public ActionResult Create()
- {
- ViewBag.DepartmentId = new SelectList(db.Departments, "DeptId", "DepartmentName");
- return View();
- }
- [Authorize(Roles = "Employee")]
- [HttpPost]
- [ValidateAntiForgeryToken]
- public ActionResult Create([Bind(Include = "EmpId,Name,Gender,Age,Position,Office,HireDate,Salary,DepartmentId")] Employee employee)
- {
- if (ModelState.IsValid)
- {
- db.Employees.Add(employee);
- db.SaveChanges();
- return RedirectToAction("Index");
- }
- ViewBag.DepartmentId = new SelectList(db.Departments, "DeptId", "DepartmentName", employee.DepartmentId);
- return View(employee);
- }
- [Authorize(Roles = "Employee")]
- public ActionResult Edit(int? id)
- {
- if (id == null)
- {
- return new HttpStatusCodeResult(HttpStatusCode.BadRequest);
- }
- Employee employee = db.Employees.Find(id);
- if (employee == null)
- {
- return HttpNotFound();
- }
- ViewBag.DepartmentId = new SelectList(db.Departments, "DeptId", "DepartmentName", employee.DepartmentId);
- return View(employee);
- }
- [Authorize(Roles = "Employee")]
- [HttpPost]
- [ValidateAntiForgeryToken]
- public ActionResult Edit([Bind(Include = "EmpId,Name,Gender,Age,Position,Office,HireDate,Salary,DepartmentId")] Employee employee)
- {
- if (ModelState.IsValid)
- {
- db.Entry(employee).State = EntityState.Modified;
- db.SaveChanges();
- return RedirectToAction("Index");
- }
- ViewBag.DepartmentId = new SelectList(db.Departments, "DeptId", "DepartmentName", employee.DepartmentId);
- return View(employee);
- }
- [Authorize(Roles = "Admin,Employee")]
- public ActionResult Delete(int? id)
- {
- if (id == null)
- {
- return new HttpStatusCodeResult(HttpStatusCode.BadRequest);
- }
- Employee employee = db.Employees.Find(id);
- if (employee == null)
- {
- return HttpNotFound();
- }
- return View(employee);
- }
- [Authorize(Roles = "Admin,Employee")]
- [HttpPost, ActionName("Delete")]
- [ValidateAntiForgeryToken]
- public ActionResult DeleteConfirmed(int id)
- {
- Employee employee = db.Employees.Find(id);
- db.Employees.Remove(employee);
- db.SaveChanges();
- return RedirectToAction("Index");
- }
- protected override void Dispose(bool disposing)
- {
- if (disposing)
- {
- db.Dispose();
- }
- base.Dispose(disposing);
- }
- }
- }
Step 6
Right click on Models folder and create a UserRoleProvider class,
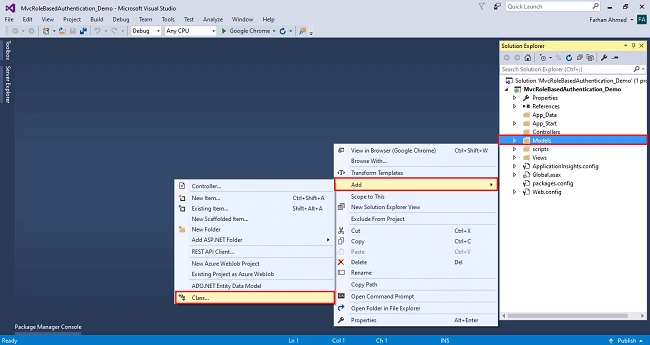
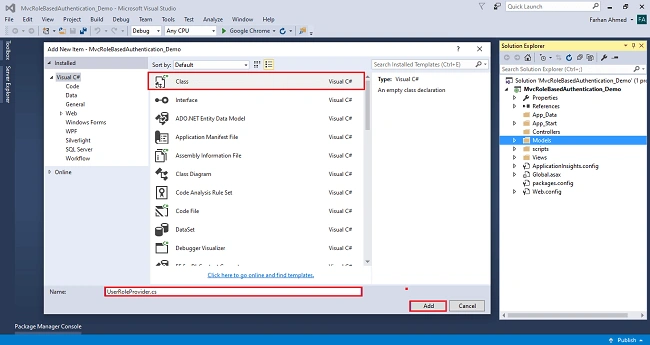
UserRoleProvider Class
- using System;
- using System.Linq;
- using System.Web.Security;
- namespace MvcRoleBasedAuthentication_Demo.Models
- {
- public class UserRoleProvider : RoleProvider
- {
- public override string ApplicationName
- {
- get
- {
- throw new NotImplementedException();
- }
- set
- {
- throw new NotImplementedException();
- }
- }
- public override void AddUsersToRoles(string[] usernames, string[] roleNames)
- {
- throw new NotImplementedException();
- }
- public override void CreateRole(string roleName)
- {
- throw new NotImplementedException();
- }
- public override bool DeleteRole(string roleName, bool throwOnPopulatedRole)
- {
- throw new NotImplementedException();
- }
- public override string[] FindUsersInRole(string roleName, string usernameToMatch)
- {
- throw new NotImplementedException();
- }
- public override string[] GetAllRoles()
- {
- throw new NotImplementedException();
- }
- public override string[] GetRolesForUser(string username)
- {
- using (EmployeeContext _Context=new EmployeeContext())
- {
- var userRoles = (from user in _Context.Users
- join roleMapping in _Context.UserRoleMappings
- on user.Id equals roleMapping.UserId
- join role in _Context.Roles
- on roleMapping.RoleId equals role.Id
- where user.Username == username
- select role.RoleName).ToArray();
- return userRoles;
- }
- }
- public override string[] GetUsersInRole(string roleName)
- {
- throw new NotImplementedException();
- }
- public override bool IsUserInRole(string username, string roleName)
- {
- throw new NotImplementedException();
- }
- public override void RemoveUsersFromRoles(string[] usernames, string[] roleNames)
- {
- throw new NotImplementedException();
- }
- public override bool RoleExists(string roleName)
- {
- throw new NotImplementedException();
- }
- }
- }
Step 7
Open web config file and write the following code.
- <authentication mode="Forms">
- <forms loginUrl="Account/Login"></forms>
- </authentication>
- <roleManager defaultProvider="userRoleProvider" enabled="true">
- <providers>
- <clear/>
- <add name="userRoleProvider" type="MvcRoleBasedAuthentication_Demo.Models.UserRoleProvider"/>
- </providers>
- </roleManager>
Step 8
Open _Layout.cshtml file which under views folder in shared folder.
- <nav class="navbar navbar-expand-md bg-dark navbar-dark">
- <a class="navbar-brand" href="#">
- @Html.ActionLink("Application name", "Index", "Home", new { area = "" }, new { @class = "navbar-brand" })
- </a>
- <button class="navbar-toggler" type="button" data-toggle="collapse" data-target="#collapsibleNavbar">
- <span class="navbar-toggler-icon"></span>
- </button>
- <div class="collapse navbar-collapse" id="collapsibleNavbar">
- <ul class="navbar-nav">
- @if (User.Identity.IsAuthenticated)
- {
- <li class="nav-item">
- @Html.ActionLink("List", "Index", "Employees", new { @class = "nav-link" })
- </li>
- <li class="nav-item">
- @Html.ActionLink("Add New", "Create", "Employees", new { @class = "nav-link" })
- </li>
- <li class="nav-item">
- @Html.ActionLink("Hello ->" + @User.Identity.Name, "", "", new { @class = "nav-link" })
- </li>
- <li class="nav-item">
- @Html.ActionLink("Logout", "Logout", "Account", new { @class = "nav-link" })
- </li>
- }
- else
- {
- <li class="nav-item">
- @Html.ActionLink("Login", "Login", "Account", new { @class = "nav-link" })
- </li>
- }
- </ul>
- </div>
- </nav>
harshilPosted Nov 27, 2023, 11:58 AM
Error HRESULT E_FAIL has been returned from a call to a COM component.
Shashank HeroPosted Oct 21, 2021, 2:53 PM
Where to write authentication part in web.config?
Ausaja AliPosted Oct 6, 2021, 8:06 AM
Can anyone please do the above same program without using entity frame work I am working on a project in which i am not allowed to use entity frame work so please tell me how to write all of the above without entity framework
dinesh kumarPosted Apr 6, 2021, 5:22 AM
How to use GetRolesForUser function, pls explain?
Shahbaz HussainPosted Mar 24, 2021, 11:05 AM
Good Job. It's helpful.
Najmul IslamPosted Nov 23, 2019, 11:59 PM
How to use RoleExists(string roleName) condition when admin create account for employee
Anthony HuangPosted Nov 21, 2019, 11:15 AM
Nice article,thanks. I followed your steps, but where can I find this object, EmployeeContext, it does not exists.
Masthan BPosted Oct 31, 2019, 7:12 AM
hello Farhan nice article, Where is AccountController development. can you please update it. if the person want to test it how he can able to to that.
Israel AmambaPosted Sep 24, 2019, 5:24 AM
Helpful article. Thanks
Amit MohantyPosted Jul 22, 2019, 11:14 PM
Nice article