
This article shows how to customize the installation of a windows service in Visual Studio 2005 to prompt for a service account username and password. This process involves combining several separate techniques than can each be used for other purposes (like passing setup screen values to a generic custom action program).
Verify you have a project installer class in your project. If not:
-
In Solution Explorer, access Design view for the service for which you want to add an installation component.
-
Click the background of the designer to select the service itself, rather than any of its contents.
-
With the designer in focus, right-click, and then click Add Installer.
-
A new class, ProjectInstaller, and two installation components, ServiceProcessInstaller and ServiceInstaller, are added to your project, and property values for the service are copied to the components.
Verify you have a Setup project.
Modify the Setup project.
-
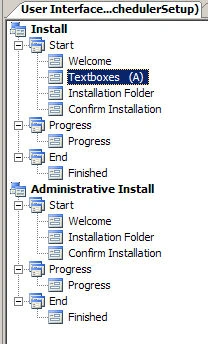
Use the User Interface Editor to add a Textboxes (A) dialog box. You will need to move it up above the Installation folder dialog box.
-
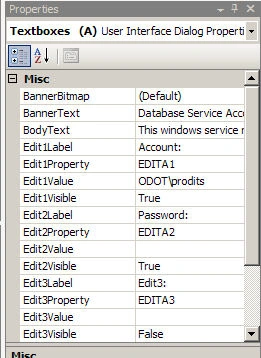
Confirm the properties of the Textboxes dialog box. Verify the Edit1Property value is the default EDITA1 and the EditProperty value is the default EDITA2.
-
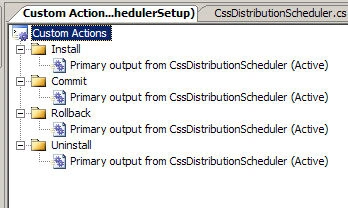
Use the Custom Actions Editor to add to the Applications folder the Primary Output.
-
Click on the Primary output item under Install and modify the properties. Set the customActionData property to:/f1=[EDITA1] /f2=[EDITA2]
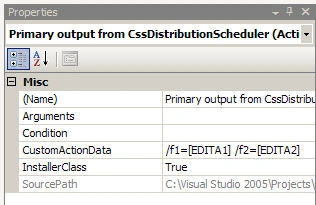
Note: This is the restricted format expected by installer classes, you can use your own format for other custom action programs.
This will pass the value entered into the username textbox as a parameter named "f1" and similarly the password value will be parameter "f2".
Modify the ProjectInstaller.cs
1. Note in the ProjectInstaller.Designer.cs file, the InitializeComponent method shows adding two installers to the Installers collection:
//
// ProjectInstaller
//
this.Installers.AddRange(new System.Configuration.Install.Installer[]
{this.serviceProcessInstaller1, this.serviceInstaller1});
2. Since we need to add the service account info to the ServiceProcessInstaller we need to find it inside the Installers collection first. Once we have the instance we can assign the service account properties found in Context.Parameters then finish up by running the base.Install method.
3. Add this to the Project.Installer.cs file:
{
System.ServiceProcess.ServiceProcessInstaller
serviceProcessInstaller1=null;
foreach (object installer in this.Installers)
try
{
serviceProcessInstaller1 = (System.ServiceProcess.ServiceProcessInstaller)
installer;
}
catch (Exception exc)
{
}
if (serviceProcessInstaller1 != null)
{
serviceProcessInstaller1.Account =
System.ServiceProcess.ServiceAccount.User;
serviceProcessInstaller1.Username = Context.Parameters["f1"];
serviceProcessInstaller1.Password = Context.Parameters["f2"];
}
base.Install(stateSaver);
}
Rakesh PatelPosted Oct 13, 2015, 5:33 AM
i have write this code but it will not work proper. but i got idea from this technique. Thanks
Lilan Madusanka SilvaPosted Jan 13, 2013, 1:52 PM
Can't pass service name like this. can any one help me ?
venkat reddyPosted Jan 2, 2009, 5:24 AM
HI all Is there any way to set the focus on the textbox , in my case the focus in directly on the next button .... {Tabbing order on the textbox } Thanks Venky
Andrea FerendelesPosted Oct 18, 2007, 11:37 AM
Hi, there is no need to add a custom textbox(A). Compiled MSI already ask you username and password when the Primary Output is added to the Applications folder (custom actions). Just check that Account property of serviceInstaller1 is set to "User". Regards, Andrea.