

Today, in this article, I will explain the multi binding in MVVM, which means if you want to pass the multiple command parameter in MVVM then how to pass it. First, you all are aware of Explain INotifyPropertyChanged In WPF - MVVM and ICommand Interface In MVVM - WPF.
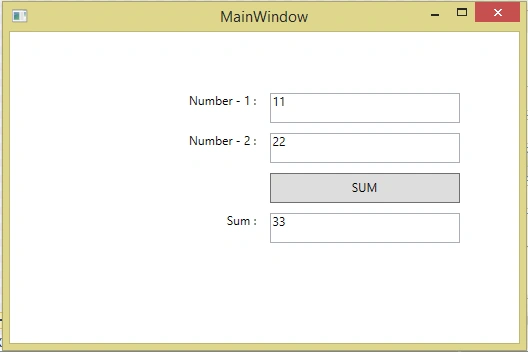
To understand the multi binding, we will take an example, so we create an WPF Application, which contains two text boxes, which contain an integer value and one button. When the user clicks on the button, it will give you the sum. Both these numbers are from the textboxes and the output is displayed in the third textbox. Here, we can say that here on the button command, we have to pass two command parameters number1 and number2, so we have to use multi binding.

Code - MainWindow.xaml
<Window x:Class="MVVM_MultiBinding.MainWindow"
        xmlns="http://schemas.microsoft.com/winfx/2006/xaml/presentation"
        xmlns:x="http://schemas.microsoft.com/winfx/2006/xaml"
        xmlns:viewmodel="clr-namespace:MVVM_MultiBinding.ViewModel"
        xmlns:converter="clr-namespace:MVVM_MultiBinding.Converter"
        Title="MainWindow" Height="350" Width="525">
    <Window.Resources>
        <viewmodel:ViewModel x:Key="vm"></viewmodel:ViewModel>
        <converter:MyValueConverter x:Key="cv"></converter:MyValueConverter>
    </Window.Resources>
    <Grid Width="400" Height="200" DataContext="{Binding Source={StaticResource vm}}">
        <Grid.RowDefinitions>
            <RowDefinition/>
            <RowDefinition/>
            <RowDefinition/>
            <RowDefinition/>
            <RowDefinition/>
        </Grid.RowDefinitions>
        <Grid.ColumnDefinitions>
            <ColumnDefinition/>
            <ColumnDefinition/>
        </Grid.ColumnDefinitions>
        <Label Grid.Row="0" Grid.Column="0" Content="Number - 1 : " HorizontalContentAlignment="Right"></Label>
        <TextBox Grid.Row="0" Grid.Column="1" Name="txtNumb1" Margin="5" Text="{Binding Path=Number1}"></TextBox>

        <Label Grid.Row="1" Grid.Column="0" Content="Number - 2 : " HorizontalContentAlignment="Right"></Label>
        <TextBox Grid.Row="1" Grid.Column="1" Name="txtNumb2"  Margin="5" Text="{Binding Path=Number2}"></TextBox>
        <Button Grid.Row="2" Grid.Column="1" Margin="5" Content="SUM" Command="{Binding Path=MyCommand}">
        </Button>
        <Label Grid.Row="3" Grid.Column="0" Content="Sum : " HorizontalContentAlignment="Right"></Label>
        <TextBox Grid.Row="3" Grid.Column="1" Margin="5" Text="{Binding Path=NumberSum, Mode=TwoWay, UpdateSourceTrigger=PropertyChanged}"></TextBox>
    </Grid>
</Window>
Here, in the example, mentioned above, we take one RelayCommand Class, which you already know, if you are not aware of this then read ICommand Interface In MVVM - WPF.
Code - RealyCommand.sc
public class RelayCommand:ICommand
{
    Action<object> _execute;
    Func<object, bool> _canexecute;
    public RelayCommand(Action<object> execute,Func<object,bool> canexecute)
    {
        _execute = execute;
        _canexecute = canexecute;

    }
    public bool CanExecute(object parameter)
    {
        if (_canexecute != null)
        {
            return _canexecute(parameter);
        }
        else
        {
            return false;
        }
    }

    public event EventHandler CanExecuteChanged
    {
        add { CommandManager.RequerySuggested += value; }
        remove { CommandManager.RequerySuggested -= value; }
    }

    public void Execute(object parameter)
    {
        _execute(parameter);
    }
}
Join the conversation! Your thoughts help the community grow.