

This is the third part of the series on Azure storage. In this article, you’ll see how we can perform different operations on storage such as creating container, uploading blobs to the container, listing of blobs and deleting of blobs through the code. For this, you have to follow the prerequisites given below.
- Microsoft Visual Studio 2015(.NET Framework 4.5.2).
- Microsoft Azure Account.
Hence, let’s start and follow the steps in the order to perform one of the best Azure storage, which is Blob Storage. I think there is no need to tell you, what Blob Storage in Azure is? If you want to learn and start with Azure, you can go with my series. In order to work, you’ve got to create a storage account by signing in to Azure Portal.
After creating a storage account on Azure portal, open Visual Studio 2015 and create a new project.
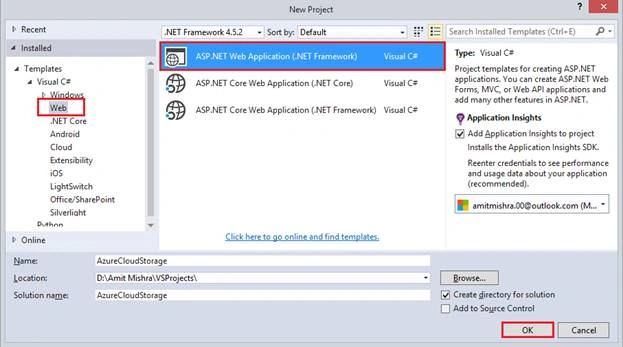
Select MVC template and click OK button.

Here, my AzureCloudStorage project is ready for use. I need some references of Azure storage in my project and Azure storage account connection string. Right click on the project, add the Connected Service.

We are going to work with Azure storage account, so select Azure storage and click Configure button to configure your account.

This will ask you to enter your Azure credentials. After successful login, your storage account is automatically configured by it. If you don’t have any storage account, you can create a new storage account from the given option.

All is set now. I have to write all the necessary code in my controller. To create a controller, right click on to Controller's folder and add a controller.

My Controller has been created. Here, add a method, which will return ActionResult. Under this method, create a Container for an existing storage account.

Create a Container in storage aAccount
Create an object of storage account, which represents our storage account information such as storage account name and key. The setting exists in Web Config file. To get all information, we parse a connection string from Cloud Configuration Manager. To create the Service client object, use CloudBlobClient credentials access to the blob Service. Now, create an object for CloudBlobContainer, which retrieves a reference to a container. Give a name to the container, which you want to create, unless a container already exists.


I’ve used ViewBag to show, if container doesn’t exist, then show container is created, else it's not created on view. Also, I've used ViewBag to show container name on view.
- namespace AzureCloudStorage.Controllers
- {
- public class MyStorageController : Controller
- {
- // Create a Container for existing Storage Account
- public ActionResult CreateStorageContainer()
- {
- CloudStorageAccount userstorageAccount = CloudStorageAccount.Parse(
- CloudConfigurationManager.GetSetting("mystorageazure01_AzureStorageConnectionString"));
- CloudBlobClient myBlobClient = userstorageAccount.CreateCloudBlobClient();
- CloudBlobContainer myContainer = myBlobClient.GetContainerReference("mystoragecontainer001");
- ViewBag.UploadSuccess = myContainer.CreateIfNotExists();
- ViewBag.YourBlobContainerName = myContainer.Name;
- return View();
- }
- }
- }
Resolve to references and the main references are given below.
- using Microsoft.Azure;
- using Microsoft.WindowsAzure.Storage;
- using Microsoft.WindowsAzure.Storage.Blob;

Perhaps, you know that views are used to display the data. Let’s create a view for the CreateStorageContainer method by right clicking it.

View Name would be as it is and use this view along with layout page.

Here is the some code snippet on view to display a result on the browser that if container has uploaded, then show a message of success, else the same name container already exists. The screenshot given below is for CreateStorageContainer.chtml.

Open _Layout.cshtml file and add an Action Link is required to create a storage account.

Run the Application by CTRL+F5. The Action Link text is available, so just click on to it to create a Container in your Storage Account (mystoragecontainer001).

After clicking it, you’ll be redirected to your controller method and container should be created on Azure portal successfully.

Let’s move to Azure portal and you will find Container has successfully been created under given storage account.

Now, again go back to dashboard and click Action Link to check, whether it will upload same name Container or not.

No, it shows Container already exists in your storage account.

Upload a Block Blob or Page Blob into Selected Container
As explained earlier in the articles, Azure storage supports a different kind of blob types such as page blob, block blob and append blob. In this demo, I am going to explain only block blob. I need to upload a blob from my local file. Here, I am creating an object of CloudBlockBlob and retrieving a reference of block blob. From the myblob reference object’s UploadFromStream, you can upload your data stream and create a blob, if there any blob does not exist.
Here, I’m using session, which would be accessed into another ActionResult through the string and string object would be accessed into our View to display blob name.
Create a method to upload blob
Now, access previous sessions in string and ViewBag represents the string as its object and for container as well.
- //Upload Blobs To selected Container
- public ActionResult UploadYourBlob( )
- {
- CloudStorageAccount userstorageAccount = CloudStorageAccount.Parse(
- CloudConfigurationManager.GetSetting("mystorageazure01_AzureStorageConnectionString"));
- CloudBlobClient myBlobClient = userstorageAccount.CreateCloudBlobClient();
- CloudBlobContainer myContainer = myBlobClient.GetContainerReference("mystoragecontainer001");
- //get blob reference by entering its name
- CloudBlockBlob myBlob = myContainer.GetBlockBlobReference("lion3.jpg");
- //directory name from where you want to upload your blob.
- using (var fileStream = System.IO.File.OpenRead(@"D:\Amit Mishra\lion3.jpg"))
- {
- myBlob.UploadFromStream(fileStream);
- ViewBag.BlobName = myBlob.Name;
- }
- //hold container in viewbag using string that we will used to get container name onto browser
- string getcontainer = Session["getcontainer"].ToString();
- ViewBag.YourBlobContainerName = getcontainer;
- return View();
- }
Right click near ActionResult method and add View for it.

Create a view to display the data.

Here, I am writing simple scripts in UploadYourBlob.chtml.
- @{
- ViewBag.Title = "UploadYourBlob";
- Layout = "~/Views/Shared/_Layout.cshtml";
- }
- <h3>Uploaded.....☺</h3><br />
- <h2>This Blob <b style="color:purple"> "@ViewBag.BlobName" </b>has Uploaded into your <b style="color:red"> "@ViewBag.YourBlobContainerName" </b> </h2>







Join the conversation! Your thoughts help the community grow.