

Introduction
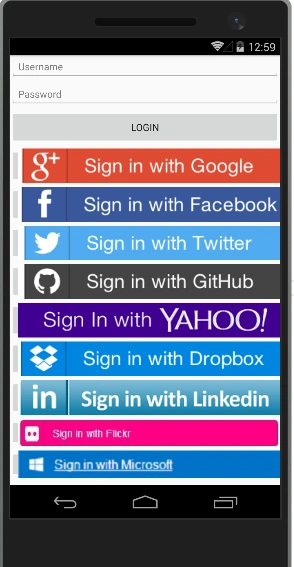
- MICROSOFT
- GITHUB
- FLICKER
- YAHOO
- DROPBOX
Register a Mobile App with Identity Provider
You can find my previous article for registering a mobile app with an identity provider from here.
Step 1 - Create New Xamarin.Forms Project
Let's start by creating a new Xamarin Forms Project in Visual Studio.
Open Run - Type Devenev.Exe and enter - New Project (Ctrl+Shift+N) - select Blank Xaml App (Xamarin.Forms Portable) template.
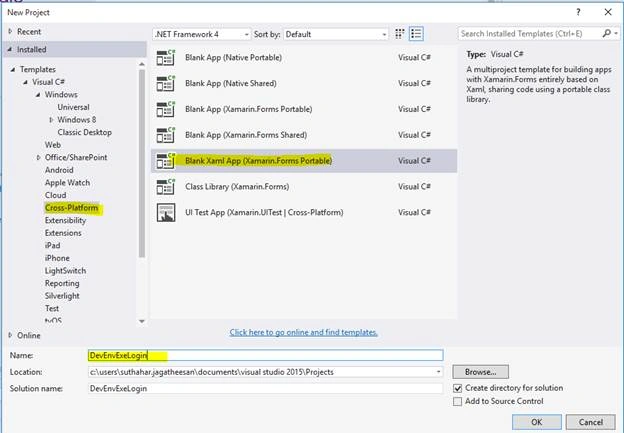 It will automatically create multiple projects, like Portable, Android, iOS, and UWP but here, I will be targeting only Android. However, the implementation of iOS and UWP is similar.
Step 2 - Install OAuth Client Components
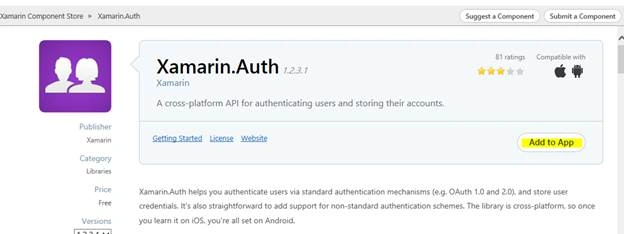
Xamarin.Auth is a cross-platform SDK for authenticating users and storing their accounts. It includes OAuth authenticators that provide support for consuming identity providers.
Let's add the Xamarin.Auth component for OAuth. We will have to add this in all platform-specific projects, separately.
Go to any project (DevEnVExeLogin.Droid) - Components - Right-click on "Get More Components".
If you are not logged in already, it will show the login page. So, log in there.
Next, search and double-click on Xamarin.Auth component and click on "Add to App".
It will automatically create multiple projects, like Portable, Android, iOS, and UWP but here, I will be targeting only Android. However, the implementation of iOS and UWP is similar.
Step 2 - Install OAuth Client Components
Xamarin.Auth is a cross-platform SDK for authenticating users and storing their accounts. It includes OAuth authenticators that provide support for consuming identity providers.
Let's add the Xamarin.Auth component for OAuth. We will have to add this in all platform-specific projects, separately.
Go to any project (DevEnVExeLogin.Droid) - Components - Right-click on "Get More Components".
If you are not logged in already, it will show the login page. So, log in there.
Next, search and double-click on Xamarin.Auth component and click on "Add to App".
 Step 3 - Create Base Login Page (LoginPage.Xaml)
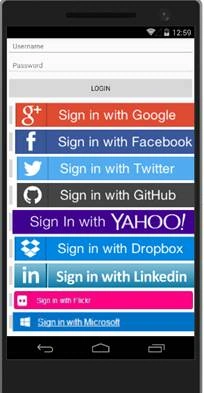
I have created quick and simple login screens . You can modify them as per your requirement.
Right-click on Portable Class Library - Add New Item - Select Xaml Page(Login Page).
LoginPage.Xaml
LoginPage.Xaml.CS
Add LoginClick event in login page code behind the file and sender object will return the button text name (eg: Facebook, Twitter, etc).
Step 4 - Create Identity Provider Login Page
As we will be having platform-specific LoginPage implementation of Xamarin.Auth, we don't need any specific implementation in the portable project.
We do need to add an empty ProviderLoginPage which will be resolved at runtime and substituted by actual implementation regarding this will explain in step 5.
Right Click Portable Project - Add New Item Select Xaml page (ProviderLoginPage.Xaml )
** In Xaml page, you need to make no changes.
Step 5: Create Platform Specific Login Renderer
Step 3 - Create Base Login Page (LoginPage.Xaml)
I have created quick and simple login screens . You can modify them as per your requirement.
Right-click on Portable Class Library - Add New Item - Select Xaml Page(Login Page).
LoginPage.Xaml
LoginPage.Xaml.CS
Add LoginClick event in login page code behind the file and sender object will return the button text name (eg: Facebook, Twitter, etc).
Step 4 - Create Identity Provider Login Page
As we will be having platform-specific LoginPage implementation of Xamarin.Auth, we don't need any specific implementation in the portable project.
We do need to add an empty ProviderLoginPage which will be resolved at runtime and substituted by actual implementation regarding this will explain in step 5.
Right Click Portable Project - Add New Item Select Xaml page (ProviderLoginPage.Xaml )
** In Xaml page, you need to make no changes.
Step 5: Create Platform Specific Login Renderer
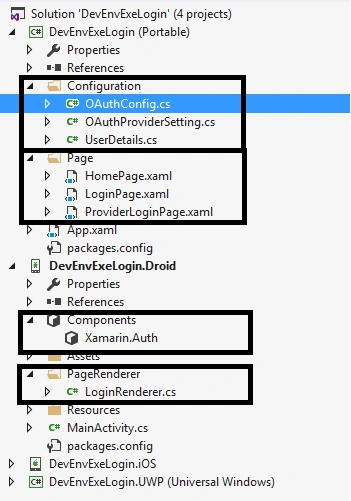 We need to create platform-specific LoginRenderer Page. So, you have to create platform-specific Login page (loginRenderer.CS) to iOS, Android, and UWP projects.
We need to add LoginPageRenderer which will be used by Xamarin.Auth to display the webView for OAuth Login Page
Code Snippet Explanation
The below code is for Xamarin.Forms Dependency Service which maps ProviderLoginPage to LoginRenderer.
Create OAuthProviderSetting class from Portable Class Library with OAuth Implementation. It is explained in Step 6.
If you want to get and save user info. You can create UserEntity from Portable Library and refer the below code.
LoginRenderer.CS
Step 6: OAuth Implementation
The OAuth2Authenticator class is responsible for managing the user interface and communicating with authentication services. It will support all the identity providers.
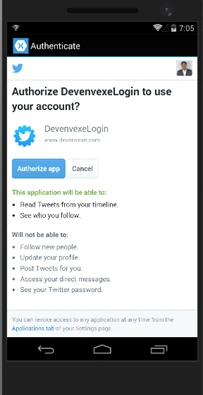
But, on Twitter, OAuth authentication will support only on OAuth1Authenticator. So, you can use the OAuth1Authenticator instead of the OAuth2Authenticator.
The OAuth2Authenticator and OAuth1Authenticator class require a number of parameters, as shown in the following list.
We need to create platform-specific LoginRenderer Page. So, you have to create platform-specific Login page (loginRenderer.CS) to iOS, Android, and UWP projects.
We need to add LoginPageRenderer which will be used by Xamarin.Auth to display the webView for OAuth Login Page
Code Snippet Explanation
The below code is for Xamarin.Forms Dependency Service which maps ProviderLoginPage to LoginRenderer.
Create OAuthProviderSetting class from Portable Class Library with OAuth Implementation. It is explained in Step 6.
If you want to get and save user info. You can create UserEntity from Portable Library and refer the below code.
LoginRenderer.CS
Step 6: OAuth Implementation
The OAuth2Authenticator class is responsible for managing the user interface and communicating with authentication services. It will support all the identity providers.
But, on Twitter, OAuth authentication will support only on OAuth1Authenticator. So, you can use the OAuth1Authenticator instead of the OAuth2Authenticator.
The OAuth2Authenticator and OAuth1Authenticator class require a number of parameters, as shown in the following list.
- <?xml version="1.0" encoding="utf-8" ?>
- <ContentPage xmlns="http://xamarin.com/schemas/2014/forms" xmlns:x="http://schemas.microsoft.com/winfx/2009/xaml" xmlns:local="clr-namespace:DevEnvExeLogin" x:Class="DevEnvExeLogin.LoginPage">
- <StackLayout>
- <Entry Placeholder="Username" />
- <Entry IsPassword="true" Placeholder="Password" />
- <Button Text="Login" HeightRequest="50" />
- <Button Text="Google" Clicked="LoginClick" Image="GOOGLE.png" HeightRequest="50" />
- <Button Text="FaceBook" Clicked="LoginClick" Image="FACEBOOK.png" HeightRequest="50" />
- <Button Text="Twitter" Clicked="LoginClick" Image="TWITTER.png" HeightRequest="50" />
- <Button Text="Github" Clicked="LoginClick" Image="GITHUB.png" HeightRequest="50" />
- <Button Text="Yahoo" Clicked="LoginClick" Image="YAHOO.png" HeightRequest="50" />
- <Button Text="DropBox" Clicked="LoginClick" Image="DROPBOX.png" HeightRequest="50" />
- <Button Text="LinkedIn" Clicked="LoginClick" Image="LINKEDIN.png" HeightRequest="50" />
- <Button Text="Flicker" Clicked="LoginClick" Image="FLICKER.png" HeightRequest="40" />
- <Button Text="Twitter" Clicked="LoginClick" Image="MICROSOFT.png" HeightRequest="40" /> </StackLayout>
- </ContentPage>
- using System;
- using Xamarin.Forms;
- namespace DevEnvExeLogin {
- public partial class LoginPage: ContentPage {
- public LoginPage() {
- InitializeComponent();
- }
- void LoginClick(object sender, EventArgs args) {
- Button btncontrol = (Button) sender;
- string providername = btncontrol.Text;
- if (OAuthConfig.User == null) {
- Navigation.PushModalAsync(new ProviderLoginPage(providername));
- //Need to create ProviderLoginPage so follow Step 4 and Step 5
- }
- }
- }
- }
- using Xamarin.Forms;
- namespace DevEnvExeLogin {
- public partial class ProviderLoginPage: ContentPage {
- //we will refer providename from renderer page
- public string ProviderName {
- get;
- set;
- }
- public ProviderLoginPage(string _providername) {
- InitializeComponent();
- ProviderName = _providername;
- }
- }
- }
- [assembly: ExportRenderer(typeof(ProviderLoginPage), typeof(LoginRenderer))]
- Get Identity ProviderName from Providerloginpage
- var loginPage = Element as ProviderLoginPage;
- string providername = loginPage.ProviderName;
- //Create OauthProviderSetting class with Oauth Implementation .Refer Step 6
- OAuthProviderSetting oauth = new OAuthProviderSetting();
- var auth = oauth.LoginWithProvider(providername);
- Create Oauth event
- for provider login completed and canceled.
- auth.Completed += (sender, eventArgs) => {
- if (eventArgs.IsAuthenticated) { //Login Success }
- else {
- // The user canceled
- }
- };
- namespace DevEnvExeLogin {
- public class UserDetails {
- public string TwitterId {
- get;
- set;
- }
- public string Name {
- get;
- set;
- }
- public string ScreenName {
- get;
- set;
- }
- public string Token {
- get;
- set;
- }
- public string TokenSecret {
- get;
- set;
- }
- public bool IsAuthenticated {
- get {
- return !string.IsNullOrWhiteSpace(Token);
- }
- }
- }
- }
- using Android.App;
- using Xamarin.Forms.Platform.Android;
- using DevEnvExeLogin;
- using Xamarin.Forms;
- using DevEnvExeLogin.Droid.PageRender;
- [assembly: ExportRenderer(typeof(ProviderLoginPage), typeof(LoginRenderer))]
- namespace DevEnvExeLogin.Droid.PageRender {
- public class LoginRenderer: PageRenderer {
- bool showLogin = true;
- protected override void OnElementChanged(ElementChangedEventArgs < Page > e) {
- base.OnElementChanged(e);
- //Get and Assign ProviderName from ProviderLoginPage
- var loginPage = Element as ProviderLoginPage;
- string providername = loginPage.ProviderName;
- var activity = this.Context as Activity;
- if (showLogin && OAuthConfig.User == null) {
- showLogin = false;
- //Create OauthProviderSetting class with Oauth Implementation .Refer Step 6
- OAuthProviderSetting oauth = new OAuthProviderSetting();
- var auth = oauth.LoginWithProvider(providername);
- // After facebook,google and all identity provider login completed
- auth.Completed += (sender, eventArgs) => {
- if (eventArgs.IsAuthenticated) {
- OAuthConfig.User = new UserDetails();
- // Get and Save User Details
- OAuthConfig.User.Token = eventArgs.Account.Properties["oauth_token"];
- OAuthConfig.User.TokenSecret = eventArgs.Account.Properties["oauth_token_secret"];
- OAuthConfig.User.TwitterId = eventArgs.Account.Properties["user_id"];
- OAuthConfig.User.ScreenName = eventArgs.Account.Properties["screen_name"];
- OAuthConfig.SuccessfulLoginAction.Invoke();
- } else {
- // The user cancelled
- }
- };
- activity.StartActivity(auth.GetUI(activity));
- }
- }
- }
- }
- Client ID – Identity provider-client ID. While registering the app, you will need a unique Client ID.
- Client Secret – identifies the client that is making the request. While registering the app, you will need a unique Client Secret
- Scope – identifies the API access being requested by the application, and the value informs the consent screen that is shown to the user.
- Authorize URL – identifies the URL where the authorization code will be obtained from.
- Redirect URL – identifies the URL where the response will be sent. The value of this parameter must match one of the values that appear on the Credentials page of the project.
- AccessToken URL — identifies the URL used to request access tokens after an authorization code is obtained.
Step 6.1: Access GOOGLE AccountStep 6.2: Access FACEBOOK Account
- var googleauth = new OAuth2Authenticator(
- // For Google login, for configure refer http://www.c-sharpcorner.com/article/register-identity-provider-for-new-oauth-application/
- "ClientId",
- "ClientSecret",
- // Below values do not need changing
- "https://www.googleapis.com/auth/userinfo.email",
- new Uri("https://accounts.google.com/o/oauth2/auth"),
- new Uri("http://www.devenvexe.com"),// Set this property to the location the user will be redirected too after successfully authenticating
- new Uri("https://accounts.google.com/o/oauth2/token")
- );
Step 6.3: Access TWITTER Account- var OauthFacebook = new OAuth2Authenticator(
- clientId: "MyAppId", // For Facebook login, for configure refer http://www.c-sharpcorner.com/article/register-identity-provider-for-new-oauth-application/
- scope: "",
- authorizeUrl: new Uri("https://m.facebook.com/dialog/oauth/"), // These values do not need changing
- redirectUrl: new Uri("http://www.facebook.com/connect/login_success.html")// These values do not need changing
- );
Step 6.4 Access Microsoft Account- OAuth1Authenticator auth = new OAuth1Authenticator(
- consumerKey: "*****", // For Twitter login, for configure refer http://www.c-sharpcorner.com/article/register-identity-provider-for-new-oauth-application/
- consumerSecret: "****", // For Twitter login, for configure refer http://www.c-sharpcorner.com/article/register-identity-provider-for-new-oauth-application/
- requestTokenUrl: new Uri("https://api.twitter.com/oauth/request_token"), // These values do not need changing
- authorizeUrl: new Uri("https://api.twitter.com/oauth/authorize"), // These values do not need changing
- accessTokenUrl: new Uri("https://api.twitter.com/oauth/access_token"), // These values do not need changing
- callbackUrl: new Uri("http://www.devenvexe.com") // Set this property to the location the user will be redirected too after successfully authenticating
Step 6.5 Access LINKEDIN Account- var OauthMicrosoft = new OAuth2Authenticator(
- clientId: "MY ID", // For Micrsoft login, for configure refer http://www.c-sharpcorner.com/article/register-identity-provider-for-new-oauth-application/
- scope: "bingads.manage",
- authorizeUrl: new Uri("https://login.live.com/oauth20_authorize.srf?client_id=myid&scope=bingads.manage&response_type=token&redirect_uri=https://login.live.com/oauth20_desktop.srf"),
- redirectUrl: new Uri("https://adult-wicareerpathways-dev.azurewebsites.net/Account/ExternalLoginCallback")
- );
Step 6.6 Access GITHUB Account- var authLinkediN = new OAuth2Authenticator(
- clientId: "**",// For LinkedIN login, for configure refer http://www.c-sharpcorner.com/article/register-identity-provider-for-new-oauth-application/
- clientSecret: "**",
- scope: "",
- authorizeUrl: new Uri("https://www.linkedin.com/uas/oauth2/authorization"),
- redirectUrl: new Uri("http://devenvexe.com/"),
- accessTokenUrl: new Uri("https://www.linkedin.com/uas/oauth2/accessToken")
Step 6.7 Access FLICKER Account- auth = new OAuth2Authenticator(
- // For GITHUB login, for configure refer http://www.c-sharpcorner.com/article/register-identity-provider-for-new-oauth-application/
- "ClientId",
- "ClientSecret",
- // Below values do not need changing
- "",
- new Uri("https://github.com/login/oauth/authorize"),
- new Uri("http://www.devenvexe.com"),// Set this property to the location the user will be redirected too after successfully authenticating
- new Uri("https://github.com/login/oauth/access_token")
- );
Step 6.8 Access YAHOO Account- auth = new OAuth2Authenticator(
- // For Flicker login, for configure refer http://www.c-sharpcorner.com/article/register-identity-provider-for-new-oauth-application/
- "ClientId",
- "ClientSecret",
- // Below values do not need changing
- "",
- new Uri("https://www.flickr.com/services/oauth/request_token"),
- new Uri("http://www.devenvexe.com"),// Set this property to the location the user will be redirected too after successfully authenticating
- new Uri("http://www.flickr.com/services/oauth/access_token")
- );
- auth = new OAuth2Authenticator(
- // For Yahoo login, for configure refer http://www.c-sharpcorner.com/article/register-identity-provider-for-new-oauth-application/
- "ClientId",
- "ClientSecret",
- // Below values do not need changing
- "",
- new Uri("https://api.login.yahoo.com/oauth2/request_auth"),
- new Uri("http://www.devenvexe.com"),// Set this property to the location the user will be redirected too after successfully authenticating
- new Uri("https://api.login.yahoo.com/oauth2/get_token")
- );
Giuseppe PistorinoPosted Jan 5, 2021, 3:46 PM
Thank you, do you have an Xamarin.Android example? thks
Liêm NguyễnPosted May 10, 2019, 5:09 AM
Thank you for your topic!
BHARATHI BPosted Oct 4, 2018, 5:25 AM
Hi,its working good in android.but getting 403(Error disallowed_useragent) error while running in ios.can you help me out
qaz wsxPosted Jun 8, 2018, 6:53 AM
Getting disallowed_useragent error for google, please help
Ranjith NagiriPosted Apr 25, 2018, 5:19 AM
Hi Suthahar, I have tried to implement the same and when I try to authenticate with google the webpage is displaying after successful login, it is not redirecting to the app. Can you please suggest what changes need to be modified. Note: I have tested the google authentication in debug mode (locally I tested).
Abbas ZoebPosted Jun 30, 2017, 9:34 AM
Thanks a lot for this amazing tutorial. A good question - could you show us how to get user permission so that we can retrieve their email as well from the Facebook graph Uri?
Chisom NwikePosted May 23, 2017, 11:37 AM
Hi, I am new to this and I do not know how to add a page renderer. Can I get some detailed help?. Thank you
arvind baldaniyaPosted May 11, 2017, 2:14 AM
I am using this url its perfectly working but i need to Token, Userid, Name https://github.com/xamarin/monodroid-samples/blob/master/google-services/SigninQuickstart/SigninQuickstart/MainActivity.cs
arvind baldaniyaPosted May 9, 2017, 6:50 AM
I am following below url.. but google login to the webview https://github.com/xamarin/Xamarin.Auth/blob/portable-bait-and-switch/samples/Xamarin.Forms/references01project/Evolve16Labs/05-OAuth/Portable/MainPage.xaml.cs
arvind baldaniyaPosted May 8, 2017, 9:08 AM
Google Login without webviews In xamarin
arvind baldaniyaPosted May 4, 2017, 9:18 AM
Any solution for OAuth Google without webviews In xamarin
Vishal KathiriyaPosted Apr 18, 2017, 3:12 AM
Hello Suthahar, thanks for great demo app. But I would like to know why Google Authentication is not working ?
arvind baldaniyaPosted Apr 17, 2017, 9:16 AM
OAuthConfig what is it and what code in OAuthConfig
Sérgio SalvadoPosted Mar 3, 2017, 3:03 PM
Hi Suthahar. Is it possible to create your own oauth authenticator provider, say based on a company's AD, instead of using Google, Facebook, etc ? I read you have to create and configure a custom authenticator deriving from FromAuthenticator, but how to implement the provider ? Only need to be pointed the right way, thanks.
sree_sundaramPosted Mar 2, 2017, 11:37 AM
Hi Suthahar. Any update on my question on how to do it inside of LoginRenderer. Thanks for all of your help so far
Chandresh KhambhayataPosted Feb 20, 2017, 2:37 AM
Hi, I am getting error in Google and Facebook Login. Link: http://stackoverflow.com/questions/42338682
sree_sundaramPosted Feb 18, 2017, 10:27 AM
Thanks for that Suthahar. How can I do this inside of LoginRenderer?
sree_sundaramPosted Feb 15, 2017, 4:55 PM
Hi Suthahar. For UWP, what is the equivalent of activity.StartActivity(auth.GetUI(activity)). Apologize for my newbie questions
sree_sundaramPosted Feb 10, 2017, 3:49 PM
Hi Suthahar. Do you have an example for UWP?
sree_sundaramPosted Feb 9, 2017, 3:29 PM
Sorry if I am dense but I do not see the following component option is VS2015: Go to any project (DevEnVExeLogin.Droid) - Components - Right click on "Get More Components".
sree_sundaramPosted Feb 9, 2017, 3:28 PM
Does Xamarin Auth support Windows OS also?
rgranerPosted Jan 1, 2017, 6:27 PM
I am also having the same problem as Sandeep, is there a way to fix this? Object Reference not set an instance of object. Thanks for building this code, I can't get past the error in OAuthConfig
gaggaPosted Dec 31, 2016, 10:11 AM
Very nice, thanks a lot :-)
Sandeep SoniPosted Dec 15, 2016, 6:35 AM
Why i need the redirect URL if authentication is success .i want to redirect my own android page
Sandeep SoniPosted Dec 15, 2016, 5:40 AM
_NavigationPage.Navigation.PushModalAsync(_HomePage);This line throw an exception "Object Reference not set an instance of object" its not calling home page. why?
C# CornerPosted Oct 28, 2016, 6:55 PM
I followed your previous article about Authenticating. I only got a clientID but in you project there is a google clientSecret necessary.
Dennis FungPosted Oct 20, 2016, 12:18 PM
Hi, Will you able to provide the iOS project with you solution. Downloaded your sample code but found that there are iso and uwp projects. No sure how to create "LoginRenderer.cs" for platform specific code. I am new to Xamarin.
SubashPosted Sep 8, 2016, 12:44 AM
Nice one sir
Bob SalitaPosted Sep 6, 2016, 12:38 PM
For V2 -- make authentication data driven, not code driven. See https://github.com/BSalita/XamarinAuthInForms/blob/master/OAuthForms1/OAuthForms1/OAuthForms1/OAuthProviders.json
S.Ravi KumarPosted Sep 6, 2016, 7:44 AM
Very Helpful article, Thanks for sharing
Bhavik PatelPosted Sep 6, 2016, 5:13 AM
Nice
Manoj KulkarniPosted Sep 6, 2016, 1:34 AM
Very helpful thank you for sharing