

Before reading this article, I highly recommend reading the previous parts of the series.
- Learn Universal Windows Programming Via Modern C++
- Learn Universal Windows Programming Via Modern C++ (Button Control)
- Learn Universal Windows Programming Via Modern C++ (Stackpanel)
- Learn Universal Windows Programming Via Modern C++ (CheckBox)
- Learn Universal Windows Programming Via Modern C++ (RadioButton)
- Learn Universal Windows Programming Via Modern C++ (Combobox)
- Learn Universal Windows Programming Via Modern C++ (Border)
In this article, we are going to learn about CommandBar control in Modern C++.
CommandBarThe CommandBar control is a new control in Universal Windows programming. It is like a Toolbar control that has more features compared to the Toolbar control.
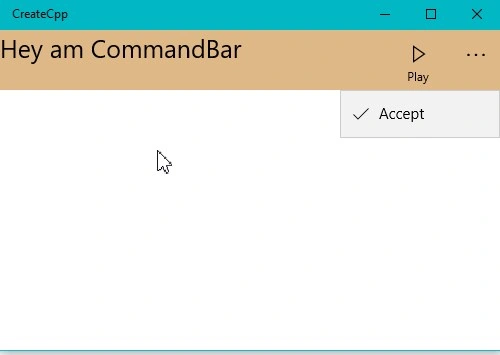
A CommandBar is divided into the following two main areas,
- Content
- Command Area
CommandArea
A Command Area has a collection of AppBarButton, AppBarToggleButton and AppBarSeparator buttons only. We can’t add any extra controls into the list, directly under the Command Area.
Note
All three controls are not necessary to be present in the CommandBar.
A Command Area is divided into the following two areas,
- Primary commands
- Secondary commands
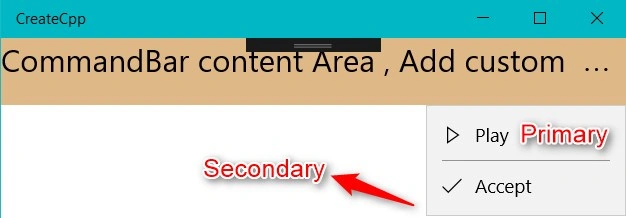
Primary and secondary commands are a priority and non-priority area, the priority area is always visible to the users, a non-priority area is always hidden to the users. Whenever the user wants to interact with the secondary area, click the “…” menu visible to the UI.
Secondary commands
Secondary commands are non-priority areas, but once the user has clicked the secondary area, we make it visible until the user interacts with the CommandBar based on the context menu. Generally, if we click outside the menu area, the overflow menu automatically disappears.
Note
If there is no space to display primary controls , It will be automatically hidden and display in the secondary area.
ex - Adding primary and secondary buttons
- auto appBtnPlay = CreateAppBarButton(Symbol::Play, L"Play", 1);
- auto appBtnAccept = CreateAppBarButton(Symbol::Accept, L"Accept", 2);
- CommandBar cmdBar;
- cmdBar.PrimaryCommands().Append(appBtnPlay);
- cmdBar.SecondaryCommands().Append(appBtnAccept);
- IsSticky: True, the menu will display until the click of any menu item in the CommandBar.
- Is IsSticky: False, the menu will disappear, click anywhere outside the menu item (the default mode).
Note
IsSticky property can be set as overall the CommandBar properties, it applies to the primary Command Area.
- CommandBar cmdBar;
- cmdBar.IsSticky(true);
IsOpen
IsOpen is true, CommandBar is open (Primary and secondary commands details will be visible to the user); If it's false default behaviors are applying to the user

- CommandBar cmdBar;
- cmdBar.IsOpen(true);
Content
The Content area is like a container, we can place any control inside the content area.
- CommandBar cmdBar;
- StackPanel sPanel;
- sPanel.Children().Append(txtHeader);
- sPanel.Children().Append(txtStatus);
- cmdBar.Content(sPanel);
DisplayMode
Initial or runtime, we can change the display mode of the CommandBar, the default mode is compact mode.
ClosedDisplayMode is a property to change the display mode of the CommandBar,
- Compact- Display CommandBar with icon mode, text are hidden
- Minimal- Display CommandBar, icon and text are hidden
- Hidden- Complete CommandBar is hidden.
- FlowDirection- We can change the content area from the left to the right using the FlowDirection property.
- CommandBar cmdBar;
- cmdBar.ClosedDisplayMode(AppBarClosedDisplayMode::Minimal);

Ex
- #include "pch.h"
- using namespace winrt;
- using namespace Windows::ApplicationModel;
- using namespace Windows::ApplicationModel::Activation;
- using namespace Windows::Foundation;
- using namespace Windows::UI;
- using namespace Windows::UI::Xaml;
- using namespace Windows::UI::Xaml::Controls;
- using namespace Windows::UI::Xaml::Controls::Primitives;
- using namespace Windows::UI::Xaml::Interop;
- using namespace Windows::UI::Xaml::Media;
- using namespace Windows::UI::Xaml::Navigation;
- using namespace Windows::UI::Popups;
- using namespace Windows::Storage;
- struct App :ApplicationT<App>
- {
- public:
- App()
- {
- }
- virtual ~App() = default;
- TextBlock txtStatus;
- TextBlock CreateTextBlock(hstring text)
- {
- TextBlock txtBlock;
- txtBlock.Text(text);
- txtBlock.TextAlignment(TextAlignment::Left);
- txtBlock.FontSize(15);
- return txtBlock;
- }
- AppBarButton CreateAppBarButton(Symbol icon, hstring text, int Idx)
- {
- AppBarButton appBtn;
- appBtn.Label(text);
- appBtn.Click({ this,&App::OnBtnClick });
- appBtn.Tag(PropertyValue::CreateInt32(Idx));
- auto sIcon = CreateSymbolIcon(icon);
- appBtn.Icon(sIcon);
- return appBtn;
- }
- void OnBtnClick(IInspectable const &sender, RoutedEventArgs const args)
- {
- Button btn = sender.as<Button>();
- IPropertyValue tagId = btn.Tag().as<IPropertyValue>();
- if (tagId.GetInt32() == 1)
- {
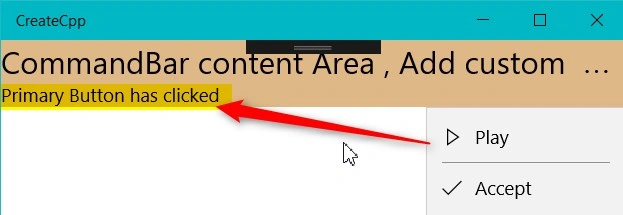
- txtStatus.Text(L"Primary Button has clicked");
- }
- else if (tagId.GetInt32() == 2)
- {
- txtStatus.Text(L"Secondary Button has clicked");
- }
- }
- SymbolIcon CreateSymbolIcon(Symbol icon)
- {
- SymbolIcon sIcon;
- sIcon.Symbol(icon);
- return sIcon;
- }
- void OnLaunched(LaunchActivatedEventArgs const&)
- {
- auto appBtnPlay = CreateAppBarButton(Symbol::Play, L"Play", 1);
- auto appBtnAccept = CreateAppBarButton(Symbol::Accept, L"Accept", 2);
- CommandBar cmdBar;
- cmdBar.PrimaryCommands().Append(appBtnPlay);
- cmdBar.SecondaryCommands().Append(appBtnAccept);
- auto txtHeader = CreateTextBlock(L"CommandBar content Area , Add custom controls here");
- txtHeader.FontSize(25);
- StackPanel sPanel;
- sPanel.Children().Append(txtHeader);
- sPanel.Children().Append(txtStatus);
- cmdBar.Content(sPanel);
- cmdBar.Background(SolidColorBrush(Colors::BurlyWood()));
- cmdBar.IsSticky(true);
- cmdBar.IsOpen(true);
- //cmdBar.ClosedDisplayMode(AppBarClosedDisplayMode::Minimal);
- Window window = Window::Current();
- window.Content(cmdBar);
- window.Activate();
- }
- };
- int __stdcall wWinMain(HINSTANCE, HINSTANCE, PWSTR, int)
- {
- Application::Start([](auto &&) {make<App>(); });
- return 0;
- }
Conclusion
I hope you understood how to use the CommandBar control.
Join the conversation! Your thoughts help the community grow.