

Introduction
Most applications today have similarities when it comes to separating the front-end and back-end. It means that the back-end can be hosted anywhere in the cloud or on a dedicated server. There can be many REST services. It can be developed in any programming language, using any development tools of your choice. The same can happen to the front-end, you can go from a Single Page Application (SPA) loading everything through Ajax or use any framework to render your data from the server synchronously.
In this article, you’ll learn how to create Angular application by consuming ASP.NET WEB API Core and how to build and run an Angular application using Docker container services.
Prerequisites
- Node.js, which is a prerequisite for Angular
- Visual Studio Code, or any other editor you like
- Visual Studio for developing ASP.NET WEB API Core
Background
- Basic knowledge of Javascript
- Familiarity with HTML and CSS
- ASP.NET Core, MVC, and C#
What's Next?
Let's start building ASP.NET WEB API step by step and then build Angular application for front-end and consume web api using ajax call. Once these two are completed we will create a Docker image of Angular application and run the image on Docker container service. Let's start one by one in detail.
Create a Product Model:
- namespace ASPNETWebAPI
- {
- public class Product
- {
- public int Id { get; set; }
- public string Name { get; set; }
- public string Category { get; set; }
- public decimal Price { get; set; }
- }
- }
Create a WEB API Controller and Action Methods:
- using System;
- using System.Collections.Generic;
- using System.Linq;
- using System.Threading.Tasks;
- using Microsoft.AspNetCore.Cors;
- using Microsoft.AspNetCore.Http;
- using Microsoft.AspNetCore.Mvc;
- namespace ASPNETWebAPI.Controllers
- {
- [Route("api/[controller]")]
- [ApiController]
- public class ProductController : ControllerBase
- {
- Product[] products = new Product[]
- {
- new Product
- {
- Id = 1, Name = "Soup", Category = "Groceries", Price = 1
- },
- new Product
- {
- Id = 2, Name = "Yo-yo", Category = "Toys", Price = 3.75M
- },
- new Product
- {
- Id = 3, Name = "Hammer", Category = "Hardware", Price = 16.99M
- }
- };
- [HttpGet]
- [EnableCors("AllowOrigin")]
- public IEnumerable<Product> GetAllProducts()
- {
- return products;
- }
- [HttpGet("{id}")]
- [EnableCors("AllowOrigin")]
- public ActionResult<Product> GetProduct(int id)
- {
- var product = products.FirstOrDefault((p) => p.Id == id);
- if (product == null)
- {
- return NotFound();
- }
- return product;
- }
- }
- }
Install Microsoft.AspNet.WebApi.Cors to enable Cross-Origin Resource Sharing (CORS) in ASP.NET Web API Core.
- PM> Install-Package Microsoft.AspNet.WebApi.Cors -Version 5.2.7
- using System;
- using System.Collections.Generic;
- using System.Linq;
- using System.Threading.Tasks;
- using Microsoft.AspNetCore.Builder;
- using Microsoft.AspNetCore.Hosting;
- using Microsoft.AspNetCore.HttpsPolicy;
- using Microsoft.AspNetCore.Mvc;
- using Microsoft.Extensions.Configuration;
- using Microsoft.Extensions.DependencyInjection;
- using Microsoft.Extensions.Hosting;
- using Microsoft.Extensions.Logging;
- namespace ASPNETWebAPI
- {
- public class Startup
- {
- public Startup(IConfiguration configuration)
- {
- Configuration = configuration;
- }
- public IConfiguration Configuration { get; }
- // This method gets called by the runtime. Use this method to add services to the container.
- public void ConfigureServices(IServiceCollection services)
- {
- services.AddControllers();
- services.AddCors(c =>
- {
- c.AddPolicy("AllowOrigin", options => options.AllowAnyOrigin());
- });
- }
- // This method gets called by the runtime. Use this method to configure the HTTP request pipeline.
- public void Configure(IApplicationBuilder app, IWebHostEnvironment env)
- {
- if (env.IsDevelopment())
- {
- app.UseDeveloperExceptionPage();
- }
- app.UseHttpsRedirection();
- app.UseRouting();
- app.UseAuthorization();
- app.UseCors(option => option.AllowAnyOrigin());
- app.UseEndpoints(endpoints =>
- {
- endpoints.MapControllers();
- });
- }
- }
- }
Now let's move on to our Angular aplication. Use Visual Studio code editor to develop the Angular application.
Install Angular CLI using the below command.
- npm install -g @angular/cli
- ng new dotnetcore-angular
- ng serve
Now let's modify the application to consume REST Service.
Create product.ts in app folder.
- export class Product {
- id: number;
- name: string;
- category: string;
- price: number;
- }
- import { Injectable } from '@angular/core';
- import { HttpClient } from '@angular/common/http';
- import { Product } from './Product';
- import { Observable, throwError } from 'rxjs';
- import { retry, catchError } from 'rxjs/operators';
- @Injectable({
- providedIn: 'root'
- })
- export class ProductService {
- // Define API
- apiURL = 'https://localhost:44389/api/Product';
- constructor(
- private http: HttpClient
- ) { }
- // HttpClient API get() method => Fetch Product list
- getProduct(): Observable<Product[]> {
- return this.http.get<Product[]>(this.apiURL)
- .pipe(
- retry(1),
- catchError(this.handleError)
- )
- }
- // Error handling
- handleError(error) {
- let errorMessage = '';
- if(error.error instanceof ErrorEvent) {
- // Get client-side error
- errorMessage = error.error.message;
- } else {
- // Get server-side error
- errorMessage = `Error Code: ${error.status}\nMessage: ${error.message}`;
- }
- window.alert(errorMessage);
- return throwError(errorMessage);
- }
- }
- import { Component, OnInit } from '@angular/core';
- import {ProductService} from '../app/ProductService';
- @Component({
- selector: 'app-root',
- templateUrl: './app.component.html',
- styleUrls: ['./app.component.less']
- })
- export class AppComponent implements OnInit {
- Product : any = [];
- constructor(
- private productService : ProductService
- ) { }
- ngOnInit() {
- this.getAllProducts()
- }
- // Get Product list
- getAllProducts() {
- return this.productService.getProduct().subscribe((data: {}) => {
- this.Product = data;
- })
- }
- }
Finally, let's modify the app.component.html to render the data in the UI.
- <div>
- <h3 class="mb-3 text-center">Product List</h3>
- <div class="col-md-12">
- <table class="table table-bordered">
- <thead>
- <tr>
- <th scope="col"> Id</th>
- <th scope="col">Name</th>
- <th scope="col">Category</th>
- <th scope="col">Price</th>
- </tr>
- </thead>
- <tbody>
- <tr *ngFor="let product of Product">
- <td>{{product.id}}</td>
- <td>{{product.name}}</td>
- <td>{{product.category}}</td>
- <td>{{product.price}}</td>
- </tr>
- </tbody>
- </table>
- </div>
- </div>
We are done with the development,lets create docker image of this application and run on docker container service. Below are commands which will build Docker image and run on Docker container service. Beforehand, you need to install Docker Deskop to your machine. This will enable Docker commands.
Command for building the docker image.
- docker build -t dotnetcore-angular .
Command to see a list of docker images.
- docker image ls
- docker run --name dotnetcore-angular-container -d -p 8080:80 dotnetcore-angular
- docker container ls
Push Docker Image to Docker Hub
Before pushing the docker image into Docker Hub you need to have a Docker account. Once the Docker account is created using the below command to push the Docker image to Docker Hub.
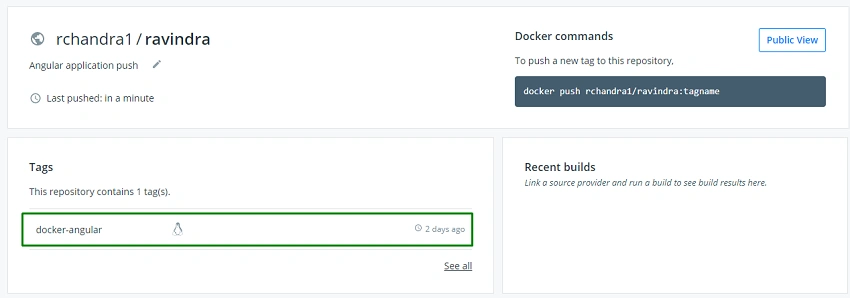
- docker tag docker-angular-test:v1 rchandra1/ravindra:docker-angular
You can see the Docker image after pushed to Docker Hub.
Salman JavedPosted Aug 31, 2021, 10:04 PM
Is your code available in githuib?
Harmesh KaushikPosted May 27, 2020, 12:37 AM
Very useful , Nice article