

In this tutorial, I will explain how to upload images in Angular 2. In this demo, I am using Angular 2 as front-end and node.js (with express template) as back-end along with MySQL as database. I am using Angular-cli to create the project. I hope you guys have already created the project using Angular-cli. If not, you can find how to create one.
You can also find both back-end and front-end links here.
Note
To run both projects, you need to install dependency from the package.json. You can simple do that by navigating to the project directory and writing the command "npm install".
Then, to run the back-end project, write "npm start"
Setting up the table in MySQL
- script file
- for student_tbl[code language = "sql"]
- CREATE TABLE IF NOT EXISTS `student_tbl` (`rno`
- int(11) NOT NULL, `name`
- varchar(50) DEFAULT NULL, `mobile_no`
- varchar(15) DEFAULT NULL, `student_img`
- varchar(1000) NOT NULL, PRIMARY KEY(`rno`)) ENGINE = InnoDB DEFAULT CHARSET = latin1;
Back-end using node.js
First, I will start from creating the back-end using node.js. If you want to know the steps for how to create REST API using node.js, you can go here.
So first, I will create dbconnection.js file which will store the hostname, username, and database name.
- var mysql = require('mysql');
- var connection = mysql.createPool({
- host: 'localhost',
- user: 'root',
- password: '',
- database: 'demo'
- });
- module.exports = connection;
Now, in the next step, I will create the student_model inside Models directory. It contains all the methods for fetching, inserting, and deleting the student records from the database.
- var db = require('../dbconnection');
- var fs = require('fs');
- var Student = {
- getAllStudent: function(callback) {
- return db.query("select * from student_tbl", callback);
- },
- deleteStudent: function(Student, callback) {
- if (Student.student_img != '') {
- var path = './public' + Student.student_img;
- fs.unlink(path, function(err) {
- if (err) {
- console.log(err);
- }
- console.log('Deleted successfuly')
- });
- }
- return db.query("delete from student_tbl where rno=?", [Student.rno], callback);
- },
- addStudent: function(Student, callback) {
- var dt = new Date(); //current date and time of server
- var text = ""; //random text
- var possible = "ABCDEFGHIJKLMNOPQRSTUVWXYZabcdefghijklmnopqrstuvwxyz0123456789";
- for (var i = 0; i < 5; i++) text += possible.charAt(Math.floor(Math.random() * possible.length));
- var base64d = Student.student_img.replace(/^data:image\/png;base64,/, "");
- var path = "./public/images/" + text + dt.getDate() + dt.getMonth() + dt.getMilliseconds() + ".png";
- var path1 = "/images/" + text + dt.getDate() + dt.getMonth() + dt.getMilliseconds() + ".png";
- fs.writeFile(path, base64d, 'base64', function(err) {
- if (err) {
- return console.log(err);
- }
- console.log("The file was saved!");
- });
- return db.query("Insert into student_tbl values(?,?,?,?)", [Student.rno, Student.name, Student.mobile_no, path1], callback);
- }
- };
- module.exports = Student;
First, I need to import dbconnection.js and file system references to student_model.js file. In the above code, the first method "getAllStudent" simply returns all the records from the student_tbl.
Now, set the routes in app.js.
- var express = require('express');
- var path = require('path');
- var favicon = require('serve-favicon');
- var logger = require('morgan');
- var cookieParser = require('cookie-parser');
- var bodyParser = require('body-parser');
- var cors = require('cors');
- var index = require('./routes/index');
- var users = require('./routes/users');
- var Students = require('./routes/Students');
- var app = express();
- // view engine setup
- app.set('views', path.join(__dirname, 'views'));
- app.set('view engine', 'jade');
- // uncomment after placing your favicon in /public
- //app.use(favicon(path.join(__dirname, 'public', 'favicon.ico')));
- app.use(cors());
- app.use(logger('dev'));
- app.use(bodyParser.json({
- limit: '50mb'
- }));
- app.use(bodyParser.urlencoded({
- limit: '50mb',
- extended: false
- }));
- app.use(cookieParser());
- app.use(express.static(path.join(__dirname, 'public')));
- app.use('/', index);
- app.use('/users', users);
- app.use('/Students', Students);
- // catch 404 and forward to error handler
- app.use(function(req, res, next) {
- var err = new Error('Not Found');
- err.status = 404;
- next(err);
- });
- // error handler
- app.use(function(err, req, res, next) {
- // set locals, only providing error in development
- res.locals.message = err.message;
- res.locals.error = req.app.get('env') === 'development' ? err : {};
- // render the error page
- res.status(err.status || 500);
- res.render('error');
- });
- module.exports = app;
Now, one important thing in app.js is that I am defining the limit of data. By default, it is set to 1 MB. So, I have extended it to 50 MB.
Front-end using Angular 2
I will start from creating data structure for student.
student.ts
- export class Student {
- public constructor(public rno: number, public name: string, public mobile_no: string, public student_img: string) {}
- }
I have created one class for students which contains 4 columns like rno, name, mobile_no, and student_img.
Now, I will create a component to add a new student.
addstudent.component.html
- <div class="container">
- <form (ngSubmit)="studentSubmit()" #addform="ngForm">
- <div class="form-group"> <label for="id">rollno</label> <input type="number" [(ngModel)]="model.rno" name="rno" class="form-control" id="rno" required #rno="ngModel"> </div>
- <div [hidden]="rno.valid || rno.pristine" class="alert alert-danger"> Roll No is required </div>
- <div class="form-group"> <label for="name">Name</label> <input type="text" [(ngModel)]="model.name" name="name" class="form-control" id="name" required #name="ngModel"> </div>
- <div [hidden]="name.valid || name.pristine" class="alert alert-danger"> Student Name is required </div>
- <div class="form-group"> <label for="name">Mobile Number</label> <input type="text" [(ngModel)]="model.mobile_no" name="mobile_no" class="form-control" id="mobile_no" required #mobile_no="ngModel"> </div>
- <div [hidden]="mobile_no.valid || mobile_no.pristine" class="alert alert-danger"> Student Mobile Number is required </div>
- <div class="form-group"> <input type="file" name="student_img" required (change)="fileChange(input)" #input /> </div>
- <div> <img [attr.src]='file_srcs[0]' alt="" /> </div> <button type="submit" class="btn btn-default form-control" [disabled]="!addform.form.valid">Add Task</button> </form>
- </div>
Here, in the above HTML, I used <input type=”file” />, and created filechange() method to create a preview of selected file.
addstudent.component.ts
- import {
- Component,
- OnInit,
- ChangeDetectorRef
- } from '@angular/core';
- import {
- Student
- } from './student';
- import {
- StudentdataService
- } from './studentdata.service';
- import {
- Router
- } from '@angular/router';
- @Component({
- selector: 'app-addstudent',
- templateUrl: './addstudent.component.html',
- styleUrls: ['./addstudent.component.css']
- })
- export class AddstudentComponent implements OnInit {
- model = {
- rno: 0,
- name: '',
- mobile_no: '',
- student_img: ''
- };
- path = '';
- public file_srcs: string[] = [];
- public debug_size_before: string[] = [];
- public debug_size_after: string[] = [];
- constructor(private changeDetectorRef: ChangeDetectorRef, private studata: StudentdataService, public _route: Router) {}
- ngOnInit() {}
- fileChange(input) {
- this.readFiles(input.files);
- }
- readFile(file, reader, callback) {
- reader.onload = () => {
- callback(reader.result);
- this.model.student_img = reader.result;
- console.log(reader.result);
- }
- reader.readAsDataURL(file);
- }
- readFiles(files, index = 0) {
- // Create the file reader
- let reader = new FileReader();
- // If there is a file
- if (index in files) {
- // Start reading this file
- this.readFile(files[index], reader, (result) => {
- // Create an img element and add the image file data to it
- var img = document.createElement("img");
- img.src = result;
- // Send this img to the resize function (and wait for callback)
- this.resize(img, 250, 250, (resized_jpeg, before, after) => {
- // For debugging (size in bytes before and after)
- this.debug_size_before.push(before);
- this.debug_size_after.push(after);
- // Add the resized jpeg img source to a list for preview
- // This is also the file you want to upload. (either as a
- // base64 string or img.src = resized_jpeg if you prefer a file).
- this.file_srcs.push(resized_jpeg);
- // Read the next file;
- this.readFiles(files, index + 1);
- });
- });
- } else {
- // When all files are done This forces a change detection
- this.changeDetectorRef.detectChanges();
- }
- }
- resize(img, MAX_WIDTH: number, MAX_HEIGHT: number, callback) {
- // This will wait until the img is loaded before calling this function
- return img.onload = () => {
- // Get the images current width and height
- var width = img.width;
- var height = img.height;
- // Set the WxH to fit the Max values (but maintain proportions)
- if (width > height) {
- if (width > MAX_WIDTH) {
- height *= MAX_WIDTH / width;
- width = MAX_WIDTH;
- }
- } else {
- if (height > MAX_HEIGHT) {
- width *= MAX_HEIGHT / height;
- height = MAX_HEIGHT;
- }
- }
- // create a canvas object
- var canvas = document.createElement("canvas");
- // Set the canvas to the new calculated dimensions
- canvas.width = width;
- canvas.height = height;
- var ctx = canvas.getContext("2d");
- ctx.drawImage(img, 0, 0, width, height);
- // Get this encoded as a jpeg
- // IMPORTANT: 'jpeg' NOT 'jpg'
- var dataUrl = canvas.toDataURL('image/jpeg');
- // callback with the results
- callback(dataUrl, img.src.length, dataUrl.length);
- };
- }
- studentSubmit() {
- this.studata.addStudent(this.model).subscribe(
- (data: any) => {
- this._route.navigate(['/allStudent']);
- },
- function(error) {
- console.log(error);
- },
- function() {
- console.log("On Complete");
- });
- }
- }
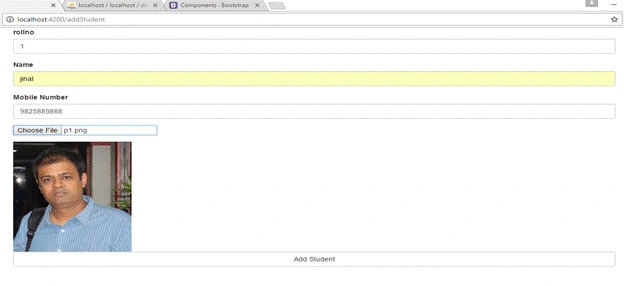
In the above code, I have created the filechange method which will be fired when file is selected. I have created two more functions for resizing the file and converting the file to base 64. Finally, on clicking the "Add Student" button, I am submitting the data using post method and on success, it will navigate back to student display page.
students.component.html
- <div class="container">
- <div class="row"> <button (click)="addStudent()">Add Student</button> <br/>
- <table class="table">
- <thead>
- <th>RollNo</th>
- <th>Name</th>
- <th>Mobile Number</th>
- <th>Photo</th>
- <th>Action</th>
- </thead>
- <tbody>
- <tr *ngFor="let item of allStudent ">
- <td>{{item.rno}}</td>
- <td>{{item.name | uppercase}}</td>
- <td>{{item.mobile_no}}</td>
- <td><span class="thumbnail"><img src="http://localhost:3000{{item.student_img}}" height="150px" width="150px" /></span></td>
- <td><button (click)="delStudent(item)"><span class="glyphicon glyphicon-trash"></span></button> </td>
- </tr>
- </tbody>
- </table>
- </div>
- </div>
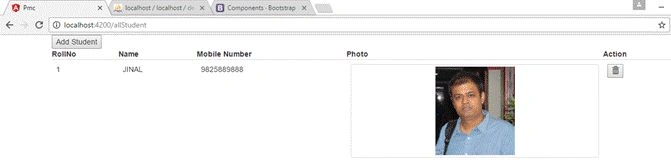
In this HTML, I am displaying the list of all students.
students.component.ts
- import {
- Component,
- OnInit
- } from '@angular/core';
- import {
- Student
- } from './student';
- import {
- StudentdataService
- } from './studentdata.service';
- import {
- Router
- } from '@angular/router';
- @Component({
- selector: 'app-students',
- templateUrl: './students.component.html',
- styleUrls: ['./students.component.css']
- })
- export class StudentsComponent implements OnInit {
- allStudent: Student[] = [];
- constructor(private _studata: StudentdataService, private _route: Router) {}
- ngOnInit() {
- this._studata.getAllStudent().subscribe(
- (data: Student[]) => {
- this.allStudent = data;
- },
- function(error) {
- console.log(error);
- },
- function() {
- console.log("complete");
- });
- }
- addStudent() {
- this._route.navigate(['/addStudent']);
- }
- delStudent(item: Student) {
- this._studata.deleteStudent(item).subscribe(
- (data: any) => {
- this.allStudent.splice(this.allStudent.indexOf(item), 1);
- },
- function(error) {
- console.log(error);
- },
- function() {});
- }
- }
The above code will loop through the "allStudent" array and display each and every student in HTML.
Add Student
Display Student
Conclusion
This tutorial is in continuation of my Angular 2 series. If you do not understand anything in this article, please go through the other parts of the tutorial. For example, if you are wondering how routing is done, then you can simply find everything here.
First LastPosted Nov 14, 2019, 3:40 PM
At add time, how to store the image into a database table as a column: [ImageData] [varbinary](max) NOT NULL. Not into a folder.
PoojaPosted Sep 30, 2017, 10:29 AM
Does front end work if in backend java is used