

Introduction
In this article, we will learn about how to select multiple images from our gallery and display them on recyclerview. To achieve this, we need the user's permission to open the mobile gallery and design our layout. We also need an adaptor class for the recyclerview.
Prerequisites
- Having the latest version of the android studio.
- Having a basic knowledge of recyclerview, you can check out this article RecyclerView In Android to understand the concept of recyclerview.
Implementation
Step 1
Create a new project in android studio and select Empty Activity.
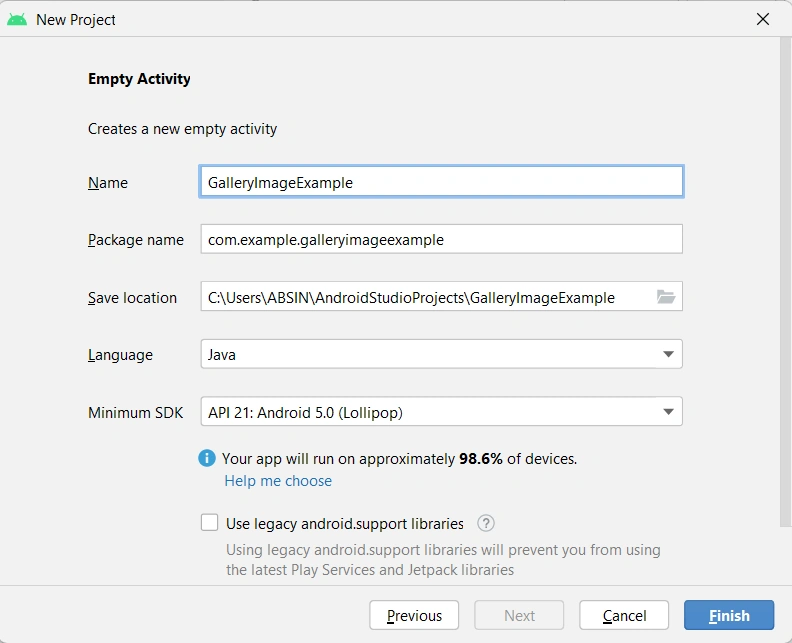
Click on the finish button.
Step 2
Go to AndroidManifest.xml and add the following user permissions.
<uses-permission android:name="android.permission.READ_EXTERNAL_STORAGE"/>
<uses-permission android:name="android.permission.WRITE_EXTERNAL_STORAGE"/>
We need the above permissions to open the gallery.
Step 3
Go to activity_main.xml and add the following code
activity_main.xml
<?xml version="1.0" encoding="utf-8"?>
<androidx.constraintlayout.widget.ConstraintLayout
xmlns:android="http://schemas.android.com/apk/res/android"
    xmlns:app="http://schemas.android.com/apk/res-auto"
    xmlns:tools="http://schemas.android.com/tools"
    android:layout_width="match_parent"
    android:layout_height="match_parent"
    tools:context=".MainActivity">

    <com.google.android.material.button.MaterialButton
        android:id="@+id/button"
        style="@style/Widget.MaterialComponents.Button.OutlinedButton"
        android:layout_width="wrap_content"
        android:layout_height="wrap_content"
        android:layout_marginTop="20dp"
        android:text="Pick Image"
        android:textAllCaps="false"
        app:layout_constraintEnd_toEndOf="parent"
        app:layout_constraintHorizontal_bias="0.445"
        app:layout_constraintStart_toStartOf="parent"
        app:layout_constraintTop_toTopOf="parent"
        app:strokeColor="@color/purple_700" />

    <TextView
        android:id="@+id/textView"
        android:layout_width="wrap_content"
        android:layout_height="wrap_content"
        android:layout_marginTop="20dp"
        android:text="Image Count:"
        android:textColor="@color/purple_700"
        android:textSize="20dp"
        app:layout_constraintEnd_toEndOf="parent"
        app:layout_constraintHorizontal_bias="0.447"
        app:layout_constraintStart_toStartOf="parent"
        app:layout_constraintTop_toBottomOf="@+id/button" />

    <androidx.recyclerview.widget.RecyclerView
        android:id="@+id/recycler"
        android:layout_width="match_parent"
        android:layout_height="wrap_content"
        android:layout_margin="20dp"
        android:elevation="20dp"
        app:layout_constraintEnd_toEndOf="parent"
        app:layout_constraintStart_toStartOf="parent"
        app:layout_constraintTop_toBottomOf="@+id/textView" />

</androidx.constraintlayout.widget.ConstraintLayout>
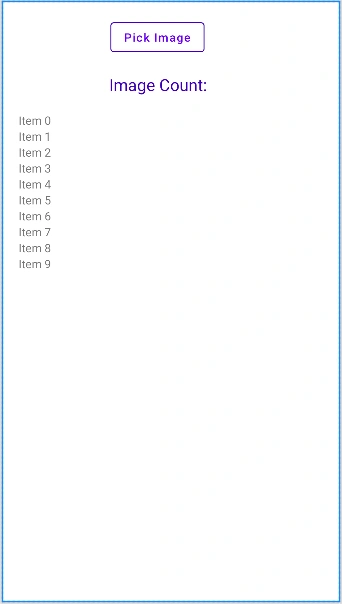
Here we take 1 button, 1 textview, and 1 recyclerview.
activity_main.xml layout
Step 3
Create a new layout named custom_item_layout inside layout folder and add the following code
custom_item_layout.xml
<?xml version="1.0" encoding="utf-8"?>
<androidx.constraintlayout.widget.ConstraintLayout
xmlns:android="http://schemas.android.com/apk/res/android"
    xmlns:app="http://schemas.android.com/apk/res-auto"
    xmlns:tools="http://schemas.android.com/tools"
    android:layout_width="match_parent"
    android:layout_height="wrap_content">

    <ImageView
        android:id="@+id/imageView"
        android:layout_width="match_parent"
        android:layout_height="0dp"
        android:src="@mipmap/ic_launcher"
        android:scaleType="centerCrop"
        app:layout_constraintDimensionRatio="1"
        tools:ignore="MissingConstraints" />

</androidx.constraintlayout.widget.ConstraintLayout>
Here we take 1 imageview.
custom_item_layout.xml layout

Step 4
Create an adaptor class inside the java folder
RecyclerAdaptor.java
package com.example.galleryimageexample;

import android.net.Uri;
import android.view.LayoutInflater;
import android.view.View;
import android.view.ViewGroup;
import android.widget.ImageView;
import androidx.annotation.NonNull;
import androidx.recyclerview.widget.RecyclerView;
import java.util.ArrayList;

public class RecyclerAdaptor extends RecyclerView.Adapter<RecyclerAdaptor.ViewHolder> {

    private ArrayList list;

    public RecyclerAdaptor(ArrayList list) {
        this.list = list;
    }

    @NonNull
    @Override
    public RecyclerAdaptor.ViewHolder onCreateViewHolder(@NonNull ViewGroup parent, int viewType){
        LayoutInflater inflater=LayoutInflater.from(parent.getContext());
        View view =inflater.inflate(R.layout.custom_item_layout,parent,false);
        return new ViewHolder(view);
    }

    @Override
    public void onBindViewHolder(@NonNull RecyclerAdaptor.ViewHolder holder, int position) {
      holder.imageView.setImageURI((Uri) list.get(position));
    }

    @Override
    public int getItemCount() {
        return list.size();
    }

    public class ViewHolder extends RecyclerView.ViewHolder {
        ImageView imageView;
        public ViewHolder(@NonNull View itemView) {
            super(itemView);
            imageView=itemView.findViewById(R.id.imageView);
        }
    }
}
Step 5
Go to MainActivity.java and add the following code
MainActivity.java
package com.example.galleryimageexample;

import androidx.annotation.Nullable;
import androidx.appcompat.app.AppCompatActivity;
import androidx.core.app.ActivityCompat;
import androidx.recyclerview.widget.GridLayoutManager;
import androidx.recyclerview.widget.RecyclerView;
import android.Manifest;
import android.content.Intent;
import android.content.pm.PackageManager;
import android.net.Uri;
import android.os.Build;
import android.os.Bundle;
import android.view.View;
import android.widget.Button;
import android.widget.TextView;
import java.util.ArrayList;

public class MainActivity extends AppCompatActivity implements View.OnClickListener {
    RecyclerView recyclerView;
    TextView textView;
    Button button;
    ArrayList<Uri> list;
    RecyclerAdaptor adaptor;
    String colum[]={
            Manifest.permission.WRITE_EXTERNAL_STORAGE,
            Manifest.permission.READ_EXTERNAL_STORAGE};

    @Override
    protected void onCreate(Bundle savedInstanceState) {
        super.onCreate(savedInstanceState);
        setContentView(R.layout.activity_main);
        list=new ArrayList<>();
        recyclerView=findViewById(R.id.recycler);
        textView=findViewById(R.id.textView);
        button=findViewById(R.id.button);
        adaptor=new RecyclerAdaptor(list);
        recyclerView.setLayoutManager(new GridLayoutManager(MainActivity.this,4));
        recyclerView.setAdapter(adaptor);
        button.setOnClickListener(this);

        if((ActivityCompat.checkSelfPermission(
                this,colum[0])!= PackageManager.PERMISSION_GRANTED)&&
           (ActivityCompat.checkSelfPermission(
                   this,colum[1])!= PackageManager.PERMISSION_GRANTED)){
            if (Build.VERSION.SDK_INT >= Build.VERSION_CODES.M) {
                requestPermissions(colum,123);
            }
        }

    }

    @Override
    public void onClick(View view) {

        switch (view.getId()){
            case R.id.button:
                openGalley();
                break;
        }

    }

    private void openGalley() {
        Intent intent=new Intent();
        intent.setType("image/*");
        intent.putExtra(Intent.EXTRA_ALLOW_MULTIPLE,true);
        intent.setAction(Intent.ACTION_GET_CONTENT);
        startActivityForResult(Intent.createChooser(intent,"Selcet Picture"),123);
    }


    @Override
    protected void onActivityResult(int requestCode, int resultCode, @Nullable Intent data) {
        super.onActivityResult(requestCode, resultCode, data);
        if(requestCode==123 && resultCode==RESULT_OK){
            if(data.getClipData()!=null){
                int x=data.getClipData().getItemCount();
                for(int i=0;i<x;i++){
                    list.add(data.getClipData().getItemAt(i).getUri());
                }
                adaptor.notifyDataSetChanged();
                textView.setText("Image("+list.size()+")");
            }else if(data.getData()!=null){
                String imgurl=data.getData().getPath();
                list.add(Uri.parse(imgurl));
            }
        }
    }
}
Step 6

Now click on the run button and launch the application
Output
Conclusion
In this article, we have seen how to select multiple images from the gallery and display them on recyclerview. Thanks for reading and hope you like it. If you have any suggestions or queries on this article, please share your thoughts.
Join the conversation! Your thoughts help the community grow.