

Introduction
In this article I'll show you how to create a simple Xamarin.Forms application that gets your coordinates and retrieves them on your default map application.
This will be possible using the Xamarin Essentials API for Geolocation and Maps.
If you want, you can download the solution from my GitHub Repository.
Of course this is a very basic solution and, If you want, I invite you to improve it.
Prerequisites
IDE: Visual Studio 2019 (All Versions).
The steps given below will lead you to the goal.
Step 1
Create a new blank Xamarin.Forms project for Android and iOS.
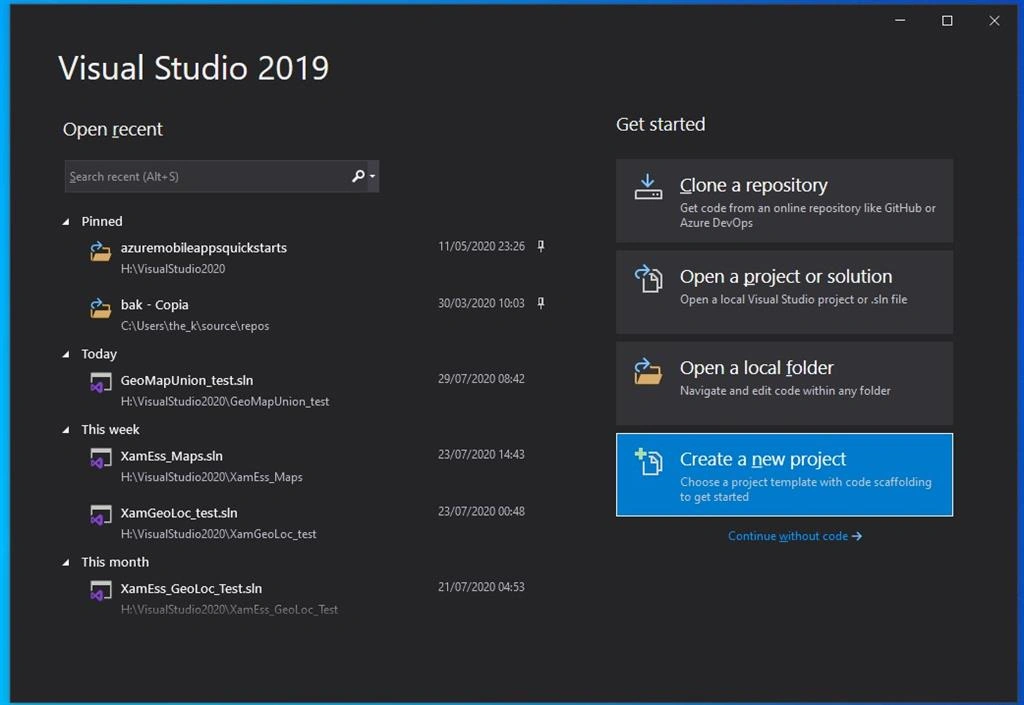
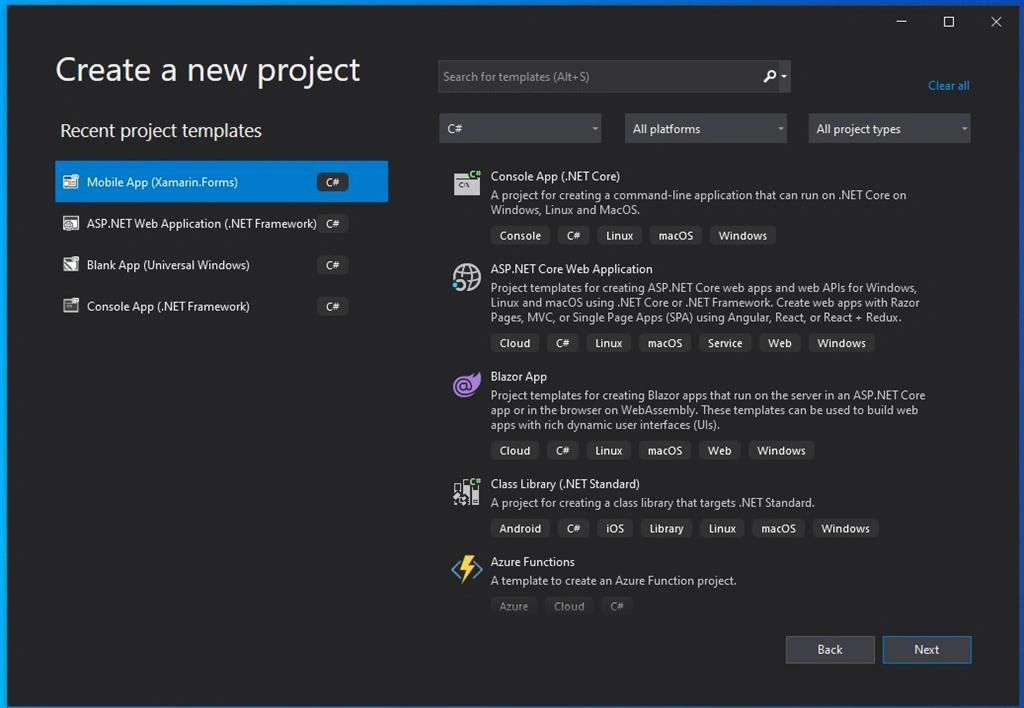
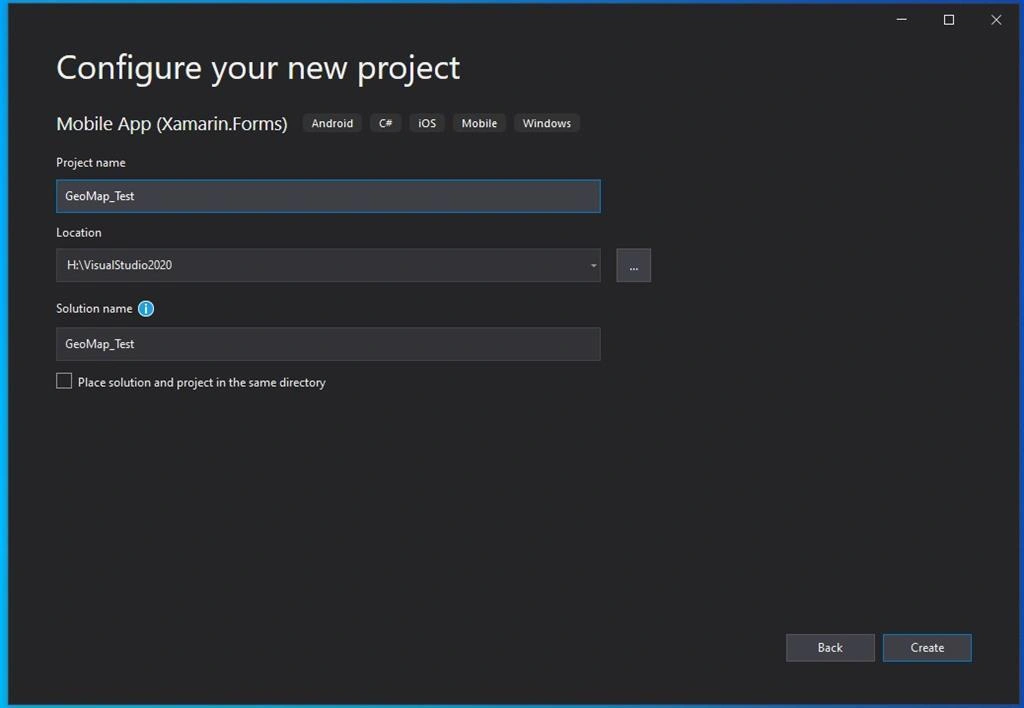
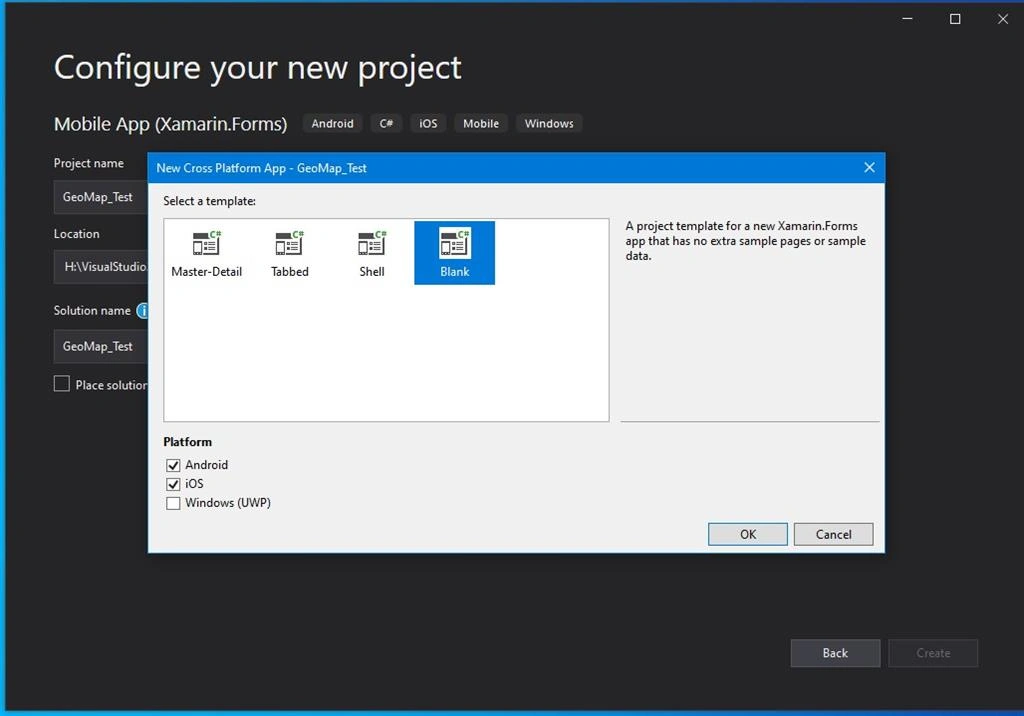
Step 2
Write the code for the App.xaml file.
With this step, we'll define the general graphic aspect of the application controllers.
Go to Solution Explorer -> Double Click on App.xaml, delete the auto-generated code and write the following,
- <?xml version="1.0" encoding="utf-8" ?>
- <Application xmlns="http://xamarin.com/schemas/2014/forms"
- xmlns:x="http://schemas.microsoft.com/winfx/2009/xaml"
- xmlns:d="http://xamarin.com/schemas/2014/forms/design"
- xmlns:mc="http://schemas.openxmlformats.org/markup-compatibility/2006"
- mc:Ignorable="d"
- x:Class="GeoMap_Test.App">
- <Application.Resources>
- <Style x:Key="CustomLabel" TargetType="Label">
- <Setter Property="FontSize" Value="Large"/>
- <Setter Property="FontAttributes" Value="Bold"/>
- <Setter Property="BackgroundColor" Value="Ivory"/>
- <Setter Property="WidthRequest" Value="150"/>
- <Setter Property="HeightRequest" Value="80"/>
- <Setter Property="HorizontalTextAlignment" Value="Center"/>
- <Setter Property="VerticalTextAlignment" Value="Center"/>
- </Style>
- <Style x:Key="CustomButton" TargetType="Button">
- <Setter Property="BackgroundColor" Value="LightGray"/>
- <Setter Property="WidthRequest" Value="180"/>
- <Setter Property="HeightRequest" Value="60"/>
- <Setter Property="CornerRadius" Value="15"/>
- </Style>
- </Application.Resources>
- </Application>
Step 3
Write the code for the MainPage.xaml file.
This step allows us to define the aspect of the MainPage.
Tip:
Please, note that I used the <StackLayout> tag. If you want, you can create a <Grid>.
Go to Solution Explorer -> Double Click on MainPage.xaml, delete the auto-generated code and write the following,
- <?xml version="1.0" encoding="utf-8" ?>
- <ContentPage xmlns="http://xamarin.com/schemas/2014/forms"
- xmlns:x="http://schemas.microsoft.com/winfx/2009/xaml"
- xmlns:d="http://xamarin.com/schemas/2014/forms/design"
- xmlns:mc="http://schemas.openxmlformats.org/markup-compatibility/2006"
- mc:Ignorable="d"
- x:Class="GeoMap_Test.MainPage"
- Title="Geo Map Application"
- BackgroundImageSource="dreamstime_xxl_88693404.jpg">
- <ContentPage.Content>
- <StackLayout Spacing="100" VerticalOptions="CenterAndExpand">
- <StackLayout Padding="10">
- <Label Text="Welcome to the GeoMapUnion test."
- HorizontalOptions="Center" FontSize="Large" TextColor="Brown"/>
- </StackLayout>
- <StackLayout HorizontalOptions="Center">
- <Button Text="Get your location" Clicked="GetYourLocation_Clicked"
- Style="{StaticResource CustomButton}"/>
- </StackLayout>
- <StackLayout Orientation="Horizontal" HorizontalOptions="Center" Spacing="60">
- <Label Text="Latitude" x:Name="YourLocationLatitude" Style="{StaticResource CustomLabel}"/>
- <Label Text="Longitude" x:Name="YourLocationLongitude" Style="{StaticResource CustomLabel}"/>
- </StackLayout>
- <StackLayout HorizontalOptions="Center">
- <Button Text="Go To Map" Clicked="GoToMap_Clicked" Style="{StaticResource CustomButton}"/>
- </StackLayout>
- </StackLayout>
- </ContentPage.Content>
- </ContentPage>
Step 4
Write the code-behind for the MainPage.xaml.cs file.
Now, we have to define the behavior, the engine, of the application.
Go to Solution Explorer -> Double Click on MainPage.xaml.cs, delete the auto-generated code and write the following,
- using System;
- using System.Collections.Generic;
- using System.ComponentModel;
- using System.Linq;
- using System.Text;
- using System.Threading.Tasks;
- using Xamarin.Forms;
- using Xamarin.Essentials;
- namespace GeoMap_Test {
- // Learn more about making custom code visible in the Xamarin.Forms previewer
- // by visiting https://aka.ms/xamarinforms-previewer
- [DesignTimeVisible(false)]
- public partial class MainPage : ContentPage {
- public MainPage() {
- InitializeComponent();
- }
- /* With this section, we'll implement the
- GeoLocation API by Xamarin Essentials*/
- #region GeoLocation API
- private async void GetYourLocation_Clicked(object sender, EventArgs e) {
- try
- {
- var yourLocation = await Geolocation.GetLocationAsync(new GeolocationRequest()
- {
- DesiredAccuracy = GeolocationAccuracy.Medium,
- Timeout = TimeSpan.FromSeconds(30)
- });
- if (yourLocation == null)
- await DisplayAlert("Attention", "GPS is not available", "Ok");
- else
- YourLocationLatitude.Text = $"{yourLocation.Latitude}";
- YourLocationLongitude.Text = $"{yourLocation.Longitude}";
- }
- catch (Exception ex)
- {
- await DisplayAlert("Ooops!", $"Something went wrong: {ex.Message}", "Ok");
- }
- }
- #endregion
- /* With this section we'll implement the
- Maps API by Xamarin Essentials*/
- #region Maps API
- private async void GoToMap_Clicked(object sender, EventArgs e) {
- try
- {
- await Map.OpenAsync(double.Parse(YourLocationLatitude.Text), double.Parse(YourLocationLongitude.Text), new MapLaunchOptions
- {
- Name = "Your location",
- NavigationMode = NavigationMode.None
- });
- }
- catch (Exception ex1)
- {
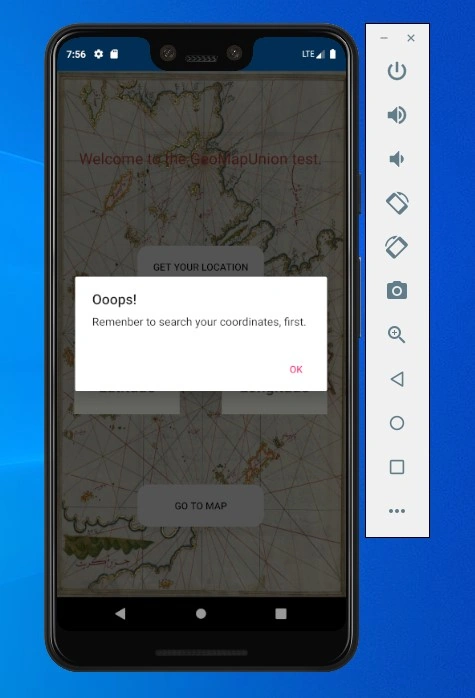
- await DisplayAlert("Ooops!", $"Remember to search your coordinates, first.", "Ok");
- }
- }
- #endregion
- }
- }
Step 4
Copy the Backgroud Image.
Now, download the BackgroudImage.zip file (from the top of the article), unzip and copy the file "dreamstime_xxl_88693404.jpg" into the following folders:
Android,
- \Resources\drawable
- \Resources\mipmap-anydpi-v26
- \Resources\mipmap-hdpi
- \Resources\mipmap-mdpi
- \Resources\mipmap-xhdpi
- \Resources\mipmap-xxhdpi
- \Resources\mipmap-xxxhdpi
iOS,
- \Resources
Step 5
Add the correct permissions for every mobile platform.
Android:
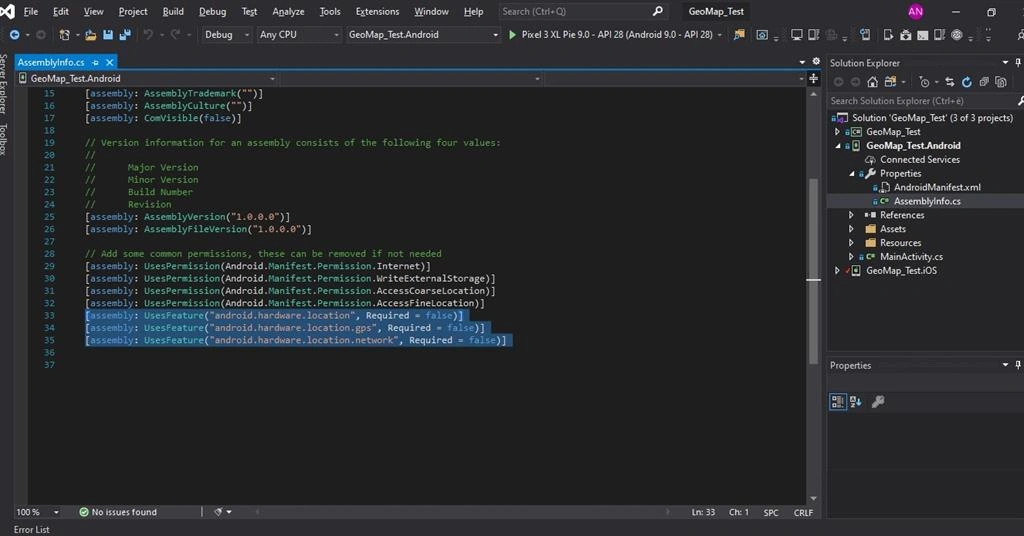
Go to Solution Explorer -> GeoMap_Test.Android -> Properties. Double click on AssemblyInfo.cs file and add the following code to the end of the "Add some common permissions" block,
- [assembly: UsesFeature("android.hardware.location", Required = false)]
- [assembly: UsesFeature("android.hardware.location.gps", Required = false)]
- [assembly: UsesFeature("android.hardware.location.network", Required = false)]
iOS
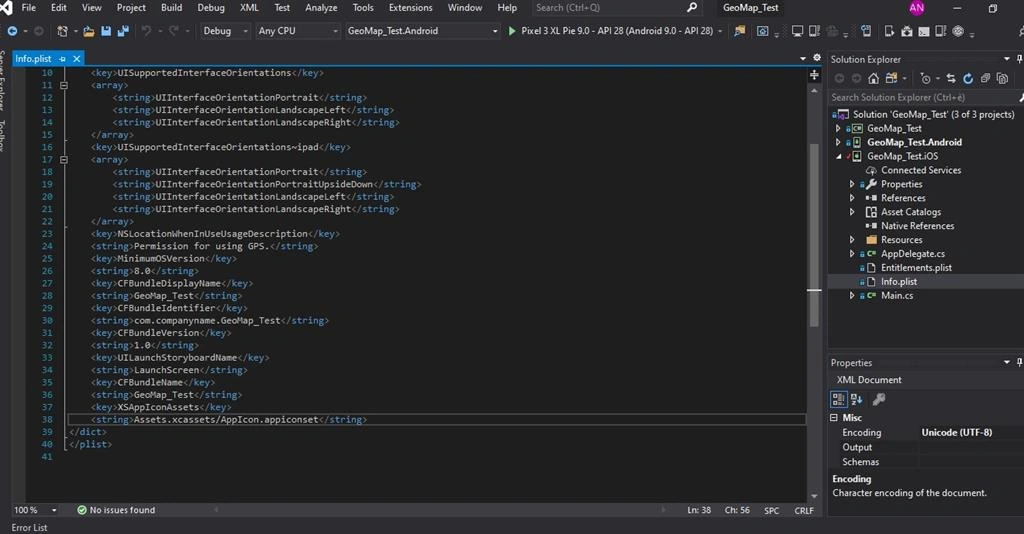
Go to Solution Explorer -> GeoMap_Test.iOS. Hit F7 on the Info.plist file and add the following code to the last code block,
- <key>NSLocationWhenInUseUsageDescription</key>
- <string>Permission for using GPS.</string>
Step 6
Platform Implementation Specifics for both mobile platforms,
Android
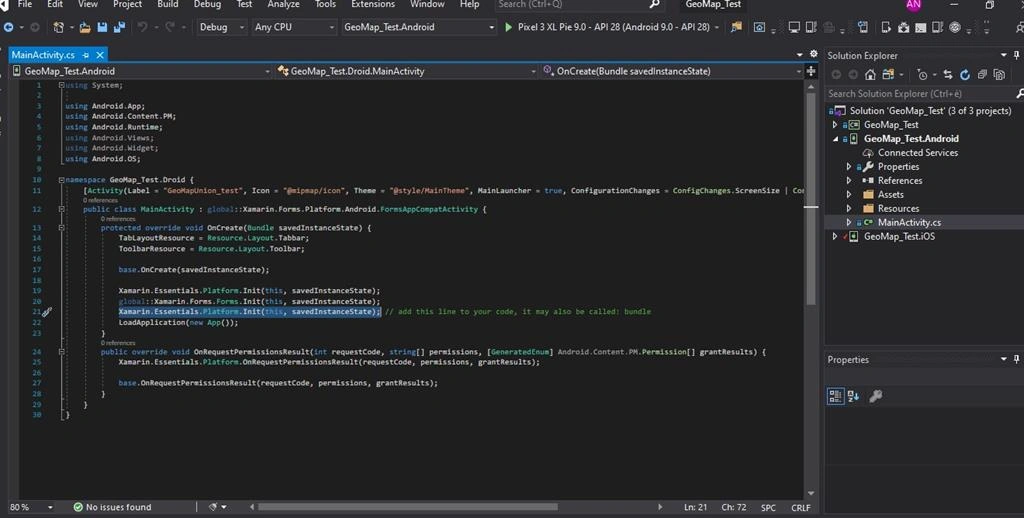
Go to Solution Explorer -> GeoMap_Test.Android -> Double click on MainActivity.cs file and add the following code to the OnCreate Method,
- Xamarin.Essentials.Platform.Init(this, savedInstanceState);
iOS
No Platform Implementation Specifics.
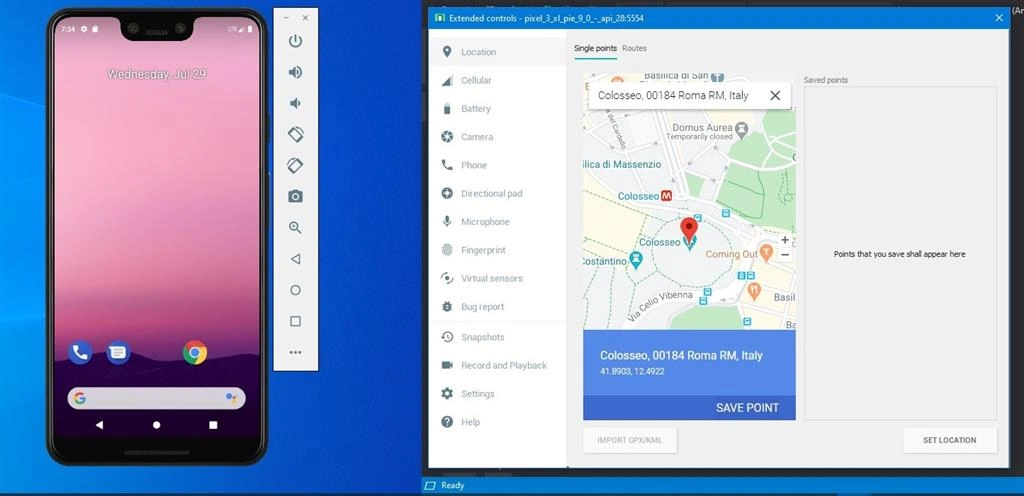
Step 7 - Configure the GPS on the emulators.
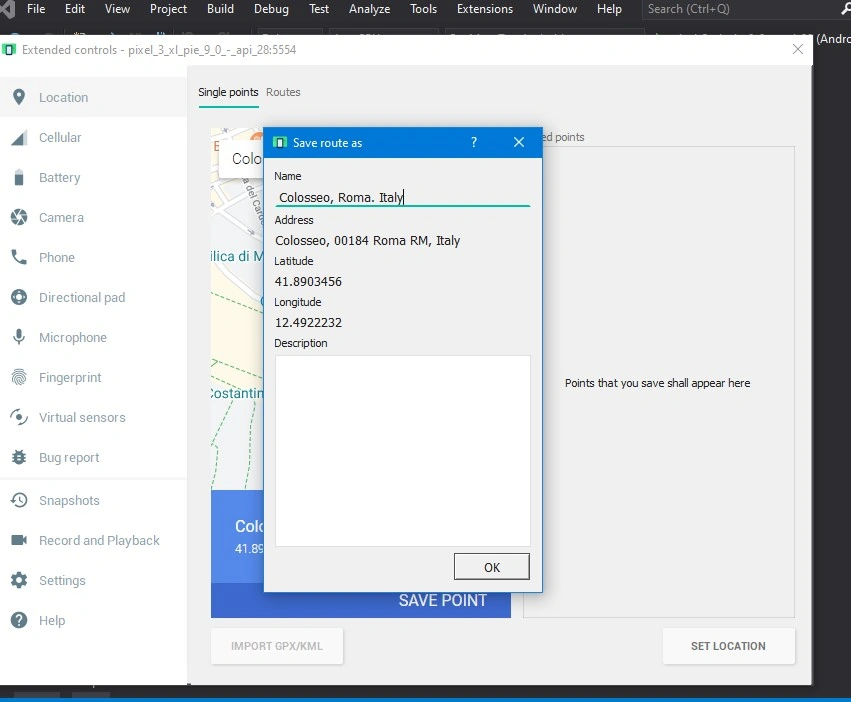
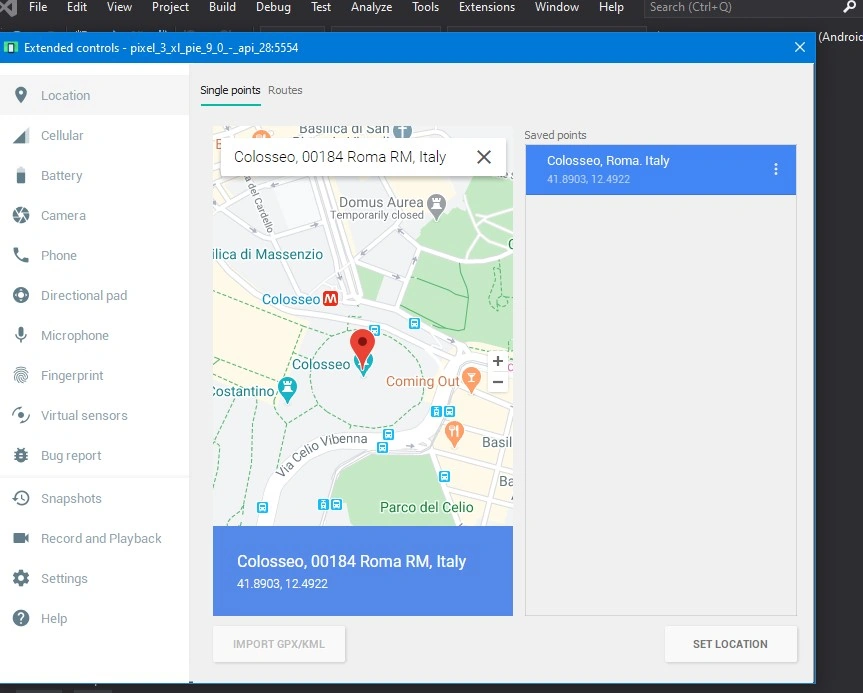
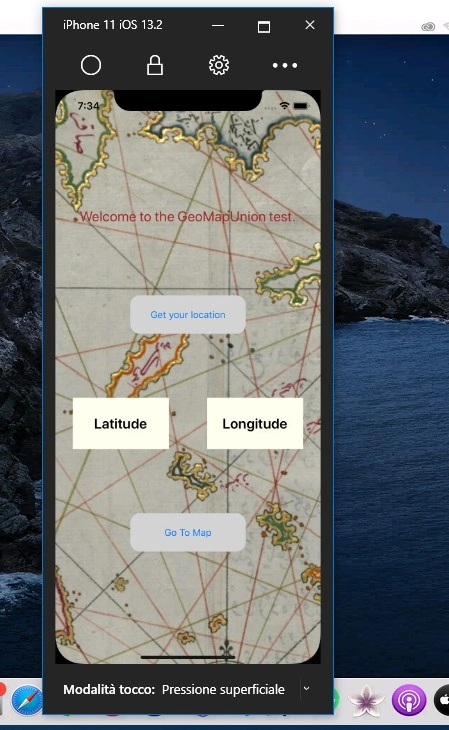
Now, we have to configure the GPS of both the simulators (of course this step is not necessary if you install the app into your smartphone).
Android
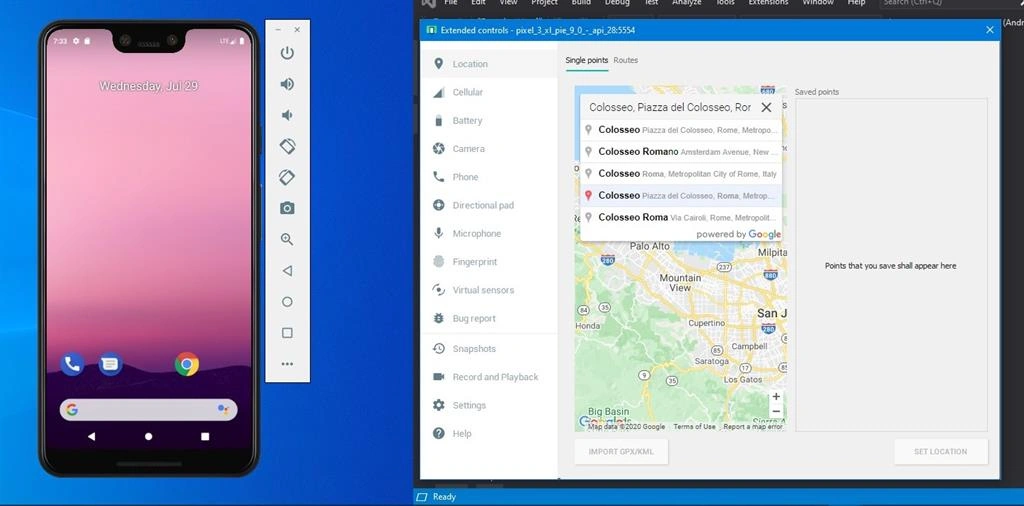
Launch the simulator -> Click on the three dots (menu) - > Location -> Write the Location name -> Save the point -> Ok.
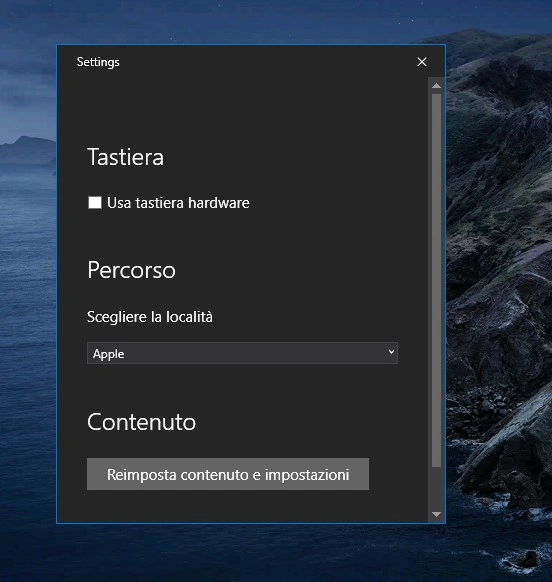
iOS
Launch the simulator -> Click on the gear (Settings) -> On Path choose "Apple".
Step 8
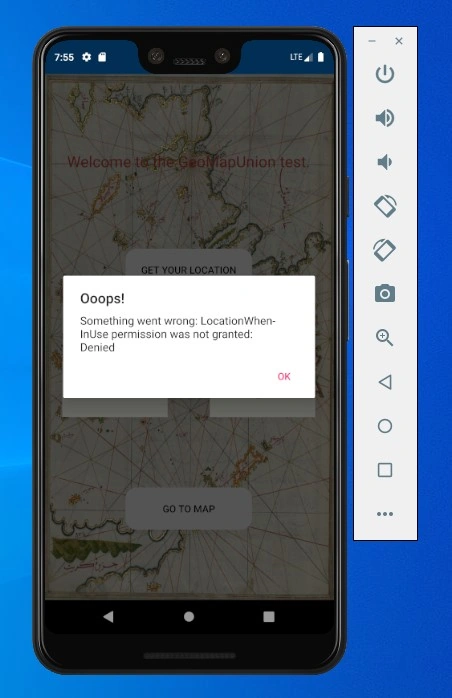
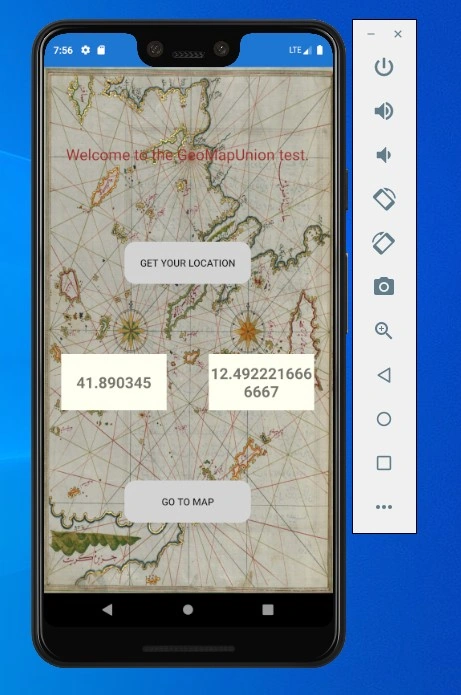
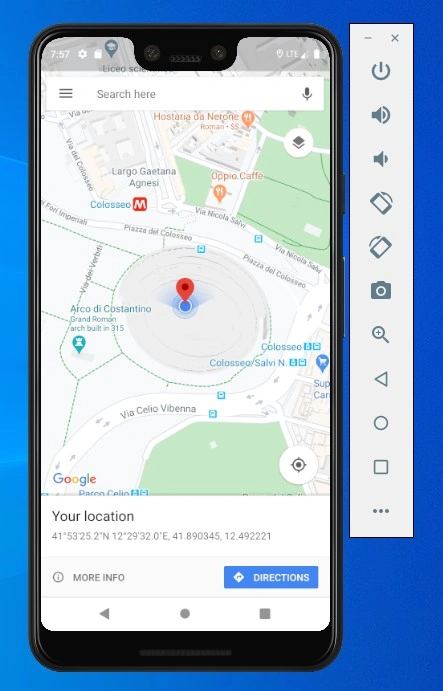
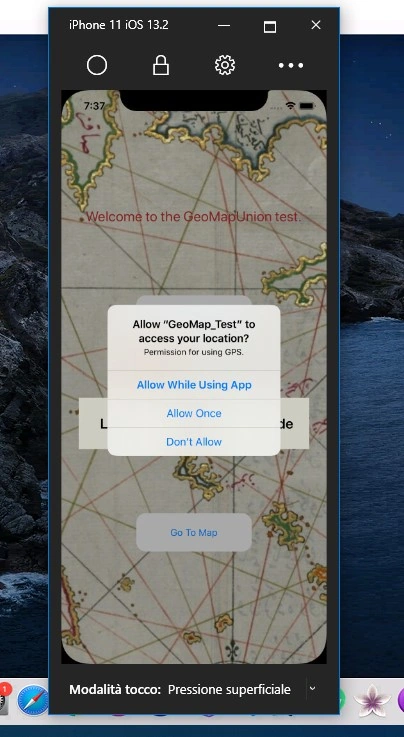
Output for both the mobile platforms.
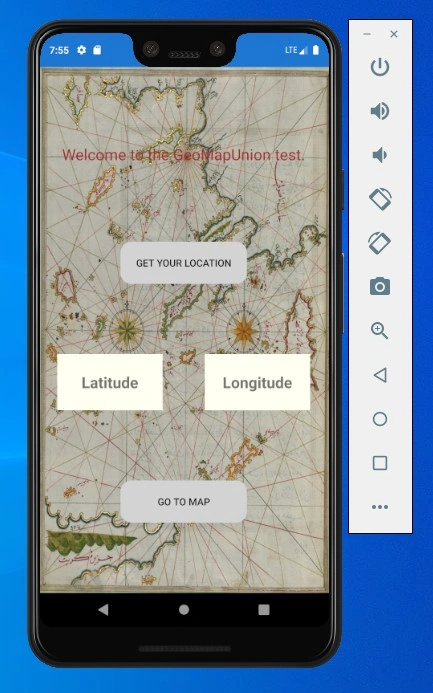
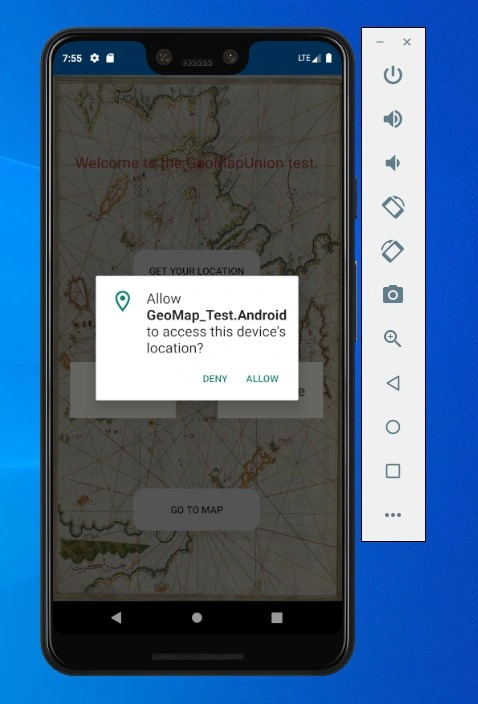
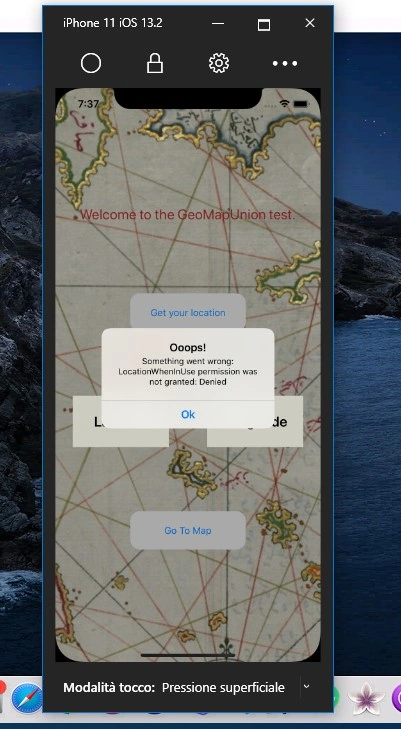
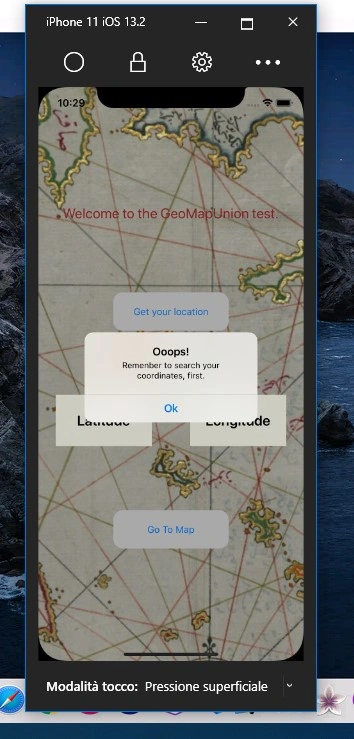
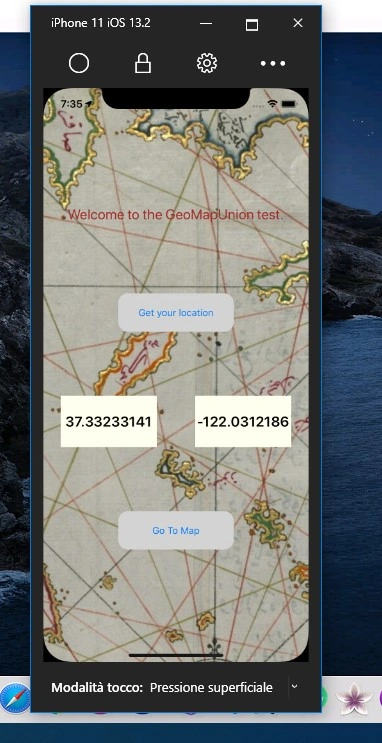
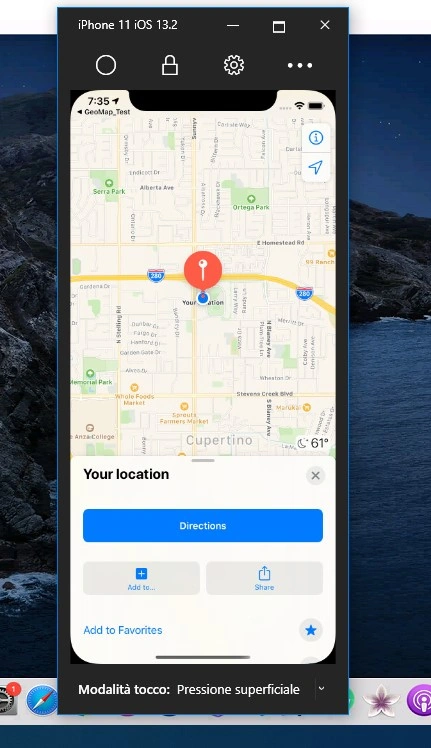
Well, we've finally arrived to the end. The following images show you the output of the application in both the mobile platforms.
Android
iOS
Conclusion
In this tutorial I've shown you how to create a basic Xamarin.Forms application that gets your coordinates and retrieves them on your default map app.
We've used the Xamarin Essentals APIs to reach this goal.
Of course, you can improve it and it's possible to "clean the code", but It's not the purpose of this demo.
The entire solution is available at this GitHub Repository
Feel free to share your feedback with me.
Thank you so much for your attention and interest.
Chittaranjan SwainPosted Nov 16, 2021, 11:00 AM
Nice article...