

Introduction
In this article we will learn about how to install and use a semantic UI framework in a React application. Semantic UI is a UI component framework for building resposive user interfaces. Semantic UI helps developers to create resposive websites with fast and compact HTML.
Prerequisites
- We should have a basic knowledge of HTML and ReactJS.
- Visual Studio Code installed
- Node and NPM installed
Step 1
Let's create a new React project by using the following command:
- npx create-react-app semanticuidemo
Open this project in Visual Studio Code and install semantic UI using the following command.
Install Semantic UI
Install Semantic UI by using the following command,
- npm install semantic-ui-react
Now open index.js file and import semantic UI css.
- import 'semantic-ui-css/semantic.min.css'
Now go to src folder and create a new component 'DemoUI.js' and in this component we will add a semantic UI button.
- import { Button } from 'semantic-ui-react'
- import React, { Component } from 'react'
- import { Button } from 'semantic-ui-react'
- export class DemoUI extends Component {
- render() {
- return (
- <div>
- <div class="ui blue inverted three item menu">
- <a class="item">Semantic UI Button</a>
- </div>
- <Button>Click Here</Button>
- <div>
- <br />
- <Button primary>Primary</Button>
- <Button secondary>Secondary</Button>
- </div>
- </div>
- )
- }
- }
- export default DemoUI
Open the App.js file and add the folllowing code.
- import React from 'react';
- import { DemoUI } from "./DemoUI";
- function App() {
- return (
- <div className="App">
- <DemoUI></DemoUI>
- </div>
- );
- }
- export default App;
Now, run the project by using 'npm start' command and check the result.
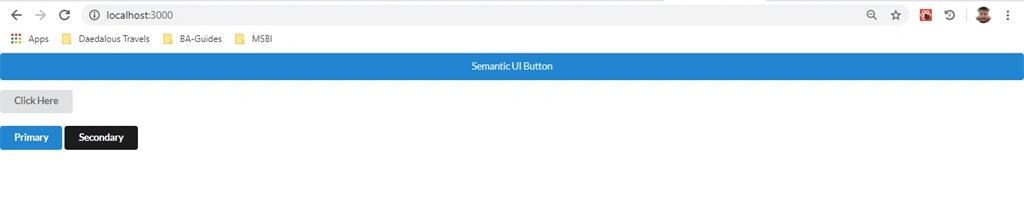
Now go to src folder and create another component 'Register.js' and in this component we will create a simple Registration form. Add the following code in this component.
- import React, { Component } from 'react'
- import { Button,Form,Grid,Message,Segment} from 'semantic-ui-react';
- export class Register extends Component {
- render() {
- return (
- <div>
- <div class="ui blue inverted three item menu">
- <a class="item">Registration Form</a>
- </div>
- <Grid centered columns={2}>
- <Grid.Column>
- <Segment>
- <Form size="large">
- <Form.Input
- fluid
- icon="user"
- iconPosition="left"
- placeholder="User Name"
- />
- <Form.Input
- fluid
- icon="user"
- iconPosition="left"
- placeholder="Email address"
- />
- <Form.Input
- fluid
- icon="lock"
- iconPosition="left"
- placeholder="Password"
- type="password"
- />
- <Form.Input
- fluid
- icon="home"
- iconPosition="left"
- placeholder="Address"
- />
- <Button color="blue" fluid size="large">
- Register
- </Button>
- </Form>
- </Segment>
- <Message>
- <a href="#">Login</a>
- </Message>
- </Grid.Column>
- </Grid>
- </div>
- )
- }
- }
- export default Register
Open the App.js file and add the folllowing code.
- import React from 'react';
- import { Register } from "./Register";
- function App() {
- return (
- <div className="App">
- <Register></Register>
- </div>
- );
- }
- export default App;
Now, run the project by using 'npm start' command and check the result.
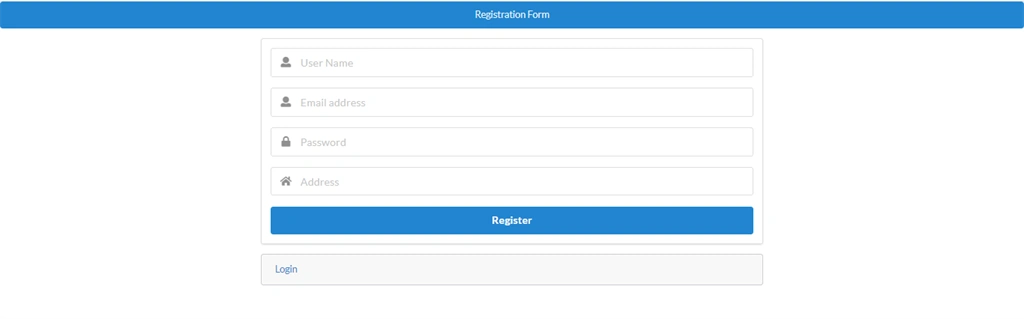
Now go to src folder and create another component, 'Navmenu.js', and in this component we will create create a navigation menu. Add the following code in this component.
- import React, { Component } from 'react'
- import { Menu } from 'semantic-ui-react'
- import { Button,Form,Grid,Message,Segment} from 'semantic-ui-react';
- export class Navmenu extends Component {
- render() {
- return (
- <div>
- <Grid centered columns={2}>
- <Grid.Column>
- <Menu pointing secondary>
- <Menu.Item icon="home" name='home' href="/home"/>
- <Menu.Item icon="find" name='About' href="/about"/>
- <Menu.Item icon="address book" name='contact' href="/contact"/>
- </Menu>
- </Grid.Column>
- </Grid>
- </div>
- )
- }
- }
- export default Navmenu
Open the App.js file and add the folllowing code.
- import React from 'react';
- import { Navmenu } from "./Navmenu";
- function App() {
- return (
- <div className="App">
- <Navmenu></Navmenu>
- </div>
- );
- }
- export default App;
Now, run the project by using 'npm start' command and check the result.

Summary
In this article, we learned the baisics of semantic UI and how to install semantic UI in a React.js application.
ChrisPosted Jun 29, 2020, 8:12 AM
Sadly, it looks like Semantic UI is dead, as it hasn't received an update in 2 years. Maybe an article on the forked Fomantic-UI project, which is actively being updated would be cool.