

Introduction
The internet of things is a technology; it can connect many physical devices with other devices through the Internet. These connected physical devices are controlled and monitored anywhere & anytime throughout the world.
In this article, we are solving a home LPG Cylinder fire prevention system using IoT technology. By reading this, you will learn how to develop an LPG gas detection system using Arduino UNO R3
Prerequisites
Hardware requirements:
| Hardware | Nos |
| Arduino UNO R3 | 1 |
| Data cable for (Arduino) | 1 |
| MQ-2 Gas Sensor | 1 |
| LCD crystal [16x2] Display | 1 |
| Breadboard | 1 |
| 220-ohm Resistor | 1 |
|
10-ohm Potentiometer
|
1 |
| Jumper wires | - |
| Gas Lighter [For checking Gas Leakage] | 1 |
Software requirements:
Arduino IDE (Click the link to Download Arduino IDE)
In this experiment, we can do three stages of work to develop a gas detection system
- Connect all the hardware
- Write & upload code to Arduino board
- Test our developed system
Stage 1 (Connect all hardware)
First, we can connect an LCD crystal display with an Arduino UNO board using jumper wires. I am using a breadboard to extend power terminals for making this system.
Refer to the below LCD crystal Pin diagram for making an easy connection with Arduino
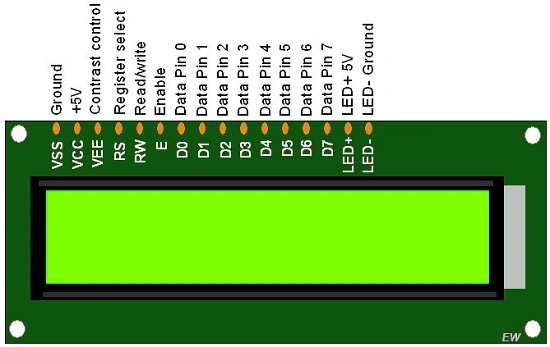
Place a 10K ohm potentiometer near the LCD crystal display. It can adjust the contrast of the LCD screen and create a power connection from Arduino +5V and GND right and left end of the potentiometer. Make a connection from the center terminal of the potentiometer to VEE (contrast control) LCD crystal display. (Refer to the connection diagram)
Pin Configuration
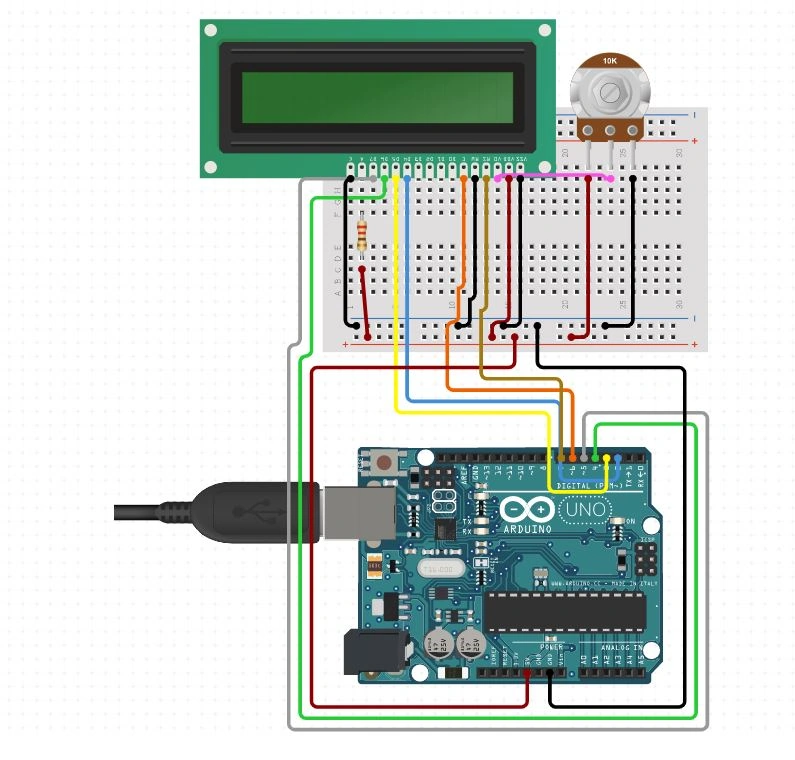
Arduino Breadboard LCD Crystal Display
Pin 2 ---------------------------------------------------------------------------------------------------> Data pin 4
Pin 3 ---------------------------------------------------------------------------------------------------> Data pin 5
Pin 4 ---------------------------------------------------------------------------------------------------->Data pin 6
Pin 5 -----------------------------------------------------------------------------------------------------> Data pin 7
Pin 7 ----------------------------------------------------------------------------------------------------> Register select
Pin 6 ---------------------------------------------------------------------------------------------------> Enable
+ 5V ----------> Potentiometer Right Terminal------>Potentiometer Centre terminal ----> VEE (Contrast Control) LCD crystal
+5V ---------------------------> 220-ohm Resistor ----------------------------------------------> LED +5V pin [LCD Crystal]
GND ---------------------------------------------------------------------------------------------------->Potentiometer Left terminal, Ground pin & LED - Ground pin [Connect to both pin]
Step 2
Next, we can connect an MQ-2 Gas sensor to Arduino, it’s very simple to connect this with the Arduino board.
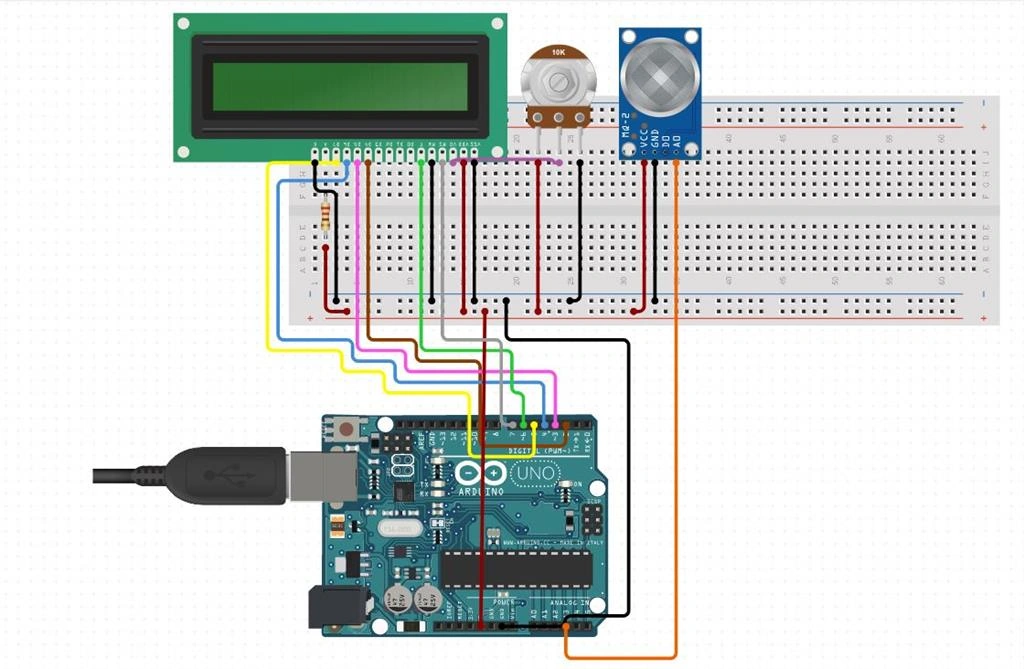
Arduino MQ-2 Gas sensor
A3 ------------------------------------------> A0 [Analog output pin]
+ 3.3 v or 5 V ---------------------------------> Vcc
GND --------------------------------------------> GND
All hardware connections are perfectly done :)
Stage 2 [Write & upload code to the Arduino board]
In this step, write code for Arduino using the Arduino IDE.
-
Download Arduino software using this link here.
-
Install and open an Arduino IDE on your PC/Laptop
-
Connect your Arduino board to your computer using a USB data cable
-
Copy and paste below the code into the Arduino IDE
- #include<LiquidCrystal.h>
- #define LCD_PIN_RS 7
- #define LCD_PIN_E 6
- #define LCD_PIN_DB4 2
- #define LCD_PIN_DB5 3
- #define LCD_PIN_DB6 4
- #define LCD_PIN_DB7 5
- #define gassensor A3
- LiquidCrystal lcd(LCD_PIN_RS,LCD_PIN_E,LCD_PIN_DB4,LCD_PIN_DB5,LCD_PIN_DB6,LCD_PIN_DB7);
- void setup() {
- Serial.begin(9600);
- lcd.begin(16, 2);
- }
- void loop() {
- lcd.setCursor(0, 0);
- lcd.print("C-ShCor Gas detection System");
- delay(500);
- gasread();
- }
- void gasread()
- {
- int d =analogRead(gassensor);
- if(d<80)
- {
- lcd.setCursor(0,1);
- lcd.print("No Gas Flow ");
- Serial.println("No Gas flow ");
- }
- else if (d>90&&d<110)
- {
- lcd.setCursor(0,1);
- lcd.print("Mild Gas Leak ");
- Serial.println("Mild Gas Leak ");
- }
- else if(d>110 && d< 150)
- {
- lcd.setCursor(0,1);
- lcd.print("Gas Leak detect ");
- Serial.println("Gas Leak Detect ");
- }
- else if (d>150&&d<300)
- {
- lcd.setCursor(0,1);
- lcd.print("Danger in home ");
- Serial.println("Danger in home ");
- }}
Save and upload this code to the Arduino UNO board, After Code upload is completed that device can start to detect Gas Leakage.
Stage 3 [Test our developed System]
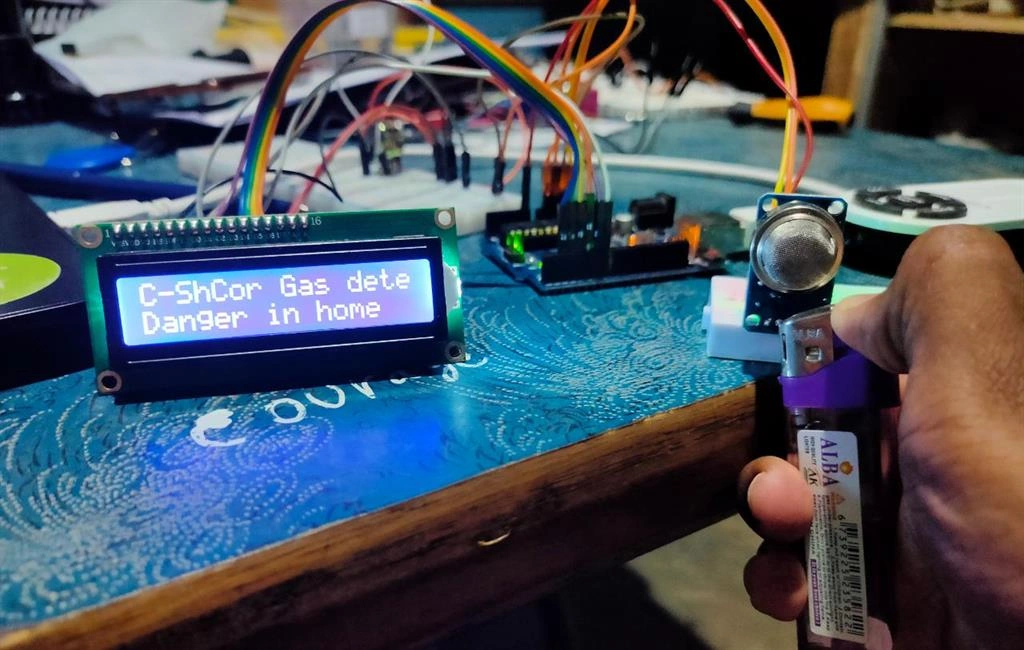
Our device is ready… Let's create a manual gas leak using a gaslighter.
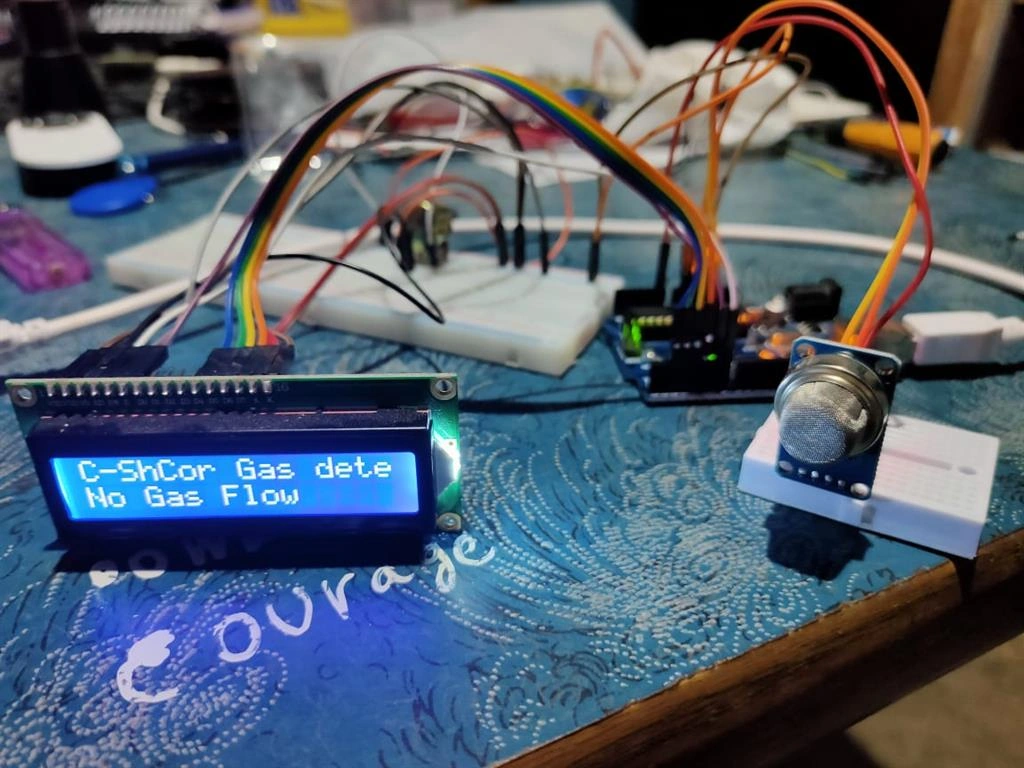
The gas detection system can detect a gas leakage successfully. It's working perfectly!
Elavarasan RPosted Feb 1, 2020, 8:47 PM
Good article, Move forward next.
Vijayaragavan SPosted Jan 31, 2020, 9:06 AM
Nice article....
Vijayakumar SPosted Jan 31, 2020, 8:17 AM
Hi, This article was nice.