

Introduction
Nowadays, the buzz word in the market is MS Flow. I would say that without MS Flow, SharePoint Online is incomplete. When we talk about SharePoint Online, we must talk about other related technology like MS Flow, PowerApps, SPFx, Teams, etc. These all go side by side. As Microsoft is focusing more on SharePoint Online, the on-premise version is not what they are recommending to use, not even the SharePoint designer workflow. In this context, we could say that MS Flow is a recommended/alternate approach of the modern way of developing a workflow, instead of designer workflow.
There are plenty of advantages of MS Flow – I am not going in-depth for this as the purpose of this article is to create HTML in MS Flow, so my focus would be on how we can make use of Create HTML action inside MS Flow.
Use cases of HTML table in MS Flow
There are many use cases in our SharePoint application. I’ll briefly discuss a few – let's say your boss has assigned tasks to the team members and at the end of the day, he/she wants to get the consolidated task status auto-emailed. Then, the MS Flow with "Create HTML" is the right choice. One more example – let's say we have a “Customer-Sales” list which holds the details of customer sales summary information and at the end of the day, an auto email should be sent to the sales manager who will summarize the daily sales. In this case also, MS Flow with "Create HTML" action is the right choice one.
In this article, I would just read a “Customers” list data and will send an email in the form of HTML table as POC (proof of concept).
Actual Implementation – step by step walk through
I assume that you know how to create that list with custom columns, so I am skipping the list creation step, hence here is my already created “Customers” list.
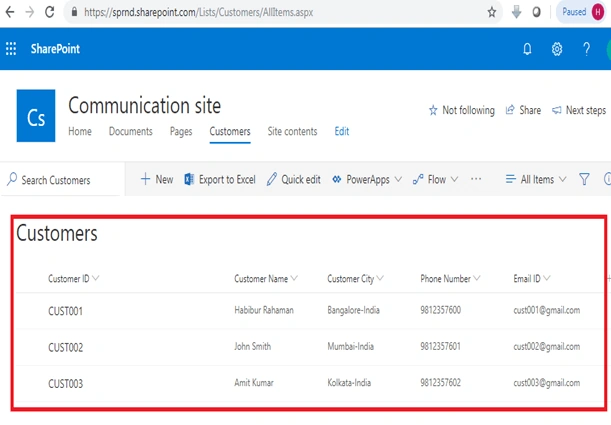
Using the MS Flow, I will send these list data to the email in the form of HTML. So let's start -- how can we do this?
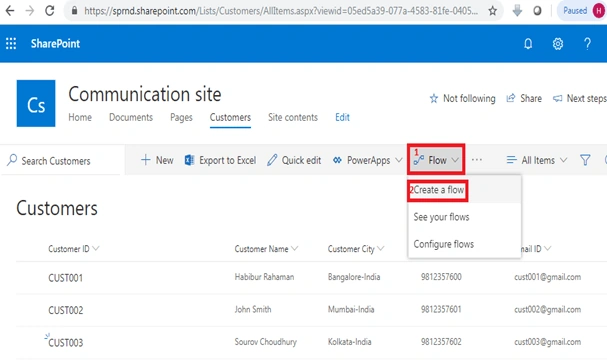
From your “Customers” list page, click on the “Flow” dropdown list and then click the “Create a flow” button, as mentioned below.
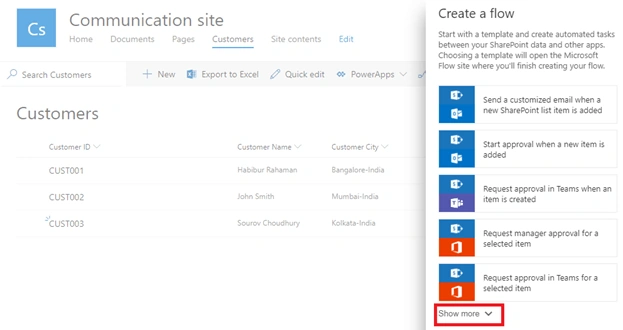
Click on the “Show more” dropdown list.
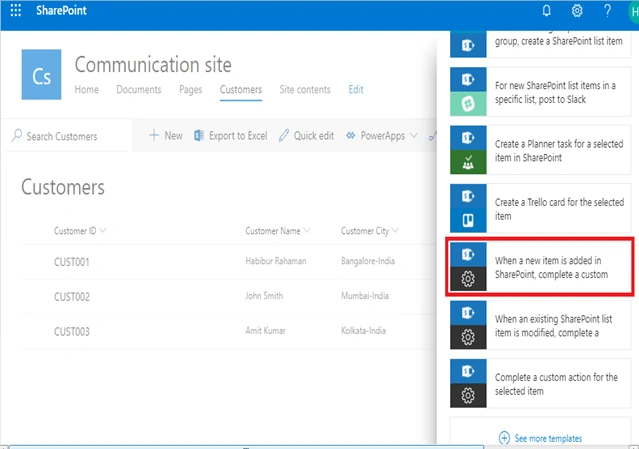
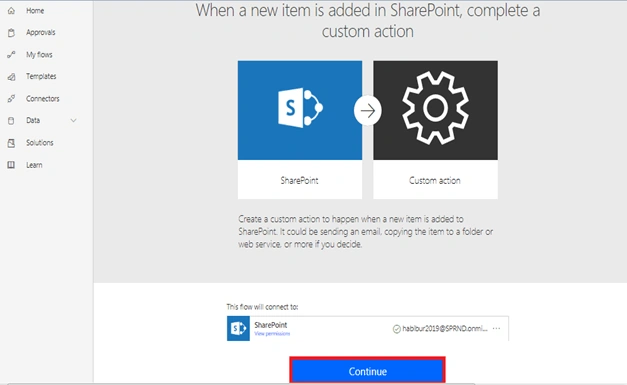
Select “When a new item is added in SharePoint, complete a custom action” template as mention below.
Note
In a real-time scenario, you need to start your flow based on some specific conditions. Here, I’ll show a POC, i.e., whenever an item is created in SharePoint list, this flow will get triggered.
In a real-time scenario, you need to start your flow based on some specific conditions. Here, I’ll show a POC, i.e., whenever an item is created in SharePoint list, this flow will get triggered.
Click on the “Continue” button as below.
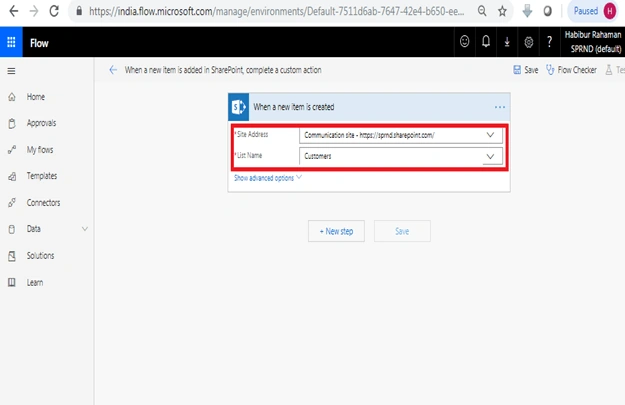
Then, we’ll land on the below page.
Note
- https://<country>.flow.microsoft.com/ in this URL <country> is dynamic, this will be based on the country from where you are accessing, here it displays as “india” as I am accessing from India.
- And in the parameters.sharepoint.site=<your SharePoint online site>
“Site Address" and “List Name” pre-populated – make sure these are correct.
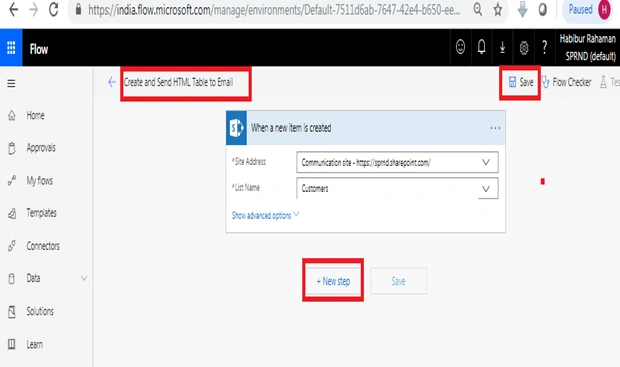
At this moment lets name this flow as “Create and Send HTML Table to Email” and click on “Save” button then click on “+Next step” button
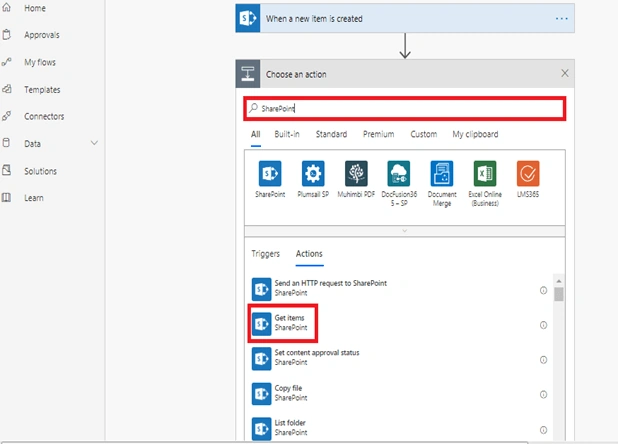
Then search with “SharePoint” and select “Get Items” action as mentioned below,
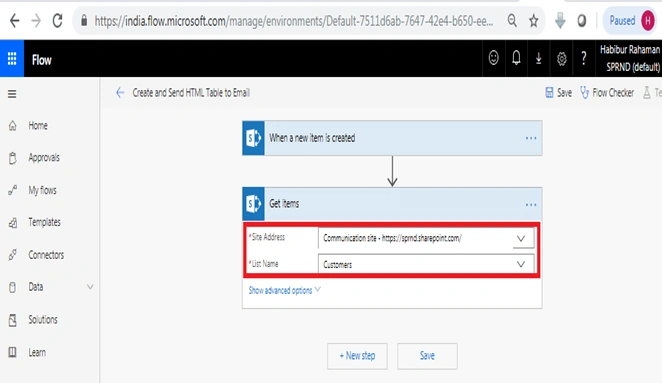
Select the “Site Address” and “List Name” as mentioned below,
Note
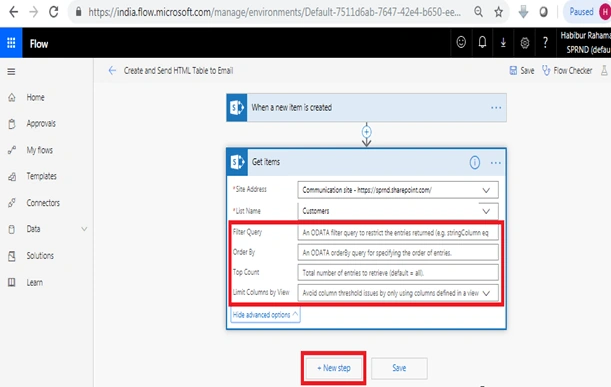
In Show advanced options – we can get the data based on specific query (like camel query) - in this we are not handling those, we’ll get all data from the “Customers” list - just showing the screen, then click on “+Next step” button.
In Show advanced options – we can get the data based on specific query (like camel query) - in this we are not handling those, we’ll get all data from the “Customers” list - just showing the screen, then click on “+Next step” button.
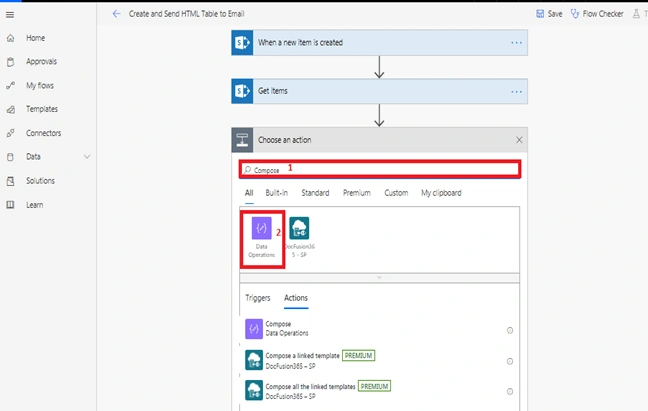
Add data operation “Compose” action: search for “Compose” text and select the “Data Operations” as below,
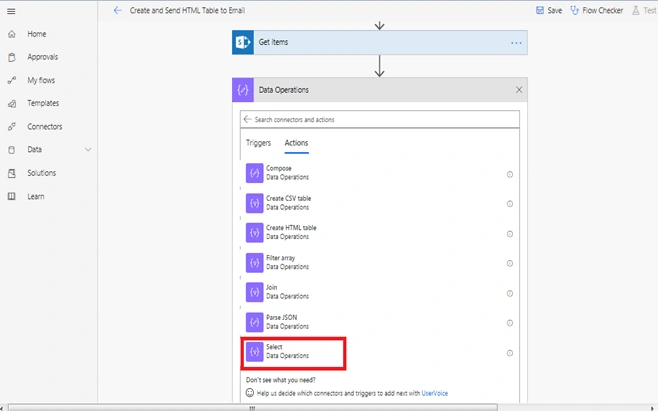
From the next screen, select the “Select Data Operations” action.
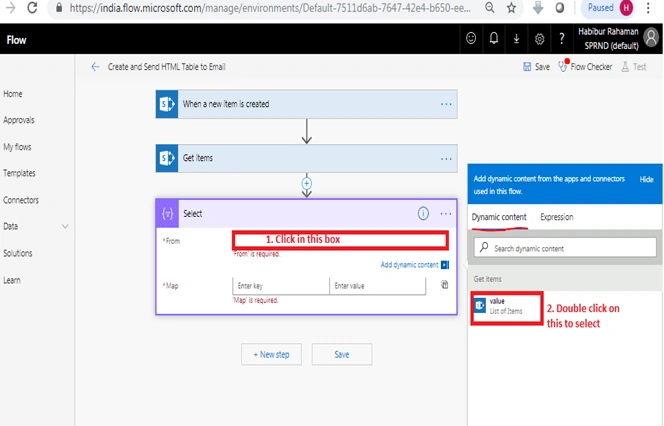
We will get the empty “From” and “Map” in “Select” operation action – you need to click on the from box and need to double click on the “value” (from Dynamic content) tab.
How to do dynamic mapping with the columns?
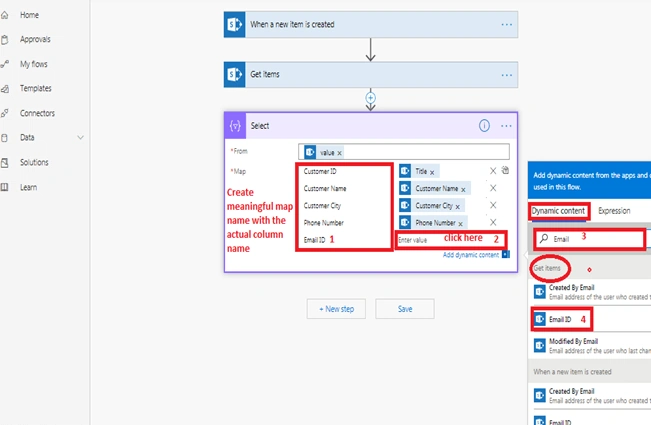
I have created all columns and correspond mapping but shown here in screen shot only for Email ID mapping to show how to create – create a meaningful mapping name corresponding to your column, then click on second box (add dynamic content), under dynamic content tab in search box type your column name which you want to map , then select your column under “Get Items” section.
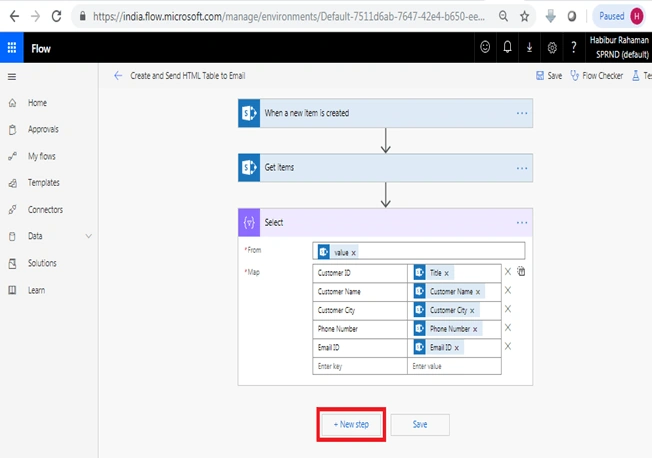
Click on “+ New step” button
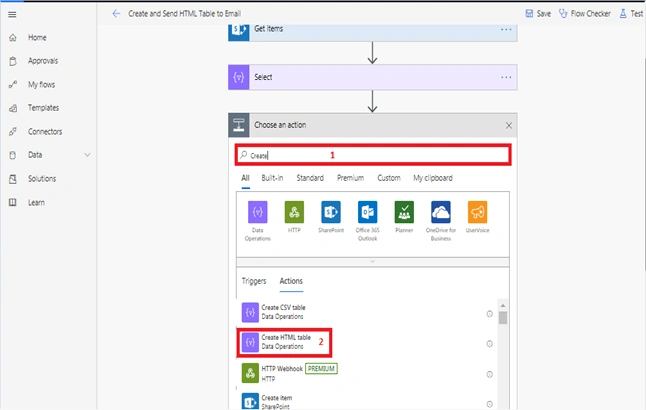
Select “Create HTML Table” action like below - search with “Create” text then click on “Create HTML Table” action
Now we can see “Create HTML Table” action as below,
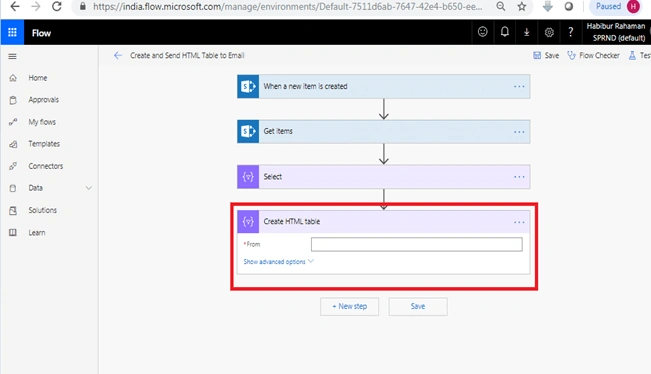
Select
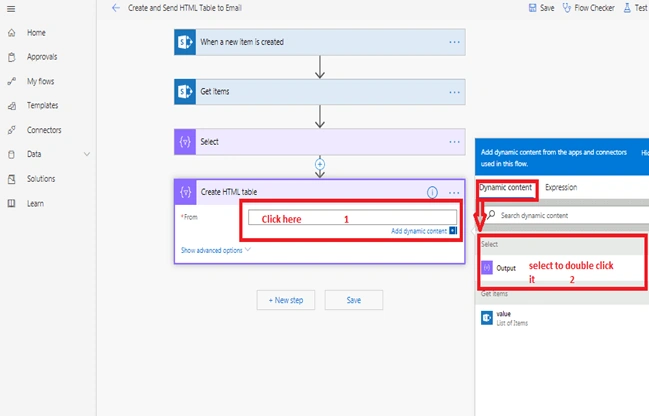
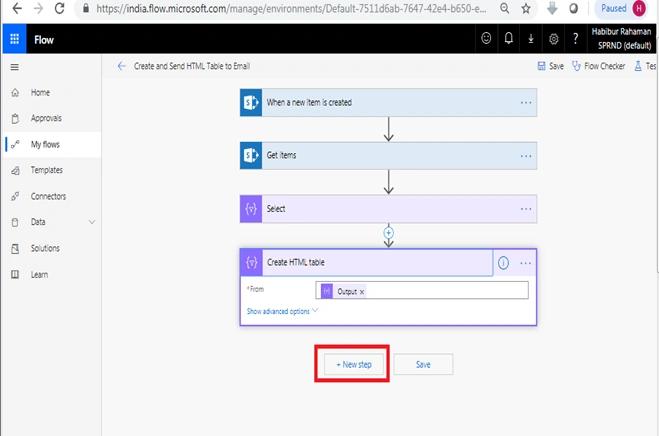
Click on “+ New step” as below,
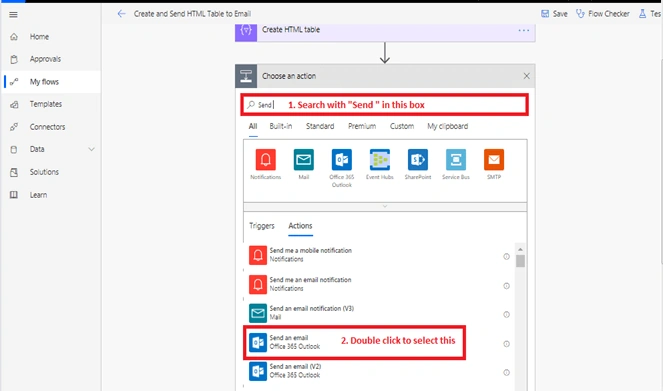
Select “Send an email” action as below,
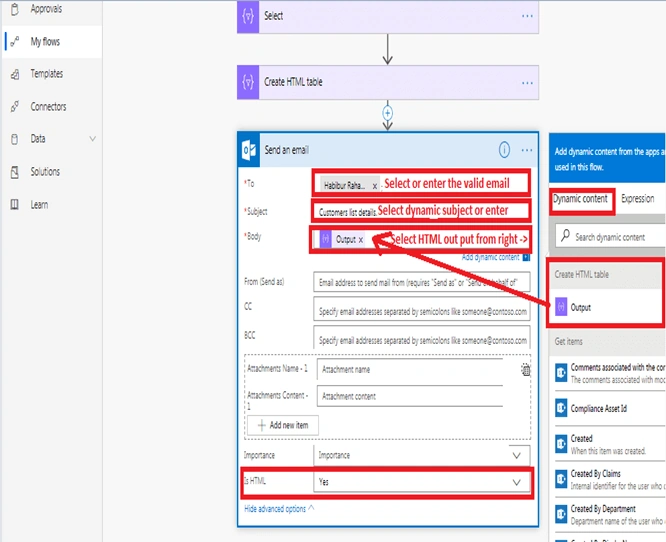
Enter the mandatory parameters as below for the email action.
Note
In the above configuration “Is HTML” should be selected as “Yes” otherwise we’ll not get tabular format output – so it's very important, though it is an optional.
In the above configuration “Is HTML” should be selected as “Yes” otherwise we’ll not get tabular format output – so it's very important, though it is an optional.
Now we are done with the basic configuration – lets test this flow at this moment, before that we must save it.
Click on “Test” button as highlighted below,
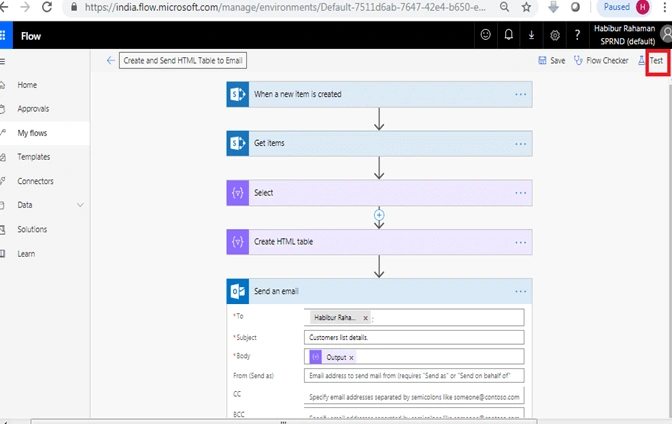
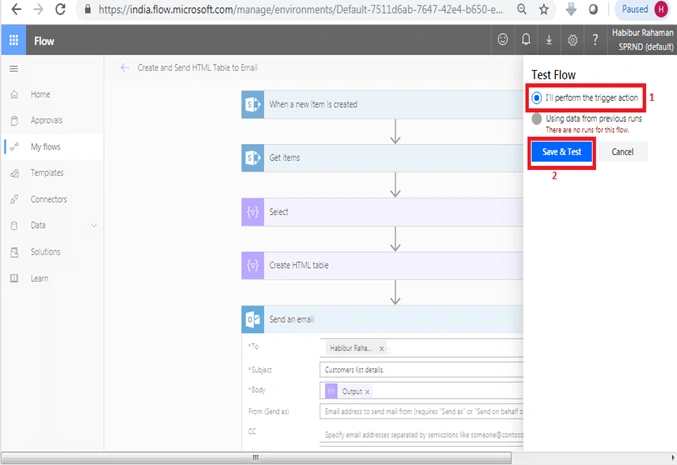
From the next screen, select the first radio button and click on “Save & Test” button as below,
Wait for a few seconds – you will get the below screen,
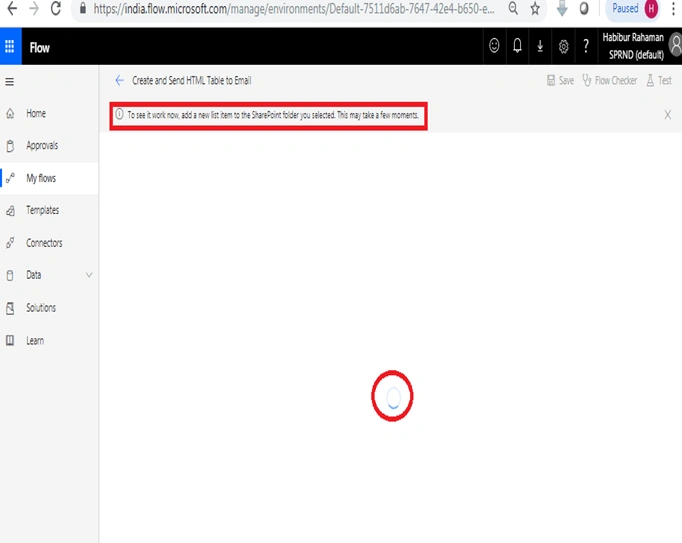
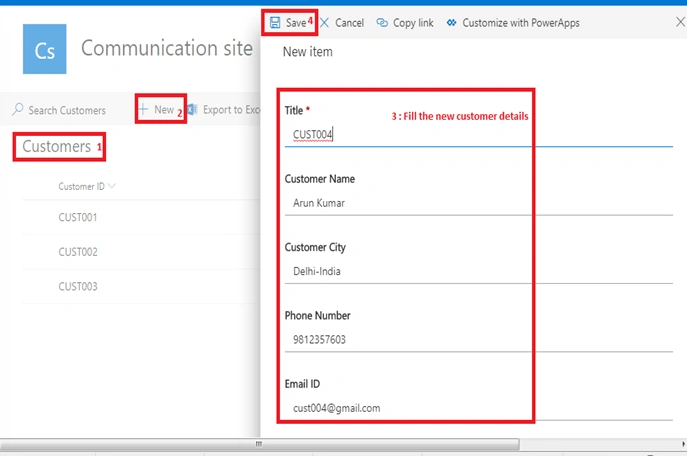
As the above highlighted message says – add a new item to the SharePoint “Customers” list to trigger the flow.
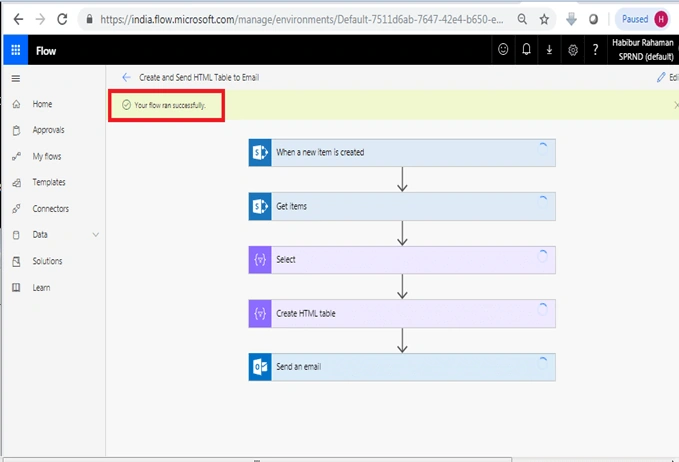
Come to your flow screen(tab) - if everything goes fine you should see the below flow ran a successful message.
Open your outlook office 365 mail box using the below url,
https://outlook.office365.com/owa/?realm=SPRND.onmicrosoft.com&exsvurl=1&ll-cc=1033&modurl=0
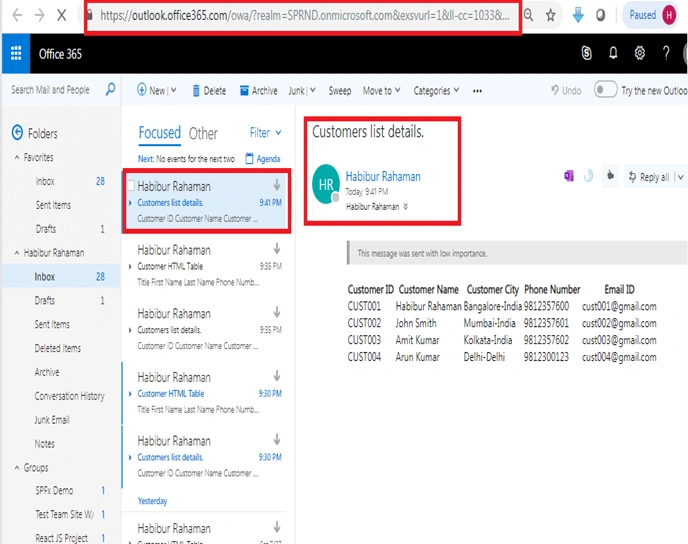
Here you can see an email has come with all customer details in the html tabular format in the email body – we are done with our basic purpose of this article but the html table in the email body does not look nice, however, this is the default behavior. Now we’ll format it a little to look better.
How to format the HTML table in MS flow?
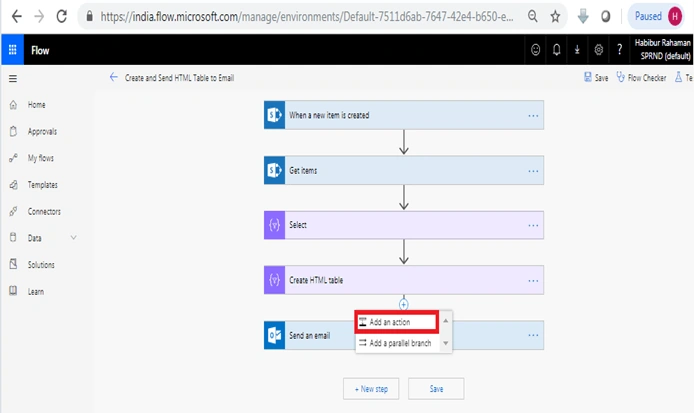
We’ll add padding and color to the above html table – insert a new step in between “Create HTML table” and “Send an email” action like below,
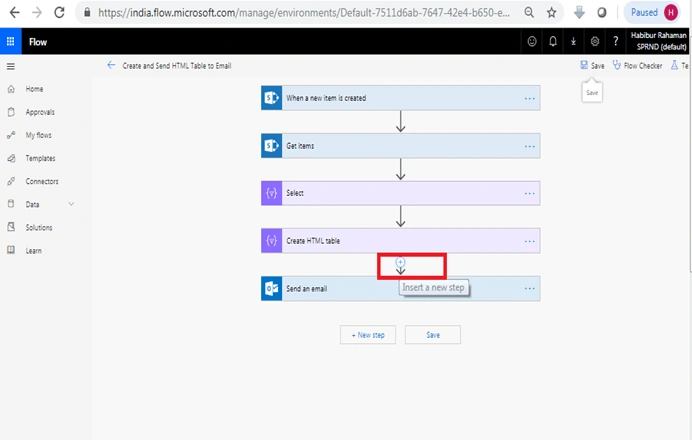
Click on “Add an action” link like below,
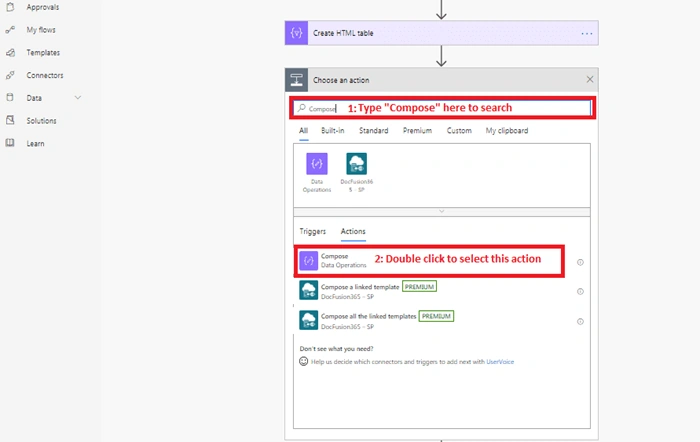
Select “Compose” data operation action like below,
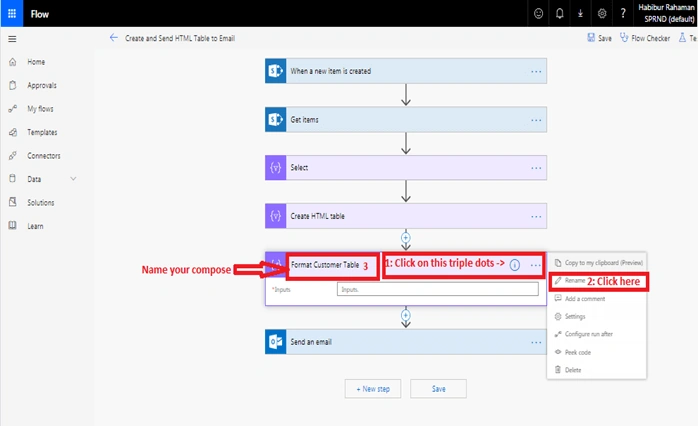
Rename your default “Compose” to Format Customer Table as below,
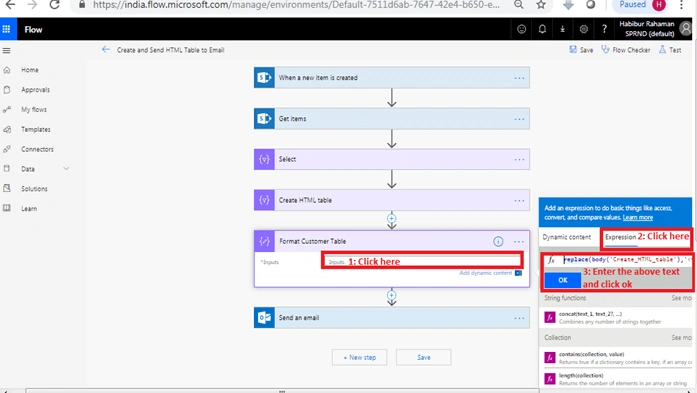
Enter the below text like the below screen
replace(body('Create_HTML_table'),'<table>','<table border="3" bgcolor="87ceeb">')
Now, double click on “Send an email action” and select the appropriate output from “Format Customer Table” as below and save the flow.
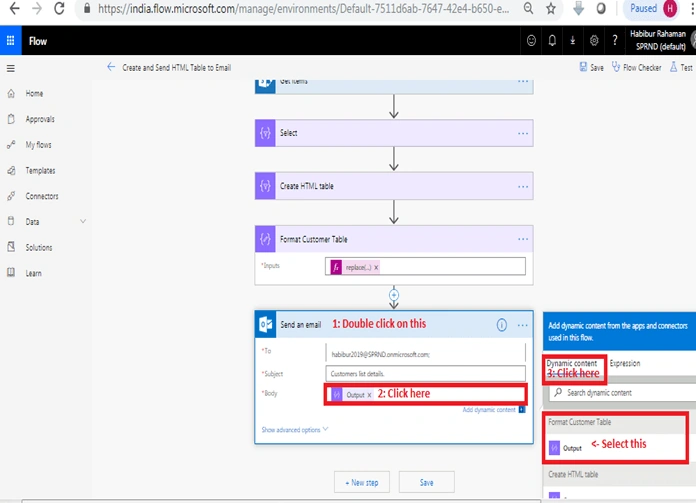
We are done with the basic formatting – however, you can explore more about this on your own.
How to test the flow without going to the SharePoint list?
Click on the “Test” button from the top right corner as we did in our previous test and perform the below operation as mentioned in the order and finally, click on the “Test” button (no 3).
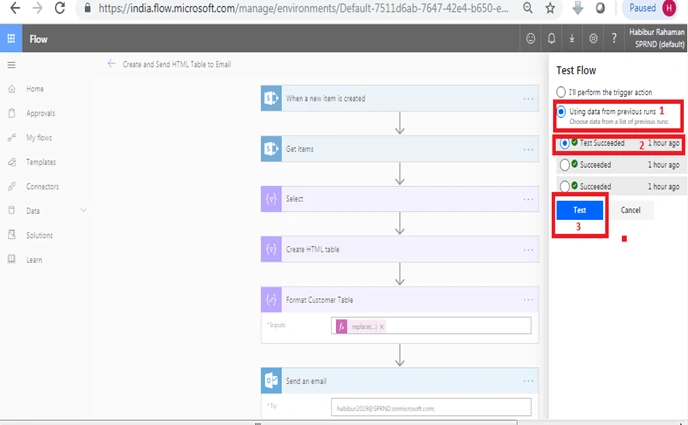
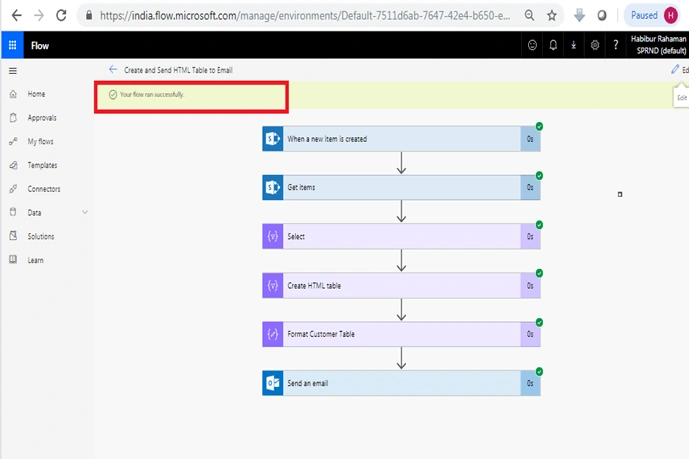
Now, you can see your flow execution status – if everything goes fine you will see the below successful message.
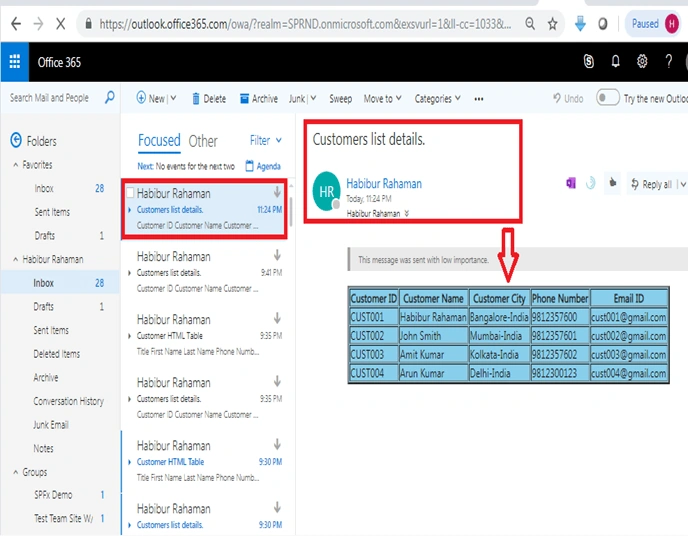
Now go to your office 365 outlook email tab again, you can see the new email has come with proper customer details with a formatted table.
Summary
Thus, we have learned the below topics from this tutorial:
- Introduction – a brief introduction to Microsoft flow.
- Use cases of HTML table in MS flow.
- Actual Implementation – step by step walk-thru.
- How to run the flow from your previous successful run without going to list.
- Formatting HTML table in MS flow.
Download
The above MS flow can be downloaded from here.
Read Also
- How To Edit PDF Files In SharePoint Online
- Modern SharePoint Online Admin Center - Step By Step Process
- Overview Of Hub Sites In SharePoint Online
- Promoted Links Web Part In SharePoint Online Modern Page
- Navigation In SharePoint Online
References
- https://docs.microsoft.com/en-us/flow/getting-started
- https://docs.microsoft.com/en-us/flow/data-operations
- https://powerusers.microsoft.com/t5/Building-Flows/Formatting-column-values-in-the-quot-Create-HTML-table-quot/td-p/110848
- https://powerusers.microsoft.com/t5/General-Flow-Discussion/Modify-Create-HTML-Output-for-formatting-purposes/td-p/125892
Megan HukillPosted Aug 27, 2020, 5:00 PM
Thanks for this article. Was wondering if there’s a way to create 2 HTML table with certain conditions applied to each table (so different values are pulled to each table) and display in one email?
Andrew JamesonPosted Jan 22, 2020, 4:40 PM
Great tutorial just what I needed, however I usually like to in word format a table with a grey header row at 20% then have a single ine spacing with 3pt of padding. the rest of the rows are formatted white at again single line with 6pt of padding, is there anyway I can do this with a single replace, if so what would the compose action be.
Winston BaldonadoPosted Dec 6, 2019, 12:50 PM
The tutorial is good, i would like to be able to send the email after all elements are listed on the Sharepoint list and not sending an email on eache input, do you know which step need to be added?