

Introduction
In this article, we will learn the step by step process of creating an employee contact list using React.js and Web API. React is an open-source JavaScript library that is used for creating user interfaces, particularly for single-page applications. It is used for controlling the view layer for web and mobile applications. React was developed by Jordan Walke, a software engineer at Facebook, and it is currently maintained by Facebook.
Prerequisites
- Basic knowledge of React.js and Web API
- Visual Studio
- Visual Studio Code
- SQL Server Management Studio
- Node.js
This article covers the following:
- Create a database and table
- Create a Web API Project
- Create React Project
- Install Bootstrap and React strap
- Add Routing
- Install Axios
Create a database and table
Open SQL Server Management Studio, create a database named ContactManager and in this database, create a table. Give that table a name like contacts
- CREATE TABLE [dbo].[contacts](
- [Id] [int] IDENTITY(1,1) NOT NULL,
- [Firstname] [nvarchar](50) NULL,
- [Lastname] [nvarchar](50) NULL,
- [Phone] [nvarchar](50) NULL,
- [Email] [nvarchar](50) NULL,
- [Password] [nvarchar](50) NULL,
- CONSTRAINT [PK_contacts] PRIMARY KEY CLUSTERED
- (
- [Id] ASC
- )WITH (PAD_INDEX = OFF, STATISTICS_NORECOMPUTE = OFF, IGNORE_DUP_KEY = OFF, ALLOW_ROW_LOCKS = ON, ALLOW_PAGE_LOCKS = ON) ON [PRIMARY]
- ) ON [PRIMARY]
- GO
Create a Web API Project
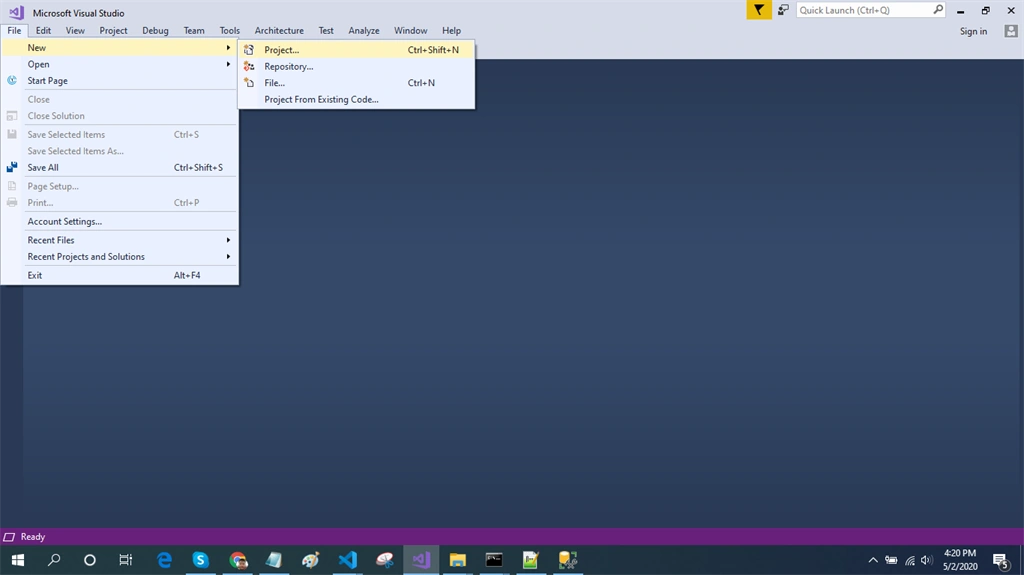
Open Visual Studio and create a new project.
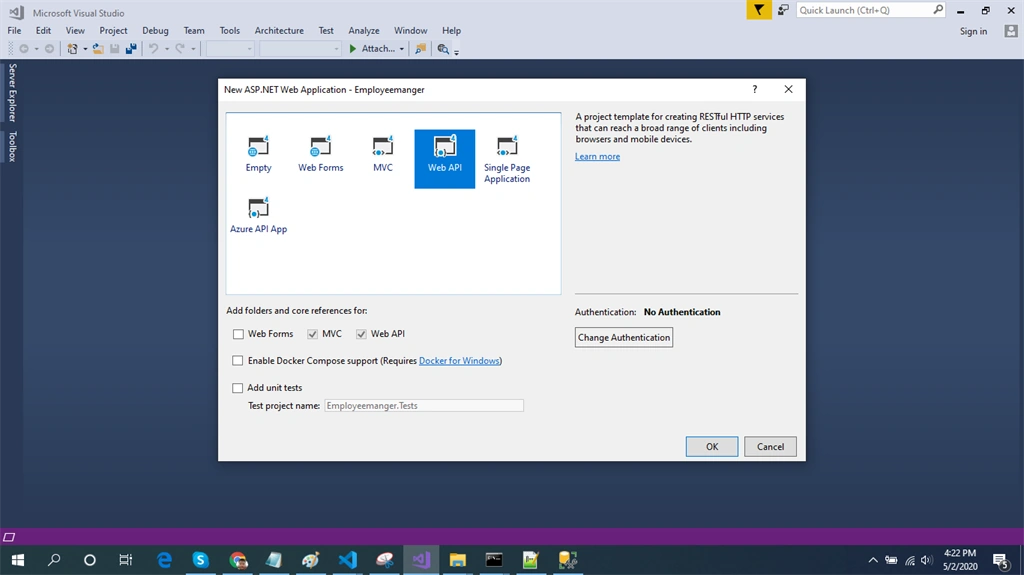
Change the name as Employeemanager and Click ok > Select Web API as its template.
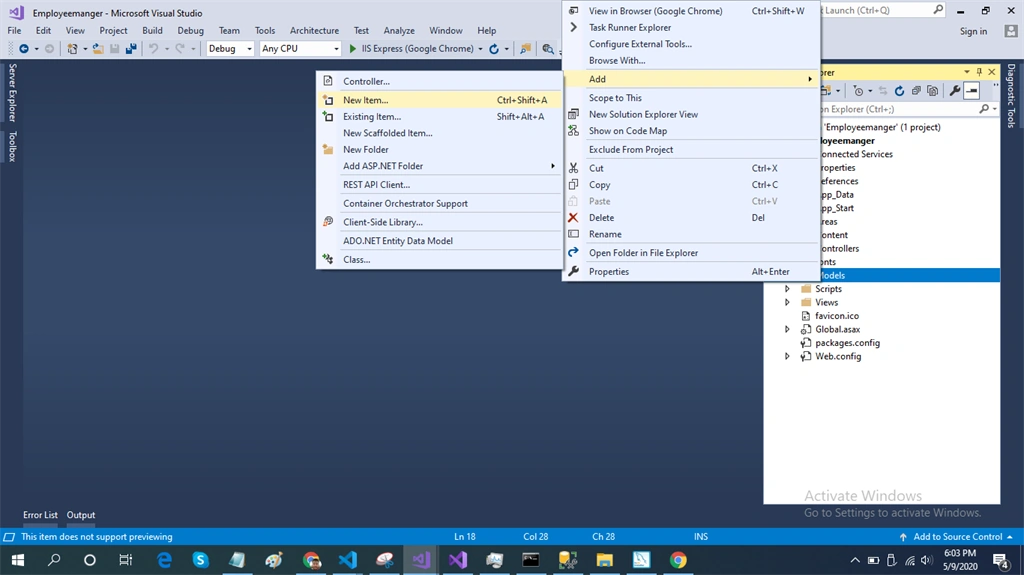
Right-click the Models folder from Solution Explorer and go to Add >> New Item >> data.
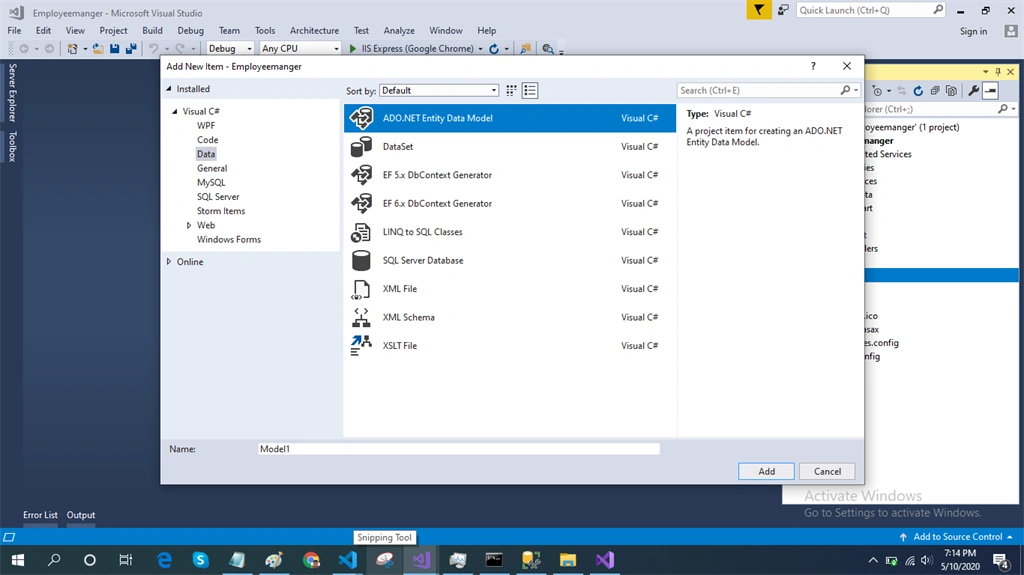
Click on the "ADO.NET Entity Data Model" option and click "Add".
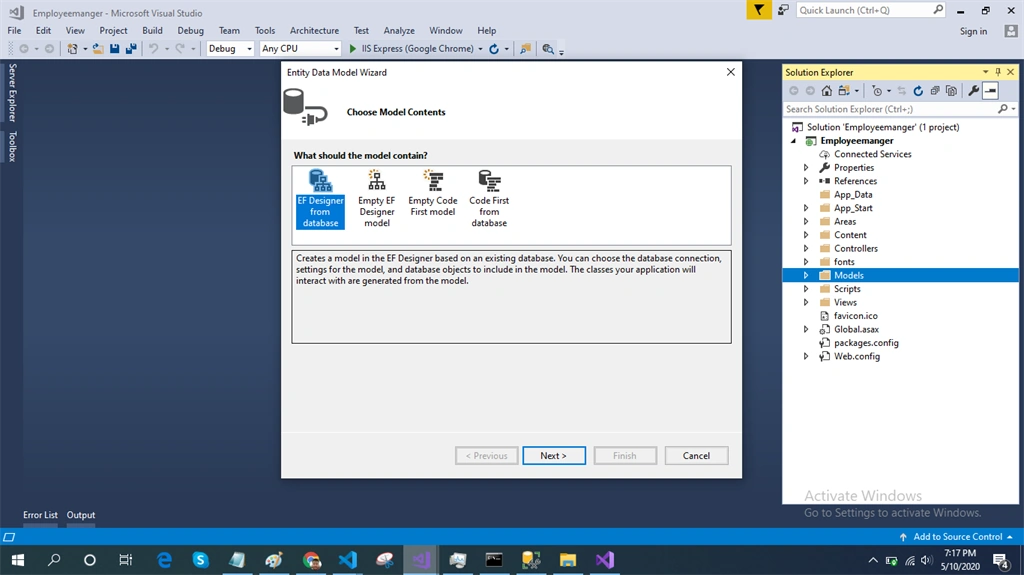
Select EF Designer from the database and click the "Next" button.
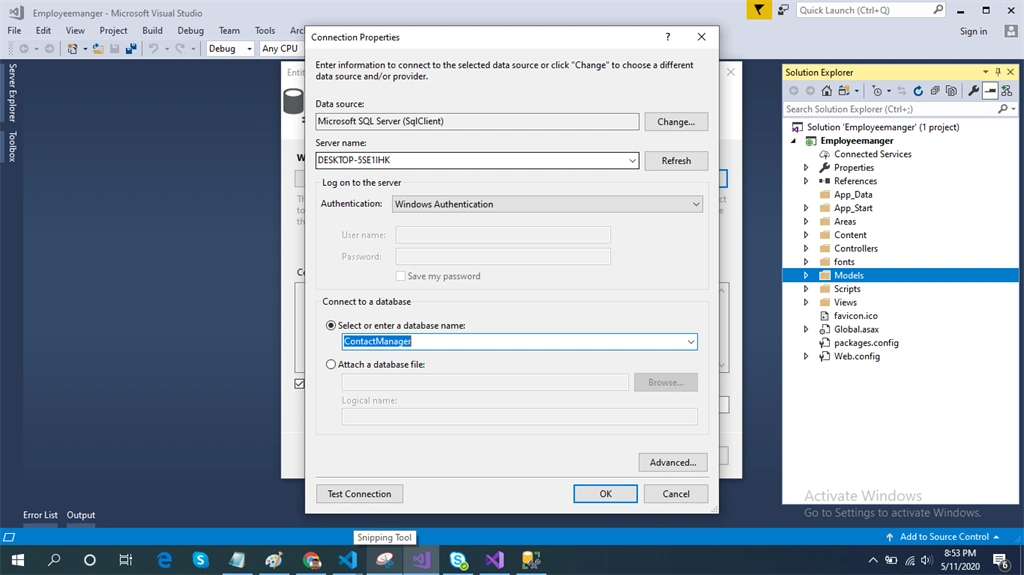
Add the connection properties and select database name on the next page and click OK.
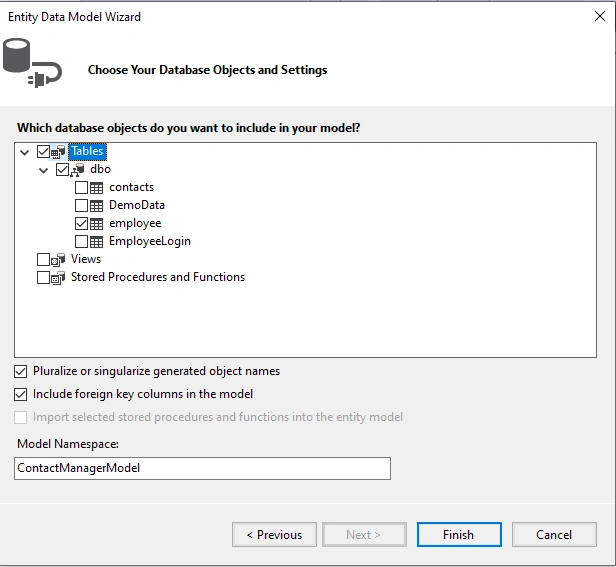
Check the Table checkbox. The internal options will be selected by default. Now, click the "Finish" button.
Our data model is successfully created now.
Now, right-click on the Models folder and add a class - createcontact and paste the following code in this class.
- using System;
- using System.Collections.Generic;
- using System.Linq;
- using System.Web;
- namespace Employeemanger.Models
- {
- public class Createcontact
- {
- public int Id { get; set; }
- public string Firstname { get; set; }
- public string Lastname { get; set; }
- public string Phone { get; set; }
- public string Email { get; set; }
- public string Password { get; set; }
- }
- }
Right-click on the Controllers folder and add a new controller. Name it "Employee controller" and add the following namespace in the Employee controller
- using Employeemanger.Models;
Now, add a method to insert data into the database.
- [Route("Addorupdatecontact")]
- [HttpPost]
- public object Addorupdatecontact(Createcontact contact)
- {
- contact ct = new contact();
- ct.Firstname = contact.Firstname;
- ct.Lastname = contact.Lastname;
- ct.Phone = contact.Phone;
- ct.Email = contact.Email;
- ct.Password = contact.Password;
- DB.contacts.Add(ct);
- DB.SaveChanges();
- return new Response
- { Status = "Success", Message = "Record SuccessFully Saved." };
- }
Add another method to fetch data from the database.
- [Route("employeelist")]
- [HttpGet]
- public object employeelist()
- {
- return DB.contacts.ToList();
- }
Now, let's enable CORS. Go to Tools, open NuGet Package Manager, search for CORS, and install the "Microsoft.Asp.Net.WebApi.Cors" package. Open
Webapiconfig.cs and add the following lines:- EnableCorsAttribute cors = new EnableCorsAttribute("*", "*", "*");
- config.EnableCors(cors);
Create React Project
Now create a new React.js project using the following command.
- npx create-react-app contactmanagerapp
Open the newly created project in visual studio code and install bootstrap in this project by using the following command:
- npm install --save bootstrap
Use the following command to add routing in React:
- npm install react-router-dom --save
Now go to src folder and add 3 new components:
- Addemployee.js
- Employeelist.js
Now, open the Addemployee.js file and add the following code.
- import React, { Component } from 'react'
- import axios from 'axios';
- export class Addemployee extends Component {
- constructor(props) {
- super(props)
- this.state = {
- FirstName: '',
- LastName: '',
- Email: '',
- Phone: '',
- Password: '',
- }
- }
- Addemployee = () => {
- debugger;
- axios.post('http://localhost:2345/api/employee/Addorupdatecontact/', {
- FirstName: this.state.FirstName, LastName: this.state.LastName,
- Email: this.state.Email, Phone: this.state.Phone,Password: this.state.Password
- })
- .then(json => {
- if (json.data.Status === 'Success') {
- console.log(json.data.Status);
- alert("Data Save Successfully");
- this.props.history.push('/EmployeeList')
- }
- else {
- alert('Data not Saved');
- debugger;
- }
- })
- }
- handleChange= (e)=> {
- this.setState({[e.target.name]:e.target.value});
- }
- render() {
- return (
- <div class="container">
- <div class="row">
- <div class="col-sm-12 btn btn-primary" style={{"margin":"6px"}}>
- Add New Contact
- </div>
- </div>
- <div class="card o-hidden border-0 shadow-lg my-5" style={{"marginTop":"5rem!important;"}}>
- <div class="card-body p-0">
- <div class="row">
- <div class="col-lg-12">
- <div class="p-5">
- <div class="text-center">
- <h1 class="h4 text-gray-900 mb-4">Create a New Contact!</h1>
- </div>
- <form class="user">
- <div class="form-group row">
- <div class="col-sm-6 mb-3 mb-sm-0">
- <input type="text" name="FirstName" onChange={this.handleChange} value={this.state.FirstName} class="form-control" id="exampleFirstName" placeholder="First Name" />
- </div>
- <div class="col-sm-6">
- <input type="text" name="LastName" onChange={this.handleChange} value={this.state.LastName } class="form-control" id="exampleLastName" placeholder="Last Name" />
- </div>
- </div>
- <div class="form-group">
- <input type="email" name="Email" onChange={this.handleChange} value={this.state.Email} class="form-control" id="exampleInputEmail" placeholder="Email Address" />
- </div>
- <div class="form-group row">
- <div class="col-sm-6 mb-3 mb-sm-0">
- <input type="text" name="Phone" onChange={this.handleChange} value={this.state.Phone} class="form-control" id="exampleInputPassword" placeholder="Phone" />
- </div>
- <div class="col-sm-6">
- <input type="password" name="Password" onChange={this.handleChange} value={this.state.Password} class="form-control" id="exampleRepeatPassword" placeholder="Password" />
- </div>
- </div>
- <button type="button" onClick={this.Addemployee} class="btn btn-primary btn-block">
- Create Contact
- </button>
- <hr />
- </form>
- <hr />
- </div>
- </div>
- </div>
- </div>
- </div>
- </div>
- )
- }
- }
- export default Addemployee
- import React, { Component } from 'react'
- import axios from 'axios'
- export class EmployeeList extends Component {
- constructor(props) {
- super(props)
- this.state = {
- Employeelist: []
- }
- }
- componentDidMount() {
- axios.get('http://localhost:2345/api/employee/employeelist').then(response => {
- console.log(response.data);
- this.setState({
- Employeelist: response.data
- });
- });
- }
- render() {
- const items = []
- for (const [index, value] of this.state.Employeelist.entries()) {
- items.push(<li key={index}>{value}</li>)
- }
- return (
- <div class="container-fluid">
- <div class="row">
- <div class="col-sm-12 btn btn-primary" style={{ "margin": "6px" }}>
- Contact List
- </div>
- </div>
- <div class="row">
- {
- this.state.Employeelist.map((p, index) => {
- return <div key={index} class="col-xl-3 col-md-6 mb-4">
- <div class="card">
- <div class="card-header py-3">
- <h6 class="m-0 font-weight-bold text-primary"> <img style={{ "height": "25px" }} src="https://img.icons8.com/nolan/64/contact-card.png" />Contact Details</h6>
- </div>
- <div class="card-body">
- <div class="row no-gutters align-items-center">
- <div class="form-group row">
- <div class="col-sm-12">
- <div class="row">
- <div class="col-sm-2">
- <img src="https://img.icons8.com/office/16/000000/user.png" />
- </div>
- <div class="col-sm-8 col mr-2">
- {p.Firstname + ' ' + p.Lastname}
- </div>
- </div>
- </div>
- <div class="col-sm-12">
- <div class="row">
- <div class="col-sm-2">
- <img style={{ "height": "20px" }} src="https://img.icons8.com/nolan/64/email.png" />
- </div>
- <div class="col-sm-10">
- {p.Email}
- </div>
- <div class="col-sm-2"></div>
- </div>
- </div>
- <div class="col-sm-12">
- <div class="row">
- <div class="col-sm-2">
- <img style={{ "height": "20px" }} src="https://img.icons8.com/nolan/64/phone.png" />
- </div>
- <div class="col-sm-8">
- {p.Phone}
- </div>
- </div>
- </div>
- </div>
- </div>
- </div>
- </div>
- </div>
- })
- }
- </div>
- </div>
- )
- }
- }
- export default EmployeeList
- import React from 'react';
- import './App.css';
- import EmployeeList from './EmployeeList'
- import Addemployee from './Addemployee'
- import { BrowserRouter as Router, Switch, Route, Link } from 'react-router-dom';
- function App() {
- return (
- <Router>
- <div className="container">
- <nav className="navbar navbar-expand-lg navheader">
- <div className="collapse navbar-collapse" >
- <ul className="navbar-nav mr-auto">
- <li className="nav-item">
- <Link to={'/EmployeeList'} className="nav-link">Contact List</Link>
- </li>
- <li className="nav-item">
- <Link to={'/Addemployee'} className="nav-link">Add Contact</Link>
- </li>
- </ul>
- </div>
- </nav> <br />
- <Switch>
- <Route exact path='/' component={EmployeeList} />
- <Route exact path='/EmployeeList' component={EmployeeList} />
- <Route path='/Addemployee' component={Addemployee} />
- </Switch>
- </div>
- </Router>
- );
- }
- export default App;
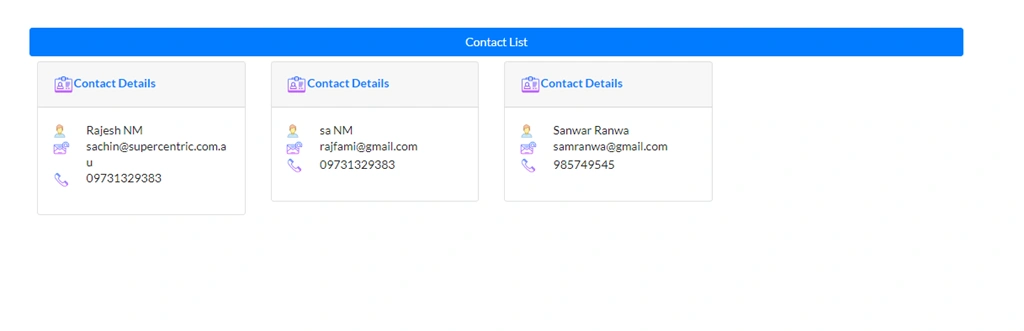
Now, run the project by using 'npm start' command and check the result.
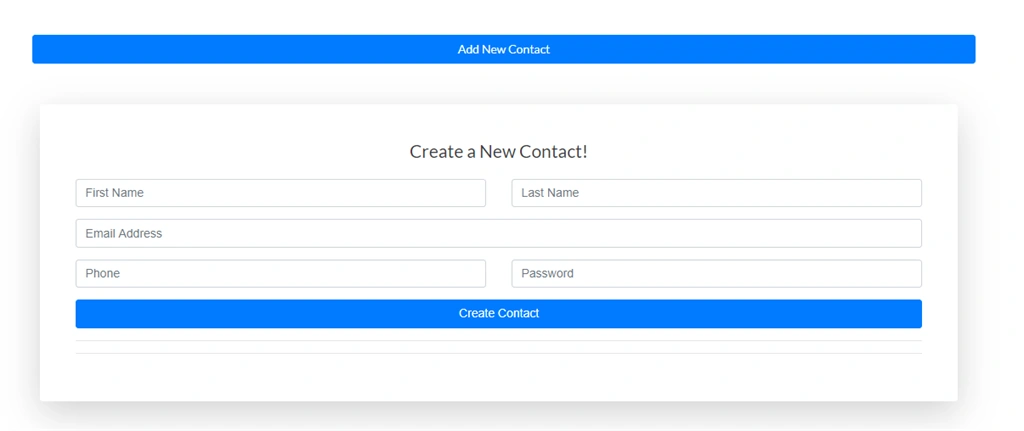
Enter the values, click on Create contact button and check
Summary
In this article, we learned the step by step process of creating an employee contact list using React.js and Web API.
RAMMOHAN SUHDAMPosted Jul 15, 2020, 8:10 AM
Nice article bro keep it up