

Build Definition TFS -2015
In this article, I’ll explain,
- How to create a build definition
- Tasks/Steps used in the build definition.
- Build menu options
- Save build definition
- Queue build
- Options after a successful build
Let’s create a new build definition for a simple web application. And in my next article, I’ll explain about release definition.
A Build definition may be defined as a collection of steps/tasks which can be executed in a sequence as specified while creating a build definition. We can change the sequence of steps added in the build definition by dragging on the desired place of execution. There are various tasks provided for adding in the build definition.
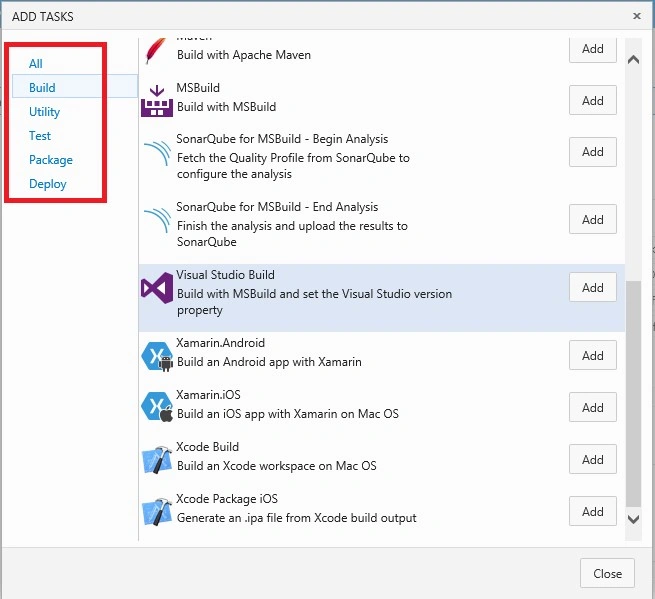
For example, there are tasks available to build, test, deploy. These tasks can be added in the build definition. Below is a screenshot of adding tasks as per your build definition. We can select any number of tasks in the build definition.
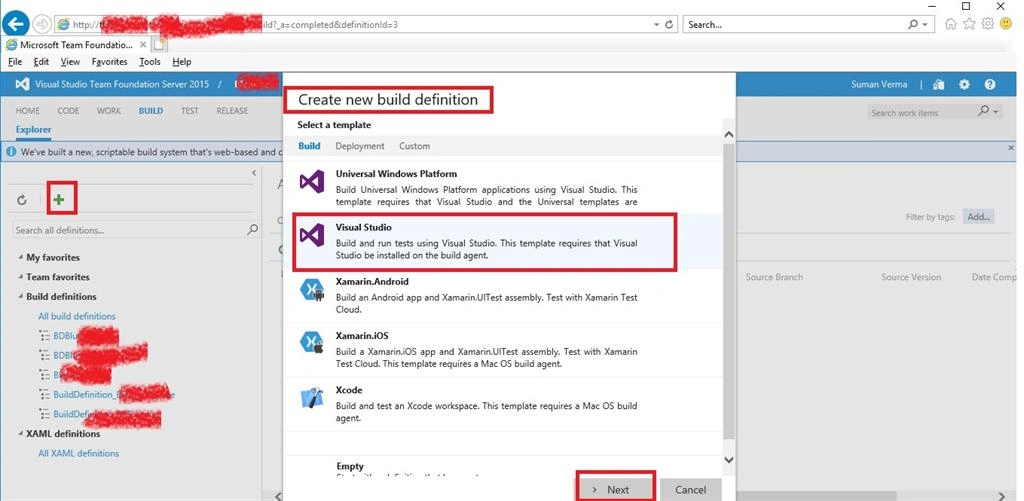
Step 1 - Select the project
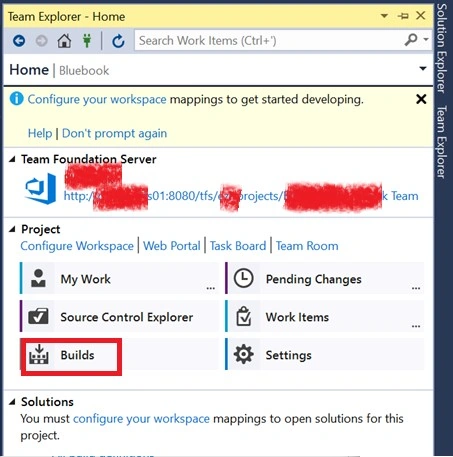
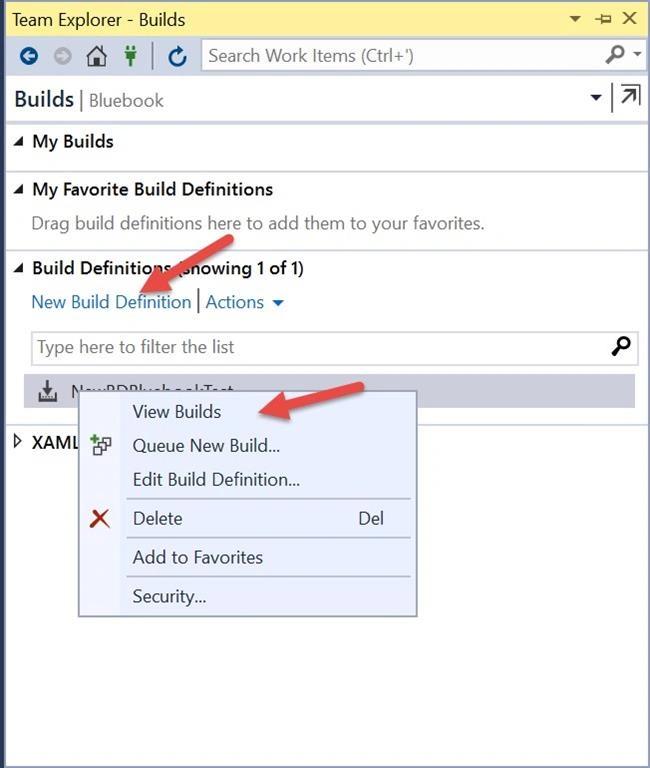
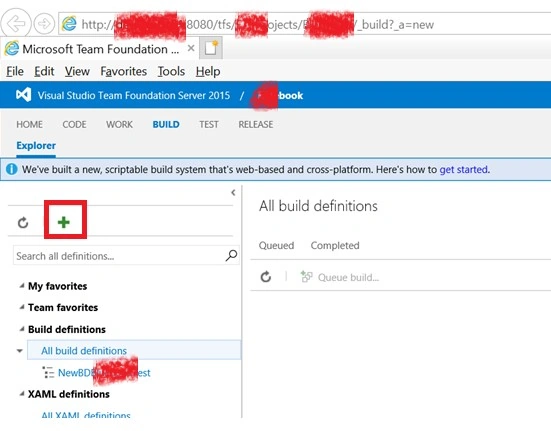
Click on the button and select Visual Studio template (This template requires that Visual Studio be installed on the build agent. (To read more about build Agent read here).
With Visual Studio Online definition, templates are also available. You can create your own templates too.
- Select Repository
Select the repository source, you can select the project from team projects, GitHub and SVN.
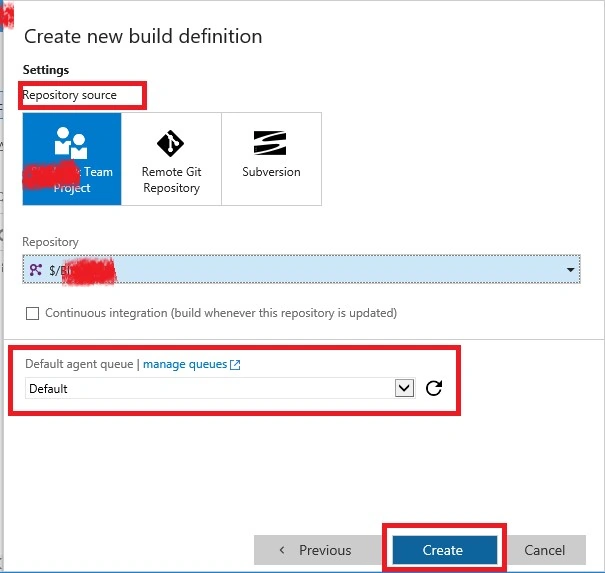
Check the continuous integration trigger if you want to queue the build on every code check-in.
A continuous integration trigger on a build definition shows that the system should automatically queue a new build whenever a code change is checked-in. We will discuss about this in Triggers tab of build Menu later in this article.
See more on Build triggers.
Then, select the agent queues. Here, I used the default one and click on "Create". A new build definition is created with default Build Steps.
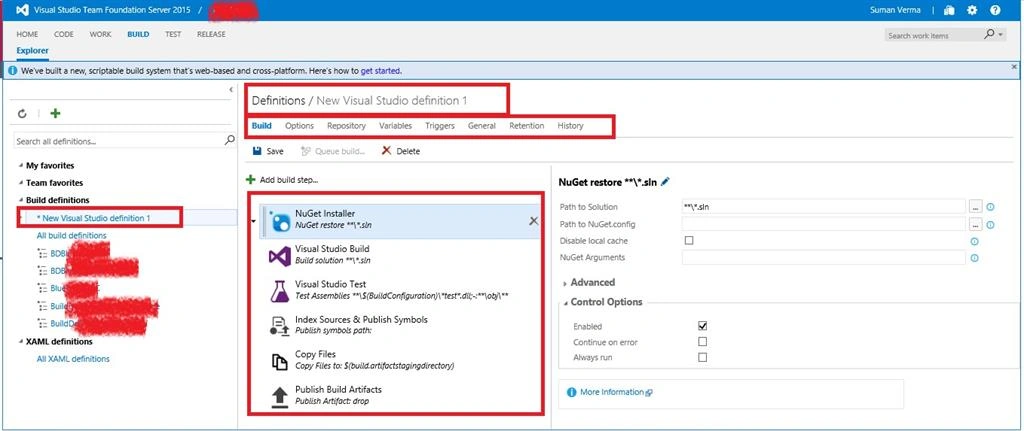
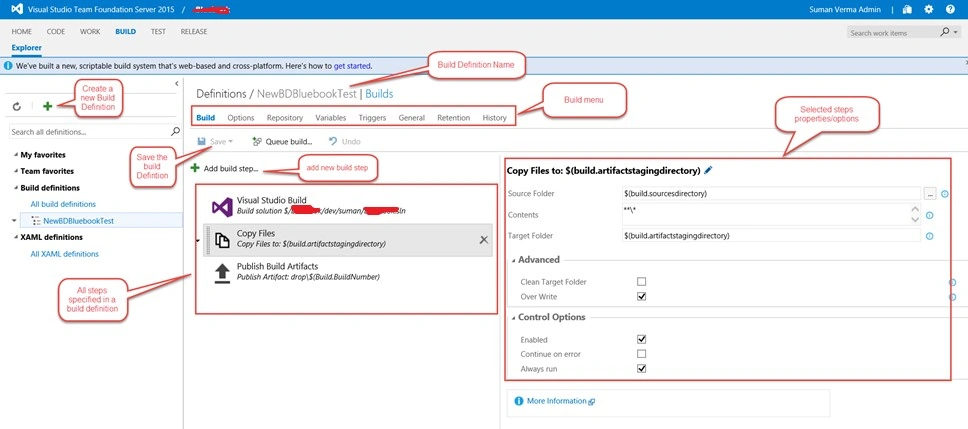
- Add Build Steps
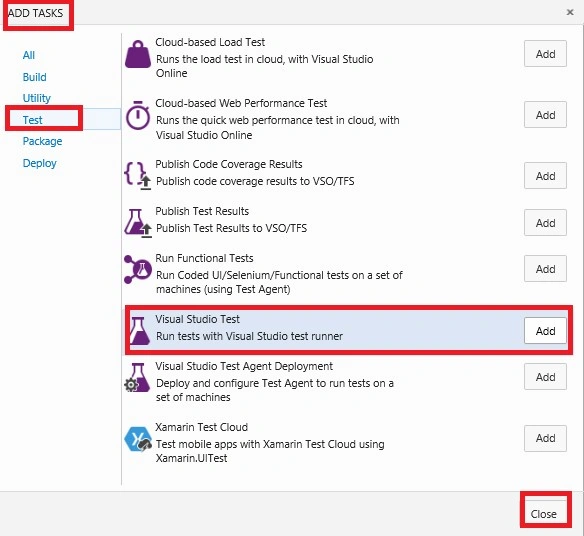
You can add new tasks included in the build by using the “Add Build step” option just below the save button. A new “Add Tasks” window will open select the step you would like to add and click on "Close".
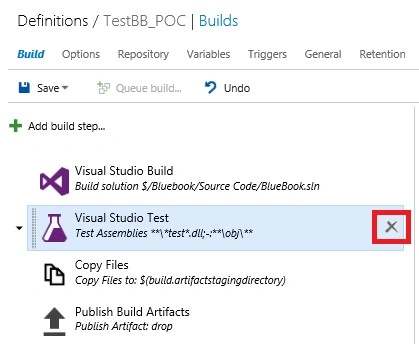
- Remove Build Steps
Click on the symbol to remove the task from the build definition as shown below.
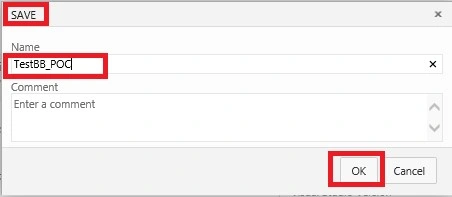
- Save Build Definition
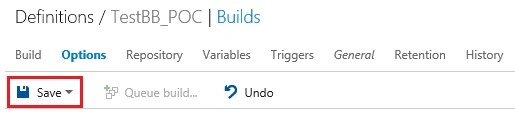
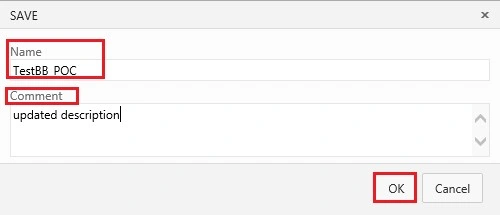
Click on save, to save the build definition Name and add comments (if any).
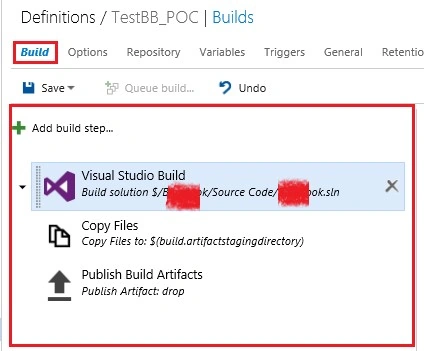
I used below the Build steps for my build definition.
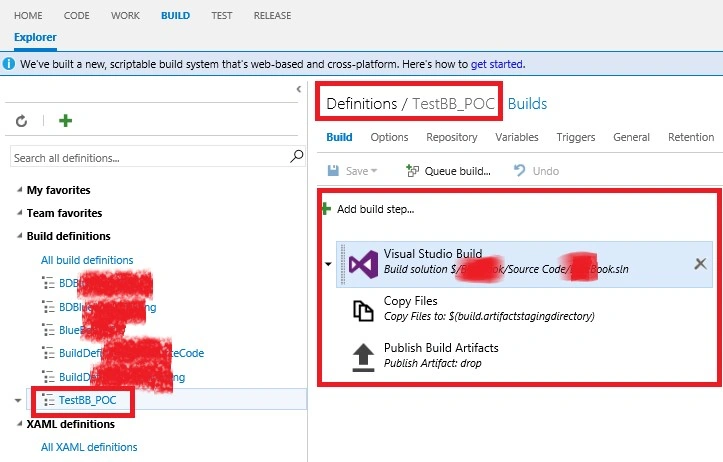
Now let’s take a look on different steps used in build definition and the settings used for the steps. In this build definition, I used 3 basic steps, you can add any other task [For the unit test, deploy, MSbuild etc. There are so many options available under add tasks window. Choose the task as per your project requirement]
- Visual Studio Build Task
- Copy files Task
- Publish Build Artifacts Task
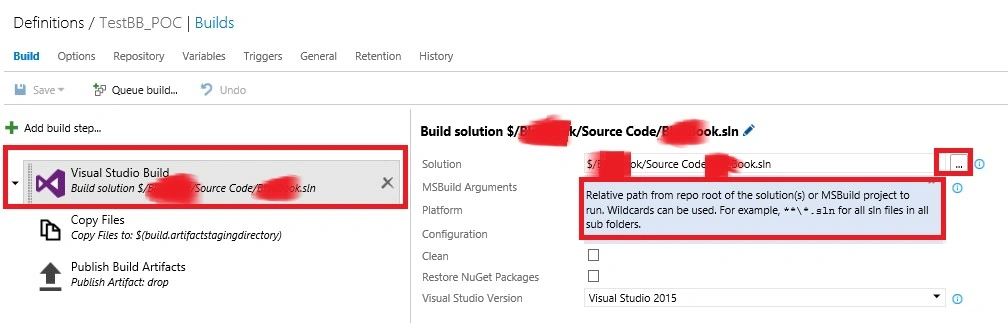
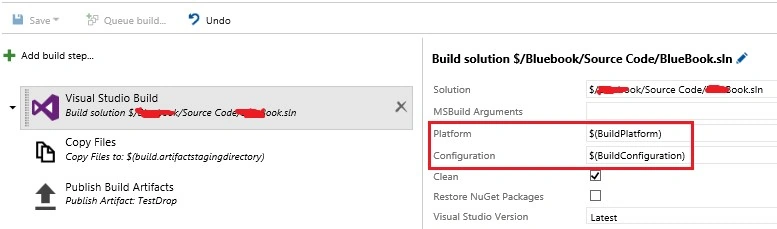
Select the task on the left side and set the properties on the right side as shown.
Platform: It provides these options to choose for build - Win32, x86, x64 or any cpu.
Configuration: Lets you set the configuration for your build such as debug or release.
For information on the particular step setting, click on blue info icon.
To read more about this step, click here.
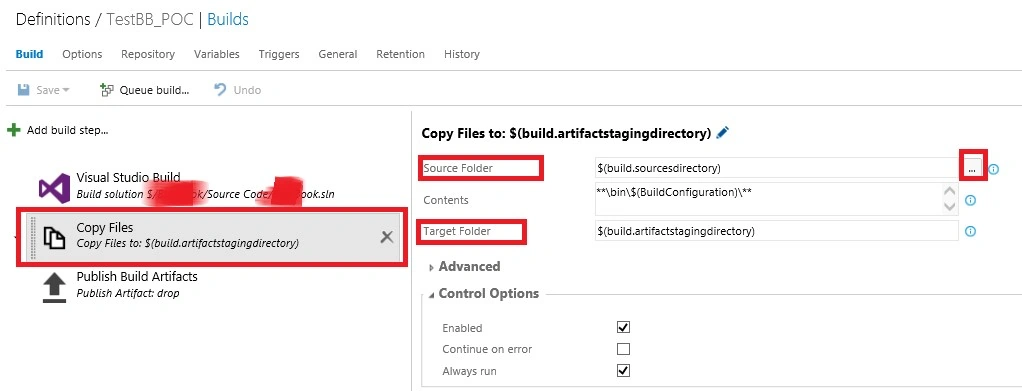
In this step, the source folder is $(build.sourcedirectory) under Agent’s _work folder.
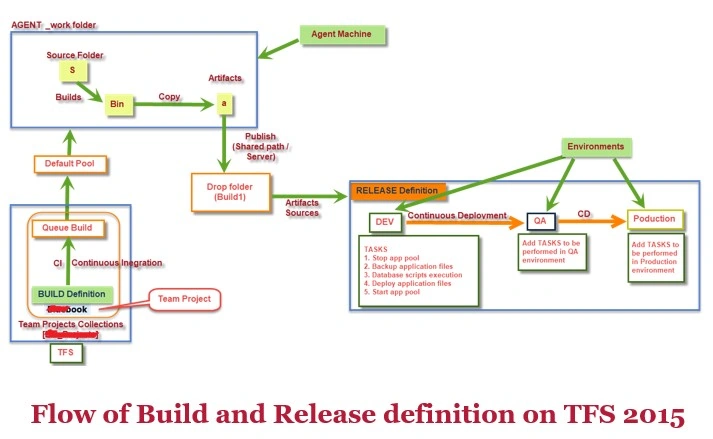
s = source directory and a= artifact staging directory.
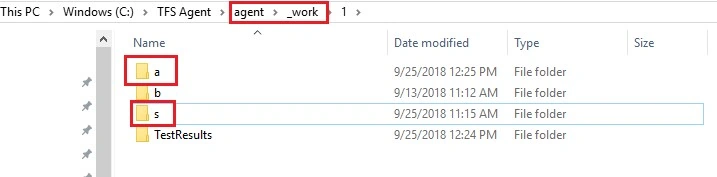
$(Build.ArtifactStagingDirectory) Directory is purged before each build, so you need not to clean it up yourself and recreate it prior to every build in spite of any settings. Read more about Artifacts here
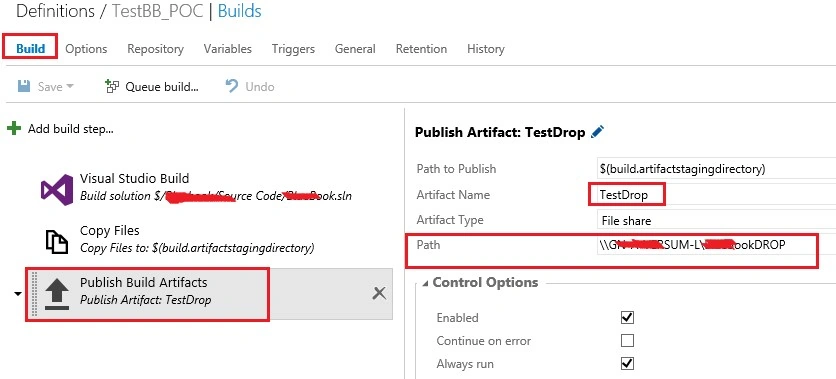
This task can be used in a build to publish build Artifacts to TFS, or a file share, as specified in the information shown below.
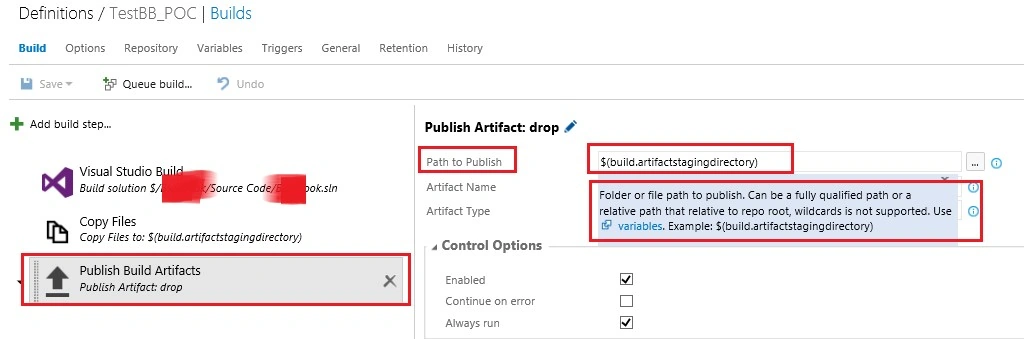
Using this task, we can specify the folder on the network and after build it publishes the files in this folder and from here, we can use these publish build Artifacts as the source for the Release definition.
Artifact Type: this can be of two types,
- Server
- File share
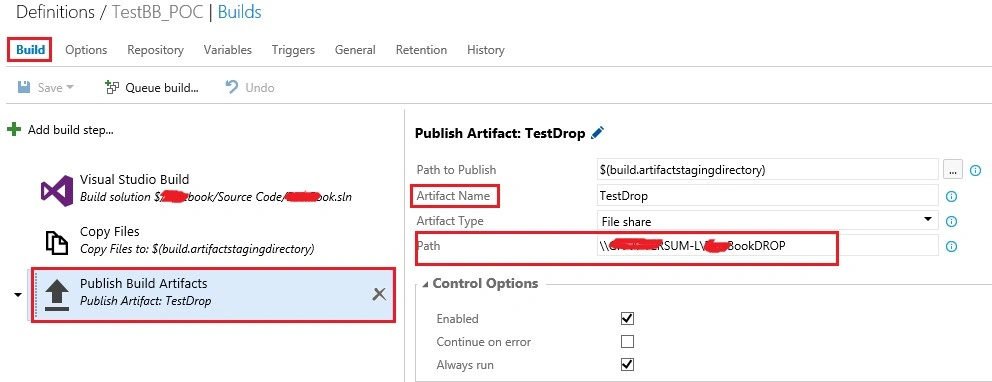
I selected file share and for this, specify the path to the file share where you want to copy the files. The path must be a fully-qualified path or a valid path relative to the root directory of your repository.
Note
Publishing artifacts from a Linux or macOS agent to a file share is not supported.
Build Menu Options
The Build definition contains various options, as we can see in the below screenshot.
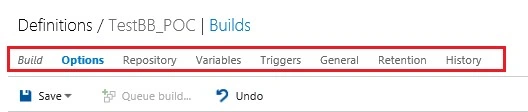
- Build tab
- Options tab
- Repository tab
- Variables tab
- Triggers tab
- General tab
- Retention tab
- History tab
Now let’s discuss, one by one,
- Multi-Configuration
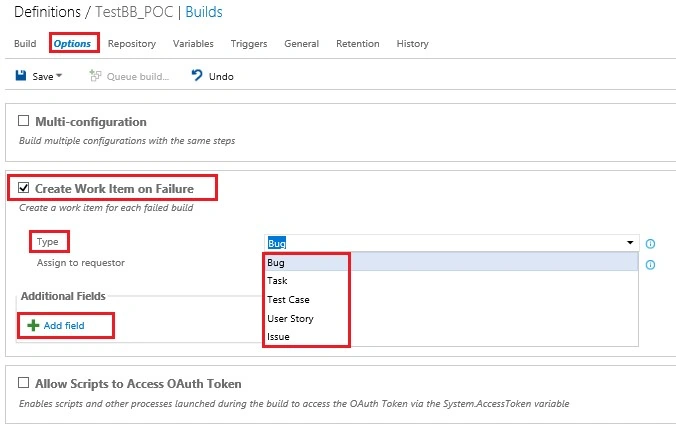
- Create Work Item on Failure
- Allow scripts to Access OAuth Token
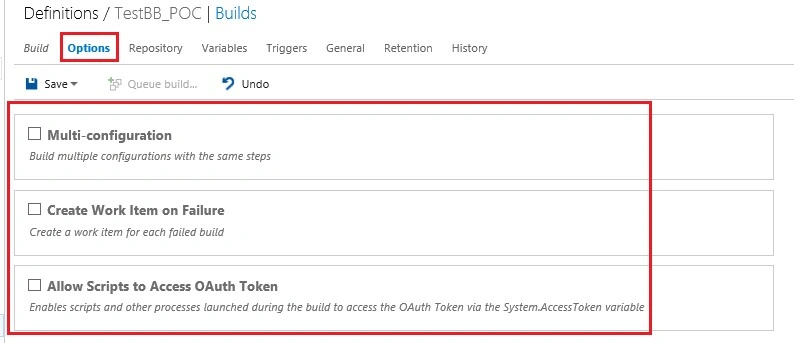
This option can be used to build multiple configurations such as configuration on both x86 and x64 platforms.
This option from Options tab helps in building selected solutions multiple times. For that, we can add comma separated list of configuration variables here. These variables are listed in the variables tab which we will discuss later in this section. You can find a list of predefined variables here. The Parallel check box, provides all the combinations in parallel.
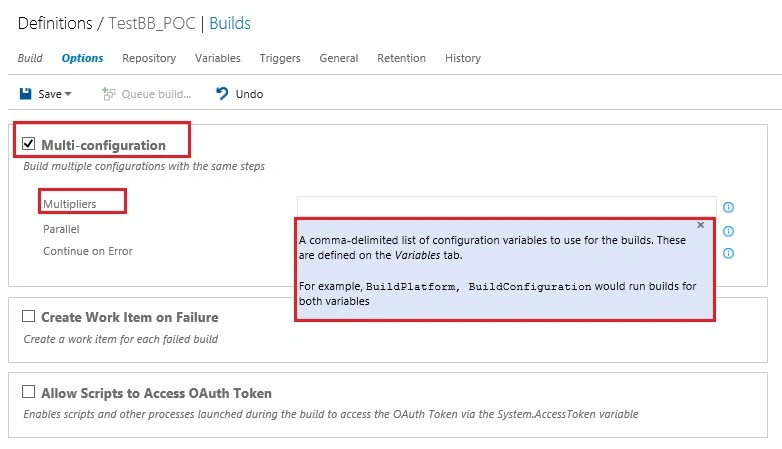
The pre-condition is that there should be multiple agents available to run.
This option can be used to automatically create a work item when the build fails due to any reason. The work item can be of Bug, Task, Test case, User story and Issue type. Assign to Requestor option can be used to assign the work item to the requestor.
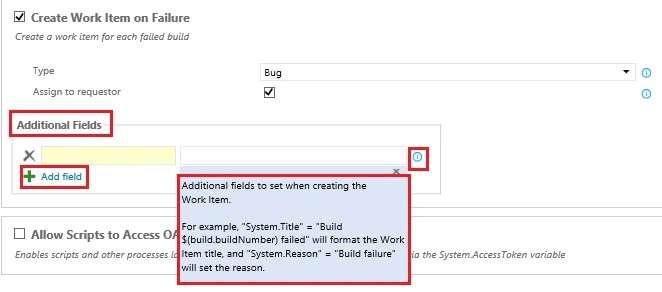
Field Value System.Title Build $(Build.BuildNumber) failed System.Reason Build failure To know more about options tab click here
Repository tab
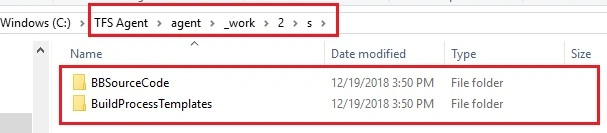
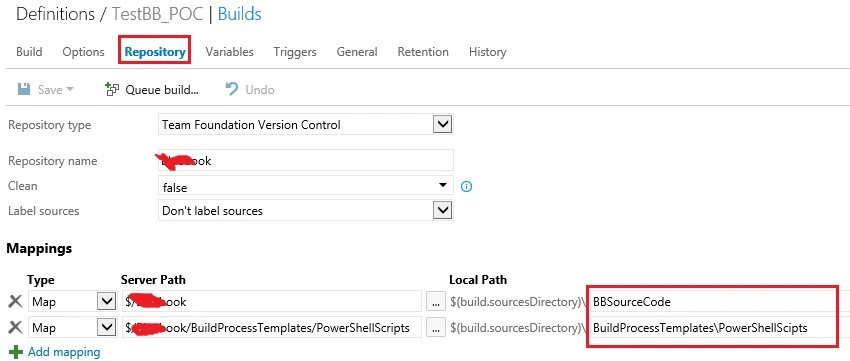
At the beginning of the build process, the agent downloads files from your remote repository into a local sources directory on an agent.
For example, in the below build, the server path is mapped to the local path under mappings section.
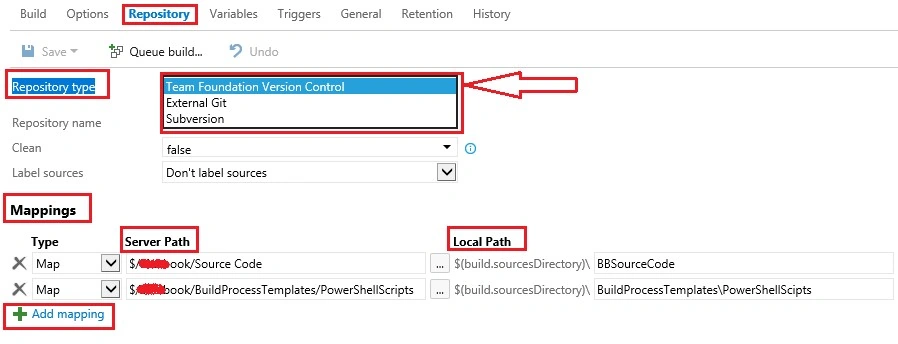
The Server paths can be mapped with a local path.
| Server Path mapped to | Local Path on the agent | |
| Application files | Source Code | BBSourceCode |
| PowerShell scripts | BuildProcessTemplates/PowerShellScripts | BuildProcessTemplates\PowerShellScipts |
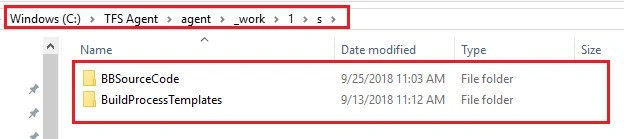
 link as shown above.
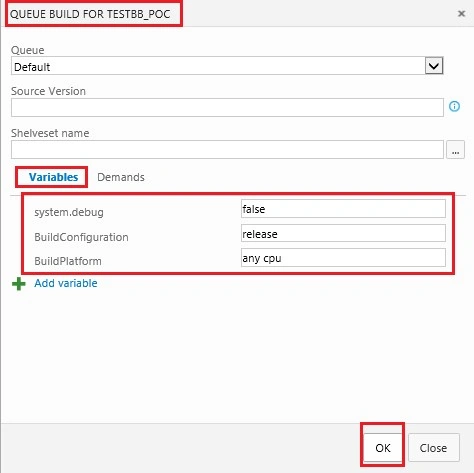
This tab contains some predefined system variables which are created automatically at the time of build definition creation. for example,
- system.collectionId,
- system.teamProject,
- system.definitionId
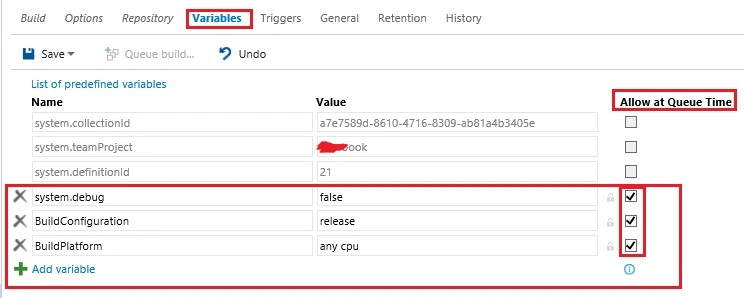
You can also add your own variables which can be used in the build definition.
SYNTAX : $(myVariablename)
Triggers available are - Continuous Integration, Scheduled and gated check-in.
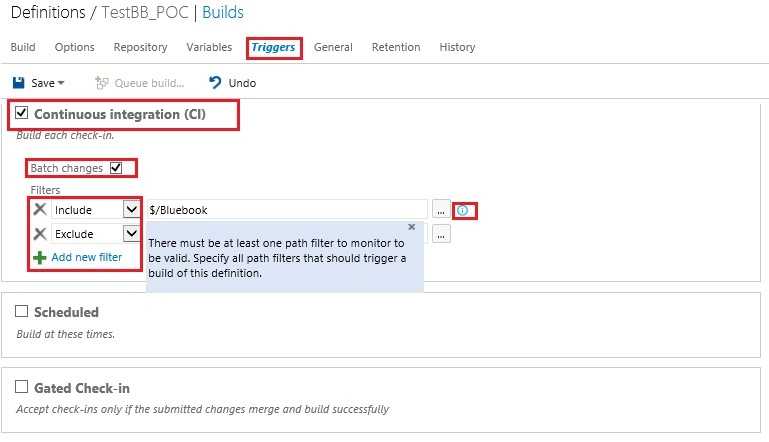
CI (Continuous Integration) - Select this trigger if you want the build to run whenever someone checks in code.
Checked Continuous Integration and provide the path of the solution for which Continuous Integration is build.
We can add filters as well to include and exclude any file/path.
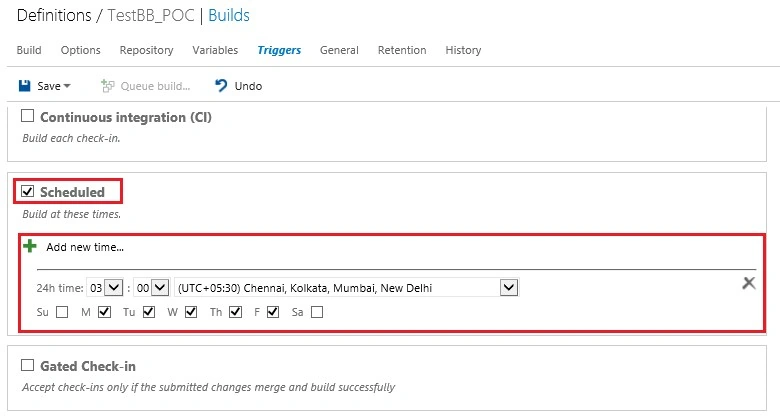
We can also schedule the build using Scheduled Trigger, specify the time at which you want the build to run.
- Default agent queue for build
- Build Job authorization scope, i.e., Project Collection or current project
- Build number format – what name you want for your build or the name of the folder under which queued build will be placed.
- Build job timeout in minutes – by default 60
- Demands - capabilities on the agent machine
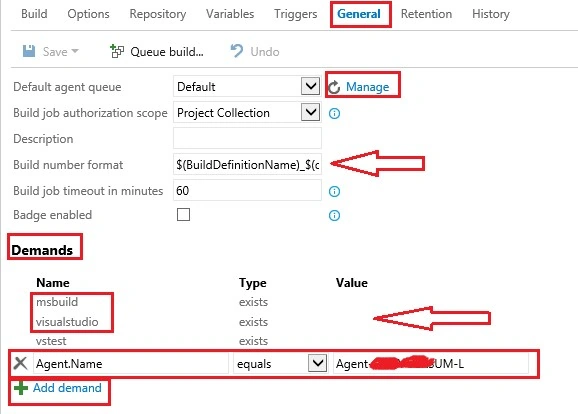
Some build steps won't run unless one or more demands are met by the build agent.
For example, the Visual Studio Build step required that "msbuild” and “visualstudio” are installed on the build agent. If your build includes steps that have demands, they are listed first.
We can specify additional demands like choosing a specific agent by adding a demand as “Agent.Name” as shown above.
if the "msbuild" and "visualstudio" are not present on the build agent, and in our build definition we added "Visual Studio Build" Task, It will show a message that capabilities are not present on the agent.

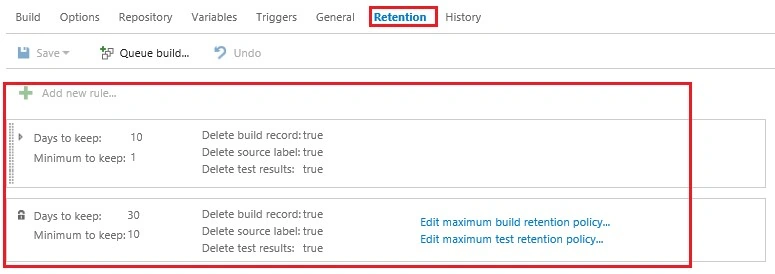
Retention tab as the name says, allows to see the duration to keep the build and a minimum number of build to keep. It also allows us to set or edit maximum build retention policy.
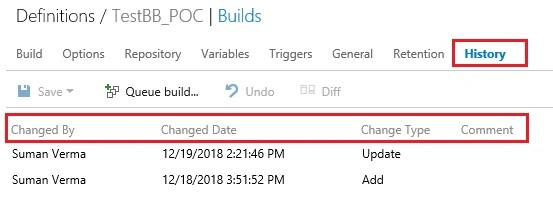
History tab allows to see any changes in the build definition.
It also shows the information like changed By, Changed date, Change Type and comment.
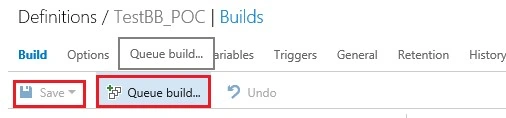
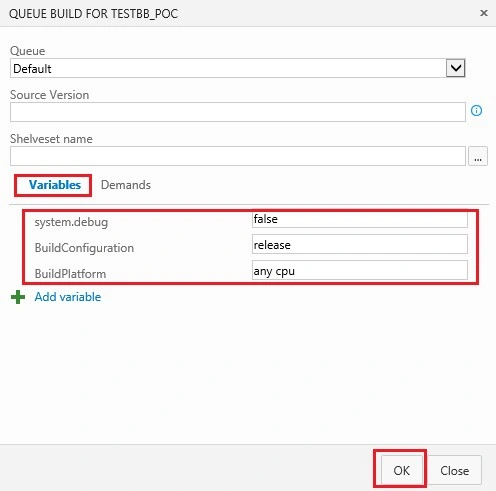
Specify variable/Demands and click ok,
Build has started and the build tasks are executing as specified in the build definition.
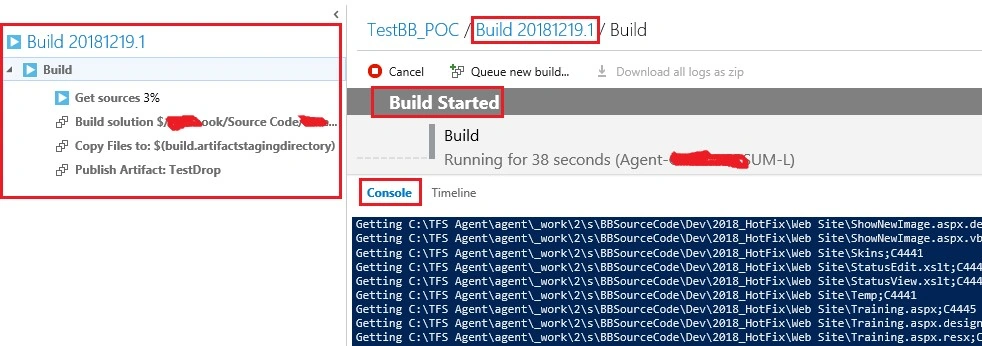
We can see the console for the build tasks and explore logs using Logs as shown below.
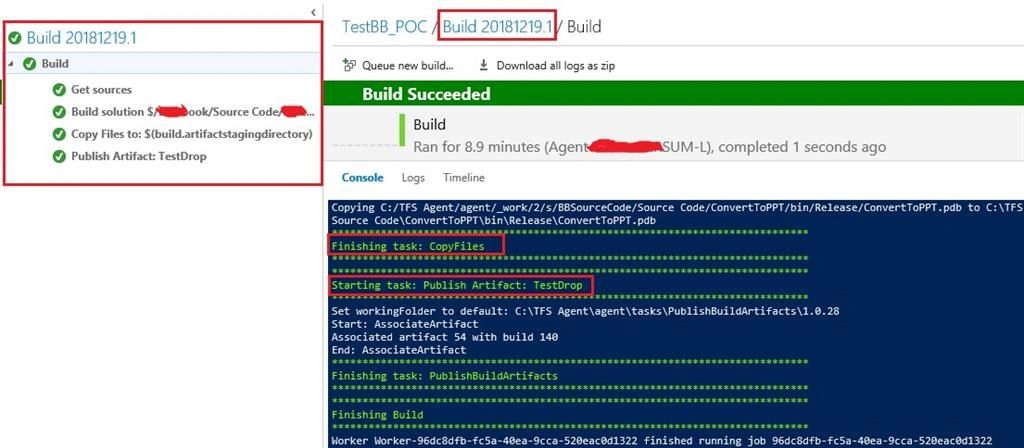
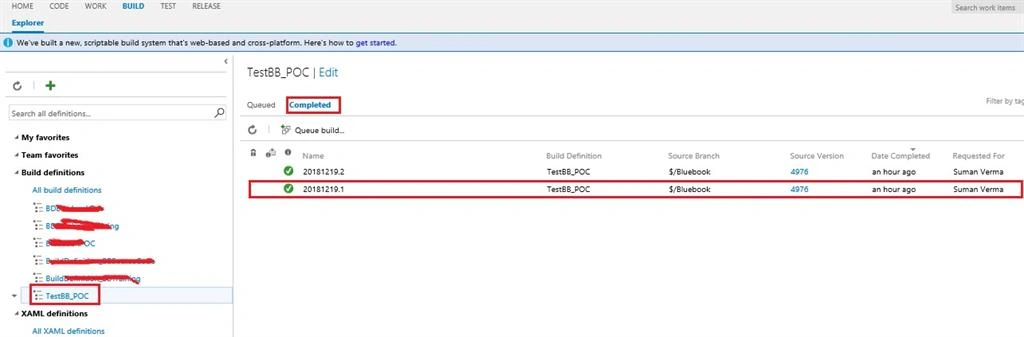
And the Build Artifacts are published on the specified location as we set in the Publish Build Artifacts step.

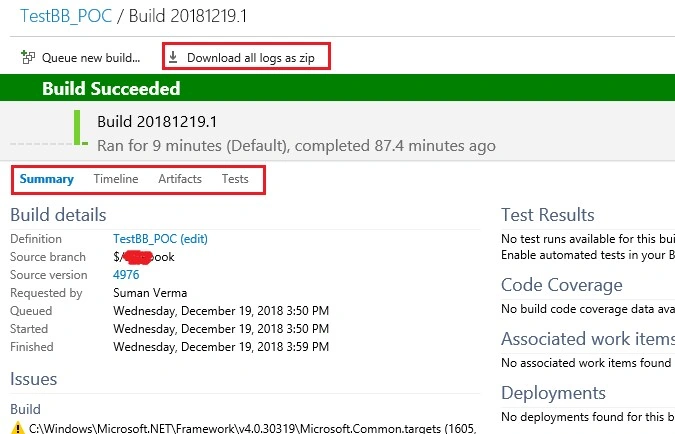
There are different options we can see when the build has succeeded
- Summary tab
- Timeline tab
- Artifacts tab
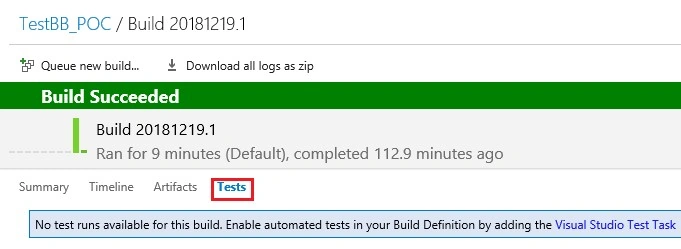
- Tests tab
Summary tab
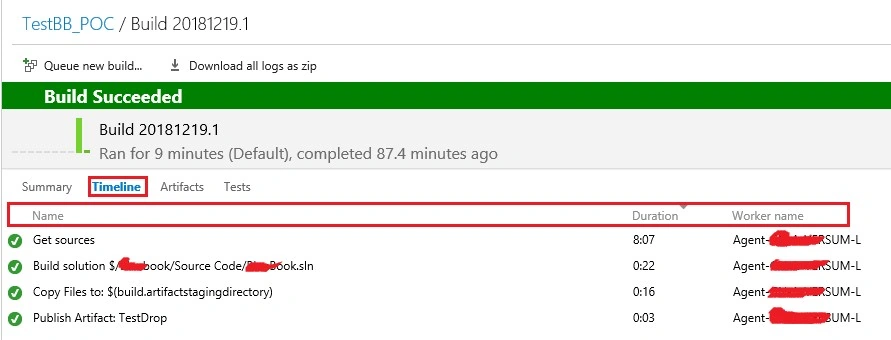
This tab can be used to display build steps, agent name and the duration takes place when executing each step as shown.
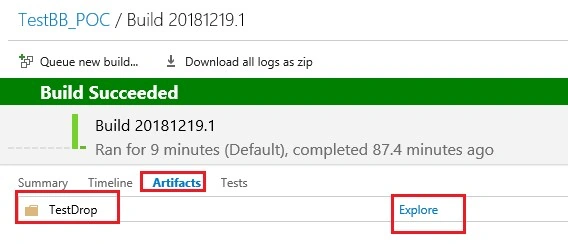
We can use this tab to explore the build Artifacts as we setup in the Publish Build Artifacts step.
On exploring we can see these artifacts on the File Share path specified as shown:

- How to create a build Definition
- How to configure the different tasks/steps included in the build
- How to configure various build menu options
- Save the build
- Queue build option
- After the build has succeeded, various options to see the information about the build
Note
We can use the build Artifacts produced by the Build definition in the release definition. I’ll explain in my next article about the Release definition for different environments and the steps included in the Release definition.
Below is a flow of the work of build, release definition, and agent.
Keyur PanchalPosted Apr 27, 2020, 1:00 AM
I can't see the Build & Release menu in TFS 2015 portal.
Prabu ElavarasanPosted Jan 2, 2019, 11:10 PM
Good design and well structured. Appreciate your hard work!!!