

Introduction
Android is one of the most popular operating systems for the mobile. I am sure that basically one Application contains multiple activities and lots of modules. I will show you how to work with the multiple activities and navigate the activities in an Android Studio. Android is the kernel-based operating system. It allows the user to modify the GUI components and the source code.
Requirements
- Android Studio.
- A little bit XML and Java knowledge.
Download link for an Android Studio- https://developer.android.com/studio/index.html
Steps to be followed are given below
Carefully follow my steps to work with the multiple activities and navigate the activities in an Android Studio. I have included the source code below.
Step 1
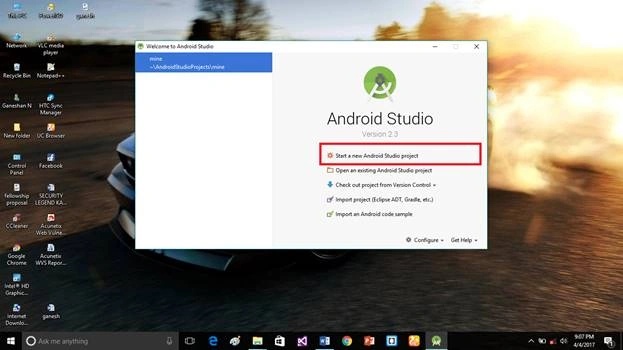
Open an Android Studio and start a new project.
Step 2
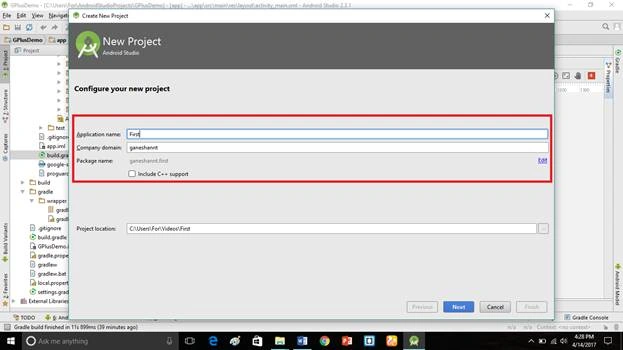
Put the Application name and the company domain. If you wish to use C++ for coding the project, mark Include c++ support, followed by clicking Next.
Step 3
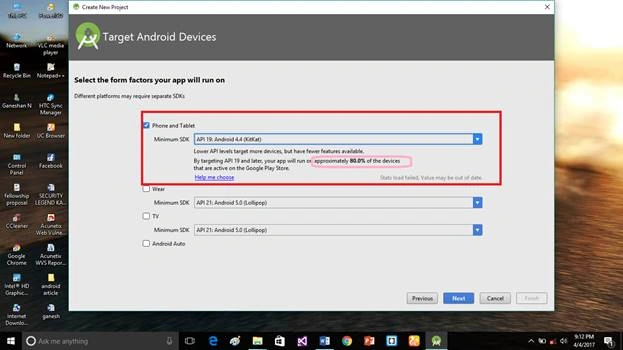
Select an Android minimum SDK. After you chose the minimum SDK; it will show the approximate percentage of the people, using SDK, followed by clicking Next.
Step 4
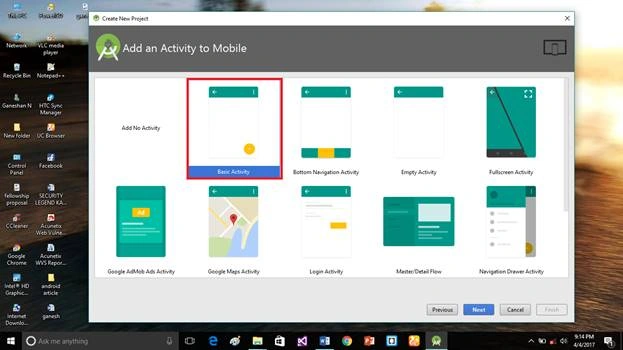
Choose the empty activity, followed by clicking Next.
Step 5
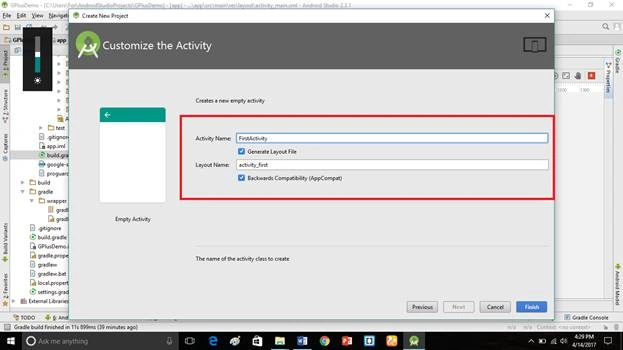
Put the activity name and the layout name. Android Studio basically takes a Java class name, which you provide for the activity name and click Finish.
Step 6
Go to activity_first.xml, followed by clicking the text bottom. This XML file contains the designing code for an Android app. In activity_first.xml, copy and paste the code given below.
activity_first.xml code
- <?xml version="1.0" encoding="utf-8"?>
- <RelativeLayout
- xmlns:android="http://schemas.android.com/apk/res/android"
- xmlns:tools="http://schemas.android.com/tools"
- xmlns:app="http://schemas.android.com/apk/res-auto"
- android:layout_width="match_parent"
- android:layout_height="match_parent"
- tools:context="ganeshannt.frist.FristActivity">
- <Button
- android:id="@+id/button2"
- android:layout_width="wrap_content"
- android:layout_height="wrap_content"
- android:onClick="Ganesh"
- android:text="click third activity"
- android:textColor="@color/colorPrimary"
- app:layout_constraintTop_toTopOf="parent"
- tools:layout_editor_absoluteX="168dp"
- android:layout_alignParentBottom="true"
- android:layout_toEndOf="@+id/text"
- android:layout_marginBottom="196dp" />
- <TextView
- android:layout_width="wrap_content"
- android:layout_height="wrap_content"
- android:text="This s my first app!"
- android:id="@+id/text"
- tools:layout_editor_absoluteY="8dp"
- tools:layout_editor_absoluteX="8dp" />
- <Button
- android:layout_width="wrap_content"
- android:layout_height="wrap_content"
- android:id="@+id/button"
- android:text="click second activity"
- android:textColor="@color/colorPrimary"
- android:onClick="Ganesh"
- tools:layout_editor_absoluteX="168dp"
- app:layout_constraintTop_toTopOf="parent"
- android:layout_above="@+id/button2"
- android:layout_alignStart="@+id/button2"
- android:layout_marginBottom="40dp" />
- </RelativeLayout>
Step 7
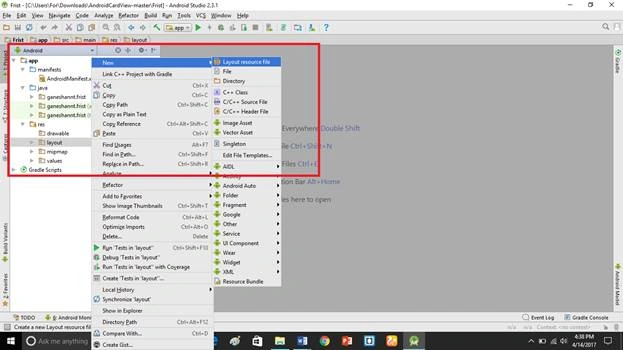
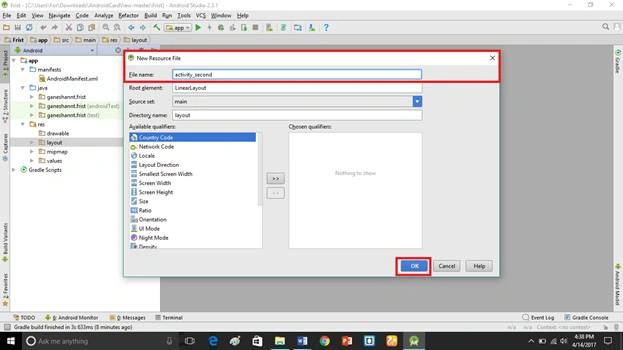
Create the new activity_second.xml file. (XML File directory :App -> res-> layout). Put your activity name, followed by clicking OK.
Step 8
Go to activity_second.xml, followed by clicking the text bottom. This XML file contains the designing code for an Android app. In activity_second.xml, copy and paste the code given below.
activity_second.xml code
- <?xml version="1.0" encoding="utf-8"?>
- <LinearLayout xmlns:android="http://schemas.android.com/apk/res/android"
- android:orientation="vertical" android:layout_width="match_parent"
- android:layout_height="match_parent">
- <TextView
- android:layout_width="wrap_content"
- android:layout_height="wrap_content"
- android:layout_margin="20pt"
- android:text="second acticity is working...."
- android:textAllCaps="true"
- android:textColor="@color/colorPrimaryDark"/>
- </LinearLayout>
Step 9
Repeat the step 7and create an activity_third.xml. Go to activity_third.xml, followed by clicking text bottom. This XML file contains designing the code for an Android app. In an activity_third.xml, copy and paste the code given below.
activity_third.xml code
- <?xml version="1.0" encoding="utf-8"?>
- <LinearLayout xmlns:android="http://schemas.android.com/apk/res/android"
- android:orientation="vertical" android:layout_width="match_parent"
- android:layout_height="match_parent">
- <TextView
- android:layout_width="wrap_content"
- android:layout_height="wrap_content"
- android:layout_margin="20pt"
- android:text="Third activity is working ........."
- android:textAllCaps="true"
- android:textColor="@color/colorPrimary"
- />
- </LinearLayout>
- package ganeshannt.frist;
- import android.content.Intent;
- import android.os.Bundle;
- import android.support.v7.app.AppCompatActivity;
- import android.view.View;
- import android.widget.Button;
- import android.widget.TextView;
- public class FristActivity extends AppCompatActivity {
- TextView textView;
- @Override
- protected void onCreate(Bundle savedInstanceState) {
- super.onCreate(savedInstanceState);
- setContentView(R.layout.activity_frist);
- textView = (TextView) findViewById(R.id.text);
- }
- public void Ganesh(View View)
- {
- String button_text;
- button_text =((Button)View).getText().toString();
- if(button_text.equals("click second activity"))
- {
- Intent ganesh = new Intent(this,SecondActivity.class);
- startActivity(ganesh);
- }
- else if (button_text.equals("click third activity"))
- {
- Intent mass = new Intent(this,ThirdActivity.class);
- startActivity(mass);
- }
- }
- }
Step 11
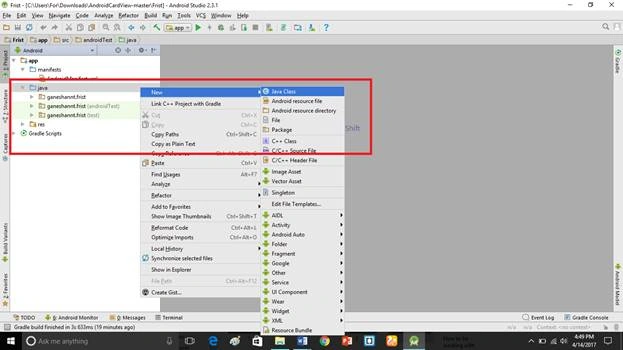
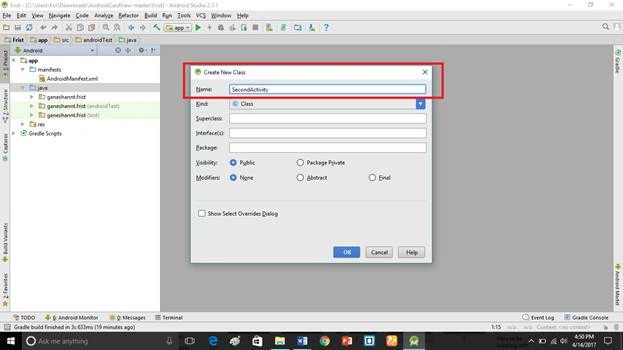
Create the new SecondActivity.java file. (Java file directory :App -> Java-> your package name). Put your class name, followed by clicking OK.
Step 12
In SecondActivity.java, copy and paste the code given below. Do not replace your package name, else an app will not run. The code given below contains my package name.
SecondActivity.java code
- package ganeshannt.frist;
- import android.app.Activity;
- import android.os.Bundle;
- import android.support.annotation.Nullable;
- /**
- * Created by For on 4/14/2017.
- */
- public class SecondActivity extends Activity {
- @Override
- protected void onCreate(@Nullable Bundle savedInstanceState) {
- super.onCreate(savedInstanceState);
- setContentView(R.layout.activity_second);
- }
- }
Step 13
Repeat the step 11and create ThirdActivity.java. Go to ThirdActivity.java, followed by copying and pasting the code given below.
ThirdActivity.java
- package ganeshannt.frist;
- import android.app.Activity;
- import android.os.Bundle;
- import android.support.annotation.Nullable;
- /**
- * Created by For on 4/14/2017.
- */
- public class ThirdActivity extends Activity {
- @Override
- protected void onCreate(@Nullable Bundle savedInstanceState) {
- super.onCreate(savedInstanceState);
- setContentView(R.layout.activity_third);
- }
- }
Step 14
Add the code given below into androidminifest.xml within the Application tab. Do not replace all the code, just copy and paste the code given below.
Androidminifest.xml
- <activity android:name=".SecondActivity"></activity>
- <activity android:name=".ThirdActivity"></activity>
Step 15
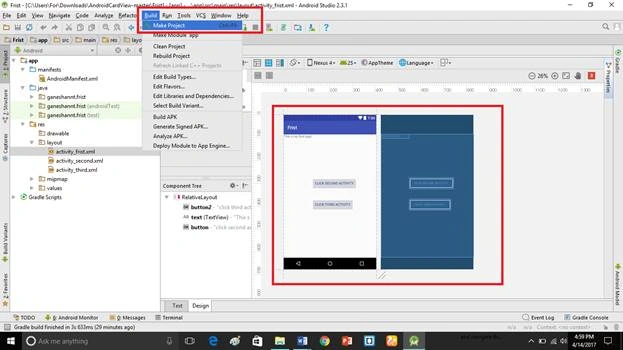
This is our user interface of the Application. Click Make project option.
Step 16
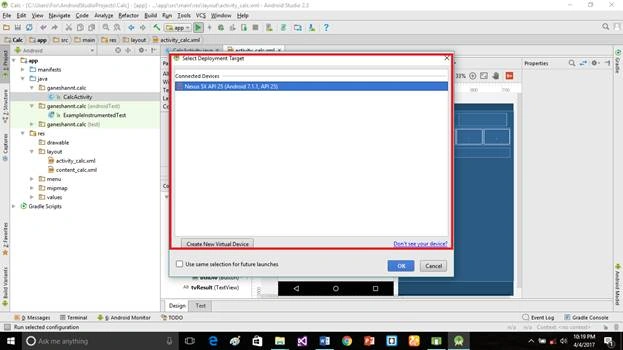
Run the Application, followed by choosing the virtual machine. Click OK.
Deliverables
Here, you are successfully working with multiple activities. Navigate the created and executed activities in and an Android Studio Application.
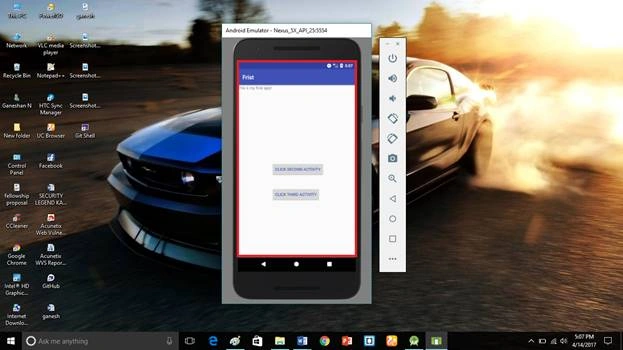
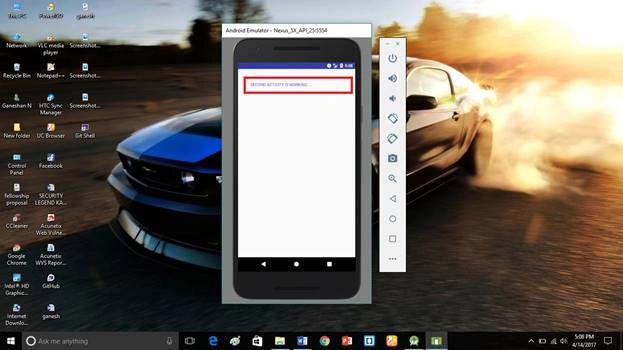
Click the second activity button and it will show the second activity page.
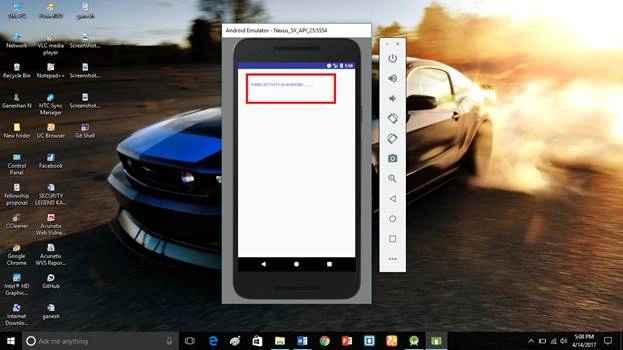
Click the third activity button and it will show the third activity page.
If you have any doubts, just comment below.
Mahesh ShrivastavaPosted Oct 12, 2020, 12:28 PM
Second activity not visible in res.layout in new activity java class
HariharanPosted Oct 28, 2018, 11:59 AM
How to create many *.xml files visible in single activity
funny funnyPosted Aug 26, 2018, 4:09 PM
Very nice tutorial sir I think this is also good tutorial
Amrutha SivaPosted Aug 12, 2018, 6:46 PM
Hi i have a code of generating histogram for an image . I want that to work after i have taken a photo from my camera app which i created . So should i just create a new activity and make it do one after the other or do i have to give this method after my image taking method.
Priyanka GangulyPosted Feb 19, 2018, 1:46 AM
I am creating an application,"Give url and click on button and open in browser" and getting getServiceInstance failed error at runtime , plz guide ASAP...!!!