

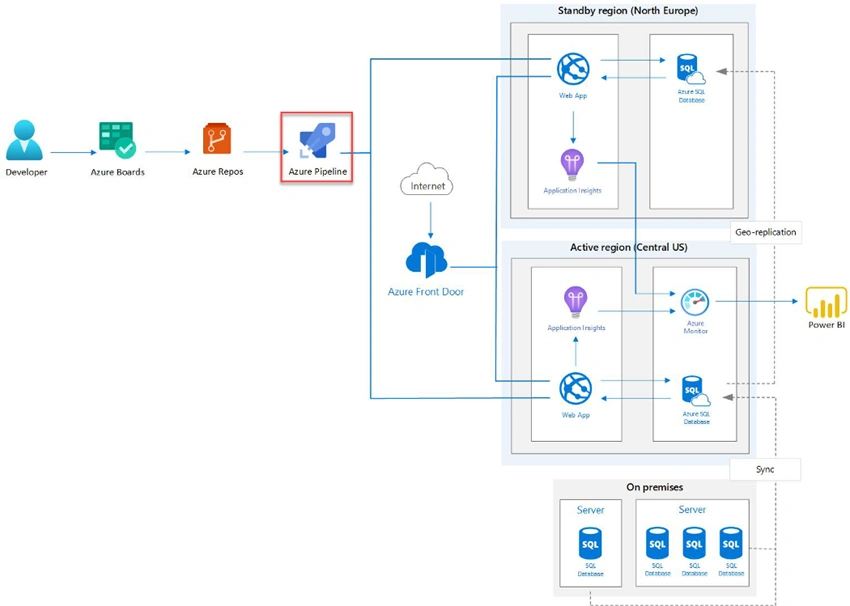
A previous article guided you through setting up your repository. You did this by creating multiple branches that reflect the GitFlow model and protecting those branch use policies. Then, I gave you an overview of how pull requests work. This article - the final installment in the Azure series - will show you how to implement Azure’s continuous testing, integration, and deployment mechanisms.
Continuous Integration
Continuous Integration (CI) is a practice that allows multiple developers to frequently merge code changes into a remote repository by automating the build, test, and run processes. To implement your own CI pipeline in Azure, follow these steps:
- From the dashboard, select Pipelines.
- Click the New Pipeline button.
- Select Azure Git Repos as a source that will trigger our pipeline.
- From the multiple templates that Azure DevOps will suggest, select Starter Pipeline and paste the following code in it.
trigger:
- mainpool:
  vmImage: ubuntu-latestvariables:
  buildConfiguration: 'Release'steps:
- script: dotnet build --configuration $(buildConfiguration)
  displayName: 'dotnet build $(buildConfiguration)'- task: PublishBuildArtifacts@1
  inputs:
    PathtoPublish: '$(Build.ArtifactStagingDirectory)'
    ArtifactName: 'drop'
    publishLocation: 'Container'
Continuous Testing
As mentioned before, the continuous integration pipeline can perform both static and dynamic tests automatically. Static testing is a technique to improve the quality of your application by detecting bugs, vulnerabilities, and code smells without executing your application’s code. Dynamic testing, on the other hand, focuses on the behavior of your application; it requires the execution of your application’s code.
This tutorial will teach you how to perform static testing using SonarCloud.
Install the SonarCube Extension
To be able to use the SonarCloud functionalities, you must install the SonarCloud extension in your organization using the following steps:
- Sign in to your Azure DevOps organization.
- Go to Organization Settings.
- Select Extensions.
- Click on Browse Marketplace at the top right.
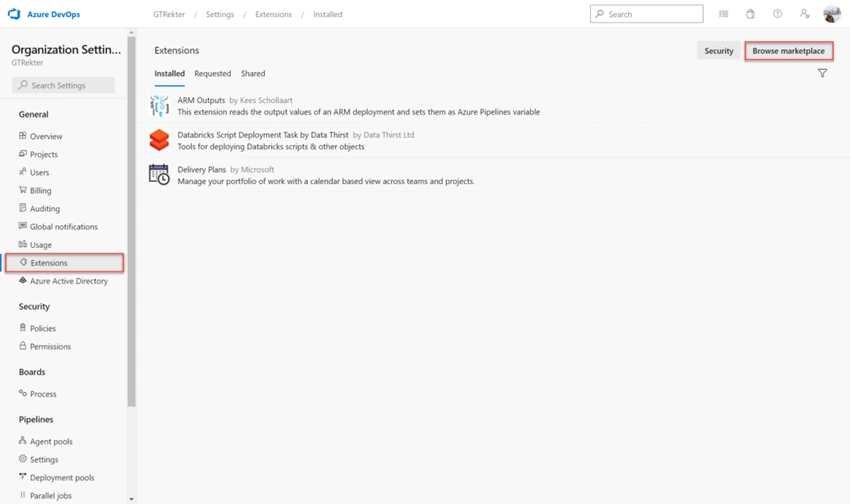
- As the Marketplace opens, search for SonarCloud. Click on the correct SonarCloud result as shown below,
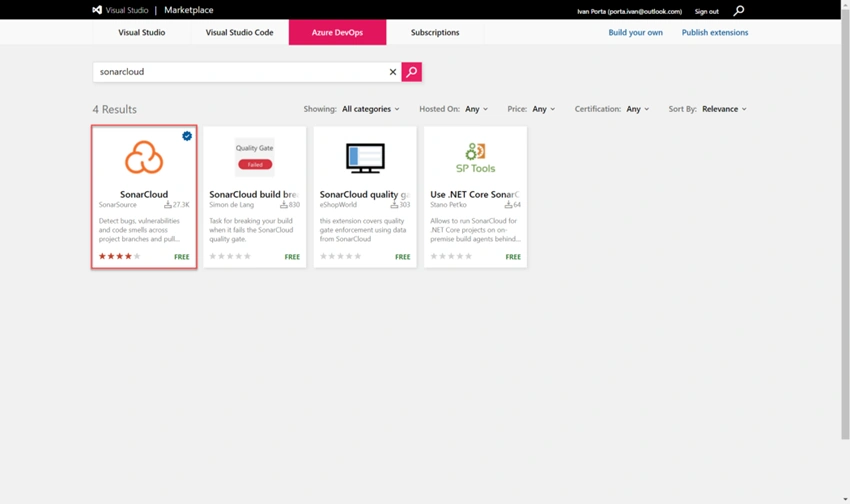
- Click on the Get it Free button.
- Select your target organization from the dropdown, then click Install to complete the procedure.
Link the Project to SonarCloud
It is now time to connect your Azure DevOps project to SonarCloud.
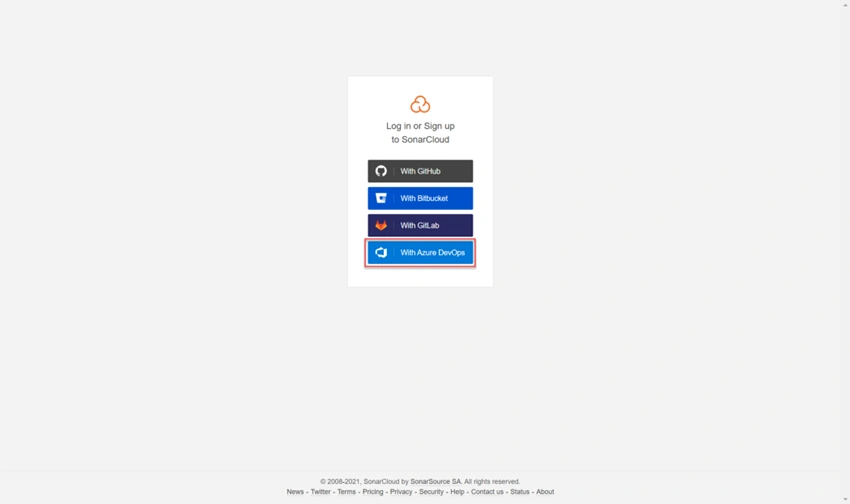
- Navigate to https://sonarcloud.io/ in your browser, then click login at the top of the page.
- Select With Azure DevOps and grant permissions to SonarCloud.
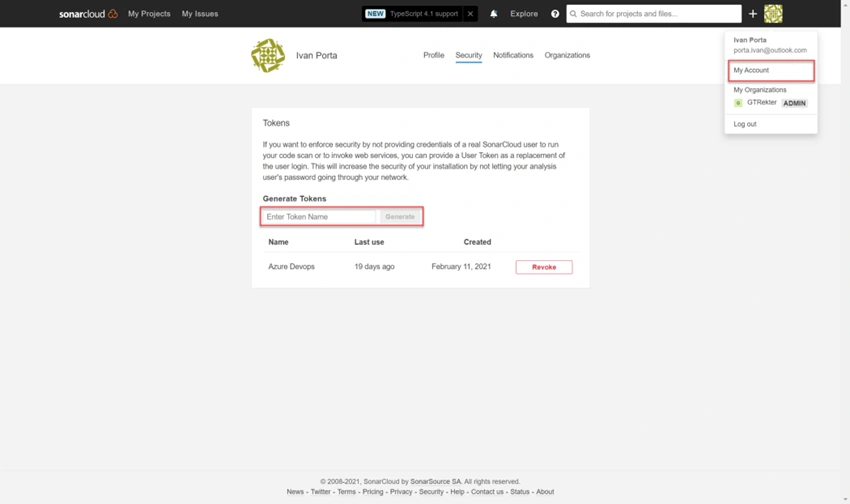
- Click on your profile’s icons on the top right side of the window, then select My Account.
- Enter the name of your token, click the Generate button, and copy the token.
- From your Azure DevOps organization, navigate to your project.
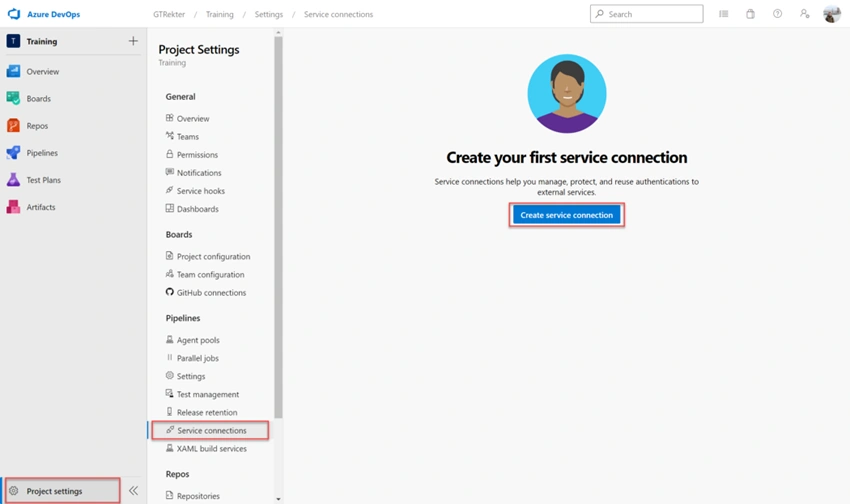
- From the Project Settings, open the Service Connections Page.
- Click the New Service Connection button and select SonarCloud to define and secure a connection to a SonarCloud.
Fill in the parameters for the service connection, allowing all pipelines to use this connection option.
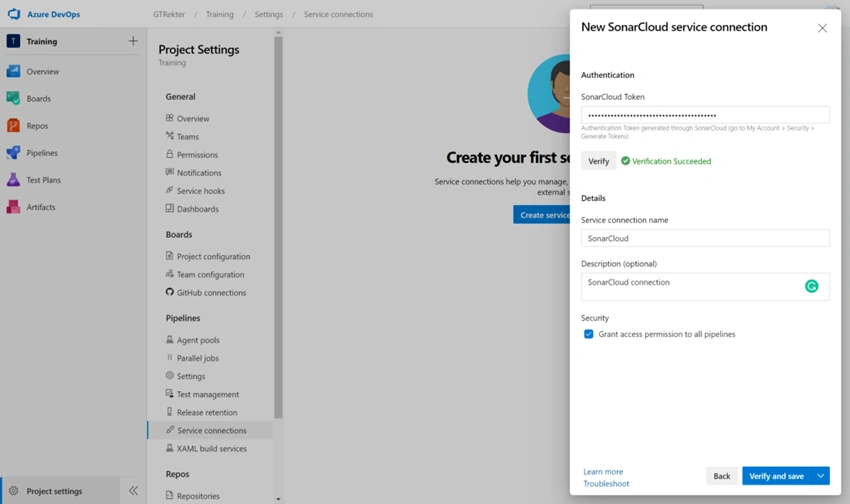
Click Verify and Save to create the connection.
Create a New Project on SonarCloud
Before you continue with the configuration of the CI pipeline, you must create a project on SonarCloud that will be linked to the repository in the next steps.
- Sign in to your SonarCloud account.
- Select the My Projects tab on the top left side of the page.
- Click the Analyze New Project button.
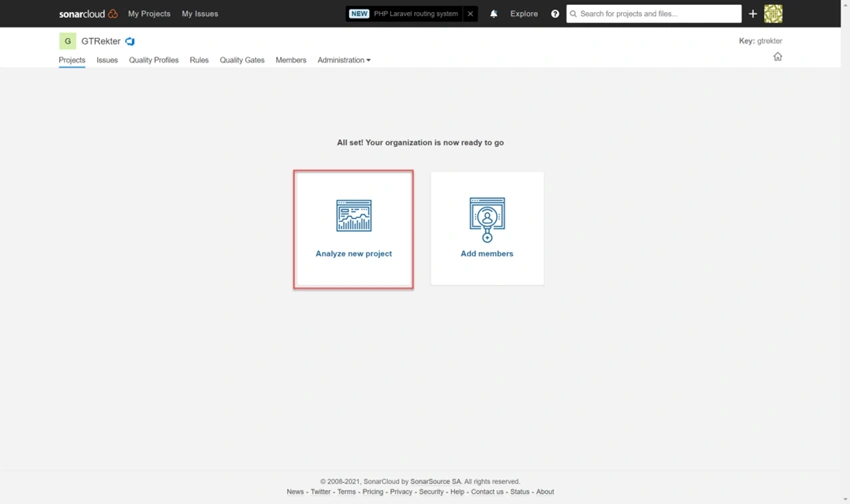
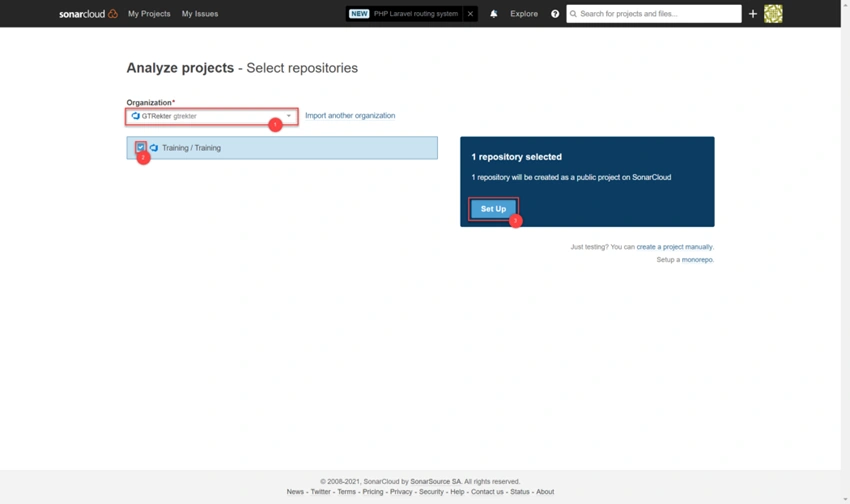
Select your organization, check your project and click Set Up.
Add Task into the Continuous Integration Pipeline
Now that you have successfully connected your SonarCloud account to your project, you can move forward and add the SonarCloud-specific tasks installed by the extension into your continuous integration pipeline.
- From the dashboard, select Pipelines.
- Select the pipeline that you previously created.
- Click the Edit button on the top right-hand corner of the page.
- Filter the available tasks for SonarCloud.
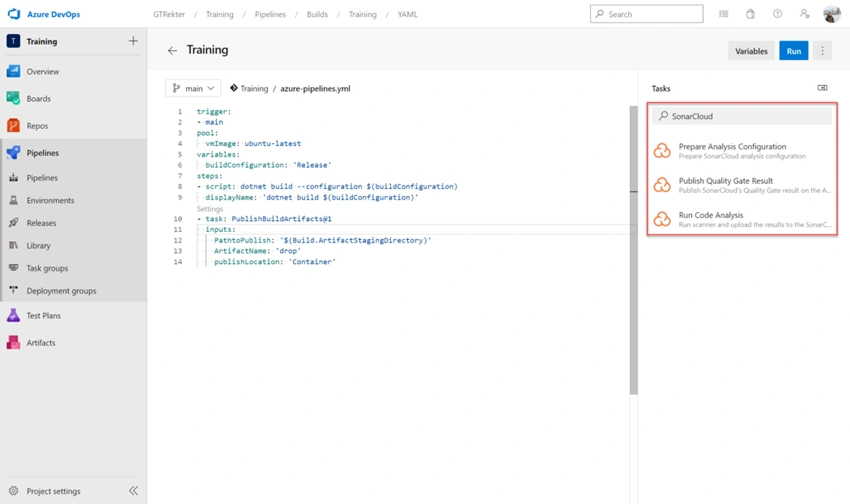
The order in which these tasks should be executed is,
- Prepare Analysis Configuration: configures the settings before executing the build
- Run Code Analysis: analyzes the source code
- Publish Quality Gate Result (optional): shows if the code meets the quality standards in the build summary
Let us start by adding a Prepare Analysis Configuration task before the build task. Here you must select the service connection, the organization, how the analysis is done (MSBuild in this tutorial because the example application was developed using the .NET 5 framework), the project key, and the project name.
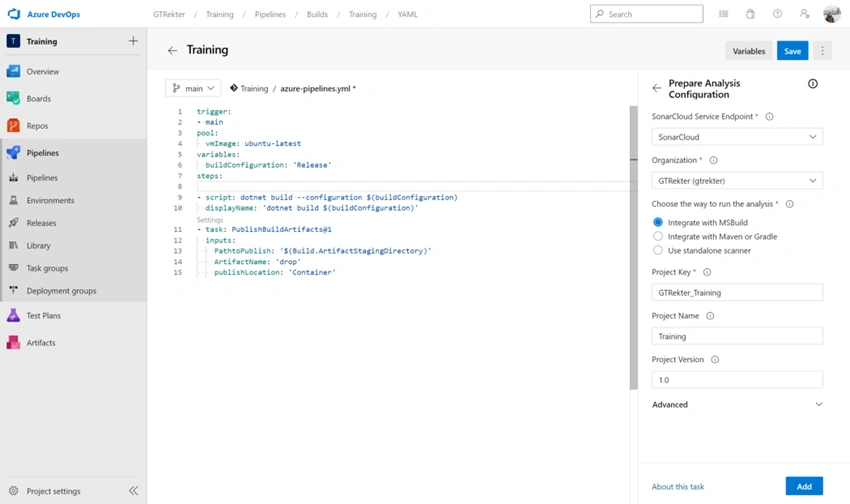
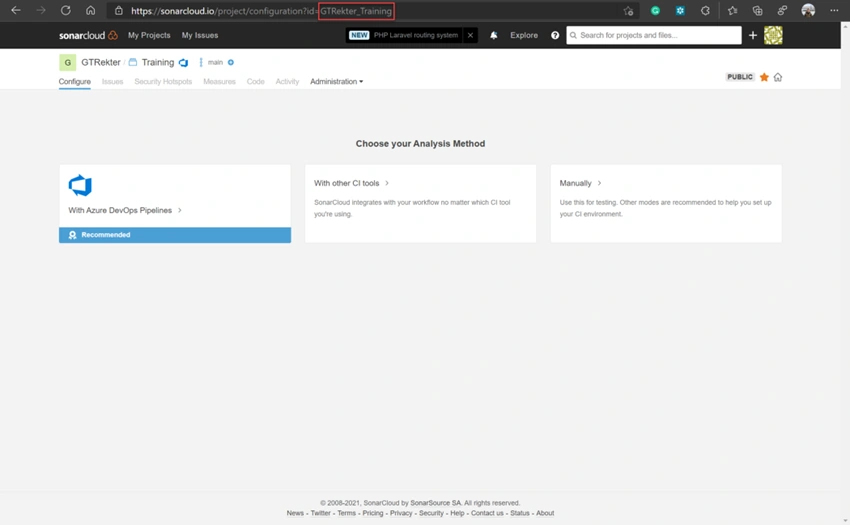
The project key is the values of the parameter ID in the URL of your SonarCloud project.
- Add a new Run Code Analysis task after your build task.
- Add a new Publish Quality Gate Result task on your build pipeline summary.
- Add a new .NET Core task with the command Publish. Make sure the Zip Published Project option is checked.
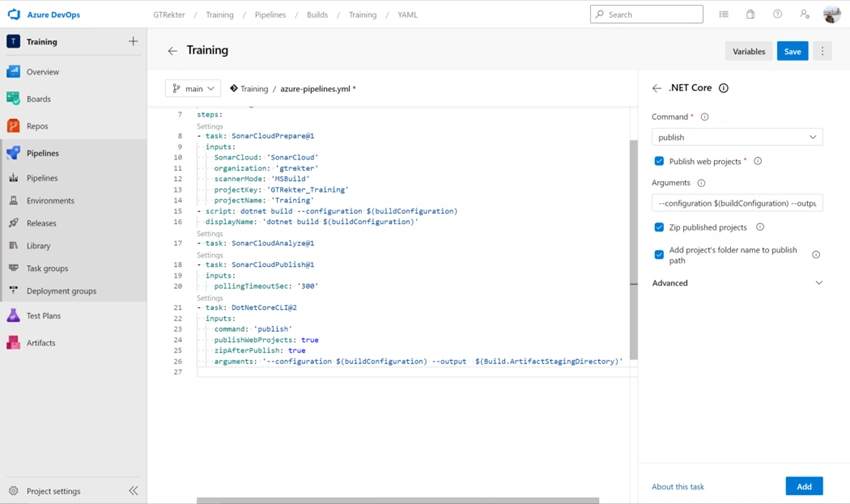
Lastly, add the Publish Build Artifact task.
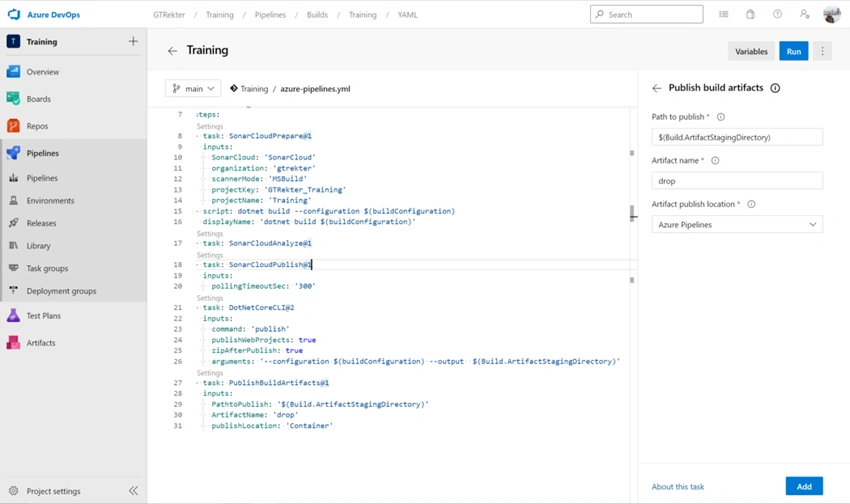
Save your pipeline.
The pipeline will look something like this,
trigger:
- main
pool:
  vmImage: ubuntu-latest
variables:
  buildConfiguration: 'Release'
steps:
- task: SonarCloudPrepare@1
  inputs:
    SonarCloud: 'SonarCloud'
    organization: 'gtrekter'
    scannerMode: 'MSBuild'
    projectKey: 'GTRekter_Training'
    projectName: 'Training'
- script: dotnet build --configuration $(buildConfiguration)
  displayName: 'dotnet build $(buildConfiguration)'
- task: SonarCloudAnalyze@1
- task: SonarCloudPublish@1
  inputs:
    pollingTimeoutSec: '300'
- task: DotNetCoreCLI@2
  inputs:
    command: 'publish'
    publishWebProjects: true
    zipAfterPublish: true
    arguments: '--configuration $(buildConfiguration) --output  $(Build.ArtifactStagingDirectory)'
- task: PublishBuildArtifacts@1
  inputs:
    PathtoPublish: '$(Build.ArtifactStagingDirectory)'
    ArtifactName: 'drop'
    publishLocation: 'Container'
Continuous Deployment
Now you can create your continuous deployment (CD) pipeline. This pipeline will automatically deploy the changes to the app services you made based on the previous tutorial.
Create a Connection to Azure Resource Manager
To be able to create, update, and delete resources in your Azure account, you must create a connection to Azure Resource Manager. Azure Resource Manager is the deployment and management service for Azure. To create the connection, perform the following steps:
- From your Azure DevOps organization, navigate to your project.
- From the Project Settings, open the Service Connections Page.
- Click the New Service Connection button and select Azure Resource Manager.
- Select the Service Principal (Automatic) authentication type.
Select your scope level, filling in the parameters for the service connection, and allowing all pipelines to use this connection option.
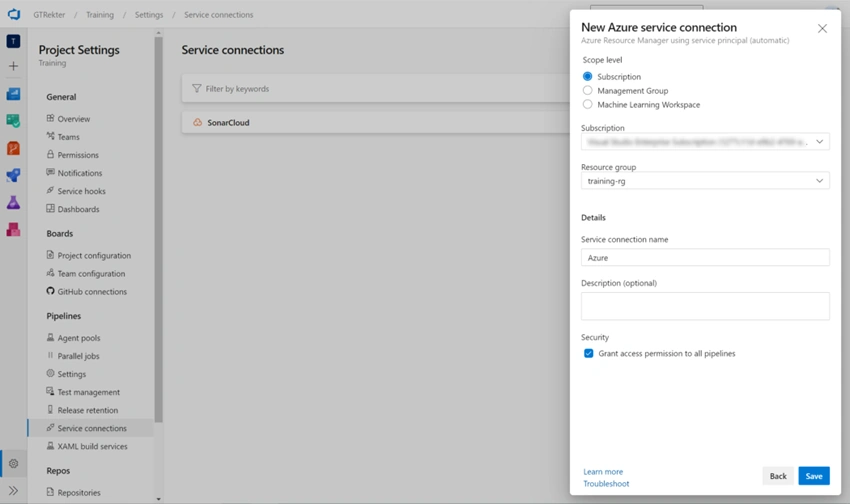
Click Save to create the connection.
Create a Release Pipeline
- From the dashboard, select Pipelines and then Releases.
- Click the New Pipeline button.
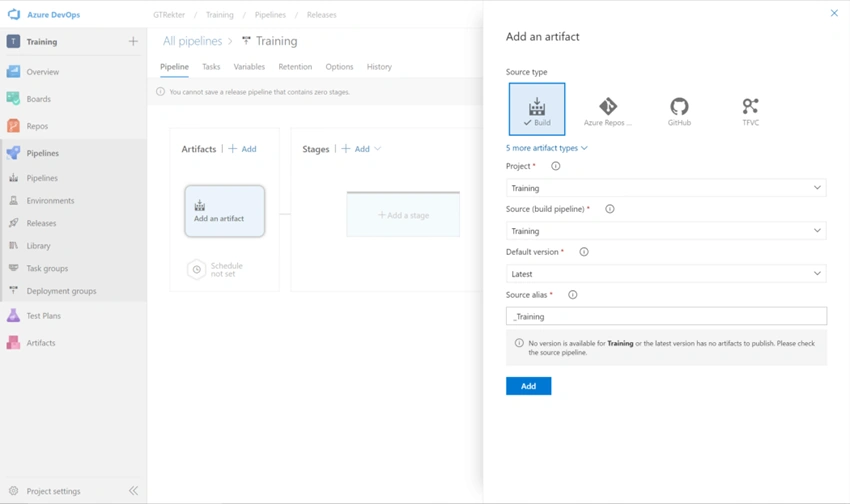
- Select Add an Artifact.
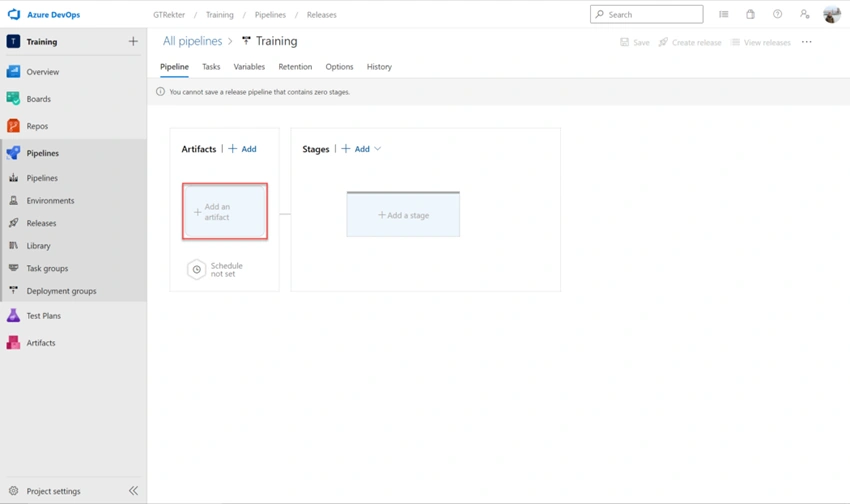
Select Build as the source type, then select the building pipeline from within the Source (Build Pipeline) dropdown.
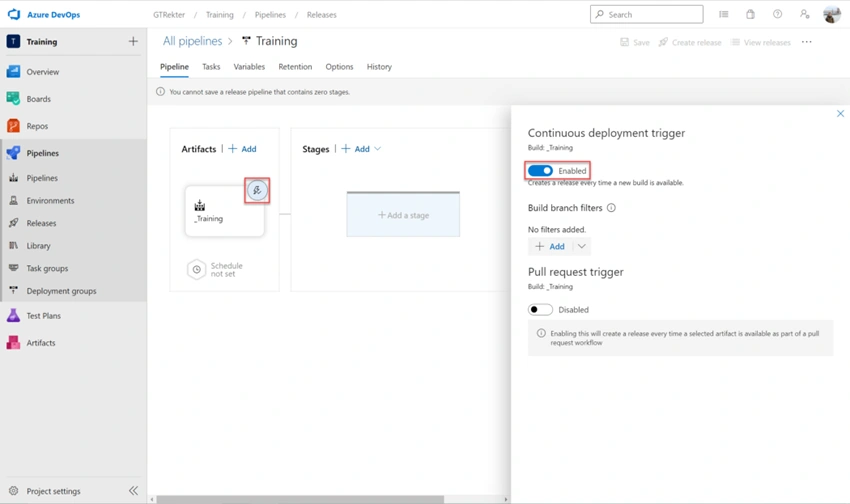
To enable deployment each time a new build is available, click the lightning icon in the top right-hand corner of your artifact. Enable the Continuous Deployment Trigger.
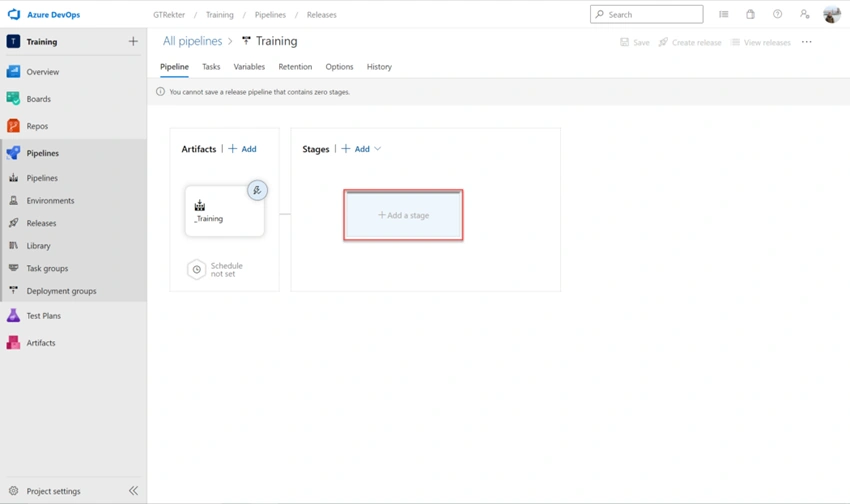
Click on Add a Stage.
- Select Empty Job.
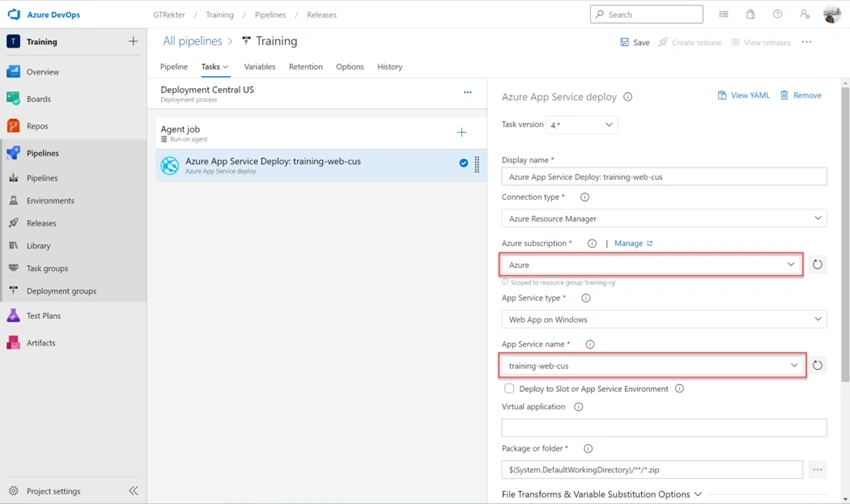
- Click the + icon then select the Azure App Service Deploy tasks.
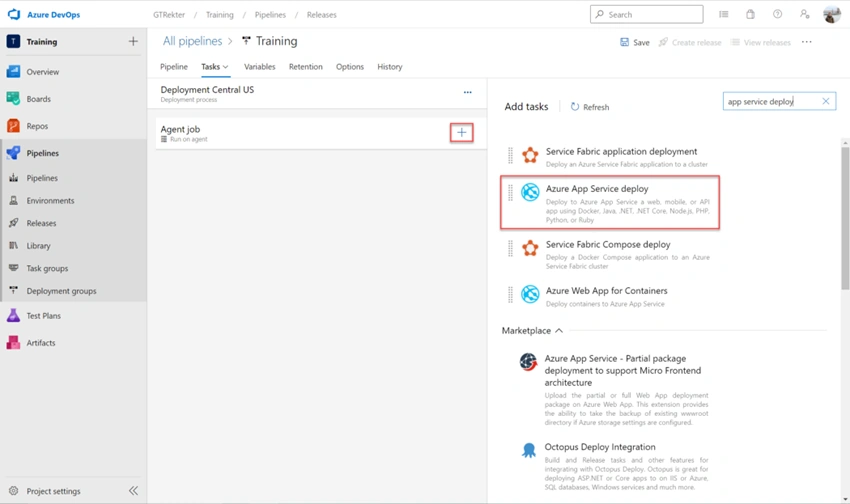
Select the service connection to the Azure Resource Manager that you have previously created; target the App Service. The example shows the deployment of the application in the App Service hosted in a server in the Central United States.
- Go back to the Pipeline tab.
- Click + Add and select Clone Stage from the dropdown.
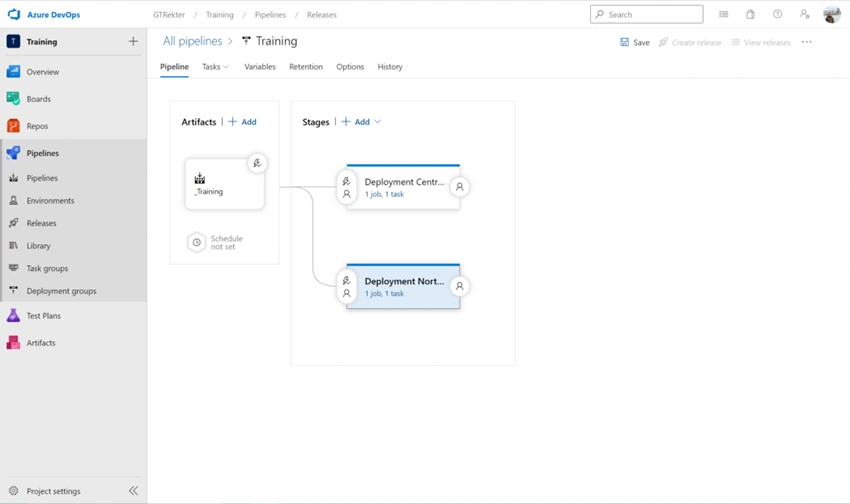
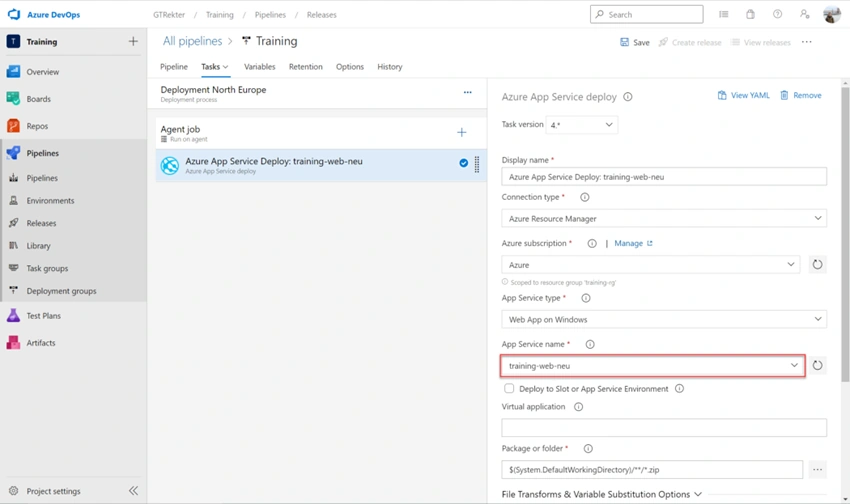
Change the App Service of the cloned stage to point to the App Service hosted on a server in Northern Europe.
Click the Save button at the top right-hand side of the page.
Congratulations! You have finished setting up the proposed architecture.
Testing the Architecture
Now that the entire architecture is finally ready, you can test the entire workflow.
On your local machine, change your application’s response to an HTTP request at the root by pasting the following code into the Configure method of your Startup file.
app.UseEndpoints(endpoints =>
{
    endpoints.MapGet("/", async context =>
    {
        await context.Response.WriteAsync("How Azure can help your company expand in multiple regions - Part 5");
    });
});
Stage, commit and push the changes on the feature-amazingfeature branch to the remote repository.
$ git add .
$ git commit -m "Change the response"
[feature-amazingfeature 369b799] Change the response
 1 file changed, 1 insertion(+), 1 deletion(-)
$ git push
Enumerating objects: 5, done.
Counting objects: 100% (5/5), done.
Delta compression using up to 8 threads
Compressing objects: 100% (3/3), done.
Writing objects: 100% (3/3), 384 bytes | 192.00 KiB/s, done.
Total 3 (delta 2), reused 0 (delta 0), pack-reused 0
remote: Analyzing objects... (3/3) (20 ms)
remote: Storing packfile... done (109 ms)
remote: Storing index... done (116 ms)
To https://dev.azure.com/GTRekter/Training/_git/Training
   d7b19ea..369b799  feature-amazingfeature -> feature-amazingfeature
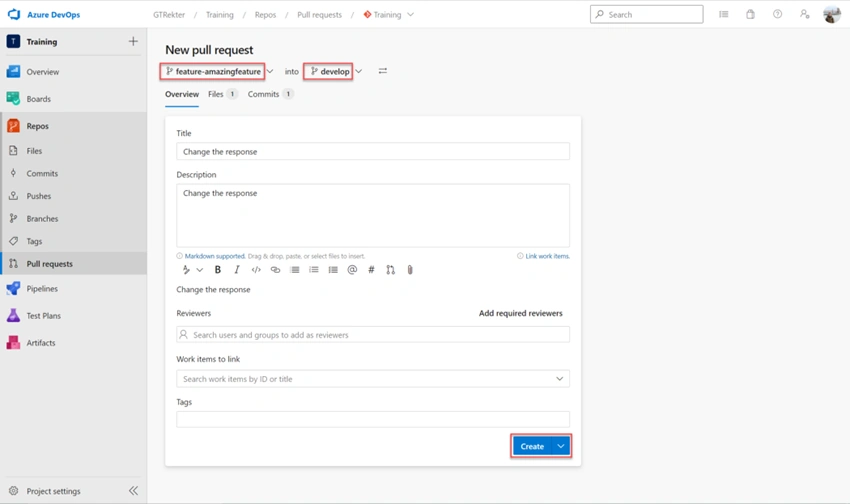
Navigate to your project on Azure DevOps, select the Pull Request option in the Repos tab, and click New Pull Request.
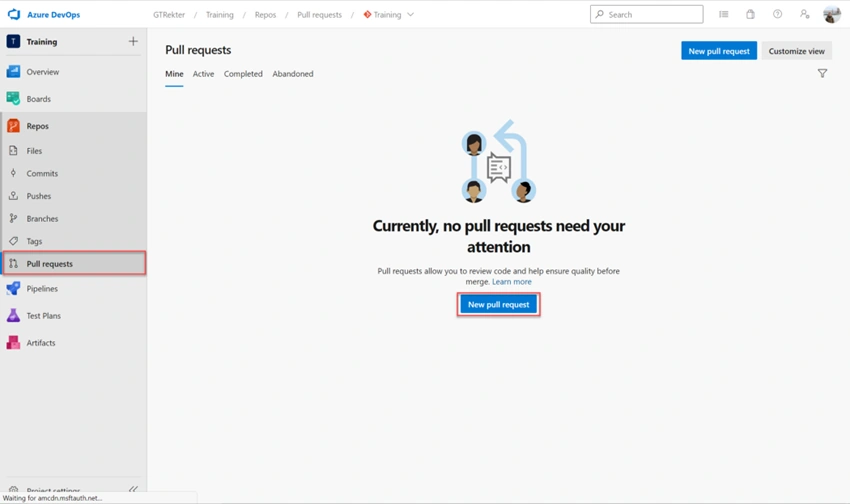
Select the branch feature-amazingfeature as the source, the branch develop as the target, create a title, create a description, and click Create.
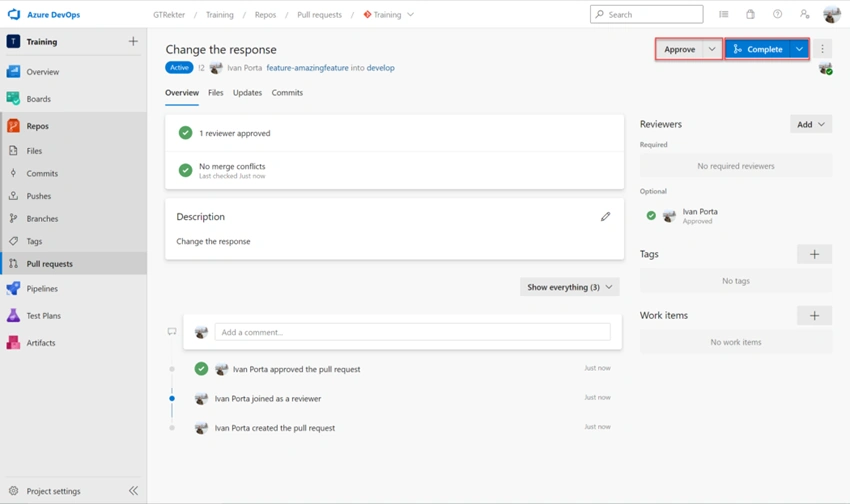
Click approve. Then click Complete to conclude the pull request.
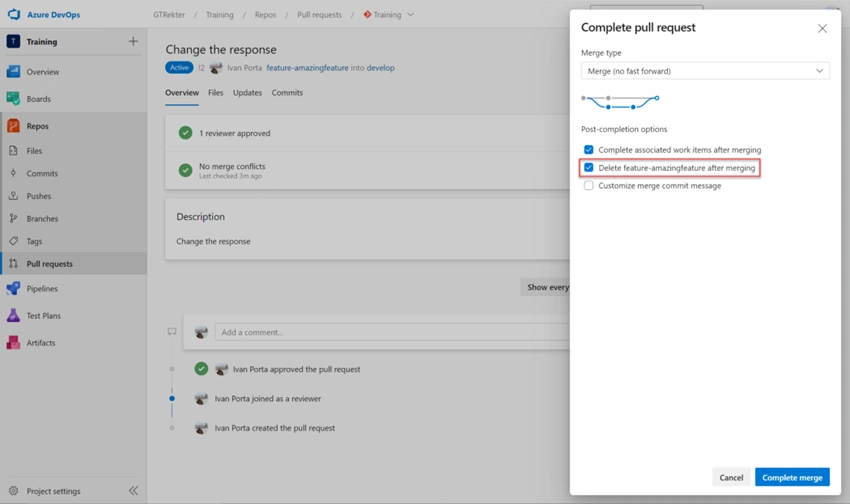
To avoid hundreds of unused branches, check the Delete feature-amazingfeature After Merging option, then click Complete Merge.
Repeat the same procedure for the other branches,
- Source: develop / Target: releases
- Source: releases / Target: main
Once the merge into the main is complete, the build pipeline will start automatically.
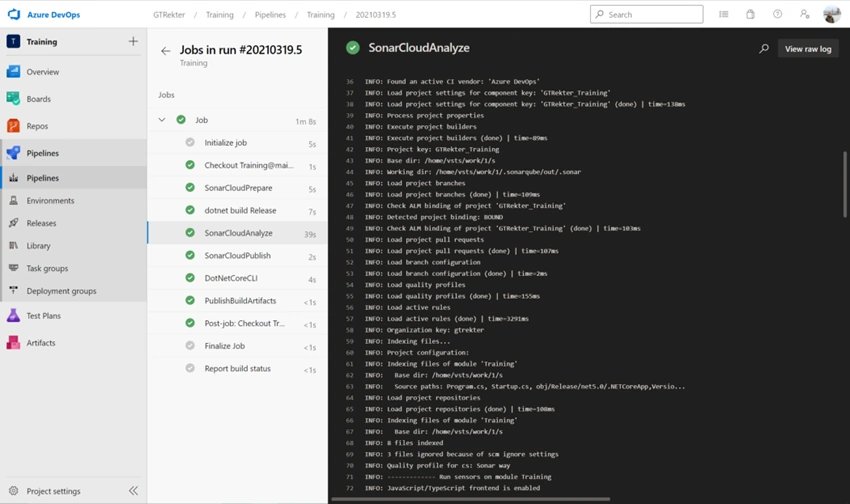
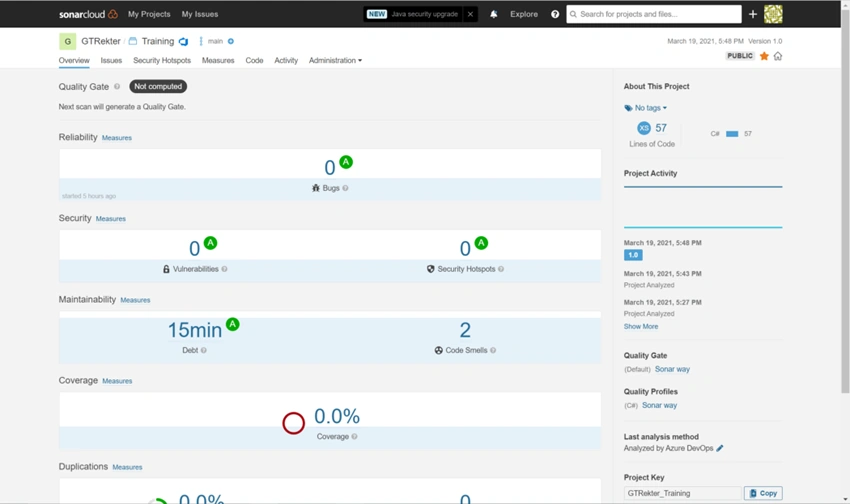
Once your build pipeline is completed, you can view the results of the analysis performed by SonarCloud by navigating to https://sonarcloud.io/ in your browser and selecting the appropriate SonarCloud project.
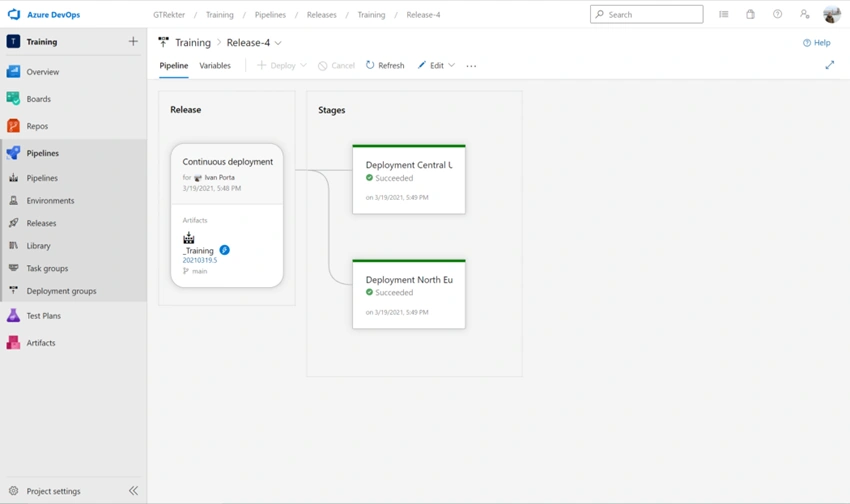
If your pipeline successfully completes, your release pipeline will automatically start. This will deploy the application on the two App Services located in different regions.
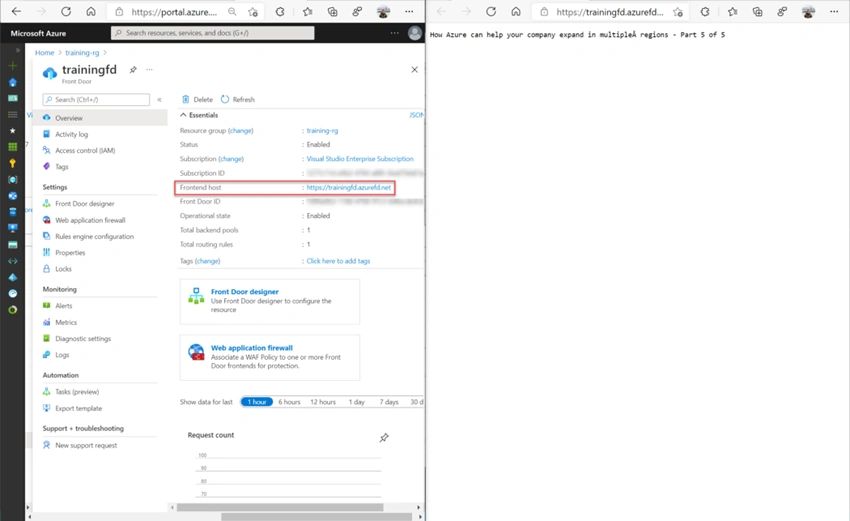
If you navigate to the URL defined in your Azure Front Door resource, your HTTP request will be forwarded to the geographically closest App Service in the backend pool. In my case, because I am currently in Philadelphia, Pennsylvania, Azure Front Door will forward my request to the App Service located in the Central United States.
Join the conversation! Your thoughts help the community grow.