

Introduction
This article was written for those who really want to understand about VSTS functionalities and features. And this article explains VSTS by comparing it with TFS (Team Foundation Server) to understand the concepts and differences better. After the theory part, this article shows how to use VSTS with screenshots.
Let’s begin…
Brief Info About VSTS
Visual Studio Team Services (Vsts) is a powerful tool to ease the end to end work involved in the software development process.
It mainly provides tools for:
- Source Code Management => Git repositories for source control of your code
- Work Item Management => Agile tools to support planning and tracking your work, code defects, and issues using Kanban and Scrum methods. Highly customizable dashboards for sharing progress and trends
- Build And Release Management => supports tools for continuous integration and delivery of our apps such as automated builds and automated deployment.
Note
All the above features can be accessed through either our web browser or IDE Client such as a Visual Studio.
Additional Information
We can also say VSTS is an Application Lifecycle Management tool.
VSTS is the cloud offering that provides a scalable, reliable, and globally available hosted service. It is backed by a 99.9% SLA, monitored by our 24-7 operations team, and available in local data centers around the world.
VSTS was previously called as “Visual Studio Online”.
Two Modes OF VSTS - Centralized and Decentralized
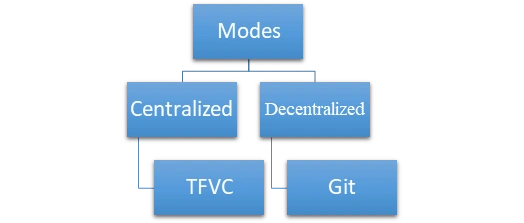
A traditional model is a centralized model, where code created by many developers is stored at the server. This mode is also called Team Foundation Version Control.
Another mode is the decentralized model, where each developer keeps their own repository of code in local repository first and merges those to the remote repository when required. This mode is also called Git.
We can set one mode as the default mode for our team project. In this article below, we will see how the decentralized mode such as Git works.
Before that, now let see the concept called “TFS” and what it actually is and how it is different from our VSTS.
Brief of TFS
- Team Foundation Server (commonly abbreviated to TFS) is a Microsoft On-Premises product similar to the cloud service VSTS.
- In simple words, TFS will work offline whereas Vsts will work online
- It also provides source code management in two modes (either with Team Foundation Version Control or Git) like vsts.
Difference between VSTS and TFS
| VSTS | TFS |
| It supports online | It supports offline |
| Just like a Rental Service | Buy an Entire Product |
| No Initial Setup and Maintenance is required by the buyer/user | All the Initial setup and maintenance needs to done by the buyer/user. |
Similarities
VSTS is an online version of TFS.
Both support the two modes TFVC and Git
Main Advantage of TFS over VSTS
- You can choose TFS when you need your data to stay within your network or you want access to SQL Server reporting services that integrate with TFS data and tools.
Main Advantages of VSTS over TFS
- Visual Studio Team Services requires no setup. A user can simply sign in using a Microsoft account to set up an environment, create projects and add team members with less effort.
- VSTS provides optimal hardware so that our infrastructure cost is avoided.
- Since the VSTS services are available on the internet, they can be easily used by teams that are distributed across multiple locations, without having any additional cost of VPN and overheads of security.
Pricing For VSTS
We are lucky if our team size is 5 because great service like VSTS is absolutely free up to 5 users.
Official Reference
https://www.visualstudio.com/team-services/pricing/
Enough of theory? Now let see the actual implementation.
Steps Involved To Use VSTS
Step 1
Create a Microsoft Account
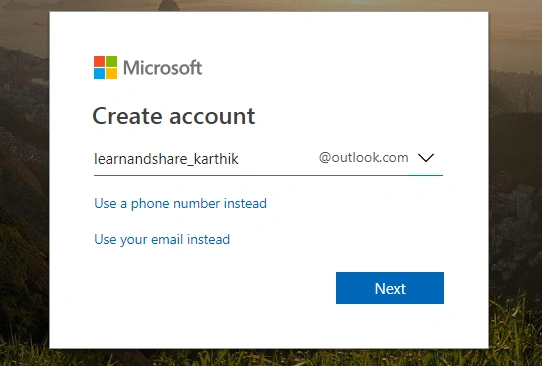
Note
Leave the above step if you already having the Microsoft account
Step 2
Create a VSTS account by using the Microsoft account.
Go to this link and click get started for a free button,
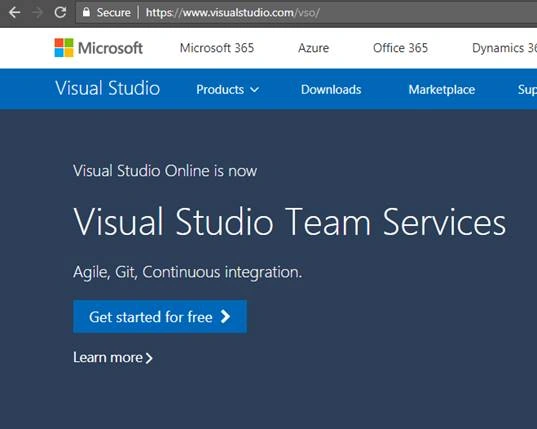
Then it will redirect you to the Microsoft sign in page, there provide your credentials and sign in
Then click yes for the stay signed in a page,
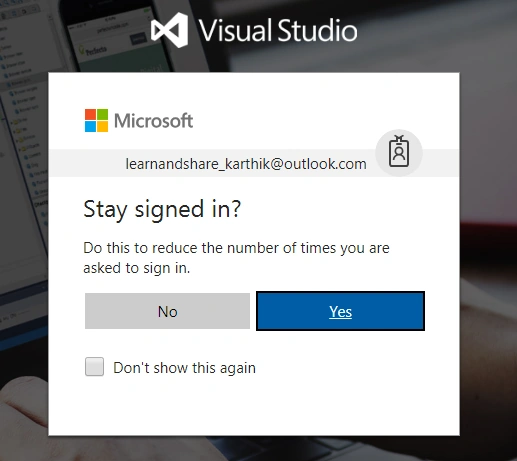
Then it will redirect you to the below page,
- In that provide any memorable name for your new site where you can see your remote repositories, we will see in-depth about that below
- And in the Manage code section, select Git Radio button
- Then finally click continue, like below
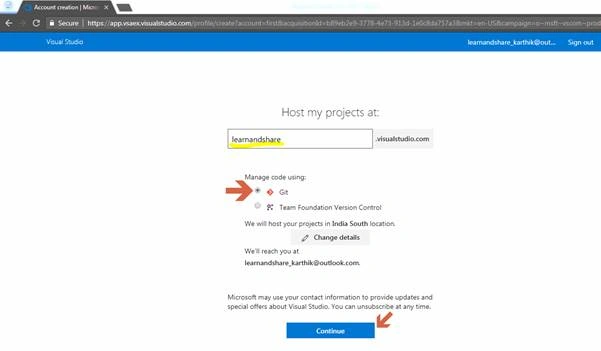
Then it will automatically create default project and repository and redirect us to the below page.
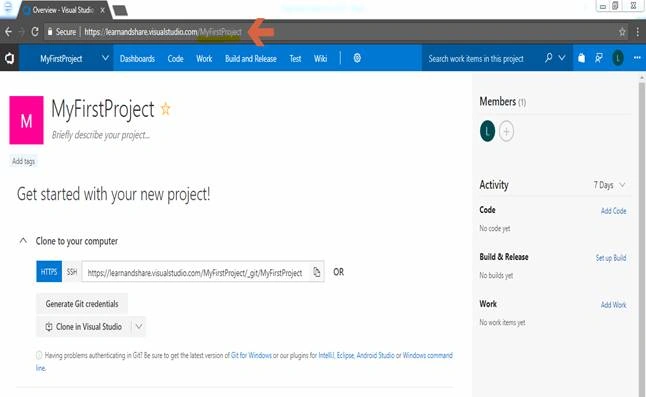
That’s it on the server side, now we will see how to connect our Visual Studio to this remote site and manage our projects
Let’s open our favorite Visual Studio and create any project with new git repository like below
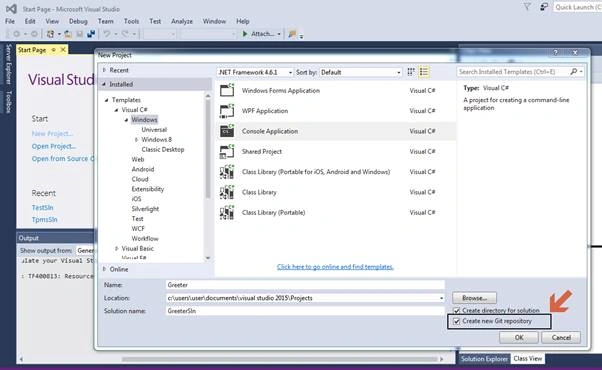
Then Click ok. Once Project has been created, Go to View Menu on the top->select Team Explorer and verify that the local repository got created like below
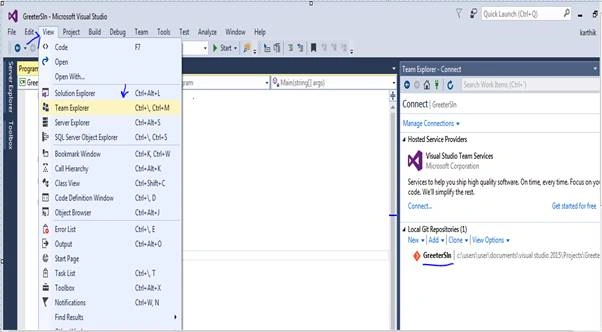
Then click on the Manage Connection icon in the team explorer, and click connect link. It will open the Connect to Team Foundation Server window like below.
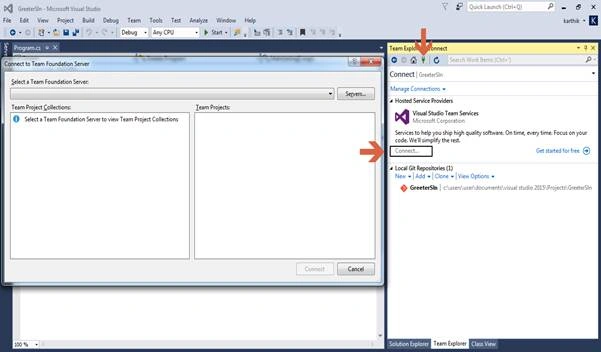
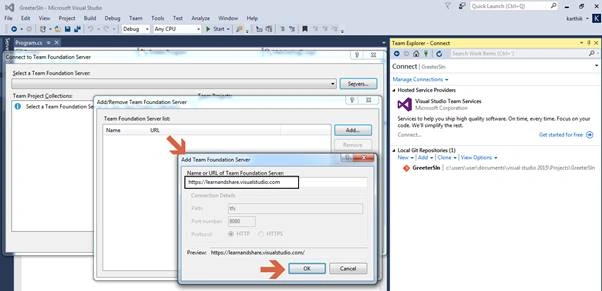
In the above, connect to Team Foundation Server window, click the Server button and add your Server Url in the Add/Remove Team Foundation Server window. For that click the Add button like below.
Then, it will open a screen like below. There enter your VSTS URL and click the ok button like below
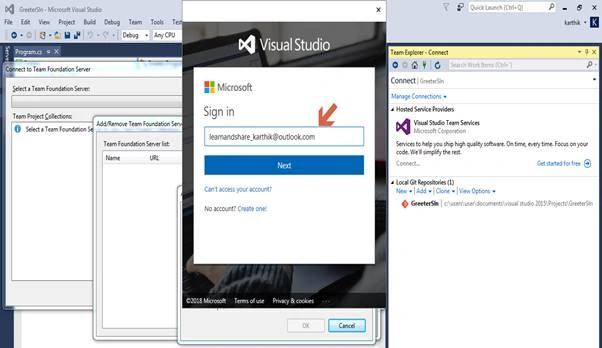
Then it will open up the Microsoft sign page from Visual Studio itself. In that window provide your credentials used for creating VSTS server page and click sign in like below
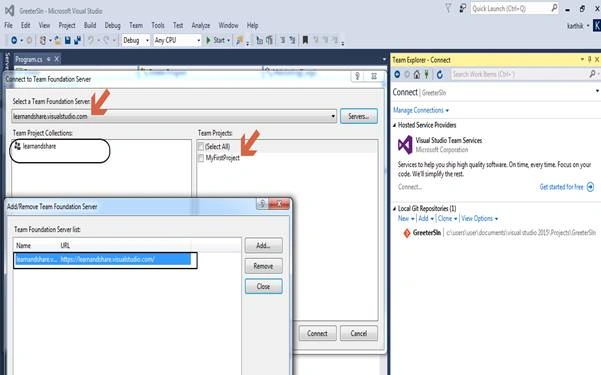
Then after a lit bit time, our server URL will be added to your Team Foundation server list window. Hereafter you can choose any project from the server and work on it like below.
Now as a next step, we will see how to move our local repository GreeterSln to our new Vsts Server Remote Repository to do the collaboration with other team members.
For that go to the Home icon in the Team Explorer window and Click Sync Option like below.
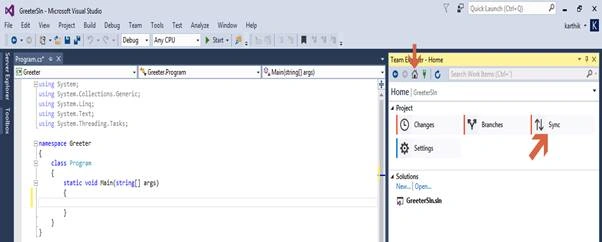
It will open a screen like below, within that click the Publish Git Repo button
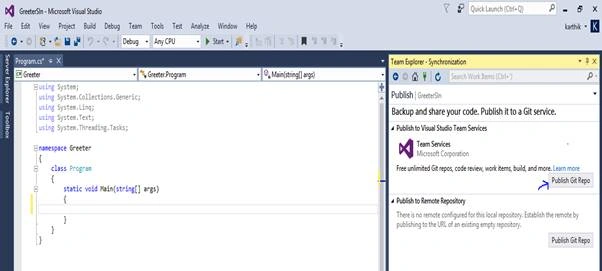
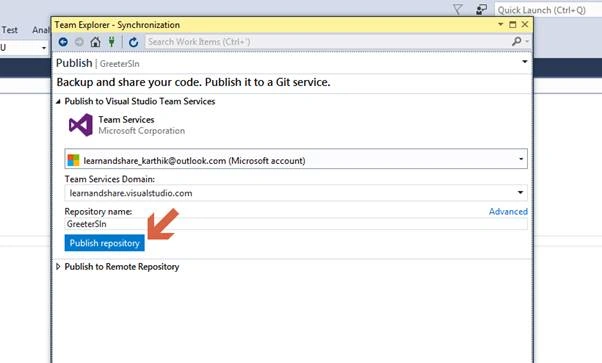
After little bit of loading, it will open up a screen to confirm your Team Service Domain and Repository Name.
Sometimes if the publish is successful, you will get a window like below, which is stating that “GreeterSln was published and see it on the web”.
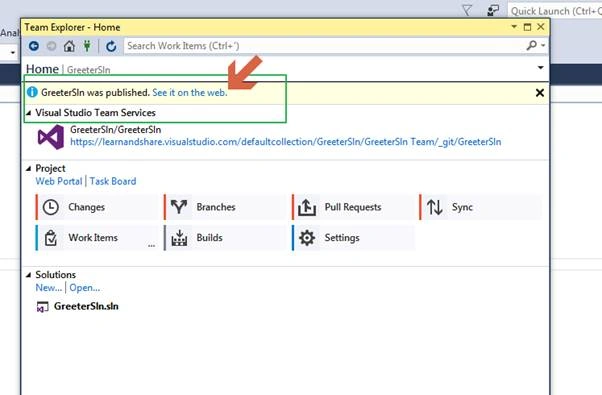
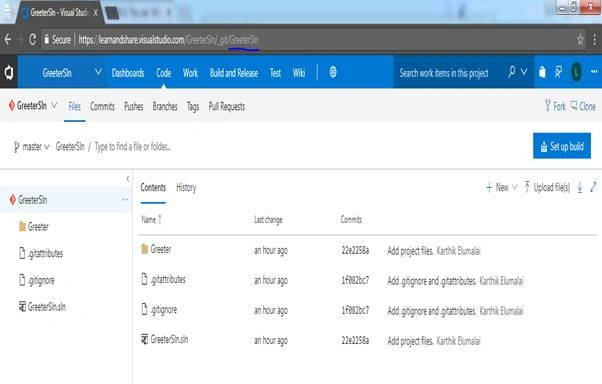
That’s it, everything is done... :), now your repository is on the cloud and you can utilize VSTS features.
Finally, let see how to add an existing project to Git Repo:
Let say intentionally you didn’t add the project to the git at the initial stage, that is, at the time of creation of the project like we did in the above process. But later you want to add it to the git. Here I will show how to do that with screenshots,
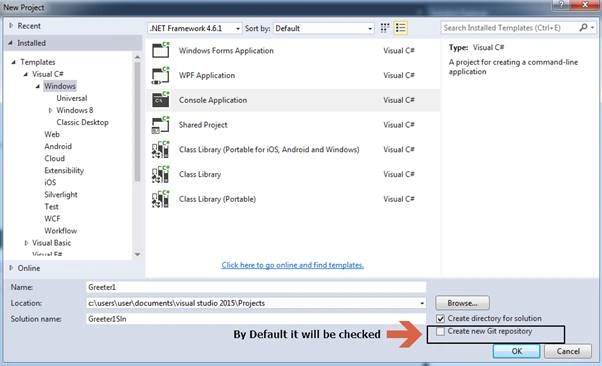
Then the project will be created like this,
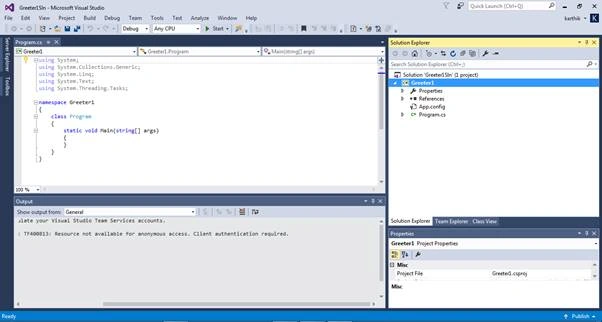
Now we would like to add this project to the repository, then click the Publish option at the rightmost corner.
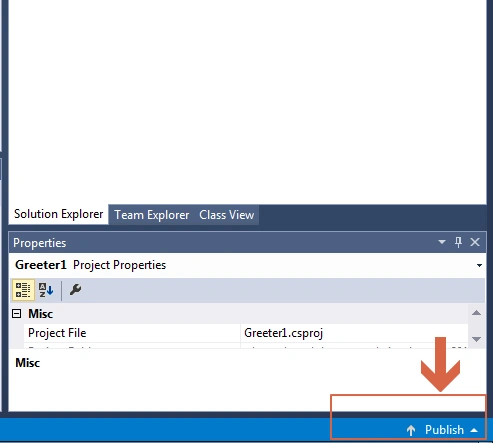
Once you click at the publish icon, you will see the Git Repository option with solution name, select that.
That’s it. Once we do that, the local repository will be successfully created, and we can verify that by clicking the connect option like below SnagIt.
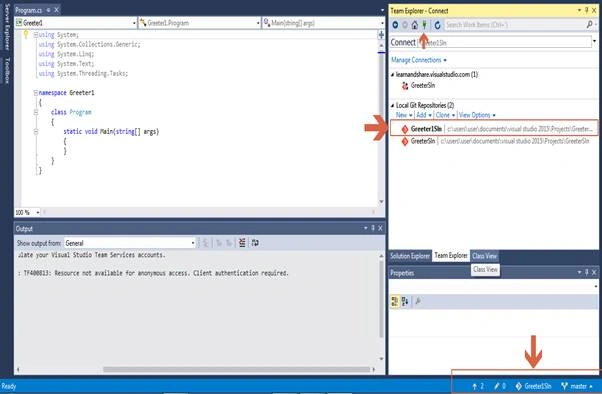
Now furthermore, if you'd like to move this local repository to the remote repository, then we can repeat steps which are mentioned above at the beginning of this article.
Hope the above information was useful, kindly let me know your thoughts or feedback.
Rishi KumarPosted Sep 27, 2018, 6:35 AM
Can we use TFS Version control instead Git?