

Introduction
This article is for beginners who wish to develop iOS applications using SwiftUI. In this article, we will create a simple screen that contains UI elements like Label, TextField, and Alert using SwiftUI.
What is SwiftUI?
SwiftUI is a user interface toolkit introduced by Apple that helps you to develop great-looking apps across all Apple platforms and with less coding. XCode contains SwiftUI within itself, and you dont need to import anything externally. SwiftUI is designed to work alongside UIKit and AppKit, so you can adopt it incrementally in your existing apps. In SwiftUI, code is instantly visible as a preview as you type, and you can even view your UI in multiple configurations. Xcode recompiles your changes instantly and inserts them into a running version of your app, which is visible and editable at all times.
You'll get to know a lot more about SwiftUI as you start working on it.
Pre-requisites
In order to run SwiftUI, you'll need at least the following.
SwiftUI runs on iOS 13, macOS 10.15, tvOS 13, watchOS 6, or any future later versions of those platforms. Make sure you have the required setup.
Implementation of SwiftUI
Create a new project in XCode. Select iOS -> App -> Name your Project.
Select Interface as SwiftUI. Save the Project to a desired location.
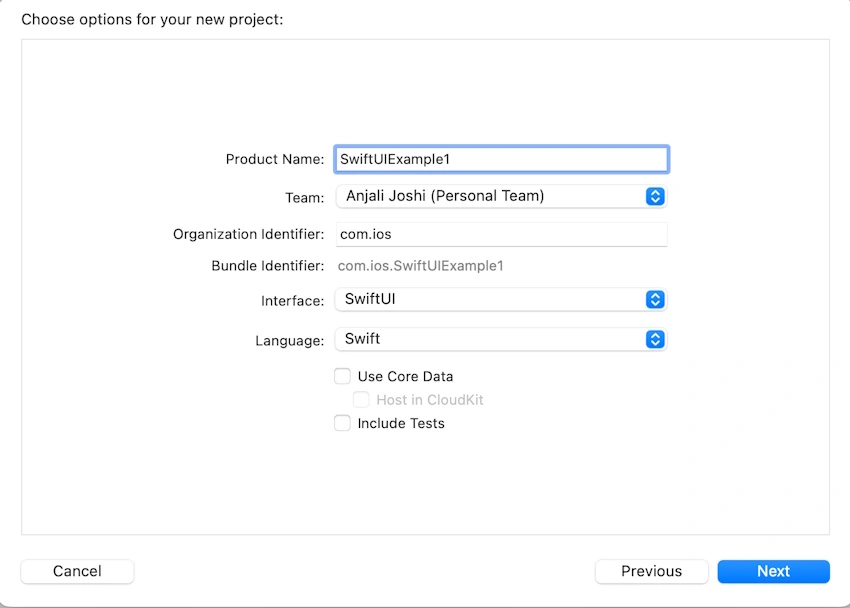
You'll notice that the Project created looks different than the one we used to create using UIKit. You won't find any Main.storyboard file. Also, you won't find any ViewController.swift file. Instead, you'll find a ContentView file and a Canvas window opened on the right-hand side.
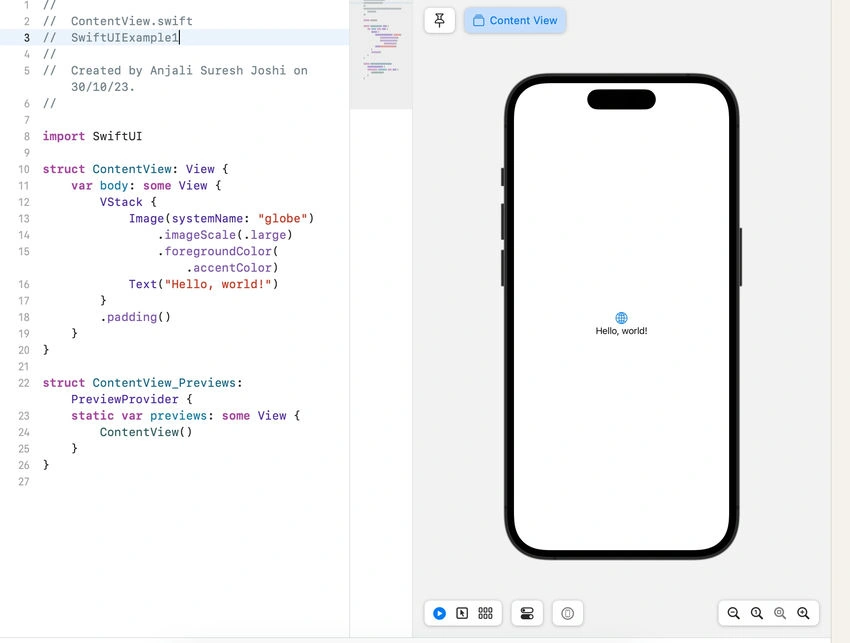
There's no Main.storyboard in SwiftUI. We'll be creating the UI programmatically in the ContentView file, and SwiftUI will display the UI in the Canvas. In the newly created SwiftUI project, the ContentView contains a simple 'Hello World' program by default. We will be replacing this code with our code.
We will be implementing our code inside 'var body' present in the ContentView file. Replace the code present inside VStack with the following code.
import SwiftUI

struct ContentView: View {
    @State private var name = ""
    @State private var nameEntered = ""

    var body: some View {
        VStack {
            HStack {
                Text("Enter your name:")
                TextField("Name", text: $name)
                    .textFieldStyle(.roundedBorder)
                    .padding(5)
            }

            Button("Say Hello!", action: {
                if !name.isEmpty {
                    nameEntered = "Hello, " + name
                }
            })

            Text(nameEntered)
                .padding()
        }
        .padding()
    }
}

struct ContentView_Previews: PreviewProvider {
    static var previews: some View {
        ContentView()
    }
}
Let's go through the code line-by-line.
- You might have noticed that ContentView is a Struct, whereas in UIKit, we used to implement the code in ViewController, which was a Class. SwiftUI uses structs for views because they are simpler, faster, and better in performance than classes.
- Next, you must be wondering what '@State' is. SwiftUI uses property wrappers, each of which provides different functionalities. The state is one of them. We will go through different property wrappers in the future. If you want to learn more about property wrappers, you can just google and also check Apple's official documentation on SwiftUI.
- Let's learn more about 'State'. SwiftUI manages the storage of any property you declare as a state. When its value changes, the view invalidates its appearance and recomputes the body. @State property wrapper allows us to modify the values inside a struct, which normally is not allowed as structs are value types.
- 'body' gives the content and behavior of the application.
- VStack and HStack are the views that arrange their subviews in a vertical and horizontal manner.
- Text in SwiftUI is the UILabel in UIKit. Similarly, TextField in SwiftUI is the UITextField in UIKit.
- The TextField gets a $name argument which indicates that there is a binding between TextField and the name property. As soon as you enter some text in TextField, the state property wrapper updates the name property, and the updated text gets displayed wherever the name property is used.
- A button is used to create a button. It has parameters like title and action to add the button title and what action to perform on button-click. In the action of the button, I have implemented the code to display a greeting if the user enters text in the textfield. When the button 'Say Hello!' is clicked, it will display the greeting on the label created below the button.
- .textFieldStyle is used to add a style to the textfield within its view. In this code, I have added a roundedBorder to the textfield.
- .padding adds some space around the element. You can add the value you desire inside the padding. For example, .padding(5). If you want to add different padding across the edges of the element, you can make use of EdgeInsets().
Now, let's run the code and check the output in the simulator.
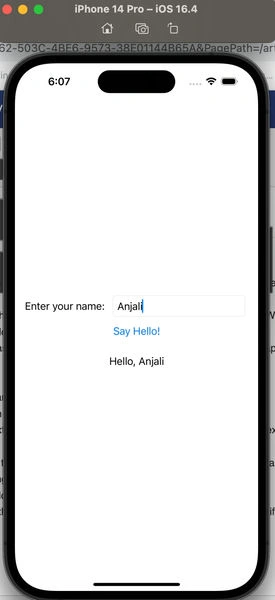
Instead of displaying the text on the label, you can also create an alert box and display it on a button-click.
import SwiftUI

struct ContentView: View {
    @State private var name = ""
    @State private var nameEntered = ""
    @State var showAlert = false

    var body: some View {
        VStack {
            HStack {
                Text("Enter your name:")
                TextField("Name", text: $name)
                    .textFieldStyle(.roundedBorder)
                    .padding(5)
            }

            Button("Say Hello!", action: {
                if !name.isEmpty {
                    nameEntered = "Hello, " + name
                    showAlert = true
                }
            })
            .alert(nameEntered, isPresented: $showAlert ) {
                Button("OK", role: .cancel) { }
            }
        }
        .padding()
    }
}

struct ContentView_Previews: PreviewProvider {
    static var previews: some View {
        ContentView()
    }
}
Add one more variable, 'showAlert', and add property wrapper 'State' to this variable.
Set showAlert to true inside the action parameter of Button.
Pass the argument 'nameEntered' and showAlert to the .alert(). Here, we are binding the value of showAlert. Once the value of showAlert gets updated to true, the alert will be displayed.
Run the code and check the output in the simulator.
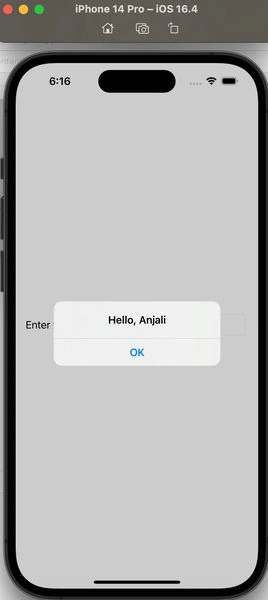
This is just a simple demo that we created using SwiftUI. The more we play with the code, the more we learn!
You can refer to this link to get more information about SwiftUI.
Happy Coding!
Join the conversation! Your thoughts help the community grow.