

SignalR is a library for ASP.NET developers that simplifies the process of adding real-time web functionality to applications. Real-time web functionality is the ability to make server code push the content to connected clients instantly as it becomes available, rather than having the server wait for a client to request the new data.
To Know more about SignalR, you can visit my blogs and articles.
Description
SignalR can be used to add any sort of "real-time" web functionality to your MVC application. While Chat is often used as an example, you can do a whole lot more; examples include dashboards and monitoring applications, collaborative applications such as simultaneous editing of documents, job progress updates, and real-time forms. We must have a way to notify all the connected clients if there are any changes on the server, without a refresh or update the web page. This is the scenario in which ASP.NET SignalR comes handy.
Here, I have created two Views - for home and for Notification entry details. After that, the notifiation message will come with counting the no. of notifications arrived.
SignalR can be used to add any sort of "real-time" web functionality to your MVC application. While Chat is often used as an example, you can do a whole lot more; examples include dashboards and monitoring applications, collaborative applications such as simultaneous editing of documents, job progress updates, and real-time forms. We must have a way to notify all the connected clients if there are any changes on the server, without a refresh or update the web page. This is the scenario in which ASP.NET SignalR comes handy.
Here, I have created two Views - for home and for Notification entry details. After that, the notifiation message will come with counting the no. of notifications arrived.
Link to download my project
Steps to be followed
Step 1
Create one MVC application named "SignalRDemo".
Step 2
Create a table named "tblEmployee". Paste the following code in that.
Step 1
Create one MVC application named "SignalRDemo".
Step 2
Create a table named "tblEmployee". Paste the following code in that.
- SET ANSI_NULLS ON
- GO
- SET QUOTED_IDENTIFIER ON
- GO
- SET ANSI_PADDING ON
- GO
- CREATE TABLE [dbo].[tblEmployee](
- [ID] [int] IDENTITY(1,1) NOT NULL,
- [Name] [varchar](50) NULL,
- [AddedOn] [datetime] NULL,
- PRIMARY KEY CLUSTERED
- (
- [ID] ASC
- )WITH (PAD_INDEX = OFF, STATISTICS_NORECOMPUTE = OFF, IGNORE_DUP_KEY = OFF, ALLOW_ROW_LOCKS = ON,
- ALLOW_PAGE_LOCKS = ON) ON [PRIMARY]
- ) ON [PRIMARY]
- GO
- SET ANSI_PADDING OFF
- GO
Enable Service Broker on the database.
- ALTER DATABASE Your_DB_Name SET ENABLE_BROKER WITH ROLLBACK IMMEDIATE ;
Service Broker is a feature introduced for the first time in SQL Server 2005. By using this feature, external or internal processes can send and receive asynchronous messages reliably by using extensions of Transact-SQL Data Manipulation Language (DML). It is a queued and reliable messaging mechanism used for asynchronous programming model.We need this feature to be enabled since, whenever a change in the table will happen such as Insert/Update/Delete/Truncate, then the SQLDependency should be able to identify that.
It (Service Broker) rather implements a Broker Architecture which publishes the events while the SQL Dependency acts as a subscriber and detects the changes. Using the SqlDependency object, the application can create and register to receive notifications via the OnChangeEventHandler event handler.
How To Check Service Broker on the database Is Enabled Or Not?
How To Check Service Broker on the database Is Enabled Or Not?
- SELECT NAME, IS_BROKER_ENABLED FROM SYS.DATABASES
- WHERE NAME='Your_db_name'

Step4
Add Ado.Net Entity Data Model named "SignalRDataModel.edmx".
Go to Solution Explorer (Visual studio) > Right Click on Project name form Solution Explorer > Add > New item > Select ADO.net Entity Data Model under data > Enter model name > Add.
A popup window will come (Entity Data Model Wizard) > Select Generate from database > Next > Chose your data connection > select your database > next > Select tables > enter Model Namespace > Finish.
Step5
Install SignalR NuGet Package.
Solution Explorer > Right Click on References > Manage NuGetPackages > Search for "SignalR"> Install > Close.
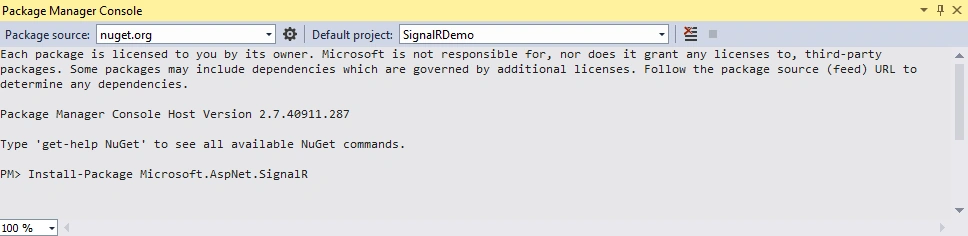
Or you can also install from package manager console.
Go to Tools (top menu) > Library Package Manager > Open "Package Manager Console" and Type below command .
Add Ado.Net Entity Data Model named "SignalRDataModel.edmx".
Go to Solution Explorer (Visual studio) > Right Click on Project name form Solution Explorer > Add > New item > Select ADO.net Entity Data Model under data > Enter model name > Add.
A popup window will come (Entity Data Model Wizard) > Select Generate from database > Next > Chose your data connection > select your database > next > Select tables > enter Model Namespace > Finish.
Step5
Install SignalR NuGet Package.
Solution Explorer > Right Click on References > Manage NuGetPackages > Search for "SignalR"> Install > Close.
Or you can also install from package manager console.
Go to Tools (top menu) > Library Package Manager > Open "Package Manager Console" and Type below command .
- PM> Install-Package Microsoft.AspNet.SignalR
Step6
Add an Owin startup file.
Add an Owin startup class in your application for enabling the SignalR in our application. Add a new class in the project named "Startup.cs"
Code Ref
Add an Owin startup file.
Add an Owin startup class in your application for enabling the SignalR in our application. Add a new class in the project named "Startup.cs"
Code Ref
- using Microsoft.Owin;
- using Owin;
- using System;
- using System.Collections.Generic;
- using System.Linq;
- using System.Web;
- [assembly: OwinStartup(typeof(SignalRDemo.Startup))]
- namespace SignalRDemo
- {
- public class Startup
- {
- public void Configuration(IAppBuilder app)
- {
- app.MapSignalR();
- }
- }
- }
Add a SignalR hub class.
Now, you need to create a SignalR Hub class, this makes possible to invoke the client side JavaScript method from the server side. In this application, we will use this for showing notification.SignalR uses ‘Hub’ objects to communicate between the client and the server.
Add a new class named "NotificationHub.cs".
Code Ref
- using Microsoft.AspNet.SignalR;
- using System;
- using System.Collections.Generic;
- using System.Linq;
- using System.Web;
- namespace SignalRDemo
- {
- public class NotificationHub : Hub
- {
- //Nothing required here
- //public void Hello()
- //{
- // Clients.All.hello();
- //}
- }
- }
Step8
Add connection string into the web.config file.
Open the application root Web.config file and find the element. Add the following connection string to the element in the Web.config file.
Code Ref
Add connection string into the web.config file.
Open the application root Web.config file and find the element. Add the following connection string to the element in the Web.config file.
Code Ref
- <add name="sqlConString" connectionString="Your_Connection_String" />
Add another class file named "NotificationComponent.cs" for register notification for data changes in the database In this class, you need to create a SQL dependency which allows your application to be notified when a data has changed in the database (Microsoft SQL Server).
Write the following in this class...
- RegisterNotification- void method for register notification
- SqlDependency_OnChange- SqlDependency onchnage event, get fired when assigned SQL command produced a different
- GetContacts- This is a method for return the changes happened on the server, here our new inserted contact data
- using Microsoft.AspNet.SignalR;
- using System;
- using System.Collections.Generic;
- using System.Configuration;
- using System.Data.SqlClient;
- using System.Linq;
- using System.Web;
- namespace SignalRDemo
- {
- public class NotificationComponent
- {
- //Here we will add a function for register notification (will add sql dependency)
- public void RegisterNotification(DateTime currentTime)
- {
- string conStr = ConfigurationManager.ConnectionStrings["sqlConString"].ConnectionString;
- string sqlCommand = @"SELECT [ID],[Name] from [dbo].[tblEmployee] where [AddedOn] > @AddedOn";
- //you can notice here I have added table name like this [dbo].[Contacts] with [dbo], its mendatory when you use Sql Dependency
- using (SqlConnection con = new SqlConnection(conStr))
- {
- SqlCommand cmd = new SqlCommand(sqlCommand, con);
- cmd.Parameters.AddWithValue("@AddedOn", currentTime);
- if (con.State != System.Data.ConnectionState.Open)
- {
- con.Open();
- }
- cmd.Notification = null;
- SqlDependency sqlDep = new SqlDependency(cmd);
- sqlDep.OnChange += sqlDep_OnChange;
- //we must have to execute the command here
- using (SqlDataReader reader = cmd.ExecuteReader())
- {
- // nothing need to add here now
- }
- }
- }
- void sqlDep_OnChange(object sender, SqlNotificationEventArgs e)
- {
- //or you can also check => if (e.Info == SqlNotificationInfo.Insert) , if you want notification only for inserted record
- if (e.Type == SqlNotificationType.Change)
- {
- SqlDependency sqlDep = sender as SqlDependency;
- sqlDep.OnChange -= sqlDep_OnChange;
- //from here we will send notification message to client
- var notificationHub = GlobalHost.ConnectionManager.GetHubContext<NotificationHub>();
- notificationHub.Clients.All.notify("added");
- //re-register notification
- RegisterNotification(DateTime.Now);
- }
- }
- public List<tblEmployee> GetData(DateTime afterDate)
- {
- using (SignalRDBEntities dc = new SignalRDBEntities())
- {
- return dc.tblEmployees.Where(a => a.AddedOn > afterDate).OrderByDescending(a => a.AddedOn).ToList();
- }
- }
- }
- }
The details code is explained using comment lines.
Step10
Add a new Controller named "HomeController.cs". Here I have added "Index" Action into "Home" Controller.
Code Ref
Add a new Controller named "HomeController.cs". Here I have added "Index" Action into "Home" Controller.
Code Ref
- public ActionResult Index()
- {
- return View();
- }
Then create one view for home controller.
Code Ref
- @{
- ViewBag.Title = "Home";
- }
- <h2>Index</h2>
- <a target="_blank" href="Add/">Go To Notification page>></a>
This View is only for home page.
Step12
Add another action in HomeController to fetch Employee data.
Add another action in HomeController to fetch Employee data.
- using System;
- using System.Collections.Generic;
- using System.Linq;
- using System.Web;
- using System.Web.Mvc;
- namespace SignalRDemo.Controllers
- {
- public class HomeController : Controller
- {
- //
- // GET: /Home/
- public ActionResult Index()
- {
- return View();
- }
- public JsonResult GetNotifications()
- {
- var notificationRegisterTime = Session["LastUpdated"] != null ? Convert.ToDateTime(Session["LastUpdated"]) : DateTime.Now;
- NotificationComponent NC = new NotificationComponent();
- var list = NC.GetData(notificationRegisterTime);
- //update session here for get only new added contacts (notification)
- Session["LastUpdate"] = DateTime.Now;
- return new JsonResult { Data = list, JsonRequestBehavior = JsonRequestBehavior.AllowGet };
- }
- }
- }
Code Description
The details code is explained using comment lines.
Step13
Add and update _Layout.cshtml for showing notification.
Code Ref
Add and update _Layout.cshtml for showing notification.
Code Ref
- <!DOCTYPE html>
- <html>
- <head>
- <meta charset="utf-8" />
- <meta name="viewport" content="width=device-width, initial-scale=1.0">
- <title>@ViewBag.Title - Satyaprakash Jquery and SignalR Intro</title>
- <link href="~/Content/bootstrap.css" rel="stylesheet" />
- <script src="~/Scripts/modernizr-2.6.2.js"></script>
- </head>
- <body>
- <div class="navbar navbar-inverse navbar-fixed-top">
- <div class="container">
- <div class="navbar-header">
- <span class="noti glyphicon glyphicon-globe"><span class="count"> </span></span>
- <div class="noti-content">
- <div class="noti-top-arrow"></div>
- <ul id="notiContent"></ul>
- </div>
- @Html.ActionLink("Satyaprakash Jquery and SignalR", "Index", "Home", null, new { @class = "navbar-brand" })
- </div>
- </div>
- </div>
- <div class="container body-content">
- @RenderBody()
- <hr />
- </div>
- @* Add Jquery Library *@
- <script src="~/Scripts/jquery-2.2.3.min.js"></script>
- <script src="~/Scripts/jquery.signalR-2.2.0.min.js"></script>
- <script src="/signalr/hubs"></script>
- <script src="~/Scripts/bootstrap.min.js"></script>
- @* Add css *@
- <link href="~/Content/bootstrap.css" rel="stylesheet" />
- <style type="text/css">
- /*Added css for design notification area, you can design by your self*/
- /* COPY css content from youtube video description*/
- .noti-content{
- position:fixed;
- right:100px;
- background:yellow;
- color:blue;
- font-size:medium;
- font-style:oblique;
- font-family:Arial;
- border-radius:4px;
- top:47px;
- width:440px;
- display:none;
- border: 1px solid #9E988B;
- }
- ul#notiContent{
- max-height:200px;
- overflow:auto;
- padding:0px;
- margin:0px;
- padding-left:20px;
- }
- ul#notiContent li {
- margin: 3px;
- padding: 6px;
- background: #FF6600;
- }
- .noti-top-arrow{
- border-color:transparent;
- border-bottom-color:#F5DEB3;
- border-style:dashed dashed solid;
- border-width: 0 8.5px 8.5px;
- position:absolute;
- right:32px;
- top:-8px;
- }
- span.noti {
- color:lightgreen;
- margin: 15px;
- position: fixed;
- right: 100px;
- font-size: 30px;
- cursor: pointer;
- }
- span.count {
- position:fixed;
- top: -1px;
- /*color:white;*/
- }
- /*.noti:hover {
- color:white;
- }*/
- </style>
- @* Add jquery code for Get Notification & setup signalr *@
- <script type="text/javascript">
- $(function () {
- // Click on notification icon for show notification
- $('span.noti').click(function (e) {
- debugger;
- e.stopPropagation();
- $('span.noti').css("color", "lightgreen");
- $('span.count').hide();
- $('.noti-content').show();
- var count = 0;
- count = parseInt($('span.count').html()) || 0;
- count++;
- // only load notification if not already loaded
- if (count > 0) {
- updateNotification();
- }
- $('span.count', this).html(' ');
- })
- // hide notifications
- $('html').click(function () {
- $('.noti-content').hide();
- })
- // update notification
- function updateNotification() {
- $('#notiContent').empty();
- $('#notiContent').append($('<li>Loading...</li>'));
- $.ajax({
- type: 'GET',
- url: '/home/GetNotifications',
- success: function (response) {
- debugger;
- $('#notiContent').empty();
- if (response.length == 0) {
- $('#notiContent').append($('<li>Currently You Have No New Notifications.</li>'));
- }
- $.each(response, function (index, value) {
- $('#notiContent').append($('<li>The User , ' + value.Name+' ' +'Of ID' + ' (' + value.ID + ') Is Written
- Something.</li>'));
- });
- },
- error: function (error) {
- console.log(error);
- }
- })
- }
- // update notification count
- function updateNotificationCount() {
- $('span.count').show();
- var count = 0;
- count = parseInt($('span.count').html()) || 0;
- count++;
- $('span.noti').css("color", "white");
- $('span.count').css({ "background-color": "red", "color": "white" });
- $('span.count').html(count);
- }
- // signalr js code for start hub and send receive notification
- var notificationHub = $.connection.notificationHub;
- $.connection.hub.start().done(function () {
- console.log('Notification hub started');
- });
- //signalr method for push server message to client
- notificationHub.client.notify = function (message) {
- if (message && message.toLowerCase() == "added") {
- updateNotificationCount();
- }
- }
- })
- </script>
- </body>
- </html>
The details code is explained using comment lines.
Step14
Update global.asax.cs to start, stop SQL dependency
Code Ref
- using System;
- using System.Collections.Generic;
- using System.Configuration;
- using System.Data.SqlClient;
- using System.Linq;
- using System.Web;
- using System.Web.Http;
- using System.Web.Mvc;
- using System.Web.Routing;
- namespace SignalRDemo
- {
- // Note: For instructions on enabling IIS6 or IIS7 classic mode,
- // visit http://go.microsoft.com/?LinkId=9394801
- public class MvcApplication : System.Web.HttpApplication
- {
- string con = ConfigurationManager.ConnectionStrings["sqlConString"].ConnectionString;
- protected void Application_Start()
- {
- AreaRegistration.RegisterAllAreas();
- // WebApiConfig.Register(GlobalConfiguration.Configuration);
- // FilterConfig.RegisterGlobalFilters(GlobalFilters.Filters);
- RouteConfig.RegisterRoutes(RouteTable.Routes);
- //here in Application Start we will start Sql Dependency
- SqlDependency.Start(con);
- }
- protected void Session_Start(object sender, EventArgs e)
- {
- NotificationComponent NC = new NotificationComponent();
- var currentTime = DateTime.Now;
- HttpContext.Current.Session["LastUpdated"] = currentTime;
- NC.RegisterNotification(currentTime);
- }
- protected void Application_End()
- {
- //here we will stop Sql Dependency
- SqlDependency.Stop(con);
- }
- }
- }
The details code is explained using comment lines.
Step15
Now add a new Controller/Action To add Notification Data.
- I have created AddController.cs in Controller directory.
- Add action named "Index"
- public ActionResult Index()
- {
- return View();
- }
Create View for Index action to add Employee Notification Details.
Code Ref
- @model SignalRDemo.tblEmployee
- @{
- ViewBag.Title = "Add Notification";
- }
- <script type="text/javascript" src="http://code.jquery.com/jquery-1.7.1.min.js"></script>
- <link href="~/App_Content/CSS/bootstrap.min.css" rel="stylesheet" />
- <link href="~/App_Content/CSS/font-awesome.min.css" rel="stylesheet" />
- <link rel="stylesheet" href="https://maxcdn.bootstrapcdn.com/bootstrap/3.3.7/css/bootstrap.min.css">
- <script src="https://ajax.googleapis.com/ajax/libs/jquery/3.2.1/jquery.min.js"></script>
- <script src="https://maxcdn.bootstrapcdn.com/bootstrap/3.3.7/js/bootstrap.min.js"></script>
- <script src="https://cdnjs.cloudflare.com/ajax/libs/bootbox.js/4.4.0/bootbox.min.js">
- </script>
- <style>
- .button {
- background-color: #4CAF50;
- border: none;
- color: white;
- padding: 15px 32px;
- text-align: center;
- text-decoration: none;
- display: inline-block;
- font-size: 16px;
- margin: 4px 2px;
- cursor: pointer;
- }
- .button4 {
- border-radius: 9px;
- }
- .control{
- width:459px;
- height:145px;
- }
- </style>
- <h2>Notification</h2>
- @using (Html.BeginForm(FormMethod.Post))
- {
- @Html.ValidationSummary(true)
- <fieldset>
- <legend>Notification</legend>
- <div class="editor-label">
- @Html.LabelFor(model => model.Name)
- </div>
- <div class="editor-field">
- @Html.TextAreaFor(model => model.Name, new { id = "ValidateNametextbox", @class = "form-control" })
- @Html.ValidationMessageFor(model => model.Name)
- </div>
- <p>
- <input id="SubmitProject" class="button button4" type="submit" value="Notify" onclick="saveToFile()" />
- </p>
- </fieldset>
- }
- <script type="text/javascript">
- function saveToFile() {
- if ($("#ValidateNametextbox").val() == "") {
- alert("Comment Section should not be empty!!");
- }
- else {
- alert("Go To Home Page of Client Browser.");
- }
- };
- </script>
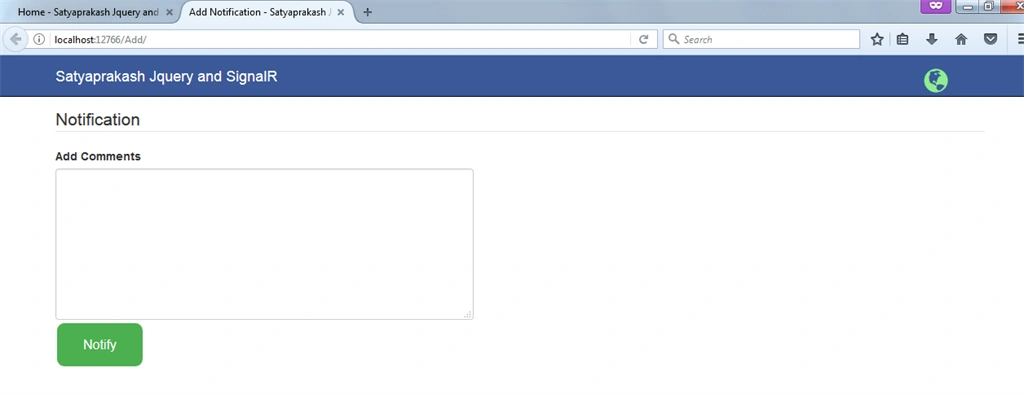
Here I have added some mvc controls like textarea and button.
- @using (Html.BeginForm(FormMethod.Post))
- {
- @Html.ValidationSummary(true)
- <fieldset>
- <legend>Notification</legend>
- <div class="editor-label">
- @Html.LabelFor(model => model.Name)
- </div>
- <div class="editor-field">
- @Html.TextAreaFor(model => model.Name, new { id = "ValidateNametextbox", @class = "form-control" })
- @Html.ValidationMessageFor(model => model.Name)
- </div>
- <p>
- <input id="SubmitProject" class="button button4" type="submit" value="Notify" onclick="saveToFile()" />
- </p>
- </fieldset>
- }
Add Post action for Index and add code to insert Employee.
Code Ref
- using System;
- using System.Collections.Generic;
- using System.Linq;
- using System.Web;
- using System.Web.Mvc;
- namespace SignalRDemo.Controllers
- {
- public class AddController : Controller
- {
- //
- // GET: /Add/
- public ActionResult Index()
- {
- return View();
- }
- [HttpPost]
- public ActionResult Index(tblEmployee model)
- {
- SignalRDBEntities entity = new SignalRDBEntities();
- model.AddedOn = DateTime.Now;
- entity.tblEmployees.Add(model);
- entity.SaveChanges();
- return View();
- }
- }
- }
Here I have added entityname "SignalRDBEntities" and using autogenerated class tblEmployee object model we added data on datetime when you insert data and for entity class object we inserted data on remaining table columns.
- SignalRDBEntities entity = new SignalRDBEntities();
- entity.tblEmployees.Add(model);
- entity.SaveChanges();
Here I configured my text area heading with "Add Comments." So, we should do an auto-generated class "tblEmployee.cs".
Code Ref
- //------------------------------------------------------------------------------
- // <auto-generated>
- // This code was generated from a template.
- //
- // Manual changes to this file may cause unexpected behavior in your application.
- // Manual changes to this file will be overwritten if the code is regenerated.
- // </auto-generated>
- //------------------------------------------------------------------------------
- namespace SignalRDemo
- {
- using System;
- using System.Collections.Generic;
- using System.ComponentModel.DataAnnotations;
- public partial class tblEmployee
- {
- public int ID { get; set; }
- [Display(Name = "Add Comments")]
- public string Name { get; set; }
- public Nullable<System.DateTime> AddedOn { get; set; }
- }
- }
I added Display attribute to configure. So, you should add the namespace.
- using System.ComponentModel.DataAnnotations;
-
- [Display(Name = "Add Comments")]
- public string Name { get; set; }
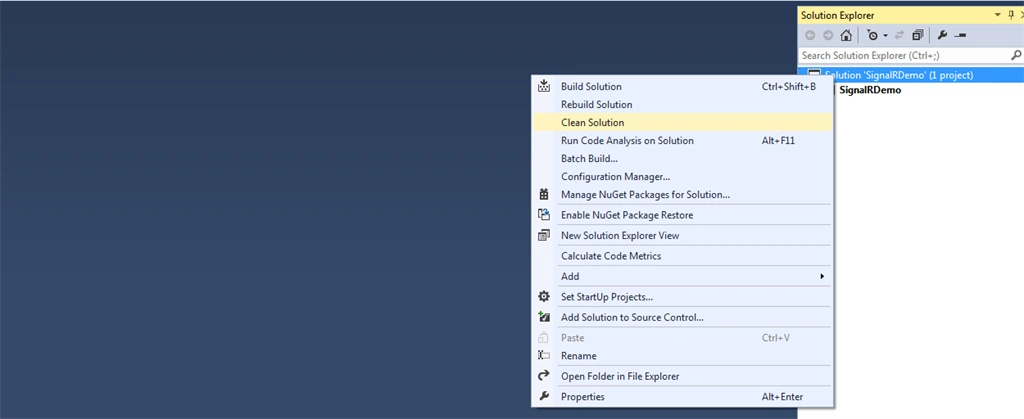
Sometimes due to more temporary and cache files the count will be a bit off. So, You should clean the solution and clean the project then Run....
OUTPUT
Home Page,

Then Notification insert page,
Add some notification text In Notification insert page
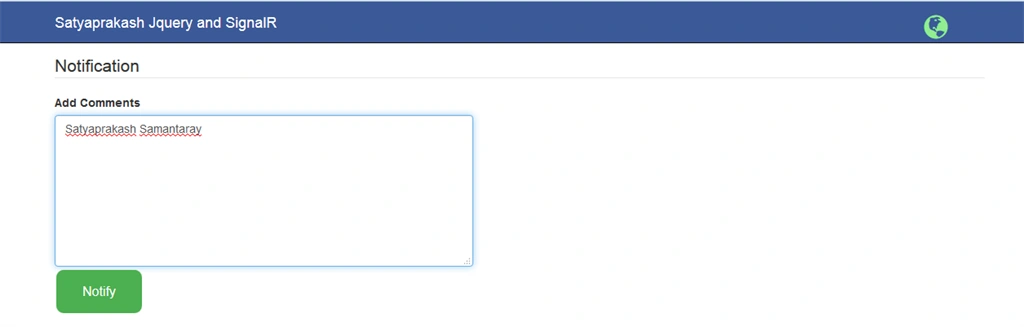
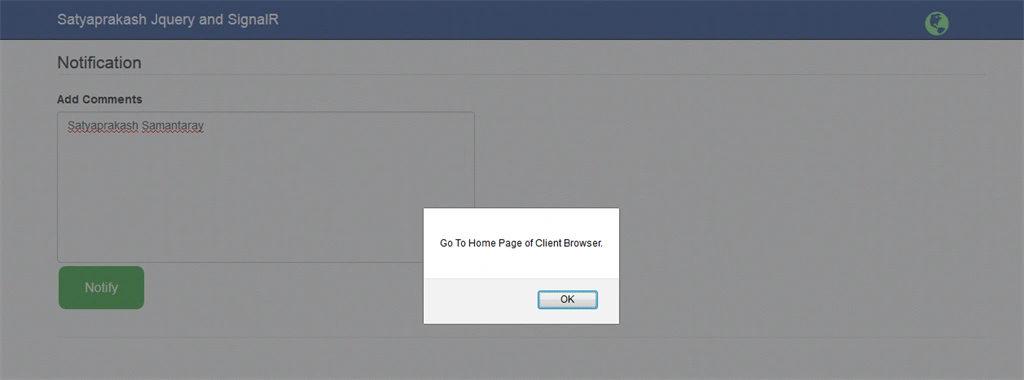
Then, it will show u a popup to go to home page to see the notification count as well as notification text.

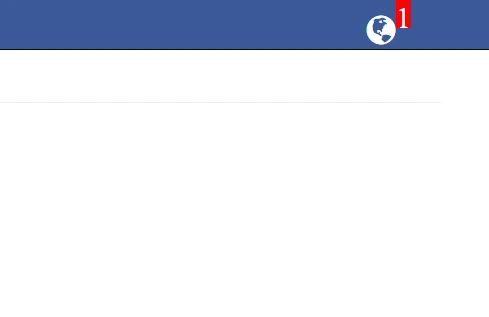
You can see when there is no new notifiation, then the notification color is light green but when any new notification comes, the notification color is changed to white. Then, after clicking on the notification, the details will be shown and notification color is changed to light green. You can see some features are the same as Facebook Notification.

You can insert the data via one browser and get the updated notification on the homepage in the other browser also. The result will be shown in the same instance and different instance of same browser or different browser.
You can check the data inserted in the table.
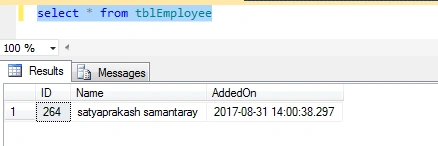
In GIF -

Home Page,
Then Notification insert page,
Add some notification text In Notification insert page
Then, it will show u a popup to go to home page to see the notification count as well as notification text.
You can see when there is no new notifiation, then the notification color is light green but when any new notification comes, the notification color is changed to white. Then, after clicking on the notification, the details will be shown and notification color is changed to light green. You can see some features are the same as Facebook Notification.
You can insert the data via one browser and get the updated notification on the homepage in the other browser also. The result will be shown in the same instance and different instance of same browser or different browser.
You can check the data inserted in the table.
In GIF -
standford bagasinPosted Jun 4, 2023, 1:55 AM
Is this possible for asp.net?
GauravPosted Feb 25, 2021, 2:25 PM
How can I send push notification from 1 website to other. Like I done an action in administration portal and customer get push notification in their portal.
Esteban ValientePosted Apr 17, 2020, 6:20 PM
Hi, i got a problem with the second connection SignalRDBEntities in the web.config archive, what parameter i need to add in the line 49 of the web.config ? , thank you, best regards
Shreya SakhalkarPosted Mar 13, 2019, 3:54 AM
If the client side browser is closed or user is logged out , upon login is it possible that the user will receive all the missed notifications
san solomanPosted Dec 6, 2018, 10:09 PM
Thanks for sharing
Fadoua DestinPosted Nov 19, 2018, 9:05 AM
Hi, please despite of installing package Microsoft.AspNet.SignalR I'm not finding this script under my Scripts : <script src="~/Scripts/jquery.signalR-2.2.0.min.js"></script> any idea !!. Thanks.
Fadoua DestinPosted Nov 19, 2018, 6:22 AM
Very interesting article .
mudassar rehmanPosted Jun 23, 2018, 11:05 PM
SIR I NEED THIS ARTICLE IN SIMPLE ASP.NET PLEASE HELP
mudassar rehmanPosted Jun 23, 2018, 11:04 PM
SIR I NEED THIS ARTICLE IN SIMPLE ASP,NET
Tridip BhattacharjeePosted Jan 7, 2018, 8:23 AM
@Aqib i heard too that signalr has performance issue. i have doubt that people at all use signalr lib in enterprise level web application?
Tridip BhattacharjeePosted Jan 7, 2018, 8:22 AM
If 500 user will browing your site then how many instance will be created for sql dependency. long time back i got a hint from a web site that we can create max 100 instance of sql dependency. so tell me what will happen if huge no of user browsing your site?
Muhammad Aqib ShehzadPosted Sep 4, 2017, 5:29 AM
Nicely Elaborate article, i have also used the signalR, i have one question as i have used in production plenty of times and whenever i used i have to rollback it due to its long polling nature and also it cause the application to slow. can you let me know what performance affects it cause and how to avoid it to run smoothly in production environment.