

Introduction
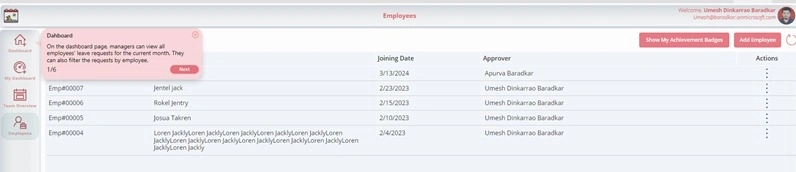
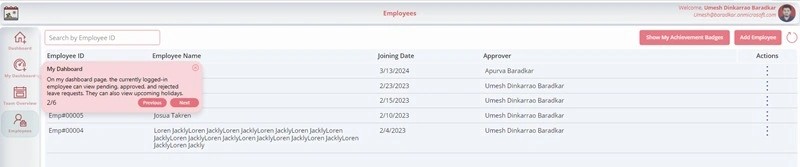
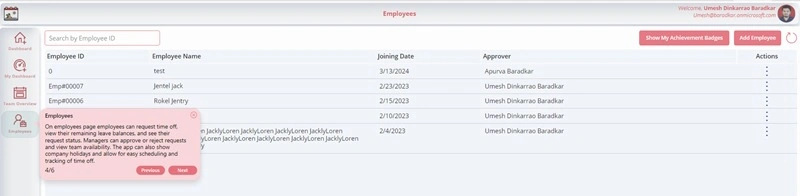
The walkthrough component will guide new users to understand the app's functionality and help existing users discover new features efficiently.
Step 1. In PowerApps, add a new component. Then, set the component's width to App. Width and height to App.Height. Within this component, add a MainContainer (Container), and within the MainContainer, add a SubContainer (Container). Finally, add two Star shapes, one 5-point Star and one 6-point Star.
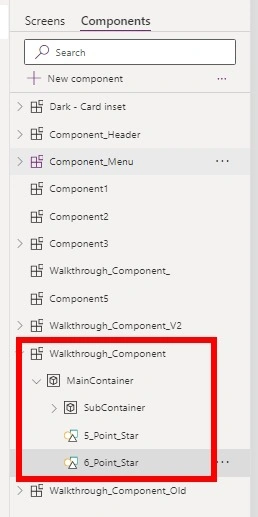
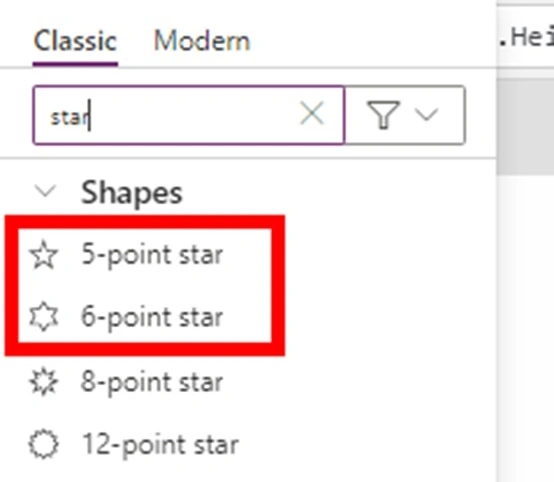
Step 2. Create a custom property named NavigationItems with a Table data type. Refer to the image below.
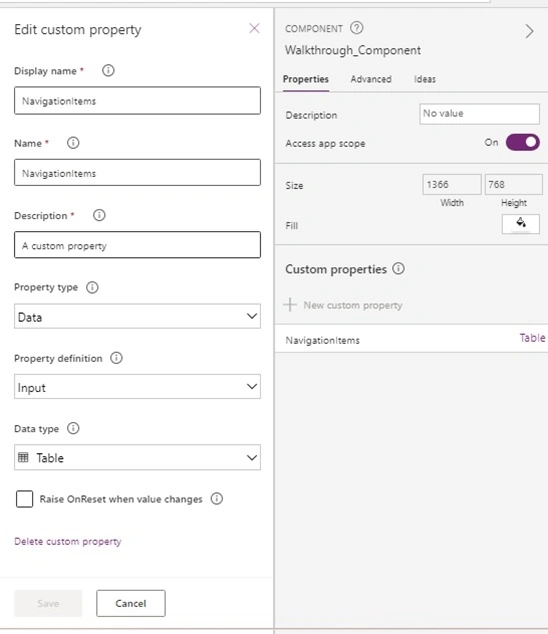
Step 3. Create a table and add the parameters as below. In the NavigationItems, add the following code, where you can set the parameters as per your requirements.
/*
The ArrowPosition property is case-sensitive.
Use "TopLeft" for the top-left arrow.
Use "TopRight" for the top-right arrow.
Use "BottomLeft" for the bottom-left arrow.
Use "BottomRight" for the bottom-right arrow.
Use "Left" for the left arrow.
Use "Right" for the right arrow.
*/
Table(
    {
        Heading: "Dashboard",
        Description: "On the dashboard page, managers can view all employees' leave requests for the current month. They can also filter the requests by employee. ",
        X: Container2_4.X+Container2_4.Width-20,//You can set the X position based on your control where you need to add.
        Y: Container2_4.Y+50,//You can set the Y position based on your control where you need to add.
        ArrowPosition: "Left",//In which side you need the arrow, add the ArrowPosition text based on that side.
        Index: 1
    },
    {
        Heading: "My Dashboard",
        Description: "On my dashboard page, the currently logged-in employee can view pending, approved, and rejected leave requests. They can also view upcoming holidays.",
        X: Container2_4.X+Container2_4.Width-20,
        Y: Container2_4.Y+150,
        ArrowPosition: "Left",
        Index: 2
    },
    {
        Heading: "Team Overview",
        Description: "On the Team Overview page, users can view the team leave summary, leave requests, team calendar, and export leave functionality.",
        X: 95,
        Y: 200,
        ArrowPosition: "Left",
        Index: 3
    },
    {
        Heading: "Employees",
        Description: "On employees page employees can request time off, view their remaining leave balances, and see their request status. Managers can approve or reject requests and view team availability. The app can also show company holidays and allow for easy scheduling and tracking of time off.",
        X: 95,
        Y: 280,
        ArrowPosition: "Left",
        Index: 4
    },
    {
        Heading: "Add Employee",
        Description: "Using the 'Add Employee' button, HR or managers can add employees to the system.",
        X: Button2_3.X-241,
        Y: 115,
        ArrowPosition: "TopRight",
        Index: 5
    },
        {
        Heading: "Search Employee",
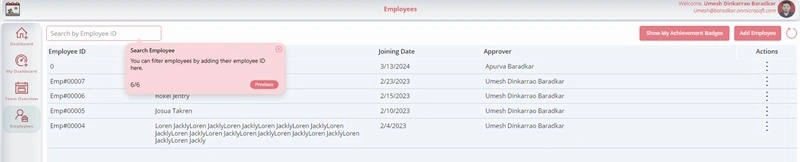
        Description: "You can filter employees by adding their employee ID here.",
        X: TextInput1.X+TextInput1.Width,
        Y: 110,
        ArrowPosition: "TopLeft",
        Index: 6
    }
)
Step 4. Set the X and Y positions and visible properties of the stars below.
- Control: 5 Point Star, Control Name: For 5_Point_Star, Width:100, Height: 100
X
YSwitch( varWalkthroughItem.ArrowPosition, "BottomLeft",//Check ArrowPosition SubContainer.X,//Keep X Position "TopLeft", SubContainer.X, "Left", SubContainer.X-20, "BottomRight", SubContainer.X + SubContainer.Width - Self.Width - 5, "TopRight", SubContainer.X + SubContainer.Width - Self.Width - 5, "Right", SubContainer.X+SubContainer.Width-Self.Width+20 )Switch( varWalkthroughItem.ArrowPosition, "BottomLeft", SubContainer.Y+SubContainer.Height-Self.Height+20, "TopLeft", SubContainer.Y-15, "Left", SubContainer.Y, "BottomRight", SubContainer.Y+SubContainer.Height-Self.Height+20, "TopRight", SubContainer.Y-18, "Right", SubContainer.Y )Visible
varWalkthroughItem.ArrowPosition="Left"||varWalkthroughItem.ArrowPosition="Right" - Control: 6 Point Star, Control Name: For 6_Point_Star, Width:80, Height: '5_Point_Star'.Height
X
Y'5_Point_Star'.X
Visible'5_Point_Star'.Y!'5_Point_Star'.Visible
Step 5. Add the controls to the sub-container and configure their properties. Also, configure the properties for the main container and sub-container as follows.
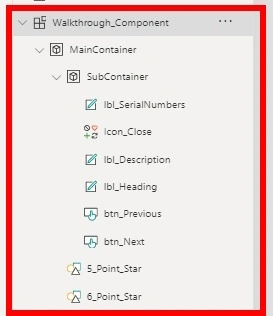
- Control: IconControl, Name: Icon_Close,Width: 18, Height:24
X
YParent.Width-Self.Width-10
OnSelectParent.Y-Self.Height+10Set(varShowHideWalkthrough, false )
- Control: LabelControl, Name: lbl_Heading, X: 10, Y: 5
Width
Auto Height: trueParent.Width-Self.X*2-Close.Width
TextvarWalkthroughItem.Heading - Control: LabelControl, Name: lbl_Description
X
Ylbl_Heading.X
Widthlbl_Heading.Y+lbl_Heading.Height
Auto Height: truelbl_Heading.Width
TextvarWalkthroughItem.Description - Control: ButtonControl, Name: btn_Next, Text: "Next"
X
YParent.Width-Self.Width-10
WidthIf(lbl_Description.Height>=54,lbl_Description.Y+lbl_Description.Height,105)
Height: 25 OnSelect:If(Self.Visible,80,0)
VisibleSet(varStepIndex, If(varStepIndex = CountRows(Walkthrough_Component.NavigationItems), 1, varStepIndex+1)); // Increment varStepIndex if it's not at the end, otherwise reset to the beginning Set(varWalkthroughItem, LookUp(Walkthrough_Component.NavigationItems,Index = varStepIndex));// Set varWalkthroughItem to the record in Walkthrough_Component.NavigationItems at index varStepIndexvarStepIndex<>CountRows(Walkthrough_Component.NavigationItems)// If varStepIndex is at the last record, hide the Next Button - Control: ButtonControl, Name: btn_Previous, Width: 80, Height: 25, Text: "Previous"
X
Ybtn_Next.X-Self.Width-10
OnSelectbtn_Next.Y
VisibleSet(varStepIndex, If(varStepIndex = 0, CountRows(Walkthrough_Component.NavigationItems), varStepIndex-1));// Decrease varStepIndex by 1 if it's not at the beginning, otherwise set it to the index of the last item Set(varWalkthroughItem, LookUp(Walkthrough_Component.NavigationItems,Index = varStepIndex));// Set varWalkthroughItem to the record in Walkthrough_Component.NavigationItems at index varStepIndexvarStepIndex<>1 - Control: LabelControl, Name: lbl_SerialNumbers, Width: 150, Height: 25
X
Ylbl_Heading.X
Textbtn_Next.YvarStepIndexV2 & "/" & CountRows(Walkthrough_Component.NavigationItems) - Control: ContainerControl, Name: SubContainer, X: 20, Y: 20, Width: 450
Height
btn_Previous.Y+btn_Previous.Height+15 - Control: ContainerControl, Name: MainContainer
X
YvarWalkthroughItem.X
WidthvarWalkthroughItem.Y
HeightSubContainer.X+SubContainer.Width+SubContainer.XSubContainer.Y+SubContainer.Height+20
Step 6. Once the Walkthrough component is created, add the following code to the OnReset property.
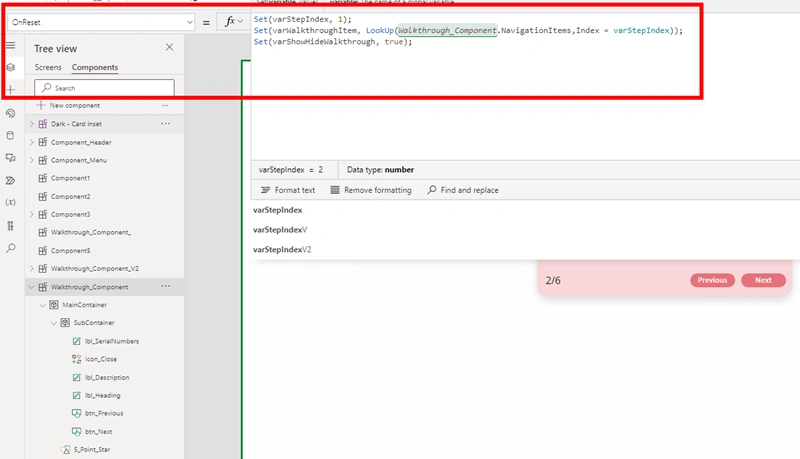
OnReset
Set(varStepIndex, 1);
Set(varWalkthroughItem, LookUp(Walkthrough_Component.NavigationItems,Index = varStepIndex));
Set(varShowHideWalkthrough, true);
Step 7. Now add this component to your required screen and reset the Walkthrough component's OnVisible property of that screen.
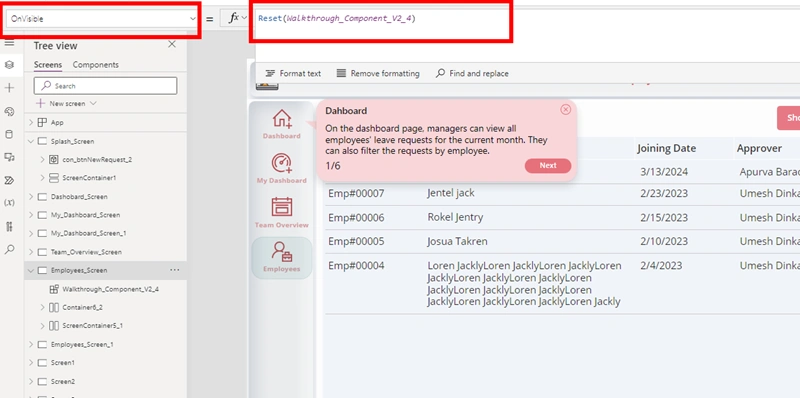
OnVisible
Reset(Walkthrough_Component_V2_4)
Note
- ArrowPosition is case-sensitive, so add the correct text in that parameter in NavigationItems.
- Make sure where you are adding the walkthrough, the X and Y Positions should be correct so the walkthrough will change position correctly.
- Star shapes are used here because it is not possible to rotate a triangle shape in PowerApps. If you find another way, you can use it instead of the Star shapes, just ensure that we can configure the colors as required.
- The ArrowPosition property is case-sensitive.
- Use "TopLeft" for the top-left arrow.
- Use "TopRight" for the top-right arrow.
- Use "BottomLeft" for the bottom-left arrow.
- Use "BottomRight" for the bottom-right arrow.
- Use "Left" for the left arrow.
- Use "Right" for the right arrow.
Conclusion
The walkthrough plays a crucial role in helping both new and existing users understand and explore an app's functionality efficiently. Using this article, you can easily develop the Walkthrough component in PowerApps.

Join the conversation! Your thoughts help the community grow.