

Introduction
Hello friends! Today, I am going to briefly explain CucumberJs basics in Protractor. Before that, let's get to know what the Protractor is.
What is Protractor?
Protractor is a node.js framework that is built on top of Selenium Webdriver APIs. It is basically used to automate angular applications. It contains the features that are available in selenium web driver. In addition to selenium locators, we have protractor locators that are helpful to automate Angular applications.
Before talking about Cucumber, let's see the installation details.
- Jdk 1.8 needs to be installed (https://www.oracle.com/in/java/technologies/javase/javase-jdk8-downloads.html)
- Download the node js (https://nodejs.org/en/download/)
- You need to write and run scripts on editor, I am using Visual studio code editor in this article, which is open-source and popular in the market. So you can download it from (https://code.visualstudio.com/).
After installing the above required software, you can verify it using the command prompt.
To check the installed JDK:
- java -version
- node -v
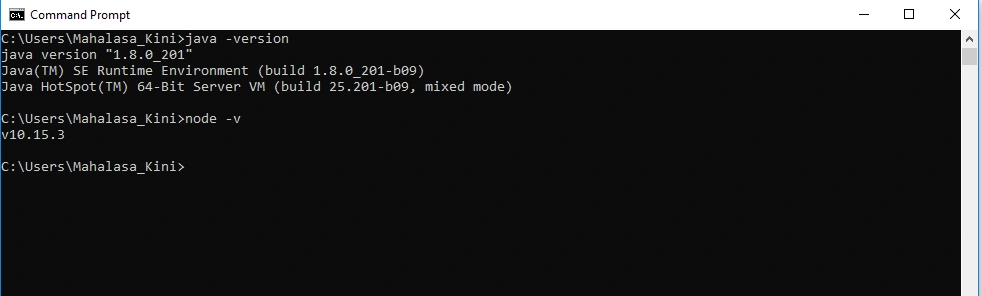
After installing the VisualStudio code editor. You can also use to run the code using the terminal.
Create a folder in the local system Ex: "Cucumberbasics" -> Open the folder in Visual Studio code.
- npm init
It just basically ask you certain details like package name. So you can give any package name (ex: cucumberjsBasics"). Please see the below screenshot
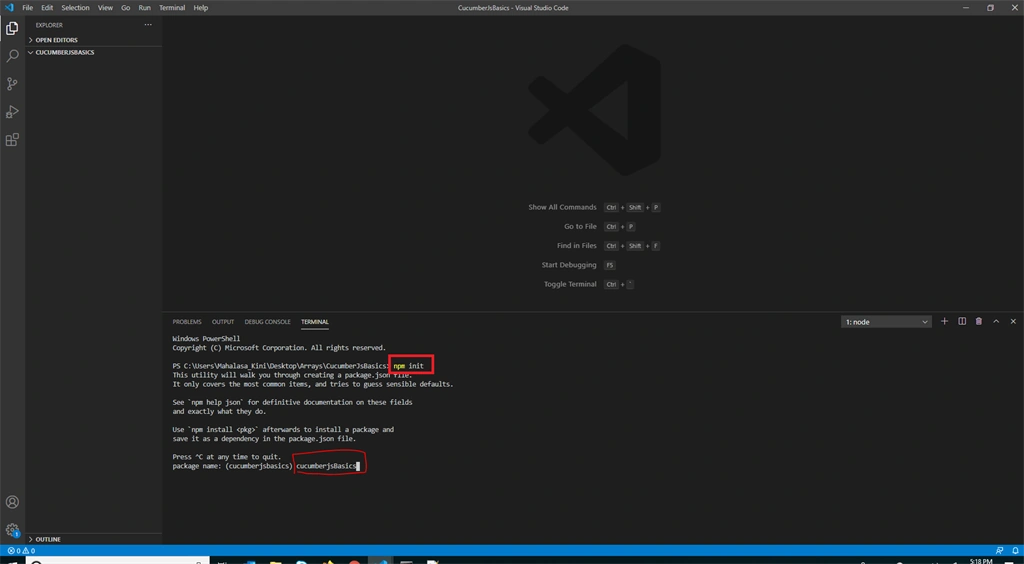
After entering the package name, it will ask you certain details like gitversion, authorname, keywords etc. you can enter the details or you can skip by clicking on enter button.
Refer to the image below. You can see the package.json file generated with the details you entered. You can edit the changes in package.json file also.
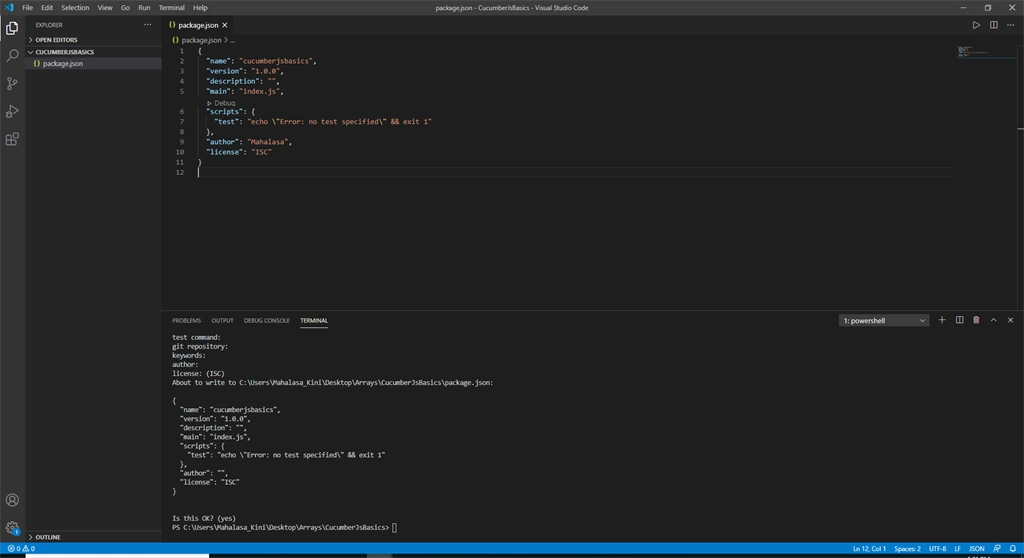
Configuring CucumberJs node package
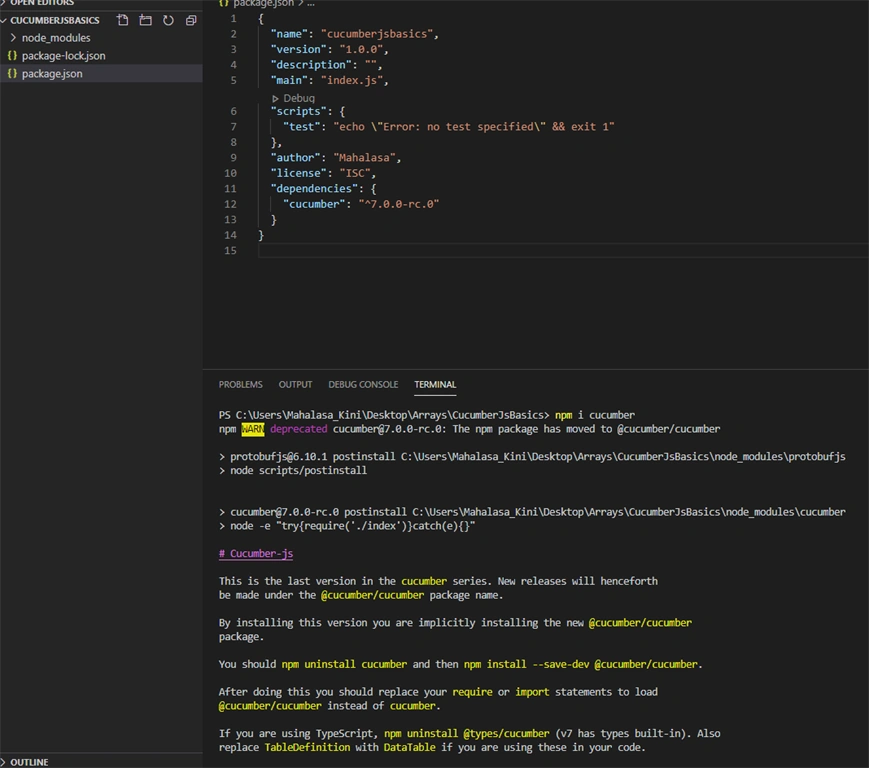
You can refer to the npm cucumber package installation in https://www.npmjs.com/package/cucumber
You can download this in VisualStudio code terminal, as shown below.
After downloading in the left pane you can see "node_modules" folder. Expand the folder and you can see the "cucumber" folder-> bin--> cucumber.js this file helps you to execute cucumber tests.
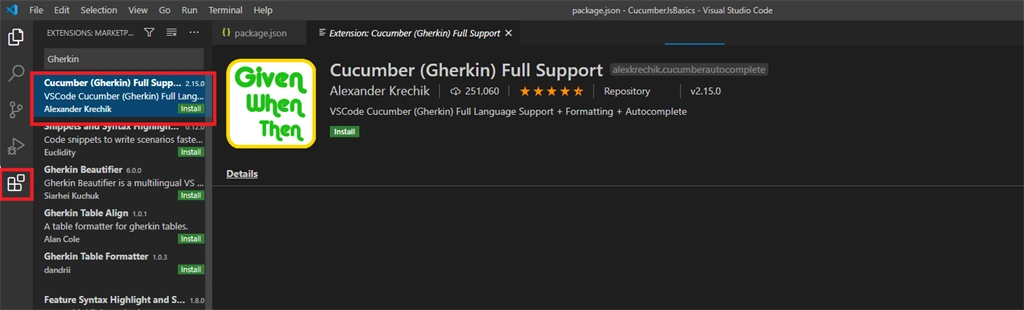
Installing Gherkin Plugin
As you all know cucumber uses "Gherkin" language, Where it is written in simple plain English language with certain sets of keywords like "Given, When,Then". We have installed the cucumber package in the above example, that is specific to the above project. After installing the package we need to install the Gherkin plugin, To write the cucumber scripts.
Creating first feature file
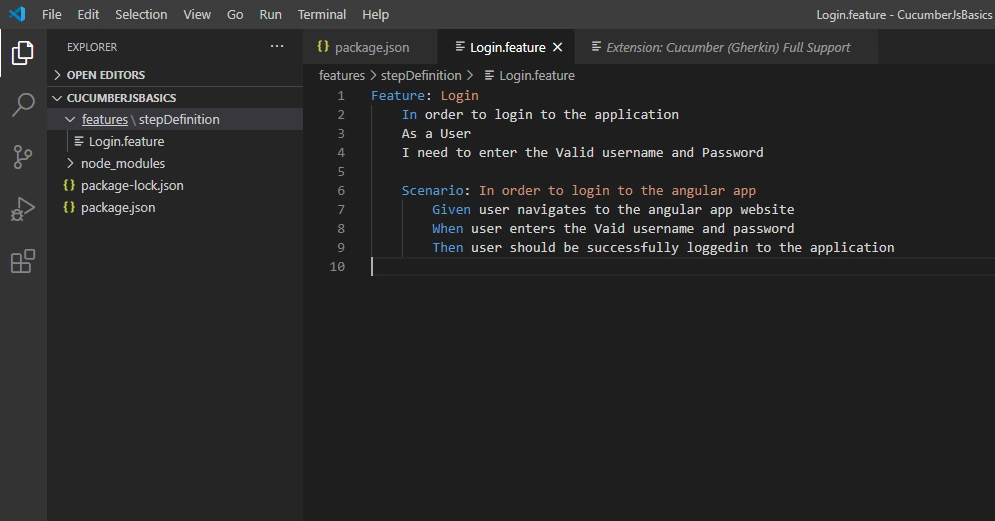
As you know cucumber works on Gherkin, we need to create .feature file first. So first create a folder with name "feature" and inside the feature folder create "stepdefinition" folder. Create a "Login.feature" file inside the "feature" folder.
First, let's take the simple example of a user login. You need to enter the below code in the .feature file.
- Feature: Login
- In order to login to the application
- As a User
- I need to enter the Valid username and Password
- Scenario: In order to login to the angular app
- Given user navigates to the angular app website
- When user enters the Vaid username and password
- Then user should be successfully loggedin to the application
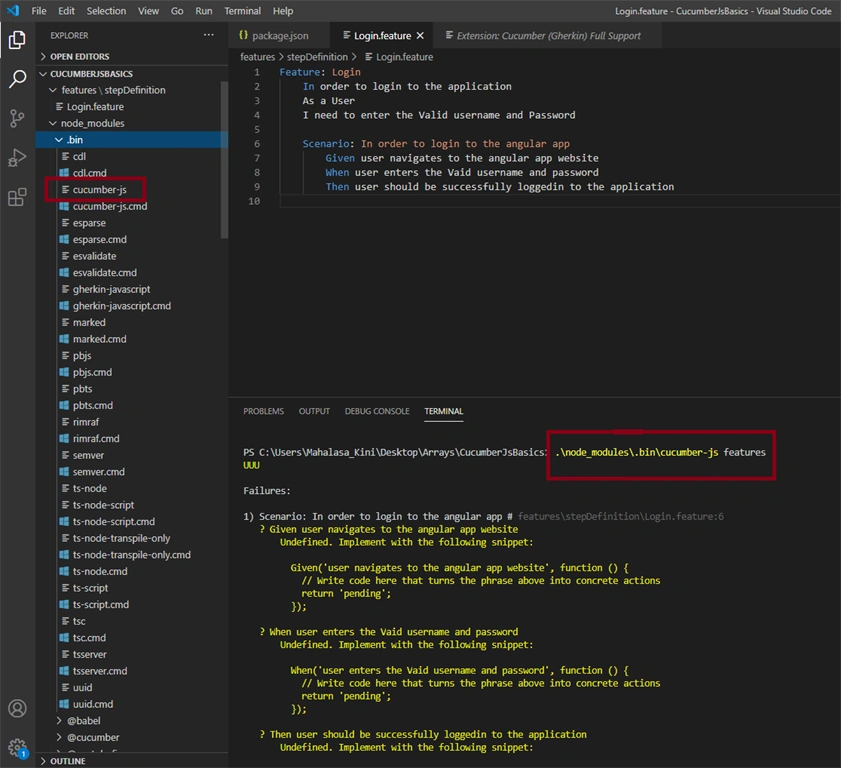
In order to run this in "Visual Studio code," you need to navigate to "node-module" -> bin-> cucumber.js file this will help you to run the cucumber files.
You need to enter the below command inside the terminal.
- .\node_modules\.bin\cucumber-js features
- .\node_modules\.bin\cucumber-js .\features\Login.feature
Now let's create a step definition file for the "login.feature" file.
- var {Given, When, Then} = require('cucumber');
- Given('user navigates to the angular app website', function () {
- // Write code here that turns the phrase above into concrete actions
- return console.log('Given - user navigates to the angular app website');
- });
- When('user enters the Vaid username and password', function () {
- return console.log('When - user enters the Vaid username and password');
- });
- Then('user should be successfully loggedin to the application', function () {
- return console.log('Then - user should be successfully loggedin to the application');
- });
Adding Multiple Scenarios to the feature file
When you are adding multiple scenarios to the feature file, you should be careful about the repeating scenarios. Let us say for ex: you have two scenarios, one is for login with valid user and one with an invalid user, as mentioned below.
- Feature: Login
- In order to login to the application
- As a User
- I need to enter the Valid username and Password
- Scenario: In order to login to the angular app
- Given user navigates to the angular app website
- When user enters the Vaid username and password
- Then user should be successfully loggedin to the application
- Scenario: In order to login to the angular app with invalid login
- Given user navigates to the angular app website
- When user enters the InVaid username and password
- Then user should not be successfully loggedin to the application
Every regular expression should start with ^/ and ends with $/ and the dynamic values should be like "([^"]*)", for every dynamic value in feature file should be represented with double quotes.
- Feature: Login
- In order to login to the application
- As a User
- I need to enter the Valid username and Password
- Scenario: In order to login to the angular app
- Given user navigates to the angular app website
- When user enters the "Valid" username "valid" password
- Then user should "be" successfully loggedin to the application
- Scenario: In order to login to the angular app with invalid login
- Given user navigates to the angular app website
- When user enters the "InValid" username "InValid" password
- Then user should "not" successfully loggedin to the application
- var {Given, When, Then} = require('cucumber');
- Given(/^user navigates to the angular app website$/, function () {
- // Write code here that turns the phrase above into concrete actions
- return console.log('Given - user navigates to the angular app website');
- });
- When(/^user enters the "([^"]*)" username "([^"]*)" password$/, function (username, password) {
- return console.log("When - user enters the "+ username+" username "+password+" password");
- });
- Then(/^user should "([^"]*)" successfully loggedin to the application$/, function (loginType) {
- return console.log("Then - user should "+ loginType+" successfully loggedin to the application");
- });
Adding Background
In the above example, we have seen multiple scenarios. But there are some repeating line for the above two scenarios in feature file. i.e Given statement, Navigating to the URL is the same for both the scenario. So you can mention it in the "Background". Any repeated statement that is same for both the scenarios can be mentioned in "Background".
Let's see this with example: In the below example, I have removed the "Given" statement from both the scenarios and i have placed that statement in "Background" which you need to declare after the "Feature". If you execute the cucumber test, it should work as same and there is no change in the step definition.
- Feature: Login
- In order to login to the application
- As a User
- I need to enter the Valid username and Password
- Background:
- Given user navigates to the angular app website
- Scenario: In order to login to the angular app
- When user enters the "Valid" username "valid" password
- Then user should "be" successfully loggedin to the application
- Scenario: In order to login to the angular app with invalid login
- When user enters the "InValid" username "InValid" password
- Then user should "not" successfully loggedin to the application
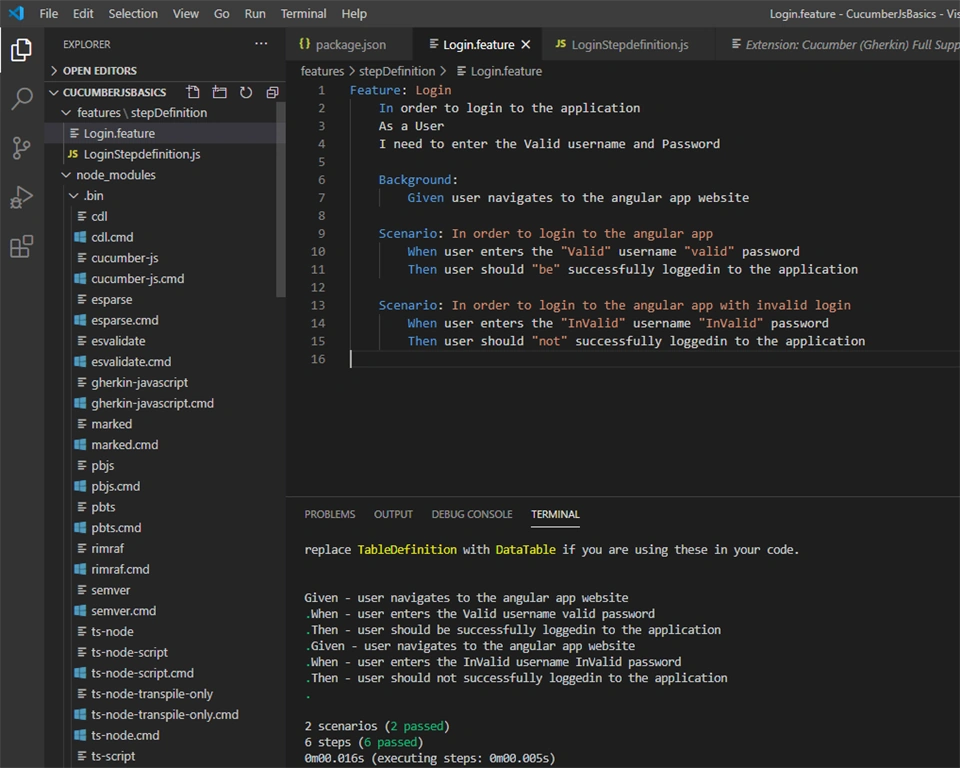
As you can see in the above result. The "Given" statement has been executed twice, since there are two scenarios.
Parameterizing the Scenarios
In the above scenarios, we created 2 scenarios for Valid and Invalid user. Each time, we cannot create the scenario to execute different sets of test data and it is not valid to create so many scenarios for the same execution. In order to avoid this we need to use "Scenario Outline" it allows to execute scenario with different sets of data. We can modify the scenario in the above example like this:
- Feature: Login
- In order to login to the application
- As a User
- I need to enter the Valid username and Password
- Background:
- Given user navigates to the angular app website
- Scenario Outline: In order to login to the angular app
- When user enters the Valid "<username>" valid "<password>"
- Then user should "<loginStatus>" successfully loggedin to the application
- Examples:
- | username | password | loginStatus |
- | Testuser1 | pass123 | passed |
- | Testuser2 | pass222 | failed |
- | Testuser3 | pass333 | passed |
Below is the execution result with different sets of data.
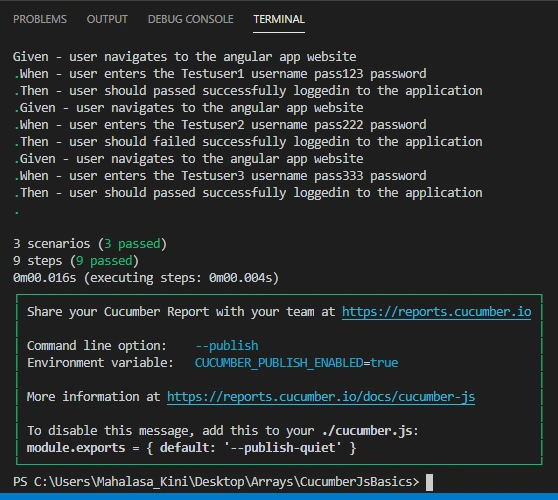
You can also add Multiple Feature file and Step definition files to your project. The code looks the same as above.
Working with DataTables and Multiple feature files
Let us look at some example. For this, I have created one more feature file in which you need to select the country of the user to login.
- Feature: Login
- In order to login to the application
- As a User
- I need to enter the Valid username and Password
- Background:
- Given user navigates to the angular app website
- Scenario Outline: In order to login to the angular app
- When user enters the Valid "username" valid "password"
- Then Select the user country
- |Country | Zipcodes|
- | India | 1000 |
- | Japan | 1001 |
- | South Korea | 1002 |
- Then user should "loginStatus" successfully loggedin to the application
Your Step definition looks like this:
- var {Given, When, Then} = require('cucumber');
- Then(/^Select the user country$/, function (table) {
- // Write code here that turns the phrase above into concrete actions
- var data = table.hashes()[1]; // this is an array type so arr[1] is nothing but Japan in the feature file
- return console.log("the user country is: "+ data["Country"] + " Zipcode is: "+ data["Zipcodes"]);
- });
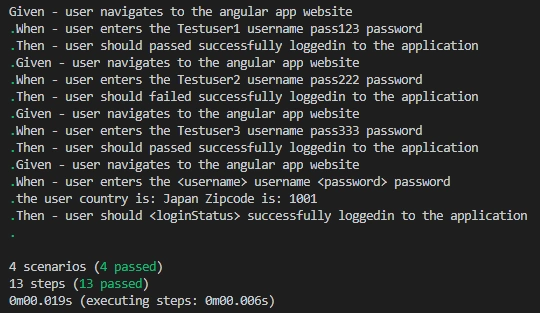
You can see in the result, IT has executed previous feature files as well. This is the example for Multiple feature file and you can see the country and the zip code in the last scenario i.e "Japan" and Zipcode is "1001" is printed.
Cucumber Tags
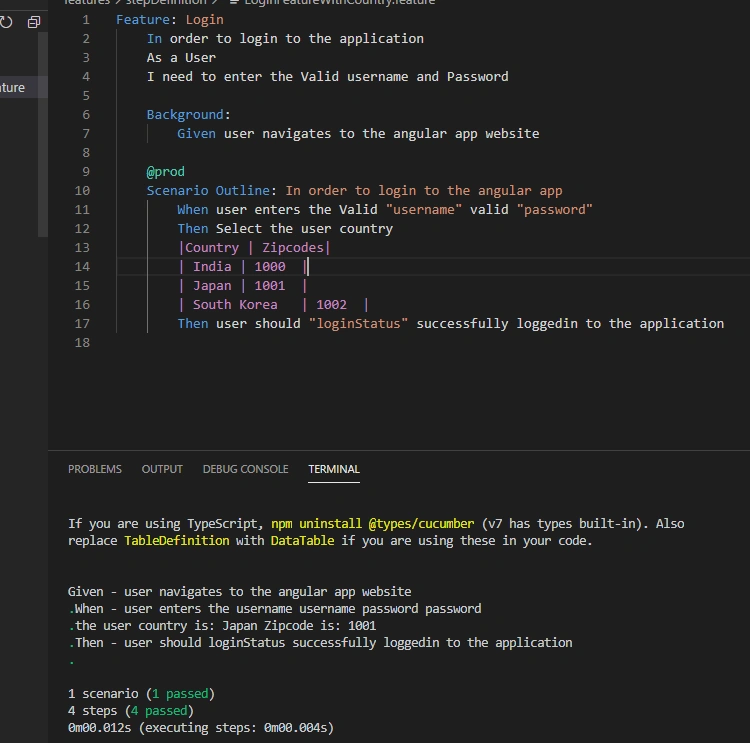
Tags are like grouping of the scenarios, With the tagname, you can execute the testcases. Suppose in the one feature film you have more than 10 scenarios, but at the time of execute you may want to run only certain scenarios. Then you can mention the scenarios with a tag name.
- Feature: Login
- In order to login to the application
- As a User
- I need to enter the Valid username and Password
- Background:
- Given user navigates to the angular app website
- @prod
- Scenario Outline: In order to login to the angular app
- When user enters the Valid "username" valid "password"
- Then Select the user country
- |Country | Zipcodes|
- | India | 1000 |
- | Japan | 1001 |
- | South Korea | 1002 |
- Then user should "loginStatus" successfully loggedin to the application
When you want to execute above feature file with tag Name "@prod"
- .\node_modules\.bin\cucumber-js --tags '@prod'
Cucumber Hooks
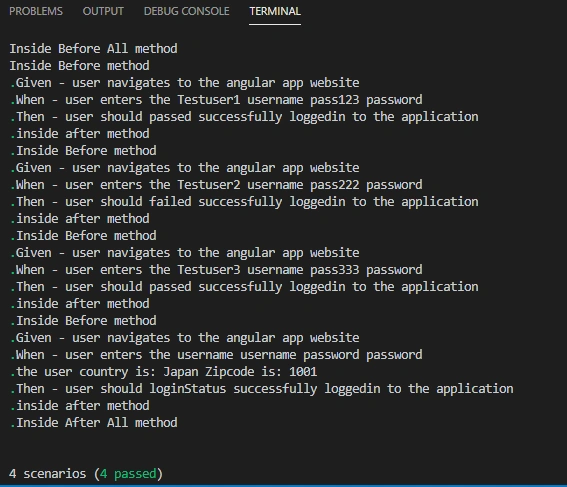
At a times you need some annotations where you can initialize the database connection, Close the database connection or you need to open the URL before starting any tests. In order to execute it you have something call hooks. "BeforeAll, AfterAll, Before, After"
Let's look at some examples here:
- var {Given, When, Then, BeforeAll, AfterAll, Before, After} = require('cucumber');
- BeforeAll(function(){
- //You can initialize any data base connection
- console.log("Inside Before All method");
- });
- AfterAll(function(){
- //close of database connection
- console.log("Inside After All method");
- });
- Before(function(){
- //Manage to open the url and wait for certain timeout
- console.log("Inside Before method");
- });
- After(function(){
- //close the browser
- console.log("inside after method");
- });
- Given(/^user navigates to the angular app website$/, function () {
- // Write code here that turns the phrase above into concrete actions
- return console.log('Given - user navigates to the angular app website');
- });
- When(/^user enters the Valid "([^"]*)" valid "([^"]*)"$/, function (username, password) {
- return console.log("When - user enters the "+ username+" username "+password+" password");
- });
- Then(/^user should "([^"]*)" successfully loggedin to the application$/, function (loginType) {
- return console.log("Then - user should "+ loginType+" successfully loggedin to the application");
- });
Cucumber Tag Hook
You can create hook based on Tag, below is the example. I have given the same tag name that I had mentioned in the feature file.
- var {Given, When, Then, BeforeAll, AfterAll, Before, After} = require('cucumber');
- BeforeAll(function(){
- //You can initialize any data base connection
- console.log("Inside Before All method");
- });
- AfterAll(function(){
- //close of database connection
- console.log("Inside After All method");
- });
- Before("@prod",function(){
- //Manage to open the url and wait for certain timeout
- console.log("Inside Before method");
- });
- After("@prod",function(){
- //close the browser
- console.log("inside after method");
- });
- Given(/^user navigates to the angular app website$/, function () {
- // Write code here that turns the phrase above into concrete actions
- return console.log('Given - user navigates to the angular app website');
- });
- When(/^user enters the Valid "([^"]*)" valid "([^"]*)"$/, function (username, password) {
- return console.log("When - user enters the "+ username+" username "+password+" password");
- });
- Then(/^user should "([^"]*)" successfully loggedin to the application$/, function (loginType) {
- return console.log("Then - user should "+ loginType+" successfully loggedin to the application");
- });
Generating HTML reports
This is the last section of this article. So far, we have learned all the basics of cucumber, like creating a file, creating a feature file, and adding the step definition, creating tags, and creating hooks. Essentially all the things we executed in the Visual Studio editor terminal itself. Now let us see how to generate HTML reports and view an output.
First you need to download "cucumber-html-reporter" from npm website (https://www.npmjs.com/package/cucumber-html-reporter)
Just execute this command in our VisualStudio code editor terminal
npm install cucumber-html-reporter --save-dev
Once it is executed, you can recheck in "package.json." It will be added like this:
- {
- "name": "cucumberjsbasics",
- "version": "1.0.0",
- "description": "",
- "main": "index.js",
- "scripts": {
- "test": "echo \"Error: no test specified\" && exit 1"
- },
- "author": "Mahalasa",
- "license": "ISC",
- "dependencies": {
- "cucumber": "^7.0.0-rc.0"
- },
- "devDependencies": {
- "cucumber-html-reporter": "^5.2.0"
- }
- }
We need to create "cucumber_report.json " as mentioned in npm website. To create the .json file. Execute the below command.
- .\node_modules\.bin\cucumber-js --format=json:cucumber_report.json
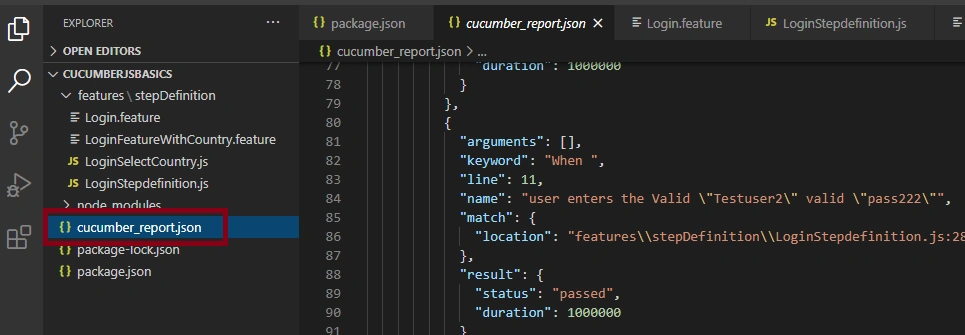
Once the cucumber_report.json file is generated, you need to create "index.js" file and add the below code:
- var reporter = require('cucumber-html-reporter');
- var options = {
- theme: 'bootstrap',
- jsonFile: './cucumber_report.json',
- output: './cucumber_report.html',
- reportSuiteAsScenarios: true,
- scenarioTimestamp: true,
- launchReport: true,
- metadata: {
- "App Version":"0.3.2",
- "Test Environment": "STAGING",
- "Browser": "Chrome 54.0.2840.98",
- "Platform": "Windows 10",
- "Parallel": "Scenarios",
- "Executed": "Remote"
- }
- };
- reporter.generate(options);
- node index.js
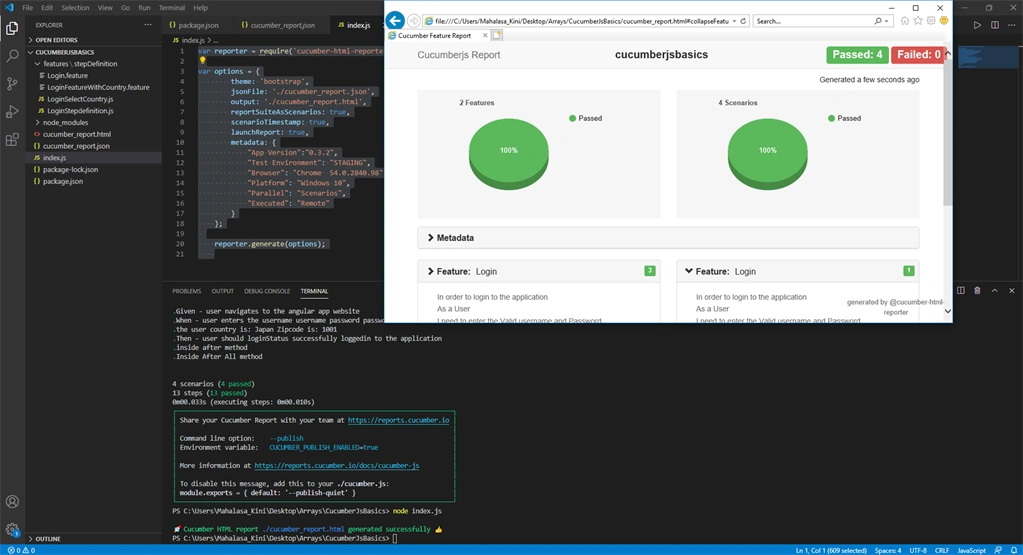
So far, we executed the command separately, one by one. Now let us see we can execute this report commands through the "package.json" file.
For this, you need to update your package.json file, as shown below.
I have added "cuke", and then i have added the two commands mentioned above in a single line.
- {
- "name": "cucumberjsbasics",
- "version": "1.0.0",
- "description": "",
- "main": "index.js",
- "scripts": {
- "test": "echo \"Error: no test specified\" && exit 1",
- "cuke": ".\\node_modules\\.bin\\cucumber-js --format=json:cucumber_report.json && node index.js"
- },
- "author": "Mahalasa",
- "license": "ISC",
- "dependencies": {
- "cucumber": "^7.0.0-rc.0"
- },
- "devDependencies": {
- "cucumber-html-reporter": "^5.2.0"
- }
- }
- npm run cuke
I think that I have covered all the basics of cucumber using VScode editor.
In the next article, I will be covering: How to integrate protractor configuration with Cucumber.
Thank you, and Happy Coding! :-)
Join the conversation! Your thoughts help the community grow.