

Introduction
Here, we are going to create a web application using ASP.NET Core MVC and ADO.NET. We will be creating a simple student record management system and performing CRUD operations on it.
Prerequisites
- Install .NET Core 2.0.0 or above SDK from here
- Download and install Visual Studio Code from here
- SQL Server 2008 or above
Creating the Table and Stored Procedures
We will be using a DB table to store all the records of the students.
First of all, we will create a database named "StudentManagement”.
- CREATE DATABASE StudentManagement
Then, we will create a table named “Student”.
- Create table Student(
- Id int IDENTITY(1,1) NOT NULL,
- FirstName varchar(50) NOT NULL,
- LastName varchar(50) NOT NULL,
- Email varchar(30) NOT NULL,
- Mobile varchar(20) NOT NULL,
- Address varchar(220) NULL,
- )
Now, we will create stored procedures to add, delete, update, and get student data.
To Insert a Student Record
- Create procedure spAddStudent
- (
- @FirstName VARCHAR(50),
- @LastName VARCHAR(50),
- @Email VARCHAR(30),
- @Mobile VARCHAR(20),
- @Address VARCHAR(220)
- )
- as
- Begin
- Insert into Student (FirstName,LastName,Email, Mobile,Address)
- Values (@FirstName,@LastName,@Email, @Mobile,@Address)
- End
To Update a Student Record
- Create procedure spUpdateStudent
- (
- @Id INTEGER ,
- @FirstName VARCHAR(50),
- @LastName VARCHAR(50),
- @Email VARCHAR(30),
- @Mobile VARCHAR(20),
- @Address VARCHAR(220)
- )
- as
- begin
- Update Student
- set FirstName=@FirstName,
- LastName=@LastName,
- Email=@Email,
- Mobile=@Mobile,
- Address=@Address
- where Id=@Id
- End
To Delete a Student Record
- Create procedure spDeleteStudent
- (
- @Id int
- )
- as
- begin
- Delete from Student where Id=@Id
- End
To View all Student Records
- Create procedure spGetAllStudent
- as
- Begin
- select *
- from Student
- order by Id
- End
Our database part has been completed.
Create the ASP.NET MVC Web Application
Now, we are going to create an ASP.NET MVC Web Application. The project name is “StudentRecordManagementSystem”.
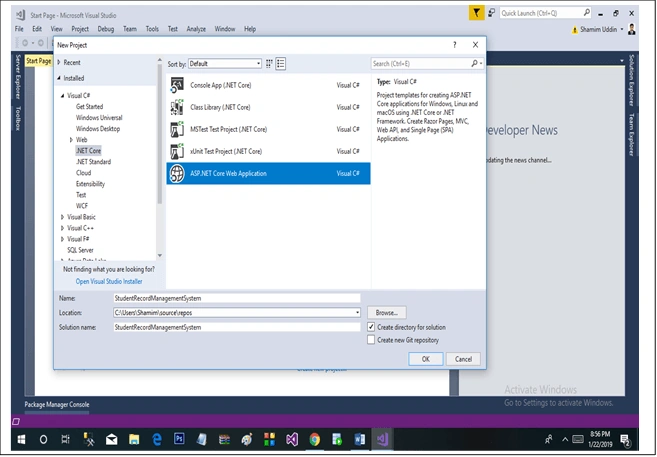
Click OK. The below window will appear on the screen.
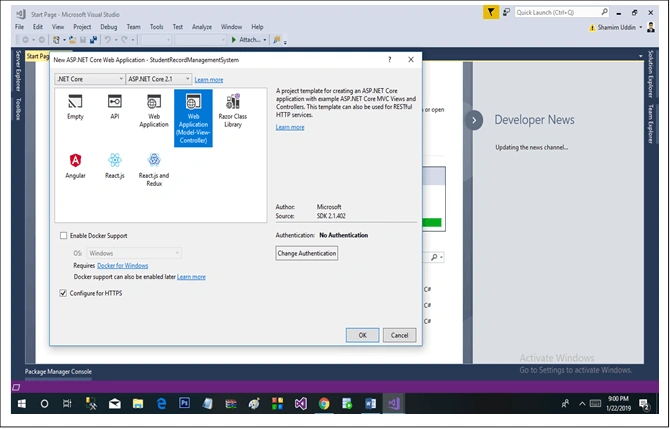
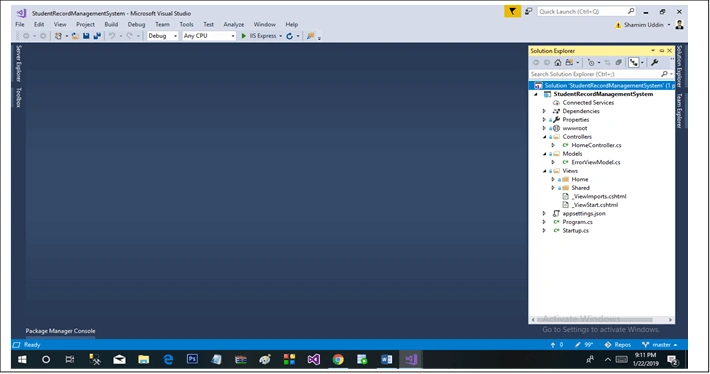
Click OK. The solution creation is done with the loading of all needed files. Given below is the picture of the solution structure.
What is MVC
- Model
Classes that represent the data of the solution
- View
Simple word view means UI (User Interface) dynamically generates HTML responses.
- Controller
A Controller is a link between User and the System. It handles incoming browser requests and after processing it using model data or specific task, returns a response to the browser.
Create a folder named “Utility” in the project. Now, we will create a class named “ConnectionString” within the Utility folder.
- public static class ConnectionString
- {
- private static string cName = "Data Source=.; Initial Catalog=StudentManagement;User ID=sa;Password=123";
- public static string CName { get => cName;
- }
- }
After that, we will create a class named “Student” within model folder.
- public class Student
- {
- public int Id { set; get; }
- [Required]
- public string FirstName { set; get; }
- [Required]
- public string LastName { set; get; }
- [Required]
- public string Email { set; get; }
- [Required]
- public string Mobile { set; get; }
- public string Address { set; get; }
- }
We will Rebuild our solution and create a “StudentController” within Controller folder. Right-Add-Controller-Select MVC Controller with read/write actions and click add.
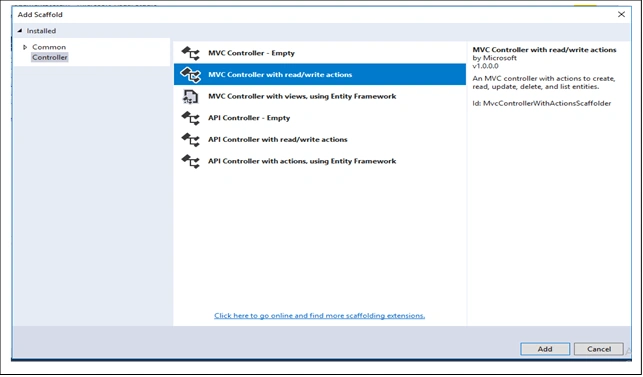
Another window will appear on screen
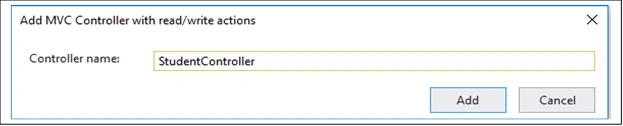
Our StudentController has been created.
- public class StudentController : Controller
- {
- // GET: Student
- public ActionResult Index()
- {
- return View();
- }
- // GET: Student/Details/5
- public ActionResult Details(int id)
- {
- return View();
- }
- // GET: Student/Create
- public ActionResult Create()
- {
- return View();
- }
- // POST: Student/Create
- [HttpPost]
- [ValidateAntiForgeryToken]
- public ActionResult Create(IFormCollection collection)
- {
- try
- {
- // TODO: Add insert logic here
- return RedirectToAction(nameof(Index));
- }
- catch
- {
- return View();
- }
- }
- // GET: Student/Edit/5
- public ActionResult Edit(int id)
- {
- return View();
- }
- // POST: Student/Edit/5
- [HttpPost]
- [ValidateAntiForgeryToken]
- public ActionResult Edit(int id, IFormCollection collection)
- {
- try
- {
- // TODO: Add update logic here
- return RedirectToAction(nameof(Index));
- }
- catch
- {
- return View();
- }
- }
- // GET: Student/Delete/5
- public ActionResult Delete(int id)
- {
- return View();
- }
- // POST: Student/Delete/5
- [HttpPost]
- [ValidateAntiForgeryToken]
- public ActionResult Delete(int id, IFormCollection collection)
- {
- try
- {
- // TODO: Add delete logic here
- return RedirectToAction(nameof(Index));
- }
- catch
- {
- return View();
- }
- }
- }
We have to work with the database so we will create a data access layer class within model folder named “StudentDataAccessLayer”
- public class StudentDataAccessLayer
- {
- string connectionString = ConnectionString.CName;
- public IEnumerable<Student> GetAllStudent()
- {
- List<Student> lstStudent = new List<Student>();
- using (SqlConnection con = new SqlConnection(connectionString))
- {
- SqlCommand cmd = new SqlCommand("spGetAllStudent", con);
- cmd.CommandType = CommandType.StoredProcedure;
- con.Open();
- SqlDataReader rdr = cmd.ExecuteReader();
- while (rdr.Read())
- {
- Student student = new Student();
- student.Id = Convert.ToInt32(rdr["Id"]);
- student.FirstName = rdr["FirstName"].ToString();
- student.LastName = rdr["LastName"].ToString();
- student.Email = rdr["Email"].ToString();
- student.Mobile = rdr["Mobile"].ToString();
- student.Address = rdr["Address"].ToString();
- lstStudent.Add(student);
- }
- con.Close();
- }
- return lstStudent;
- }
- public void AddStudent(Student student)
- {
- using (SqlConnection con = new SqlConnection(connectionString))
- {
- SqlCommand cmd = new SqlCommand("spAddStudent", con);
- cmd.CommandType = CommandType.StoredProcedure;
- cmd.Parameters.AddWithValue("@FirstName", student.FirstName);
- cmd.Parameters.AddWithValue("@LastName", student.LastName);
- cmd.Parameters.AddWithValue("@Email", student.Email);
- cmd.Parameters.AddWithValue("@Mobile", student.Mobile);
- cmd.Parameters.AddWithValue("@Address", student.Address);
- con.Open();
- cmd.ExecuteNonQuery();
- con.Close();
- }
- }
- public void UpdateStudent(Student student)
- {
- using (SqlConnection con = new SqlConnection(connectionString))
- {
- SqlCommand cmd = new SqlCommand("spUpdateStudent", con);
- cmd.CommandType = CommandType.StoredProcedure;
- cmd.Parameters.AddWithValue("@Id", student.Id);
- cmd.Parameters.AddWithValue("@FirstName", student.FirstName);
- cmd.Parameters.AddWithValue("@LastName", student.LastName);
- cmd.Parameters.AddWithValue("@Email", student.Email);
- cmd.Parameters.AddWithValue("@Mobile", student.Mobile);
- cmd.Parameters.AddWithValue("@Address", student.Address);
- con.Open();
- cmd.ExecuteNonQuery();
- con.Close();
- }
- }
- public Student GetStudentData(int? id)
- {
- Student student = new Student();
- using (SqlConnection con = new SqlConnection(connectionString))
- {
- string sqlQuery = "SELECT * FROM Student WHERE Id= " + id;
- SqlCommand cmd = new SqlCommand(sqlQuery, con);
- con.Open();
- SqlDataReader rdr = cmd.ExecuteReader();
- while (rdr.Read())
- {
- student.Id = Convert.ToInt32(rdr["Id"]);
- student.FirstName = rdr["FirstName"].ToString();
- student.LastName = rdr["LastName"].ToString();
- student.Email = rdr["Email"].ToString();
- student.Mobile = rdr["Mobile"].ToString();
- student.Address = rdr["Address"].ToString();
- }
- }
- return student;
- }
- public void DeleteStudent(int? id)
- {
- using (SqlConnection con = new SqlConnection(connectionString))
- {
- SqlCommand cmd = new SqlCommand("spDeleteStudent", con);
- cmd.CommandType = CommandType.StoredProcedure;
- cmd.Parameters.AddWithValue("@Id", id);
- con.Open();
- cmd.ExecuteNonQuery();
- con.Close();
- }
- }
- }
Create Action
Now we will work with Create Action within Student Controller. There are two Create Actions one is GET and another is POST. Now we will create a view for creating action.
Before creating a view we will create a constructor
- StudentDataAccessLayer studentDataAccessLayer = null;
- public StudentController()
- {
- studentDataAccessLayer = new StudentDataAccessLayer();
- }
Right click on create (GET) action then click add view; the below window will appear on the screen.
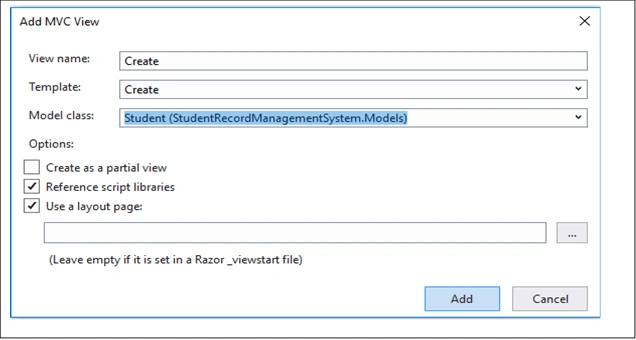
Click add
- @model StudentRecordManagementSystem.Models.Student
- @{
- ViewData["Title"] = "Create";
- }
- <h2>Create</h2>
- <h4>Student</h4>
- <hr />
- <div class="row">
- <div class="col-md-4">
- <form asp-action="Create">
- <div asp-validation-summary="ModelOnly" class="text-danger"></div>
- <div class="form-group">
- <label asp-for="Id" class="control-label"></label>
- <input asp-for="Id" class="form-control" />
- <span asp-validation-for="Id" class="text-danger"></span>
- </div>
- <div class="form-group">
- <label asp-for="FirstName" class="control-label"></label>
- <input asp-for="FirstName" class="form-control" />
- <span asp-validation-for="FirstName" class="text-danger"></span>
- </div>
- <div class="form-group">
- <label asp-for="LastName" class="control-label"></label>
- <input asp-for="LastName" class="form-control" />
- <span asp-validation-for="LastName" class="text-danger"></span>
- </div>
- <div class="form-group">
- <label asp-for="Email" class="control-label"></label>
- <input asp-for="Email" class="form-control" />
- <span asp-validation-for="Email" class="text-danger"></span>
- </div>
- <div class="form-group">
- <label asp-for="Mobile" class="control-label"></label>
- <input asp-for="Mobile" class="form-control" />
- <span asp-validation-for="Mobile" class="text-danger"></span>
- </div>
- <div class="form-group">
- <label asp-for="Address" class="control-label"></label>
- <input asp-for="Address" class="form-control" />
- <span asp-validation-for="Address" class="text-danger"></span>
- </div>
- <div class="form-group">
- <input type="submit" value="Create" class="btn btn-default" />
- </div>
- </form>
- </div>
- </div>
- <div>
- <a asp-action="Index">Back to List</a>
- </div>
- @section Scripts {
- @{await Html.RenderPartialAsync("_ValidationScriptsPartial");}
- }
Now run our application,
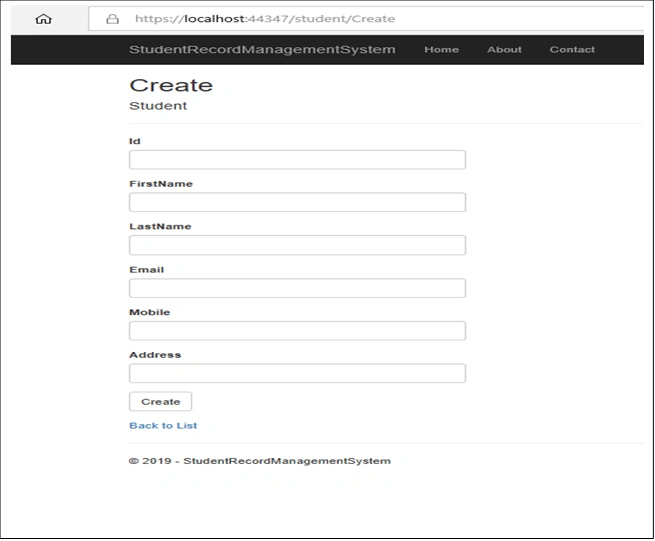
We will remove Id field from view. We have done auto increment of Id field in database.
Now we will work with Create (POST),
- [HttpPost]
- [ValidateAntiForgeryToken]
- public ActionResult Create(Student student)
- {
- try
- {
- // TODO: Add insert logic here
- studentDataAccessLayer.AddStudent(student);
- return RedirectToAction(nameof(Index));
- }
- catch(Exception ex)
- {
- return View();
- }
- }
IndexAction
We have to call GetAllStudent method from StudentDataAccessLayer class for getting all students in Index action,
- public ActionResult Index()
- {
- IEnumerable<Student> students = studentDataAccessLayer.GetAllStudent();
- return View(students);
- }
Right click on Index action then click add view and the below window will appear on screen.
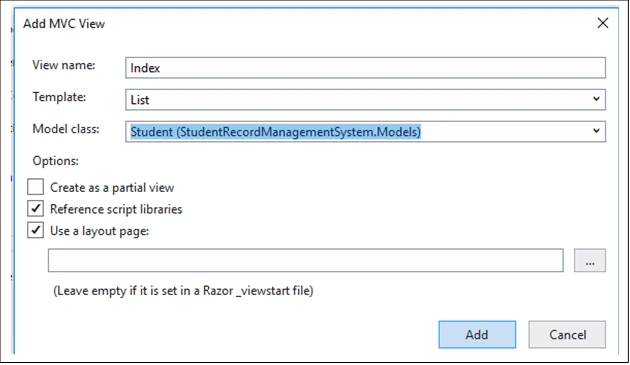
Click add
- @model IEnumerable<StudentRecordManagementSystem.Models.Student>
- @{
- ViewData["Title"] = "Index";
- }
- <h2>Index</h2>
- <p>
- <a asp-action="Create">Create New</a>
- </p>
- <table class="table">
- <thead>
- <tr>
- <th>
- @Html.DisplayNameFor(model => model.Id)
- </th>
- <th>
- @Html.DisplayNameFor(model => model.FirstName)
- </th>
- <th>
- @Html.DisplayNameFor(model => model.LastName)
- </th>
- <th>
- @Html.DisplayNameFor(model => model.Email)
- </th>
- <th>
- @Html.DisplayNameFor(model => model.Mobile)
- </th>
- <th>
- @Html.DisplayNameFor(model => model.Address)
- </th>
- <th></th>
- </tr>
- </thead>
- <tbody>
- @foreach (var item in Model) {
- <tr>
- <td>
- @Html.DisplayFor(modelItem => item.Id)
- </td>
- <td>
- @Html.DisplayFor(modelItem => item.FirstName)
- </td>
- <td>
- @Html.DisplayFor(modelItem => item.LastName)
- </td>
- <td>
- @Html.DisplayFor(modelItem => item.Email)
- </td>
- <td>
- @Html.DisplayFor(modelItem => item.Mobile)
- </td>
- <td>
- @Html.DisplayFor(modelItem => item.Address)
- </td>
- <td>
- @Html.ActionLink("Edit", "Edit", new { id=item.Id }) |
- @Html.ActionLink("Details", "Details", new { id=item.Id }) |
- @Html.ActionLink("Delete", "Delete", new { id=item.Id })
- </td>
- </tr>
- }
- </tbody>
- </table>
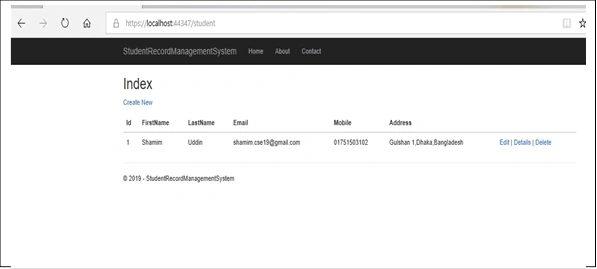
Now we will save a student and see the student in list.
Save a student:
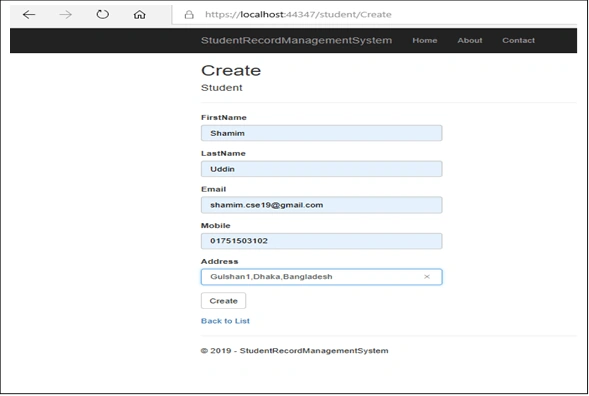
Show student list:
EditAction
Now we will work with Edit Action within Student Controller. There are two Edit Actions; one is GET and another is POST. Now we will create a view for creating action.
We have to call GetStudentData method from StudentDataAccessLayer class for getting student by Id.
- public ActionResult Edit(int id)
- {
- Student student = studentDataAccessLayer.GetStudentData(id);
- return View(student);
- }
Right click on Edit (GET) action then click add view; the below window will appear on screen.
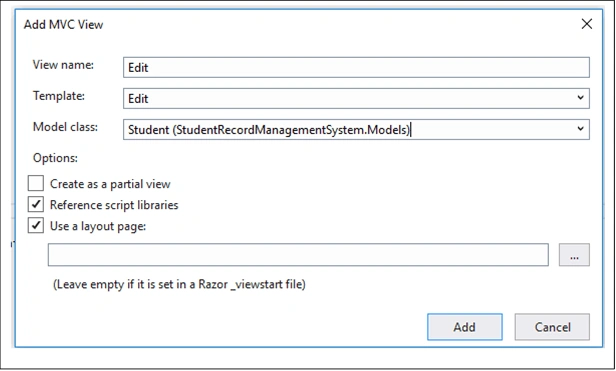
Click Add
- @model StudentRecordManagementSystem.Models.Student
- @{
- ViewData["Title"] = "Edit";
- }
- <h2>Edit</h2>
- <h4>Student</h4>
- <hr />
- <div class="row">
- <div class="col-md-4">
- <form asp-action="Edit">
- <div asp-validation-summary="ModelOnly" class="text-danger"></div>
- <div class="form-group">
- <label asp-for="Id" class="control-label"></label>
- <input asp-for="Id" class="form-control" readonly/>
- <span asp-validation-for="Id" class="text-danger"></span>
- </div>
- <div class="form-group">
- <label asp-for="FirstName" class="control-label"></label>
- <input asp-for="FirstName" class="form-control" />
- <span asp-validation-for="FirstName" class="text-danger"></span>
- </div>
- <div class="form-group">
- <label asp-for="LastName" class="control-label"></label>
- <input asp-for="LastName" class="form-control" />
- <span asp-validation-for="LastName" class="text-danger"></span>
- </div>
- <div class="form-group">
- <label asp-for="Email" class="control-label"></label>
- <input asp-for="Email" class="form-control" />
- <span asp-validation-for="Email" class="text-danger"></span>
- </div>
- <div class="form-group">
- <label asp-for="Mobile" class="control-label"></label>
- <input asp-for="Mobile" class="form-control" />
- <span asp-validation-for="Mobile" class="text-danger"></span>
- </div>
- <div class="form-group">
- <label asp-for="Address" class="control-label"></label>
- <input asp-for="Address" class="form-control" />
- <span asp-validation-for="Address" class="text-danger"></span>
- </div>
- <div class="form-group">
- <input type="submit" value="Update" class="btn btn-default" />
- </div>
- </form>
- </div>
- </div>
- <div>
- <a asp-action="Index">Back to List</a>
- </div>
- @section Scripts {
- @{await Html.RenderPartialAsync("_ValidationScriptsPartial");}
- }
Now we will work with Edit (POST):
- [HttpPost]
- [ValidateAntiForgeryToken]
- public ActionResult Edit(Student student)
- {
- try
- {
- // TODO: Add update logic here
- studentDataAccessLayer.UpdateStudent(student);
- return RedirectToAction(nameof(Index));
- }
- catch
- {
- return View();
- }
- }
Edit option has been done. Now we will test if it works or not.
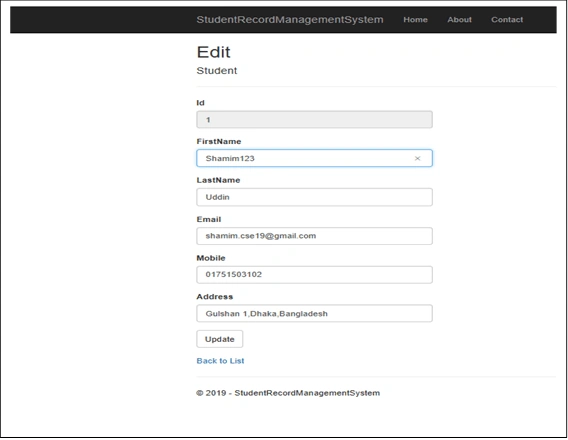
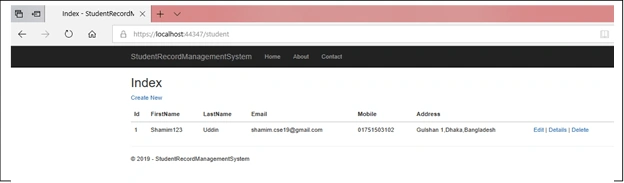
It is working fine. Now we will work with the Delete action.
Delete action
Now we will work with Delete Action within Student Controller. There are two Delete Actions, one is GET and another is POST. Now we will create a view for deleting action.
We have to call GetStudentData method from StudentDataAccessLayer class for getting student by Id.
- public ActionResult Delete(int id)
- {
- Student student = studentDataAccessLayer.GetStudentData(id);
- return View(student);
- }
Right click on Delete (GET) action then click add view; the below window will appear on screen.
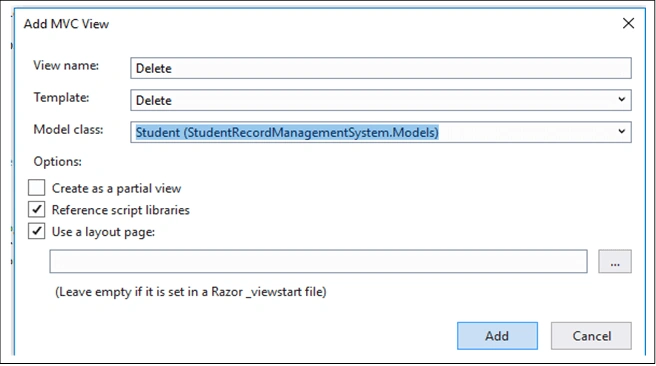
Click Add
- @model StudentRecordManagementSystem.Models.Student
- @{
- ViewData["Title"] = "Delete";
- }
- <h2>Delete</h2>
- <h3>Are you sure you want to delete this?</h3>
- <div>
- <h4>Student</h4>
- <hr />
- <dl class="dl-horizontal">
- <dt>
- @Html.DisplayNameFor(model => model.Id)
- </dt>
- <dd>
- @Html.DisplayFor(model => model.Id)
- </dd>
- <dt>
- @Html.DisplayNameFor(model => model.FirstName)
- </dt>
- <dd>
- @Html.DisplayFor(model => model.FirstName)
- </dd>
- <dt>
- @Html.DisplayNameFor(model => model.LastName)
- </dt>
- <dd>
- @Html.DisplayFor(model => model.LastName)
- </dd>
- <dt>
- @Html.DisplayNameFor(model => model.Email)
- </dt>
- <dd>
- @Html.DisplayFor(model => model.Email)
- </dd>
- <dt>
- @Html.DisplayNameFor(model => model.Mobile)
- </dt>
- <dd>
- @Html.DisplayFor(model => model.Mobile)
- </dd>
- <dt>
- @Html.DisplayNameFor(model => model.Address)
- </dt>
- <dd>
- @Html.DisplayFor(model => model.Address)
- </dd>
- </dl>
- <form asp-action="Delete">
- <input type="submit" value="Delete" class="btn btn-default" /> |
- <a asp-action="Index">Back to List</a>
- </form>
- </div>
Now we will work with Delete (POST)
- [HttpPost]
- [ValidateAntiForgeryToken]
- public ActionResult Delete(Student student)
- {
- try
- {
- // TODO: Add delete logic here
- studentDataAccessLayer.DeleteStudent(student.Id);
- return RedirectToAction(nameof(Index));
- }
- catch
- {
- return View();
- }
- }
Details Action
We have to call GetStudentData method from StudentDataAccessLayer class for getting student by Id in Index action
- public ActionResult Details(int id)
- {
- Student student = studentDataAccessLayer.GetStudentData(id);
- return View(student);
- }
Right click on Details action then click add view; the below window will appear on screen.
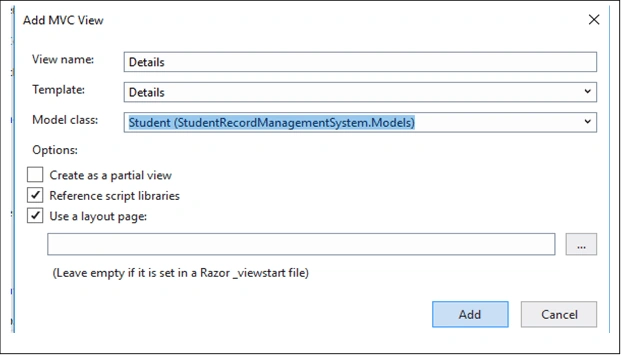
Click add
- @model StudentRecordManagementSystem.Models.Student
- @{
- ViewData["Title"] = "Details";
- }
- <h2>Details</h2>
- <div>
- <h4>Student</h4>
- <hr />
- <dl class="dl-horizontal">
- <dt>
- @Html.DisplayNameFor(model => model.Id)
- </dt>
- <dd>
- @Html.DisplayFor(model => model.Id)
- </dd>
- <dt>
- @Html.DisplayNameFor(model => model.FirstName)
- </dt>
- <dd>
- @Html.DisplayFor(model => model.FirstName)
- </dd>
- <dt>
- @Html.DisplayNameFor(model => model.LastName)
- </dt>
- <dd>
- @Html.DisplayFor(model => model.LastName)
- </dd>
- <dt>
- @Html.DisplayNameFor(model => model.Email)
- </dt>
- <dd>
- @Html.DisplayFor(model => model.Email)
- </dd>
- <dt>
- @Html.DisplayNameFor(model => model.Mobile)
- </dt>
- <dd>
- @Html.DisplayFor(model => model.Mobile)
- </dd>
- <dt>
- @Html.DisplayNameFor(model => model.Address)
- </dt>
- <dd>
- @Html.DisplayFor(model => model.Address)
- </dd>
- </dl>
- </div>
- <div>
- @Html.ActionLink("Edit", "Edit", new { id = Model.Id }) |
- <a asp-action="Index">Back to List</a>
- </div>
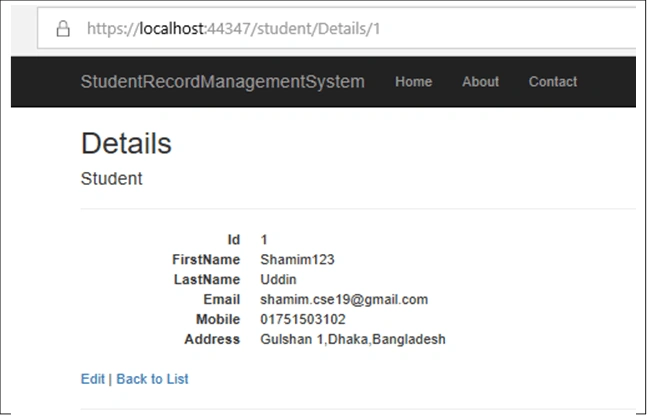
I hope this will be helpful.
Ravi KumarPosted Aug 19, 2020, 4:09 AM
StudentDataAccessLayer studentDataAccessLayer = null; public StudentController() { studentDataAccessLayer = new StudentDataAccessLayer(); }
Ravi KumarPosted Aug 19, 2020, 4:09 AM
Where we have to create StudentDataAccessLayer studentDataAccessLayer = null; public StudentController() { studentDataAccessLayer = new StudentDataAccessLayer(); }
IMAD AYOUBPosted Jun 27, 2020, 6:38 PM
Dear Mr. Shamim. Thank you one million times. It's working like a charm. It's the best reference for me on MVC with ADO on the web. Appreciate you great efforts.
Julio MartinezPosted Jul 24, 2019, 1:41 PM
Que tal Shamin Segui tu tutorial a como lo vas desarrollado en el articulo pero al ejecutar la accion de guardar me muestra este mensaje la variable de conecxion ''con.ServerVersion' threw an exception of type 'System.InvalidOperationException' y en el estado me aparece en Close
Sonia YadavPosted May 12, 2019, 11:39 PM
Hello, i am not getting proper url for edit and details path. when i click on details then path is http://localhost:49659/SignUp/Details