

HTTP is the messaging system between the client and the server-client that sends the request and the server responds with the proper message. Angular HTTP client is the toolkit that enables us to send and receive the data over the RESTful HTTP endpoints. In Angular 4.3, this Angular HTTP API was provided which in the extension to the existing API provides some new features and added to its own package of the @angular/common/HTTP.
Let’s divide this article into two sections - the first one being the Angular part and UI part while the second one is the Server-side code which will hold the API part of the project.
Client-side setup
To make the HTTP client module available in the application, we must make sure it is included and configured properly in the application. Let’s see step by step how we can do this.
Import the HTTP client module into the application module or root module. So, our root module is app.module.ts.
import { BrowserModule } from '@angular/platform-browser';
import { NgModule } from '@angular/core';
import { HttpClientModule } from '@angular/common/http';
import { FormsModule } from '@angular/forms';
import { AppComponent } from './app.component';

@NgModule({
  declarations: [
    AppComponent,
  ],
  imports: [
    BrowserModule,
    HttpClientModule,
    FormsModule
  ],
  providers: [],
  bootstrap: [AppComponent]
})
export class AppModule { }
Now, we have imported the HTTP Client into our application. We can use them in our component easily. For this demo, we are using the simple Employee as an entity and we are going to demo the Get, Post, Put and Delete Requests. For this demo purpose, let's add one component in our Angular application.
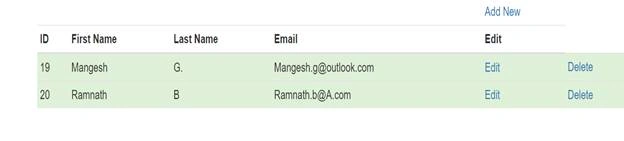
In my case, I have added the component Employee. The component looks like below.
<div class="container">
  <h3>Employee List</h3>
  <table class="table table-condensed">
    <thead>
      <tr>
        <td>    </td>
        <td>     </td>
        <td>     </td>
        <td>     </td>
        <td>  <a (click)="ShowRegForm(e)">Add New</a></td>
      </tr>
      <tr>
        <th>ID</th>
        <th>First Name</th>
        <th>Last Name</th>
        <th>Email</th>
        <th>Edit</th>
      </tr>
    </thead>
    <tbody>
      <tr class="success" *ngFor="let e of employeelist ">
        <td> {{e.id}}</td>
        <td>{{e.fname}}</td>
        <td>{{e.lname}}</td>
        <td>{{e.email}}</td>
        <td><a (click)="ShowRegForm(e)">Edit</a></td>
        <td><a (click)="ShowRegFormForDelete(e)">Delete</a></td>
      </tr>
    </tbody>
  </table>
</div>
<hr >

<form #regForm="ngForm">
  <div class="container" *ngIf="editCustomer">
    <h3>{{FormHeader}}</h3>
    <table class="table table-condensed">
      <tbody>
        <tr>
          <td>First Name</td>
          <td><input type="text" name="fname" [(ngModel)]='fname' ></td>
        </tr>
        <tr>
          <td>Last Name</td>
          <td><input type="text" name="lname" [(ngModel)]='lname'></td>
        </tr>
        <tr>
          <td> Email</td>
          <td><input type="text" name="email" [(ngModel)]='email'></td>
        </tr>
        <tr>
          <td><input type="hidden" name="id" [(ngModel)]='id'></td>
          <td><input type="button" value="Save" (click)="Save(regForm)"></td>
        </tr>
      </tbody>
    </table>
  </div>
</form>
Code Description
Here, we have an HTML page that has provision to display the List of the employees present in the database and then the Options to Add, Edit, List, and Delete.
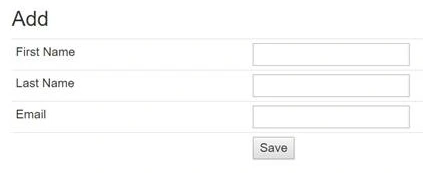
Here based on the Button input the Form Header will be set according to the operation such as delete, add, and edit.
The next step is the component itself and we have done the code for that.
Import Statements
import { Component, OnInit } from '@angular/core';
import { NgForm } from '@angular/forms';
import { FormsModule } from '@angular/forms';
import { Observable } from 'rxjs/Observable';
import 'rxjs/add/operator/do';
import 'rxjs/add/operator/filter';
import 'rxjs/add/operator/map';

import { EmployeeDataService } from '../DataServices/EmployeeDataService';
import { employee } from '../Models/Employee';
These are the basic imports that we can see here out of them, the others being the basic imports. We have some interesting imports like do, filter, and map -- these are the operators that are used to transform the result that we get from the service
Another section we have is the Data Service part and the Modal part we have EmployeeDataService which we have created to handle the Data related operations .
Constructor and inject the Data Service
Here we have used the Employee Data Service in our application it we have used the DI and injected it in the constructor like the below:
constructor(private dataservice: EmployeeDataService) // Available at imports
{
}
The next section is the code that we are using to call the data services as below:
ngOnInit() {
  this.dataservice.getEmployee().subscribe((tempdate) => {
    this.employeelist = tempdate;
  }), err => {
    console.log(err);
  }
}

ShowRegForm = function(employee) {
  this.editCustomer = true;
  if (employee != null) {
    this.SetValuesForEdit(employee)
  } else {
    this.ResetValues();
  }
}

ShowRegFormForDelete = function(employee) {
  this.editCustomer = true;
  if (employee != null) {
    this.SetValuesForDelete(employee)
  }
}

SetValuesForDelete = function(employee) {
  this.fname = employee.fname;
  this.lname = employee.lname;
  this.email = employee.email;
  this.id = employee.id;
  this.FormHeader = "Delete"
}

SetValuesForEdit = function(employee) {
  this.fname = employee.fname;
  this.lname = employee.lname;
  this.email = employee.email;
  this.id = employee.id;
  this.FormHeader = "Edit"
}

ResetValues() {
  this.fname = "";
  this.lname = "";
  this.email = "";
  this.id = "";
  this.FormHeader = "Add"
}

Save(regForm: NgForm) {
  this.GetDummyObject(regForm);

  switch (this.FormHeader) {
    case "Add":
      this.Addemployee(this.Dummyemployee);
      break;
    case "Edit":
      this.UpdateEmployee(this.Dummyemployee);
      break;
    case "Delete":
      this.DeleteEmployee(this.Dummyemployee);
      break;
    default:
      break;
  }
}

GetDummyObject(regForm: NgForm): employee {
  this.Dummyemployee = new employee;
  this.Dummyemployee.Email = regForm.value.email;
  this.Dummyemployee.Fname = regForm.value.fname;
  this.Dummyemployee.Lname = regForm.value.lname;
  this.Dummyemployee.ID = regForm.value.id;
  return this.Dummyemployee;
}

Addemployee(e: employee) {
  this.dataservice.AddEmployee(this.Dummyemployee).subscribe(res =>
    {
      this.employeelist.push(res);
      alert("Data added successfully !!")
      this.editCustomer = false;
    }),
    err => {
      console.log("Error Occured " + err);
    }
}

UpdateEmployee(e: employee) {
  this.dataservice.EditEmployee(this.Dummyemployee).subscribe(res =>
    {
      this.editCustomer = false;
      this.dataservice.getEmployee().subscribe(res => {
        this.employeelist = res;
      });
      alert("Employee data Updated successfully !!")
    });
}

DeleteEmployee(e: employee) {
  this.dataservice.DeleteEmployee(this.Dummyemployee).subscribe(res =>
    {
      this.editCustomer = false;
      this.dataservice.getEmployee().subscribe(res => {
        this.employeelist = res;
      });
      alert("employee Deleted successfully !! ")
    });
}
We can see that we have called the get employee method from the ngOnInit Event of the component instead of calling in the constructor we have specifically done this to avoid the delay in loading the component
Next, we have methods like Addemployee(), DeleteEmployee(), and UpdateEmployee() which are used for the calling the Data service methods from the application like Add Edit and Delete Employees
Other methods are the supplementary methods which are used to clear the inputs and set the object.
The next thing that we have used in our application is the Config.ts file Code for the same is as follows.
export const ROOT_URL: string = "http://localhost:39029/api/";
Here in this code, we have defined the Root_URL as the constant that holds the value of the API address. Next is the Model employee.ts which we use to map the Data that we are sending and receiving from the API code snippet for the same is
export interface Employee {
    ID: string;
    Fname: string;
    Lname: string;
    Email: string;
}
The main and most important part of the application is the Data service which we have used.
The code snippet for the same is as follows.
import { HttpClient, HttpParams, HttpHeaders } from '@angular/common/http';
import { Observable } from 'rxjs/Observable';
import 'rxjs/add/operator/map';
import 'rxjs/add/operator/catch';
import 'rxjs/add/operator/retry';
import 'rxjs/add/observable/of';
import 'rxjs/Rx';

import { employee } from '../Models/Employee';
import { ROOT_URL } from '../Models/Config';
import { Injectable } from '@angular/core';

@Injectable()
export class EmployeeDataService {

    employees: Observable<employee[]>;
    newemployee: Observable<employee>;

    constructor(private http: HttpClient) {

    }

    getEmployee() {
        return this.http.get<employee[]>(ROOT_URL + '/Employees');
    }

    AddEmployee(emp: employee) {

        const headers = new HttpHeaders().set('content-type', 'application/json');
        var body = {
            Fname: emp.Fname, Lname: emp.Lname, Email: emp.Email
        };

        return this.http.post<employee>(ROOT_URL + '/Employees', body, { headers });

    }


    EditEmployee(emp: employee) {
        const params = new HttpParams().set('ID', emp.ID);
        const headers = new HttpHeaders().set('content-type', 'application/json');
        var body = {
            Fname: emp.Fname, Lname: emp.Lname, Email: emp.Email, ID: emp.ID
        };
        return this.http.put<employee>(ROOT_URL + '/Employees/' + emp.ID, body, { headers, params });

    }


    DeleteEmployee(emp: employee) {
        const params = new HttpParams().set('ID', emp.ID);
        const headers = new HttpHeaders().set('content-type', 'application/json');
        var body = {
            Fname: emp.Fname, Lname: emp.Lname, Email: emp.Email, ID: emp.ID
        };
        return this.http.delete<employee>(ROOT_URL + '/Employees/' + emp.ID);

    }
}
Michael BugaevskiPosted Aug 10, 2018, 8:54 AM
The code downloaded - does not match the tutorial. This make this tutorial useless. Sorry...
Geshem WanasinghePosted Jul 13, 2018, 8:11 AM
Well written article.