

Introduction
Xamarin is a development platform that allows us to code native, cross-platform iOS, Android, and Windows Phone apps in C#.
UI Designers
The tools we use to create mobile user interfaces are called designers. These generate Extensible Markup Language (XML) files in their respective proprietary file formats. Two designers are available from Xamarin - "Xamarin Designer for Android" and "Xamarin Designer for iOS". With the availability of these designers, the need for the original, native XML editors has diminished. Anything you might need to build Android or iOS UIs can be found in Xamarin’s tools. However, iOS developers still frequently use the Xcode Interface Builder, and Android developers (less frequently) use XML editors, such as the Android Development Tools (ADT) plug-in for Eclipse. An XML layout is a layout provided by XML , and the tool is largely a matter of taste and personal preference, even the decision to use a designer tool at all.
Requirements
- Visual Studio RC 2017
- Xamarin Studio Packages should be installed
- Self confidence with creativity
Steps should be followed
Please follow my steps to create Dialog Fragment and use this tutorial effectively.
Step 1
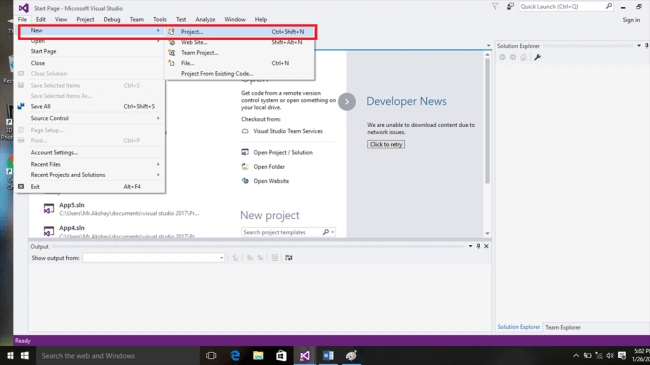
Launch the Visual Studio RC 2017 and go to File >> New >> Project.
Step 2
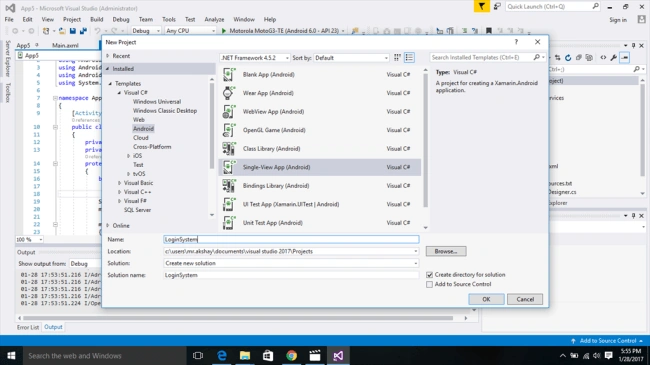
Then, we need to select the Android template from the list, name the application, create the Project, and select where to save the project.
Step 3
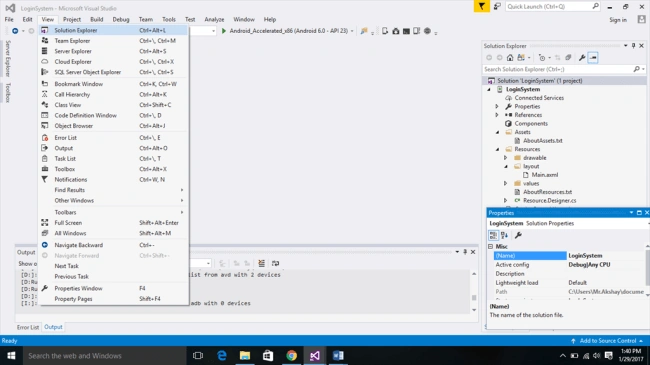
Here we go. Our new project has been created successfully. Now, we need to navigate to Designer Page. To open the designer page, you need to open Solution Explorer View >> Solution Explorer.
Step 4
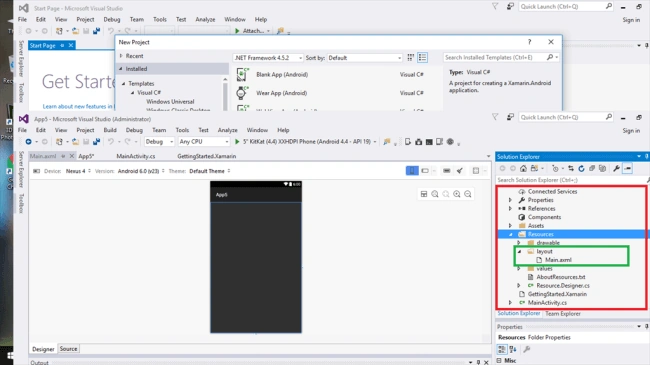
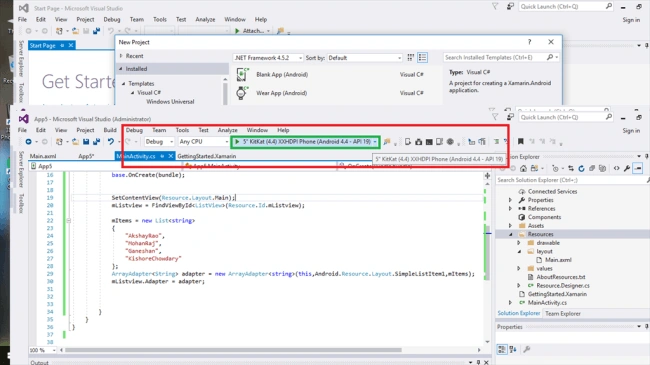
Then, to open "Designer" page, we need to select the following,
Step 5
Add the following code in Main.Xaml source page. This is our designer page and here, our Login System UI design will be displayed. We need to add the Message Icon in left side of our button. So, download any message icon.png from the internet and add that to drawable folder in Solution Explorer.
- <?xml version="1.0" encoding="utf-8"?>
- <LinearLayout xmlns:android="http://schemas.android.com/apk/res/android"
- android:orientation="vertical"
- android:layout_width="match_parent"
- android:layout_height="match_parent"
- android:background="@android:color/background_light">
- <TextView
- android:text="Create An Account"
- android:textAppearance="?android:attr/textAppearanceLarge"
- android:layout_width="match_parent"
- android:layout_height="0dp"
- android:id="@+id/textView1"
- android:layout_weight="1"
- android:background="@android:color/darker_gray"
- android:textStyle="bold"
- android:textSize="25sp"
- android:gravity="center" />
- <Button
- android:text="Sign IN"
- android:layout_width="match_parent"
- android:layout_height="0dp"
- android:id="@+id/button1"
- android:layout_weight="1"
- android:textSize="25sp"
- android:background="@android:color/holo_blue_light" />
- <TextView
- android:text="OR"
- android:textAppearance="?android:attr/textAppearanceLarge"
- android:layout_width="match_parent"
- android:layout_height="0dp"
- android:id="@+id/textView2"
- android:layout_weight="1"
- android:background="@android:color/darker_gray"
- android:textSize="25sp"
- android:textColor="@android:color/background_light"
- android:gravity="center" />
- <Button
- android:text="Sign Up"
- android:layout_width="match_parent"
- android:layout_height="0dp"
- android:id="@+id/sinup"
- android:layout_weight="1"
- android:textSize="30sp"
- android:background="@drawable/buttonsignupstyle"
- android:drawableLeft="@drawable/images" />
- <ProgressBar
- android:layout_width="match_parent"
- android:layout_height="wrap_content"
- android:id="@+id/progressBar1"
- android:layout_weight="1" />
- </LinearLayout>
Add the following code in MainActivity.cs. This is the main activity which plays the most important role and makes your app work correctly by customizing the buttons with background activity.
- using System;
- using Android.App;
- using Android.Content;
- using Android.Runtime;
- using Android.Views;
- using Android.Widget;
- using Android.OS;
- namespace LoginSystem
- {
- [Activity(Label = "LoginSystem", MainLauncher = true, Icon = "@drawable/icon")]
- public class MainActivity : Activity
- {
- private Button mButtnSignup;
- protected override void OnCreate(Bundle bundle)
- {
- base.OnCreate(bundle);
- // Set our view from the "main" layout resource
- SetContentView(Resource.Layout.Main);
- mButtnSignup = FindViewById<Button>(Resource.Id.sinup);
- mButtnSignup.Click += (object sender, EventArgs args) =>
- {
- FragmentTransaction transcation = FragmentManager.BeginTransaction();
- Dialogclass signup = new Dialogclass();
- signup.Show(transcation, "Dialog Fragment");
- };
- }
- }
- }
Step 7
Then, we need to add the drawable objects in the "drawable" folder and create Buttonsignupstyle.xml and edittextstyle.xml files to add the following code. This gives style to our button and makes the text color.
- <selector xmlns:android="http://schemas.android.com/apk/res/android">
- <item android:state_pressed="false">
- <layer-list>
- <item android:right="5dp" android:top="5dp">
- <shape>
- <corners android:radius="2dp"/>
- <solid android:color="#D6D6D6"/>
- </shape>
- </item>
- <item android:bottom="2dp" android:left="2dp">
- <shape>
- <gradient android:angle="270" android:endColor="#F57847" android:startColor="#F57847"/>
- <stroke android:width="1dp" android:color="#BABABA"/>
- <corners android:radius="4dp"/>
- <padding android:bottom="10dp" android:left="10dp" android:right="10dp" android:top="10dp"/>
- </shape>
- </item>
- </layer-list>
- </item>
- <item android:state_pressed="true">
- <layer-list>
- <item android:right="5dp" android:top="5dp">
- <shape>
- <corners android:radius="2dp"/>
- <solid android:color="#D6D6D6"/>
- </shape>
- </item>
- <item android:bottom="2dp" android:left="2dp">
- <shape>
- <gradient android:angle="270" android:endColor="#E67E55" android:startColor="#F57847"/>
- <stroke android:width="1dp" android:color="#BABABA"/>
- <corners android:radius="4dp"/>
- <padding android:bottom="10dp" android:left="10dp" android:right="10dp" android:top="10dp"/>
- </shape>
- </item>
- </layer-list>
- </item>
- </selector>
- <?xml version="1.0" encoding="utf-8"?>
- <selector xmlns:android="http://schemas.android.com/apk/res/android">
- <item android:state_focused="true">
- <shape android:shape="rectangle">
- <gradient
- android:startColor="#FFF"
- android:endColor="#FFF">
- </gradient>
- <stroke
- android:width="3dp"
- android:color="#4A6EA9">
- </stroke>
- <corners
- android:radius="2dp">
- </corners>
- <padding
- android:left="10dp">
- </padding>
- </shape>
- </item>
- <item>
- <shape>
- <gradient
- android:startColor="#FFF"
- android:endColor="#FFF">
- </gradient>
- <corners
- android:radius="2dp">
- </corners>
- <padding
- android:left="10dp"
- android:top="6dp"
- android:right="10dp"
- android:bottom="6dp">
- </padding>
- </shape>
- </item>
- </selector>
Then, we need to create the Dialog.cs file to our project. Here, it must be defined as class and add the following code in it.
- using System;
- using System.Collections.Generic;
- using System.Linq;
- using System.Text;
- using Android.App;
- using Android.Content;
- using Android.OS;
- using Android.Runtime;
- using Android.Views;
- using Android.Widget;
- namespace LoginSystem
- {
- class Dialogclass: DialogFragment
- {
- public override View OnCreateView(LayoutInflater inflater, ViewGroup container, Bundle savedInstanceState)
- {
- base.OnCreateView(inflater, container, savedInstanceState);
- var view = inflater.Inflate(Resource.Layout.dialog_sign_up, container, false);
- return view;
- }
- }
- }
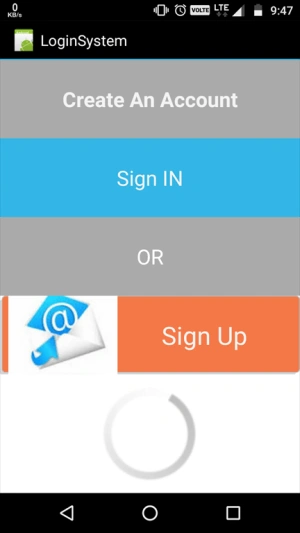
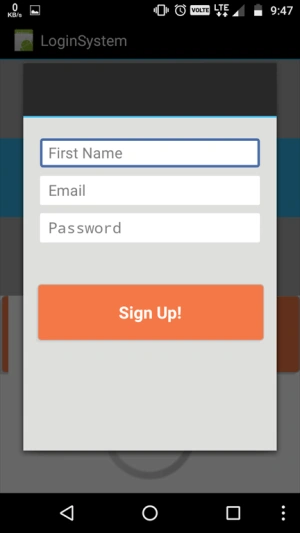
Then, run the app using Visual Studio Android Emulator and here we go.
Conclusion
If you have any doubts or queries, please comment below. In the next tutorial, I will show you how to create Sliding Tab Interface.
Thank you for reading!!!!!!!
ArifPosted Aug 5, 2019, 5:51 AM
Where is dialog_sign_up.axml file man???
Chong johnsonPosted Apr 23, 2018, 4:04 AM
Nice article, i have follow the step but i didn't get the second screen. Can you help. Thanks a lot.
Abdur RafayPosted Feb 26, 2018, 6:47 PM
Good work Akshay! Thanks for sharing it with us.
Carlo CaballeroPosted Feb 10, 2018, 12:06 AM
Hi, thank you very much for the great article. is it possible to add a possitive button and a negative button for the dialog?.. if it's possible, can you kindly tell me the way to do it. thank you very much.
Bogdan SSPosted Jan 10, 2018, 3:33 AM
Thx.How to set the title of DialogFragment?
R BarzegarPosted Jan 6, 2018, 3:11 AM
Nice article ,but i think forgoted presents dialog_sign_up.axml.
ali benchardaPosted Jun 8, 2017, 7:18 AM
How i can call fragment dialog inside class fragment
David NultyPosted Apr 2, 2017, 2:51 PM
Nice post.How would I pass data back to the main activity. For example Password, eMail. How would I close the DialogFragment when I press the 'SignUp!' button ?? David
Akshayrao VPosted Feb 6, 2017, 10:53 AM
Yeah you are right do u have any doubts regarding to that
Kajan TharmalingamPosted Feb 1, 2017, 6:11 AM
I think you have put Resource.Layout.dialog_sign_up layer
Vishal PrajapatiPosted Jan 31, 2017, 10:59 PM
Nice article.Keep up the good work..
Joe WilsonPosted Jan 31, 2017, 12:36 PM
Thank you very much for sharing.