

Introduction
In this article, we will learn to implement the Inventory Approval and Sign system using Power Automate. In this scenario, we will insert the inventory items SharePoint list and attach a quotation of the inventory as an attachment. An inventory request will be sent to the inventory manager to sign the inventory request document with an attached quotation. Once the inventory manager will sign the document request document it will change the status of the Inventory request item in the SharePoint list. Here we will implement the whole process using Power automate flow.
Note
Here we will use some premium connector to merge the pdfs, sign the inventory request document which needs Adobe premium accounts.
Create Inventory List in SharePoint Site
We need to create an Appropriate list with appropriate columns.
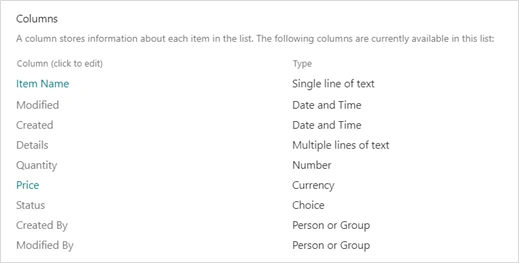
Create Power Automate which triggers on Create of InventoryDemo list item
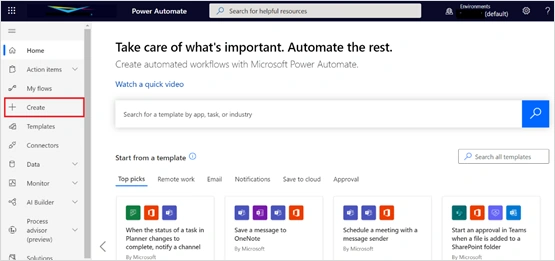
To create a flow, we can visit https://flow.microsoft.com/ and click on Create from left navigation.
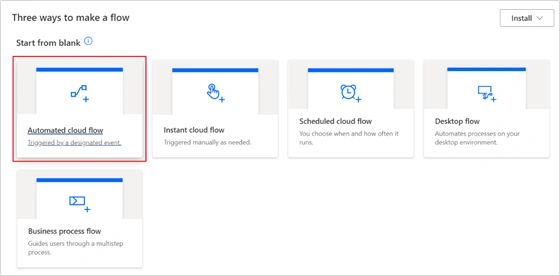
Select the Automated Cloud Flow template.
We will see the dialog box where we need to enter the name of flow and select the When an item is created action and click on Create button.
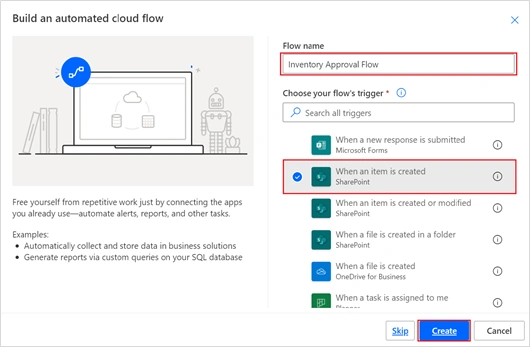
The flow will be created with the trigger we have selected where we can select the SharePoint site and our InventoryDemo list to set the trigger.
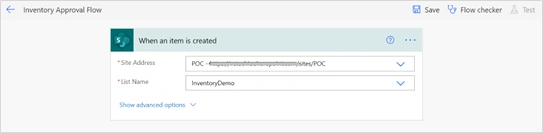
Add Actions to the Flow
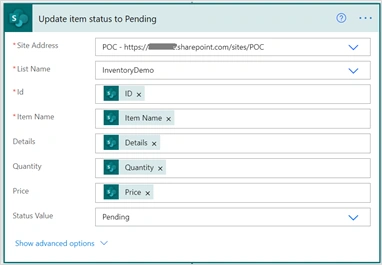
Add logic actions that will perform when we create items in the InventoryDemo list. Actions will include generate HTML using inserted item data, fetch attachments, converting it into pdf format, and merge it into one pdf then sending it to the Manager for Sign. The signed document should store in the Approved Inventory library. This logic also includes changing the status of the item to pending, Approved, and Declined according to the progress of the document. Every Action is given below with details.
Update Item Status to Pending.
Initialize the string variable and place the Html design with current item values.
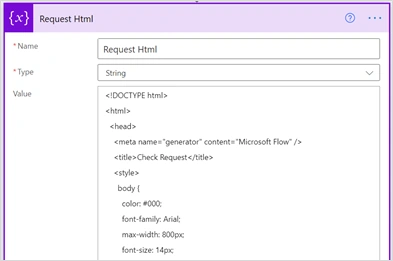
Html code to paste in Request Html variable is given below.,
- <!DOCTYPE html>
- <html>
- <head>
- <meta name="generator" content="Microsoft Flow" />
- <title>Check Request</title>
- <style>
- body {
- color: #000;
- font-family: Arial;
- max-width: 800px;
- font-size: 14px;
- padding: 20px;
- }
- table {
- width: 100%;
- }
- table td {
- vertical-align: top;
- text-align: left;
- width: 50%;
- }
- h1 {
- font-size: 24px;
- font-weight: 600;
- color: #000;
- text-align: center;
- }
- #top {
- padding-bottom: 30px;
- }
- #top .topTable td {
- vertical-align: middle;
- }
- #top .field {
- font-weight: 600;
- font-size: x-large;
- background-color: rgba(250, 70, 22, .3);
- padding: 10px;
- width: 50%;
- }
- #top .value {
- background-color: rgb(255 242 204);
- padding: 3px 10px;
- overflow-wrap: anywhere;
- width: 50%;
- }
- #middle .valueTable td {
- vertical-align: middle;
- }
- .section {
- padding: 16px 0 10px;
- margin-bottom: 20px;
- border-top: 1px dotted #999;
- }
- h2 {
- font-size: 16px;
- font-weight: 600;
- color: #000;
- }
- #middle .value {
- background-color: rgb(255, 242, 204);
- padding: 3px 10px;
- display: inline-block;
- word-break: break-word;
- width: 420px;
- min-height: 12px;
- }
- #totalAmount {
- font-weight: bold;
- font-size: 1.2em;
- overflow-wrap: anywhere;
- }
- #bottom {
- clear: both;
- border-top: 1px dotted #999;
- }
- .valueTable {
- page-break-after: always;
- }
- .topTable tr {
- height: 60px
- }
- </style>
- </head>
- <body>
- <div id="top">
- <h1>Inventory Details</h1>
- <table class="topTable">
- <tr>
- <td class="field">Item Name</td>
- <td class="value">@{triggerOutputs()?['body/Title']}</td>
- </tr>
- <tr>
- <td class="field">Details</td>
- <td class="value">@{triggerOutputs()?['body/Details']}</td>
- </tr>
- <tr>
- <td class="field">Quantity</td>
- <td class="value">@{triggerOutputs()?['body/Quantity']}</td>
- </tr>
- <tr>
- <td class="field">Price</td>
- <td class="value">@{triggerOutputs()?['body/Price']}</td>
- </tr>
- <tr>
- <td class="field">Requested By</td>
- <td class="value">@{triggerOutputs()?['body/Author/DisplayName']}</td>
- </tr>
- <tr>
- <td class="field">Requested Date</td>
- <td class="value">@{formatDateTime(triggerOutputs()?['body/Created'],'yyyy-dd-MM')}</td>
- </tr>
- </table>
- </div>
- </body>
- </html>
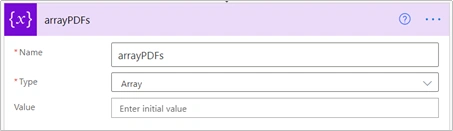
Initialize the array variable with name arrayPDFs where we will bind HTML we generated previously and content of attachments.
Create a temporary HTML file in OneDrive using the HTML content we have generated previously.
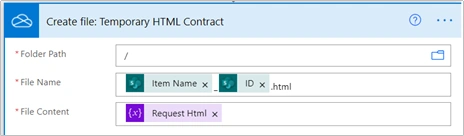
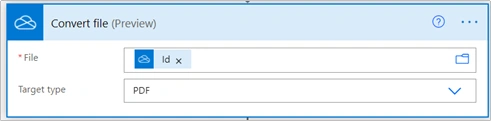
Convert created HTML to pdf content.
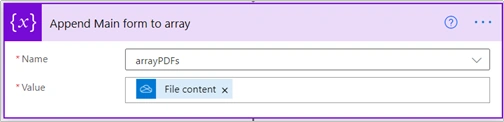
Append generated pdf content to arrayPDFs array.
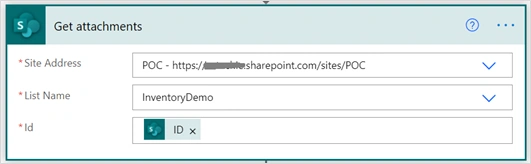
Fetch attachments of the current item.
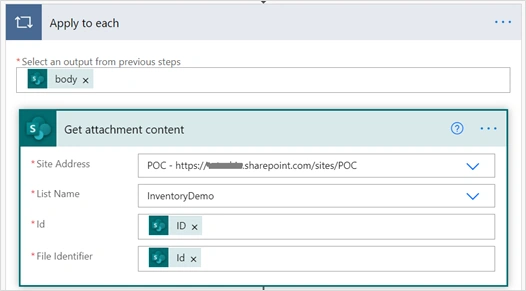
Get content of all the attachments one by one using Apply to Each loop.
We need to apply the condition to check if the attachment is pdf or another doc format. For that, we need to check the content type of the attachment content.
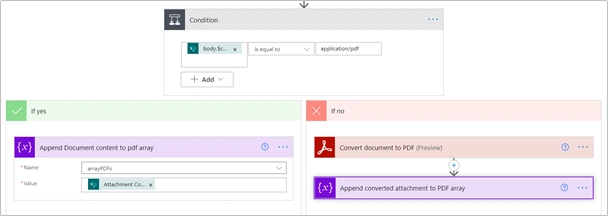
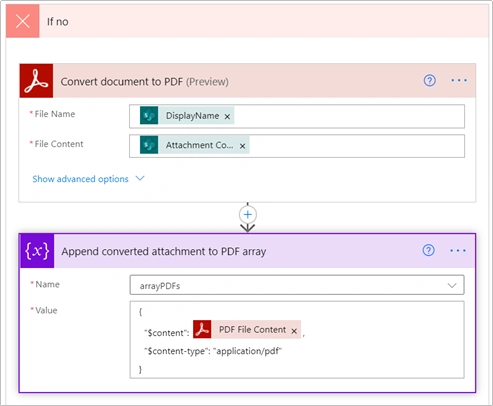
If @body('Get_attachment_content')['body']['$content-type'] value is equals to application/pdf then we can directly append the attachment into arrayPDFs variable else we need to convert the content into pdf and then we can append converted pdf content into arrayPDFs variable.
Merge all the pdf content from the arrayPDFs variable to one single file.
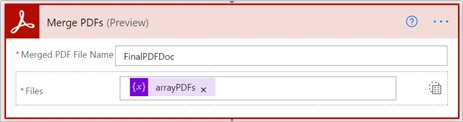
Merge PDFs action is part of the premium Adobe connector. To use this connector, we need a premium Adobe account and sign in to it. For that, we need to generate the Connection from https://www.adobe.com/go/powerautomate_getstarted and provide the below information to sign in to power automate.
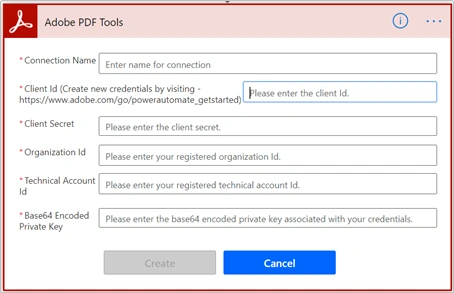
Now, we can delete the temporary HTML that we have created previously in OneDrive. We can pass the id of created file here to delete it. We can get that id as the output of creating file action.

We need to upload the merged pdf to Adobe sign, and it will generate a document ID in response. For that, we need to pass the PDF file name and PDF file Content from the merge PDFs response. Adobe sign connector is a premium connector that required a premium Adobe Sign account. So we need to sign in to Adobe sign account before we use it.
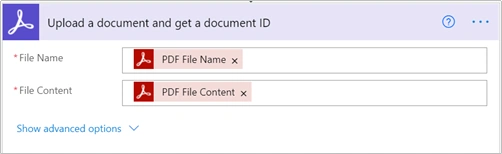
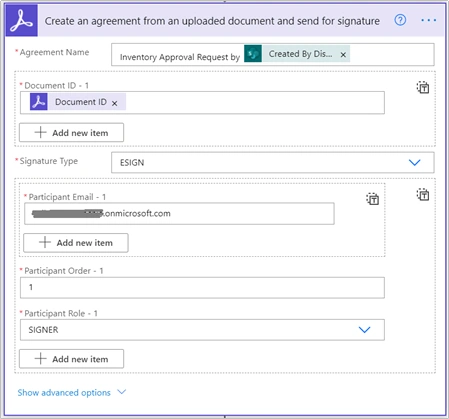
We need to create an Adobe sign agreement using Document ID which we get from the uploaded pdf document and send it to Approver. Here we are using a static Approver Email address to make the scenario simple and understandable, but we also can use a dynamic email address from the SharePoint library field, and also, we can use multiple approvers here. Approver will be notified using email and he/she can open the document and sign the merged PDF(it contains information of requested inventory and attached quotations in the same pdf).
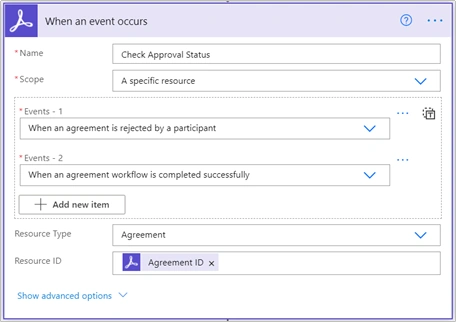
Below we have used Trigger action of Adobe Sign connector which will wait until Approver sign/decline the document. For that, we need to pass the Agreement ID of the agreement that we have created in the previous action. Also, we need to select two events for completion and rejection of the agreement.
We need to use conditions here. We need to check if Agreement Status is SIGNED. If it is not signed, then we can update the Request Status to Declined.
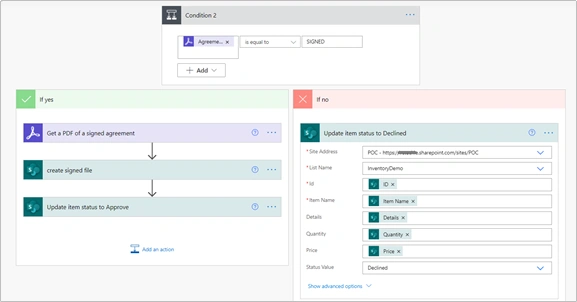
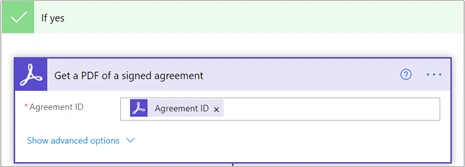
But if the condition becomes true then we need to fetch the signed documents in pdf format using Agreement ID.
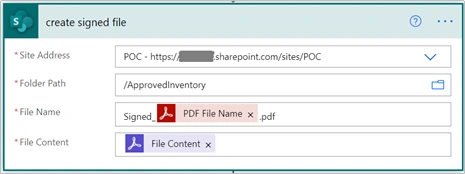
Now we will store a signed pdf file in the SharePoint library called ApprovedInventory.
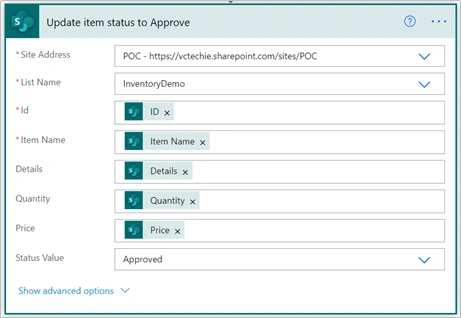
Finally, Update Status to Approved.
Create Inventory Request for Approval along with Quotation as Attachment
We need to go to the InventoryDemo list and create one inventory request item with all inventory details and upload the quotation of inventory as an attachment so the manager can review the quotation and approve or reject the inventory request.
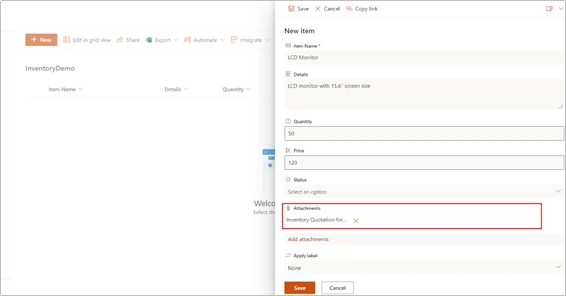
Flow Execution
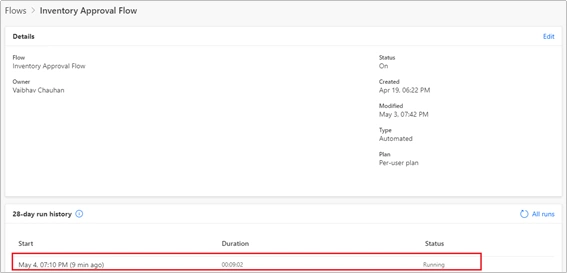
Once the inventory request item will be submitted to the list the Inventory Flow will trigger and change the status to Pending.

We can also see the running workflow in the workflow history.
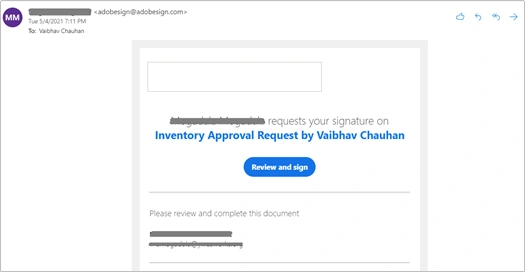
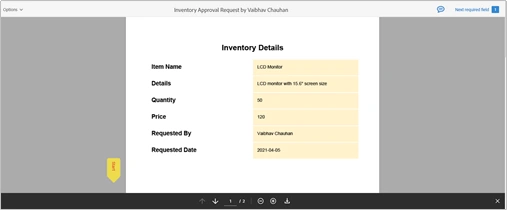
Inventory Request Details and quotation will be merged into one pdf and will be sent to the Inventory Manager to sign. The inventory manager can open the pdf using the Review and Sign button.
The inventory Manager can apply the signature below the document.
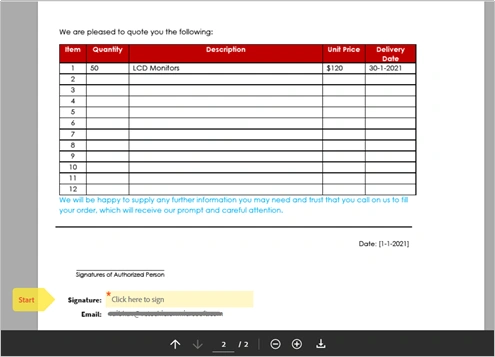
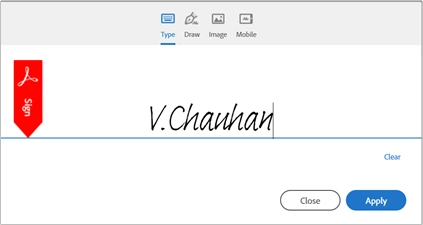
Once Approver clicks on the signature field, the dialog for signature will open where Approver has different options to sign like Draw, Type, etc.
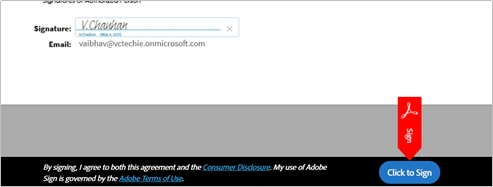
After applying the signature Approver needs to select the button Click to Sign.
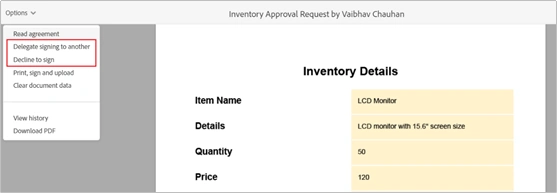
Approver also has the option to decline the Inventory or delegate to another approver from the Options dropdown. After Decline, the sign the Inventory request status will be set to Decline.
If the Inventory manager approves the Inventory Request the Signed file will be stored in the Approved Inventory library and the request status of inventory will be set to Approve.
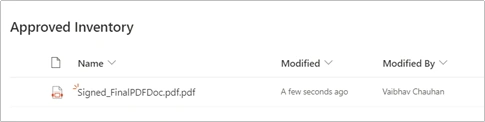
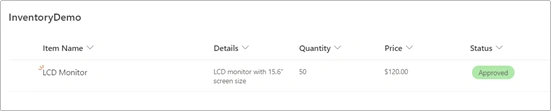
Also, we can see the flow is completed successfully.
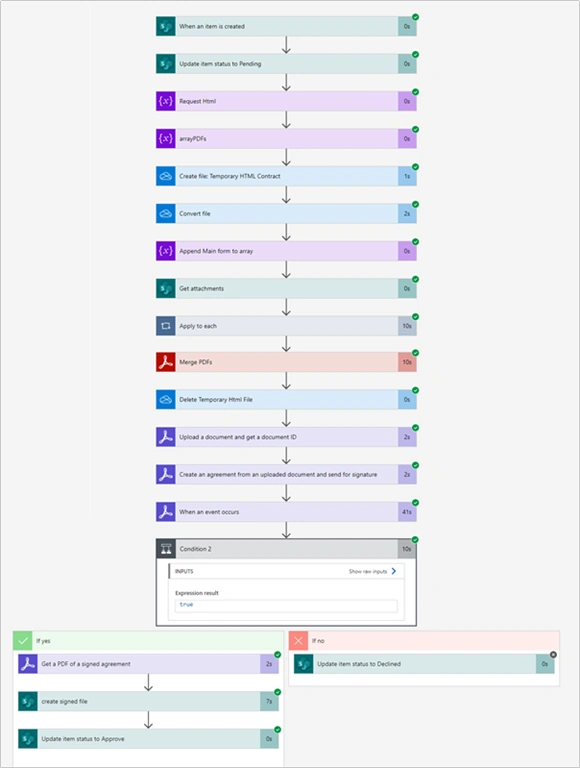
Summary
After reading this article we have a good understanding of implementing functionalities like Converting Html to PDF, merging more than one PDFs to a single PDF file using Adobe Connector, and how Adobe Sign can be implemented in this scenario using Power Automate. This article also gives an understanding of how the Inventory Approval System can be implanted using SharePoint lists/libraries and Power Automate.
Tejal KalalPosted May 8, 2021, 5:38 AM
Good stuff
Vinay AyinapurapuPosted May 7, 2021, 5:34 PM
Very cool. is the adobe pdf is premium action? which comes with paid licenses correct?