

Introduction
In this article, we will learn how to create and use Clearable EditText without using any third-party library. It is very easy to implement and useful control for our application development.
Steps
I have split this part into 3 steps as in the following.
- Step 1 - Creating a New Project with Empty Activity.
- Step 2 - Setting up the Library.
- Step 3 - Implementation of Custom Control in Android.
Step 1 - Creating a New Project with Android Studio
- Open Android Studio and select Create a new project.
- Name the project as per your wish and select your activity template.
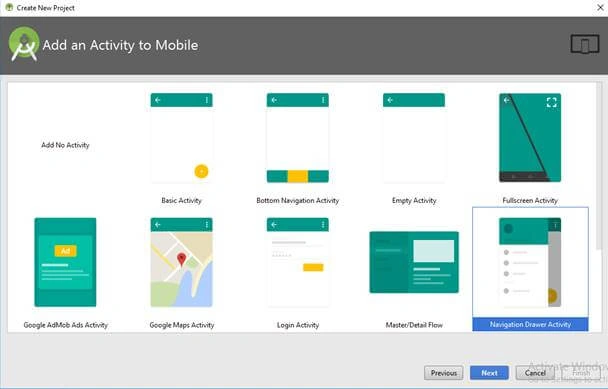
- Click the “Finish” button to create a new project in Android Studio.
Step 2 - Setting up the Firebase Library
In this part, we will see how to set up the library for the project.
- Open your app level build.gradle file and add the following lines in dependencies to apply the required libraries to your project.
- dependencies {
- ...
- implementation 'com.android.support:appcompat-v7:26.1.0'
- implementation 'com.android.support.constraint:constraint-layout:1.1.2'
- implementation 'com.android.support:support-annotations:27.1.1'
- implementation 'com.android.support:design:26.1.0'
- }
- Then click “Sync Now” to setup your project.
Step 3 - Implementation of Clearable EditText
Create a class named as ClearableEditText extend with android.support.v7.widget.AppCompatEditText as Parent. Then open the class file and add the following lines of code.
- public class ClearableEditText extends android.support.v7.widget.AppCompatEditText {
- private Drawable drawableTemp;
- private Drawable drawableRight;
- int actionX, actionY;
- private DrawableClickListener clickListener;
- public ClearableEditText(Context context) {
- super(context);
- }
- public ClearableEditText(Context context, AttributeSet attrs) {
- super(context, attrs);
- }
- public ClearableEditText(Context context, AttributeSet attrs, int defStyleAttr) {
- super(context, attrs, defStyleAttr);
- }
- protected void onDraw(Canvas canvas) {
- super.onDraw(canvas);
- }
- @Override
- protected void onSizeChanged(int w, int h, int oldw, int oldh) {
- super.onSizeChanged(w, h, oldw, oldh);
- }
- @Override
- public void setCompoundDrawables(Drawable left, Drawable top,
- Drawable right, Drawable bottom) {
- if (right != null) {
- drawableRight = right;
- }
- super.setCompoundDrawables(left, top, right, bottom);
- }
- @Override
- protected void onTextChanged(CharSequence text, int start, int lengthBefore, int lengthAfter) {
- if (text.toString().length() > 0) {
- drawableRight = drawableTemp;
- setCompoundDrawables(null, null, drawableRight, null);
- } else {
- drawableTemp = drawableRight;
- setCompoundDrawables(null, null, null, null);
- }
- super.onTextChanged(text, start, lengthBefore, lengthAfter);
- }
- @SuppressLint("ClickableViewAccessibility")
- @Override
- public boolean onTouchEvent(MotionEvent event) {
- Rect bounds;
- if (event.getAction() == MotionEvent.ACTION_DOWN) {
- actionX = (int) event.getX();
- actionY = (int) event.getY();
- if (drawableRight != null) {
- bounds = drawableRight.getBounds();
- int x, y;
- int extraTapArea = 13;
- /*
- IF USER CLICKS JUST OUT SIDE THE RECTANGLE OF THE DRAWABLE
- THAN ADD X AND SUBTRACT THE Y WITH SOME VALUE SO THAT AFTER
- CALCULATING X AND Y CO-ORDINATE LIES INTO THE DRAWBABLE
- BOUND. - this process help to increase the tappable area of
- the rectangle.
- */
- x = actionX + extraTapArea;
- y = actionY - extraTapArea;
- /*
- Since this is right drawable subtract the value of x from the width
- of view. so that width - tapped_area will result in x co-ordinate in drawable bound.
- */
- x = getWidth() - x;
- /*x can be negative if user taps at x co-ordinate just near the width.
- e.g views width = 300 and user taps 290. Then as per previous calculation
- 290 + 13 = 303. So subtract X from getWidth() will result in negative value.
- So to avoid this add the value previously added when x goes negative.
- */
- if (x <= 0) {
- x += extraTapArea;
- }
- /*
- If result after calculating for extra tap-able area is negative.
- assign the original value so that after subtracting
- extra tapping area value doesn't go into negative value.
- */
- if (y <= 0)
- y = actionY;
- /*
- If drawable bounds contains the x and y points then move ahead.
- */
- if (bounds.contains(x, y) && clickListener != null) {
- clickListener.onClick();
- event.setAction(MotionEvent.ACTION_CANCEL);
- return false;
- }
- return super.onTouchEvent(event);
- }
- }
- return super.onTouchEvent(event);
- }
- @Override
- protected void finalize() throws Throwable {
- drawableRight = null;
- super.finalize();
- }
- public void setDrawableClickListener(DrawableClickListener listener) {
- this.clickListener = listener;
- }
- public interface DrawableClickListener {
- void onClick();
- }
Here, I have created DrawableClickListener interface.
Open your activity_main.xml file and add the following lines.
- <?xml version="1.0" encoding="utf-8"?>
- <android.support.constraint.ConstraintLayout xmlns:android="http://schemas.android.com/apk/res/android"
- xmlns:app="http://schemas.android.com/apk/res-auto"
- xmlns:tools="http://schemas.android.com/tools"
- android:layout_width="match_parent"
- android:layout_height="match_parent"
- android:layout_margin="10dp"
- tools:context="com.androidmads.materialedittext.MainActivity">
- <android.support.design.widget.TextInputLayout
- android:id="@+id/text_input_layout"
- android:layout_width="match_parent"
- android:layout_height="wrap_content"
- app:errorEnabled="true"
- app:layout_constraintBottom_toBottomOf="parent"
- app:layout_constraintLeft_toLeftOf="parent"
- app:layout_constraintRight_toRightOf="parent"
- app:layout_constraintTop_toTopOf="parent">
- <com.androidmads.materialedittext.ClearableEditText
- android:id="@+id/edit_text"
- android:layout_width="match_parent"
- android:layout_height="wrap_content"
- android:drawableEnd="@drawable/ic_close"
- android:drawableRight="@drawable/ic_close"
- android:hint="Enter your name" />
- </android.support.design.widget.TextInputLayout>
- <Button
- android:id="@+id/button"
- android:layout_width="match_parent"
- android:layout_height="wrap_content"
- android:layout_marginTop="68dp"
- android:text="Click Here..."
- app:layout_constraintEnd_toEndOf="parent"
- app:layout_constraintStart_toStartOf="parent"
- app:layout_constraintTop_toTopOf="@+id/text_input_layout" />
- </android.support.constraint.ConstraintLayout>
The Layout Preview looks like the below screenshot,
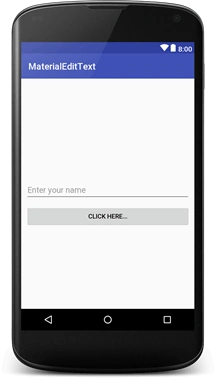
This control will show the cancel “icon” when the control has typed text and “icon” will hide when the control has no text.
Then open your MainActivity.java file and initialize your control like the following.
- final TextInputLayout textInputLayout = findViewById(R.id.text_input_layout);
- final ClearableEditText editText = findViewById(R.id.edit_text);
- final Button button = findViewById(R.id.button);
The cancel icon will appear when the user types the data. Add the following Drawable click listener as in the following.
- editText.setDrawableClickListener(new ClearableEditText.DrawableClickListener() {
- @Override
- public void onClick() {
- editText.setText(null);
- }
- });
Download Code
You can download the full source code of the article in GitHub. If you like this article, do star the repo in GitHub.
Join the conversation! Your thoughts help the community grow.