

Introduction
This article demonstrates how to create a circular fill loader to an android application using the Android studio. This is an Android project allowing us to realize a beautiful circular fillable loader to be used for splash screen.
Let's start
Step 1
Open, Android studio creates a new project in Android studio. When it prompts you to select the default activity, select Empty Activity and proceed.
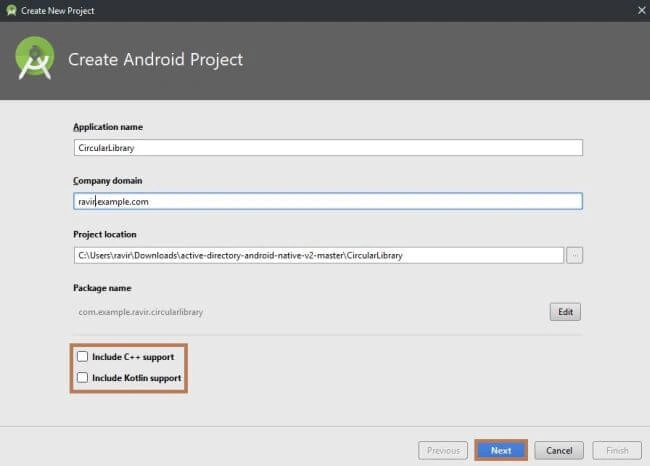
Step 2
Next, go to Gradle Scripts >> build. gradle (Module: app),
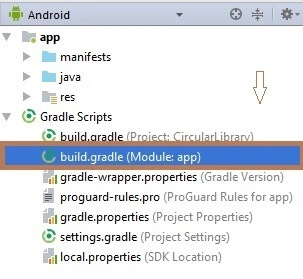
Select build.gradle (Module: app). The app Gradle compile code and build types will appear. Just replace that the following code. To make a circular fillable loader add Circular Fillable Loader in your layout XML and add Circular Fillable Loader library in your project or you can also grab it via Gradle.
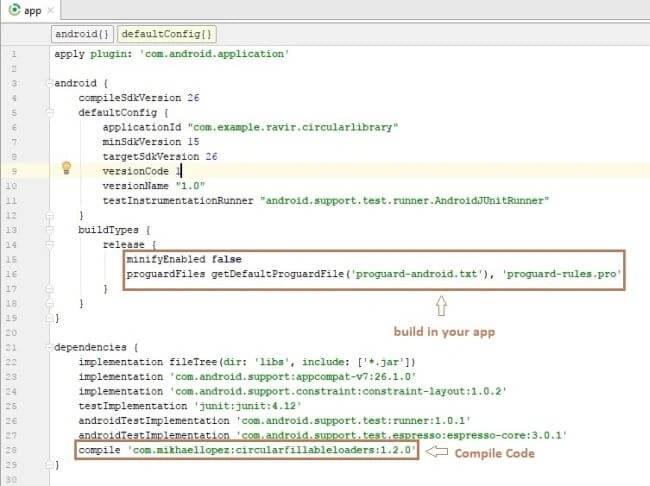
Compile Code
- compile 'com.mikhaellopez:circularfillableloaders:1.2.0'
Next, go to app >> res >> layout >> activity_main.xml. Select activity_main.xml page. The xml code will appear, Just the following code.
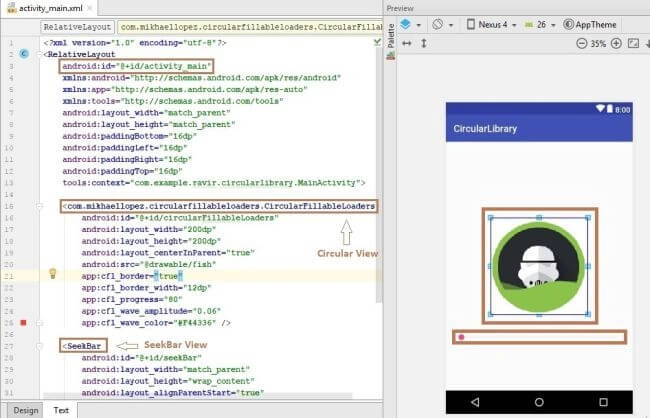
Circular Fillable Loader
com.mikhaellopez.circularfillableloaders.CircularFillableLoaders this code applied to Circular Loader shape will appear.
SeekBar Controller
CircularImageView Properties
- app:cfl_border="true" --> default true
- app:cfl_border_width="12dp" --> default 4dp
- app:cfl_progress="80" --> default 0
- app:cfl_wave_amplitude="0.06" --> default 0.05f(between 0.00f and 0.10f)
- app:cfl_wave_color="#F44336" --> default Back color
XML Code
- <?xml version="1.0" encoding="utf-8"?>
- <RelativeLayout
- android:id="@+id/activity_main"
- xmlns:android="http://schemas.android.com/apk/res/android"
- xmlns:app="http://schemas.android.com/apk/res-auto"
- xmlns:tools="http://schemas.android.com/tools"
- android:layout_width="match_parent"
- android:layout_height="match_parent"
- android:paddingBottom="16dp"
- android:paddingLeft="16dp"
- android:paddingRight="16dp"
- android:paddingTop="16dp"
- tools:context="com.example.ravir.circularlibrary.MainActivity">
- <com.mikhaellopez.circularfillableloaders.CircularFillableLoaders
- android:id="@+id/circularFillableLoaders"
- android:layout_width="200dp"
- android:layout_height="200dp"
- android:layout_centerInParent="true"
- android:src="@drawable/alien" // import ur image png format
- app:cfl_border="true"
- app:cfl_border_width="12dp"
- app:cfl_progress="80"
- app:cfl_wave_amplitude="0.06"
- app:cfl_wave_color="#F44336" />
- <SeekBar
- android:id="@+id/seekBar"
- android:layout_width="match_parent"
- android:layout_height="wrap_content"
- android:layout_alignParentStart="true"
- android:layout_below="@+id/circularFillableLoaders"
- android:layout_marginTop="37dp"
- android:layout_alignParentLeft="true" />
- </RelativeLayout>
Next, go to app >> java >> your domain !! >> MainActivity.
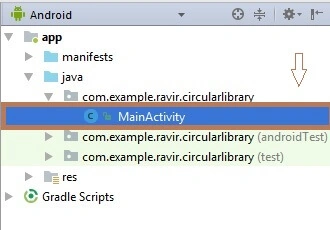
Select the MainActivity page. The Java code will appear, Just replace the following code
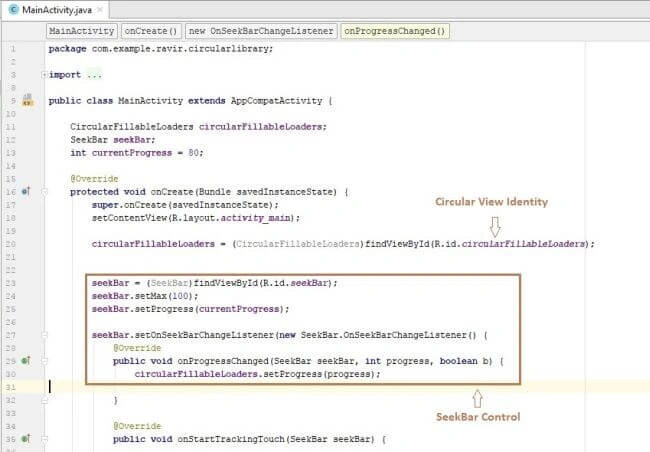
Java Code
- package com.example.ravir.circularlibrary;
- import android.support.v7.app.AppCompatActivity;
- import android.os.Bundle;
- import android.widget.SeekBar;
- import com.mikhaellopez.circularfillableloaders.CircularFillableLoaders;
- public class MainActivity extends AppCompatActivity {
- CircularFillableLoaders circularFillableLoaders;
- SeekBar seekBar;
- int currentProgress = 80;
- @Override
- protected void onCreate(Bundle savedInstanceState) {
- super.onCreate(savedInstanceState);
- setContentView(R.layout.activity_main);
- circularFillableLoaders = (CircularFillableLoaders)findViewById(R.id.circularFillableLoaders);
- seekBar = (SeekBar)findViewById(R.id.seekBar);
- seekBar.setMax(100);
- seekBar.setProgress(currentProgress);
- seekBar.setOnSeekBarChangeListener(new SeekBar.OnSeekBarChangeListener() {
- @Override
- public void onProgressChanged(SeekBar seekBar, int progress, boolean b) {
- circularFillableLoaders.setProgress(progress);
- }
- @Override
- public void onStartTrackingTouch(SeekBar seekBar) {
- }
- @Override
- public void onStopTrackingTouch(SeekBar seekBar) {
- }
- });
- }
- }
This listener method will be invoked if any change is made in the SeekBar.
public void onStartTrackingTouch(SeekBar seekBar){..}
This listener method will be invoked at the start of the user's touch event. Whenever a user touches the thumb for dragging this method will automatically be called.
public void onStopTrackingTouch(SeekBar seekBar){..}
This listener method will be invoked at the end of the user's touch event. Whenever a user stops dragging the thumb this method will automatically call.
Step 5
Next, go to Android Studio and Deploy the application, Select Emulator or your Android mobile with USB debugging enabled. Give it a few sec to make installations and set permission.
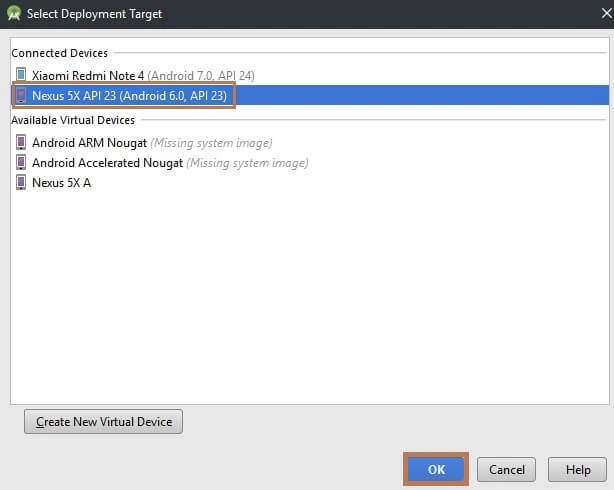
Step 6
Run the application in your desired emulator (Shift + F10)

Summary
Finally, we have successfully created Circular Fillable Loader View. Later we will discuss more Android Applications.
Rachit AgarwalPosted Jan 4, 2018, 1:46 AM
I need similar in iOS. Pls help
Gaurav KumarPosted Dec 15, 2017, 6:03 AM
Nice article Thanks for sharing ..