

In this article, we will see how to provision Azure VM with PowerShell and how to implement PowerShell Desired State Configuration to have our VM running always in the desired state.
If you have not installed Azure PowerShell, you can download and configure it from here. Once we have downloaded and installed Azure PowerShell, let us begin step-by-step.
Step 1 - Open PowerShell ISE and sign-in to Azure Portal
command: Login-AzureRmAccount
Description: It will open the sign-in page of your Azure Portal.
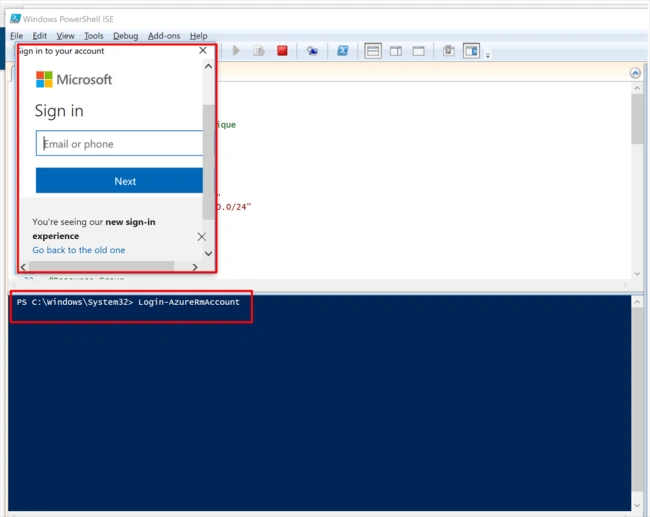
Once you are signed-in successfully, PowerShell will display your Environment, Associated Account, TenantId, SubscriptioNId and SubscriptionName etc.. as shown below.

These variables will pass the values when we create our VM. The first variable $rgname holds the Resource Group name and the second variable holds the location.
$rgname= “vmwithpowershell”
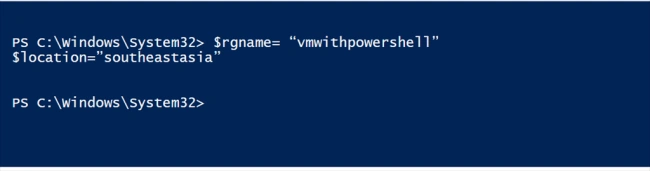
Step 3 - Create variables to hold storage-related information
Here, storageName will hold the storage account name which must be unique while storageType defines the storage type which is Locally Redundant Storage and storage type is Standard.
$storageName = "powershellstorageforvm" m

Step 4
Define network variables such as Network Interface Card name, Subnet and VNet as well as VNetaddress and Subnetaddress.
nicname = "psvmnic"
$subnet1Name = "pssubnet1"
$vnetName = "psvmnet"
$vnetAddressPrefix = "10.0.0.0/16"
$vnetSubnetAddressPrefix = "10.0.0.0/24"

Step 5
Define compute configuration such as VM Name, Computer Name, Size and OS Disk.
$vmName = "psvmkrunal"
$computerName = "pskrunalcomputer"
$vmSize = "Standard_A1"
$osDiskName = $vmName + "osDisk" 
Command : New-AzureRmResourceGroup.

You can see as a result Resource Group named vmwithpowershell has been created at southeast-Asia location.
Step 7: Configure Storage Account
Command : New-AzureRmStorageAccount

Step 8 Configure Network
Network configuration is composed of 4 subsections.
- Configuring Public IP
- Defining Subnet Configuration,
- Define Virtual Network
- Define Network Interface
Command: New-AzureRmPublicIpAddress

Now, we will define the Subnet Configuration.
Command : New-AzureRmVirtualNetworkSubnetConfig

Now, we have to define a Virtual Network.
Syntax: $vnet = New-AzureRmVirtualNetwork -Name $vnetName -ResourceGroupName $rgname -Location $location -AddressPrefix $vnetAddressPrefix -Subnet $subnetconfig
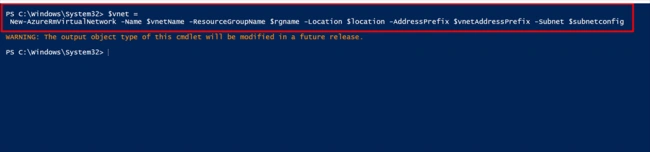
In this final step now, we will define the Network Interface.
Command : New-AzureRmNetworkInterface
Syntax : $nic = New-AzureRmNetworkInterface -Name $nicname -ResourceGroupName $rgname -Location $location -SubnetId $vnet.Subnets[0].Id -PublicIpAddressId $pubip.Id
Step 9 Configuring Virtual Machine.
Command: Get-Credential
Description: Open credential dialogs and retrieve the credentials from the user.

Now, we will provision VM Name and VM Size.
Command : New-AzureRmVMConfig
Syntax: $vm = New-AzureRmVMConfig -VMName $vmName -VMSize $vmSize
Now, we will configure windows OS along with credentials and upgradation options.
Command: Set-AzureRmVMOperatingSystem
Syntax : $vm = Set-AzureRmVMOperatingSystem -VM $vm -Windows -ComputerName $computerName -Credential $cred -ProvisionVMAgent -EnableAutoUpdate
Now, we have to define VM OS Image settings such as publisher, OS Version and SKUs.
Command : Set-AzureRmVMSourceImage
Syntax : $vm = Set-AzureRmVMSourceImage -VM $vm -PublisherName "MicrosoftWindowsServer" -Offer "WindowsServer" -Skus "2012-R2-Datacenter" -VersionAnd finally we will provide Network Interface Card info such as nic id to the vm variable.
Command : Add-AzureRmVMNetworkInterface
Syntax : $vm = Add-AzureRmVMNetworkInterface -VM $vm -Id $nic.Id

Step 10
Now we will define blob path to store our VM and then we will append that blob path with our storage account’s endpoint.
Syntax : $blobPath = "vhds/OsDisk1.vhd"
$osDiskUri = $storageacc.PrimaryEndpoints.Blob.ToString() + $blobPath

Step 11 - Create OS disk name for our Azure VM.
Command : Set-AzureRmVMOSDisk
Syntax : $vm = Set-AzureRmVMOSDisk -VM $vm -Name "myOsDisk" -VhdUri $osDiskUri -CreateOption fromImage

Step 12 - Now, in this final step we will provide our Azure Virtual Machine
Command: New-AzureRmVM
Syntax: New-AzureRmVM -ResourceGroupName $rgname -Location $location -VM $vm

Once the VM is created successfully you will get isSuccessStatusCode as shown in the above diagram.
Step 13 - Retrieve the details of Azure VM.
Command : Get-AzureRmVM
Syntax : Get-AzureRmVM -ResourceGroupName $rgname

Step 14
Go to Portal - Resource Groups - vmwithpowershell (your newly created resource group), you can see all resources are provisioned.

So you can see we have successfully created Azure VM with PowerShell and now we will work with Desired State Configuration with PowerShell. To have a better understanding of PowerShell DSC, you can read my article here.
Azure PowerShell DSC
- Now, connect to the VM using RDP.
- You can see the VM doesn’t have IIS Role Installed as well as VM doesn’t include ASP.NET 4.5 Role installed.
- What I need is every time if some planned or unplanned changes happen and if my VM reboot it must have these two roles available. So instead of configuring it manually, I am going to work with Desired State Configuration.
- We will add some PS Scripts based on Azure DSC which will make sure your VM must have these two roles configured every time it restarts.
- I also want to upload a web application to the wwwroot folder of my application.

So let us begin.
Step 15 - Go to your VM and click on Extensions and Click Add

Step 16
Select PowerShell DSC and click on Create.

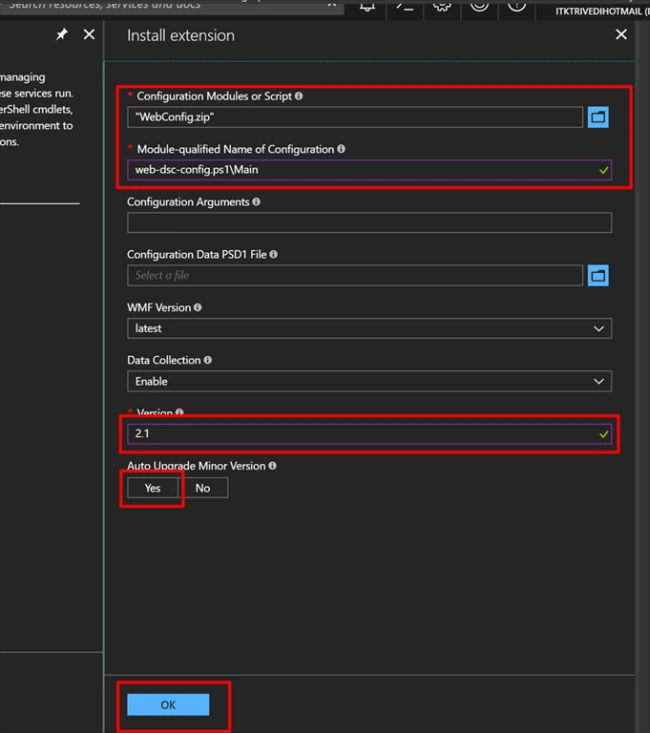
Step 17 - Provisioning PowerShell DSC Script
- Now here in the Configuration section, we are going to upload our zip file.That zip file contains our PowerShell DSC script as well as one ASP.NET MVC based web application called CloudShop.
- In the next step, in the Module-Qualified Name of Configuration, we will provide our PS DSC script file name followed by module name Main.
- As of now we don’t have any Configuration arguments as well as any configuration data file. Windows Management Framework (WMF) would be latest and upgrade to minor version is set to Yes. So if I modify my PS DSC file it would be automatically updated to next version.
Step 18
It will take some time and you can see it shows Provision Successful.

Step 19
Now if you run you reboot your VM you can see IIS Role is enabled.

Also if you go inside inetpubàwwwroot folder our CloudShop application is copied.

Abhishek ChakrabortyPosted May 4, 2018, 5:40 AM
Very helpful, nice article.