

Here are the steps to automate the building of UWP project using Jenkins. Jenkins is an open source tool:
Step 1: Go to your Jenkins Portal and click on New Item on the left.
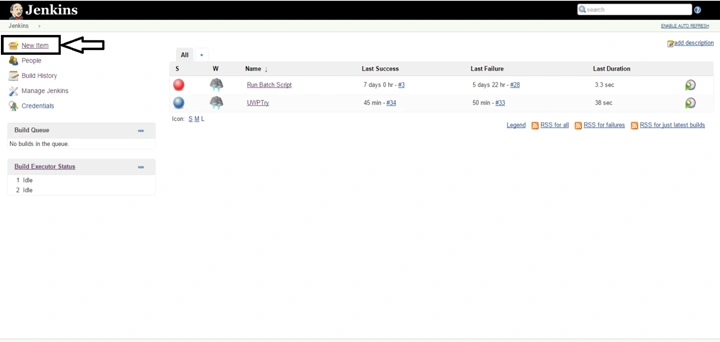
Step 2: Select Freestyle Project and give a Item Name and then click on OK.

Step 3:
This is the place where you do the configuration stuff e.g. Source Code Management, etc.
Give a Description if you want.

Step 4:
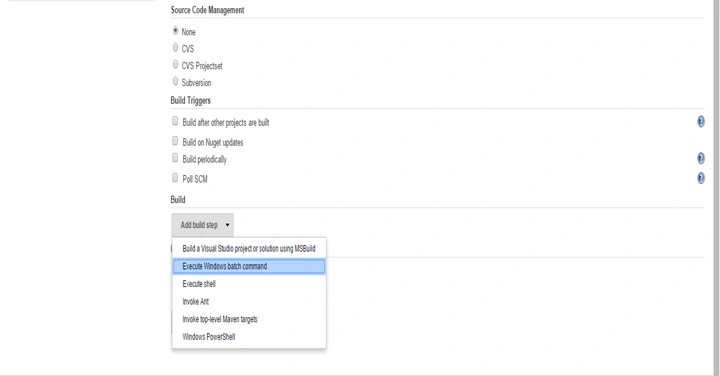
This is where the fun begins. Scroll down to Build and click on Add Build Step -> Execute Windows Batch Command.
Step 5:
This step is basically for restoring Nuget packages before the project is actually built. Enter the following in the Command box:
NuGet.exe restore "Path_To_Solution" -ConfigFile "path_To_Nuget_ConfigFile" –NoCache
In my case it looks like:

Step 6:
Again click on Add Build Step and click on Windows PowerShell [Please Note: For this you should have PowerShell plugin for Jenkins Installed].

Step 7:
This step is basically for the building of the UWP Project. Add the following code to the Windows PowerShell Command box:
#############################################################################
# Path to Msbuild tool
# $msbuild = "[Path to MsBuild.exe. See below for reference]"
$msbuild = "C:\Program Files (x86)\MSBuild\14.0\bin\MSBuild.exe"
set-alias msbuild $msbuild
# solution settings
# $sln_name = "[Path to Solution File. See below for reference]"
$sln_name = "C:\Users\Saurabh\Documents\Visual Studio 2015\Projects\uwptry\uwptry.sln"
$vs_config = "Release"
$vs_platfom = "ARM"
# call the build method
Write-Host "Building solution`n" -foregroundcolor Green
msbuild $sln_name /t:Build /p:Configuration=$vs_config /p:Platform=$vs_platfom /v:q /nologo
#############################################################################
This is how it looks:

Step 8: Click on Save.

Step 9: Now click on Build Now on the left side.

Step 10: The build process starts. The build is in progress.

Step 11:
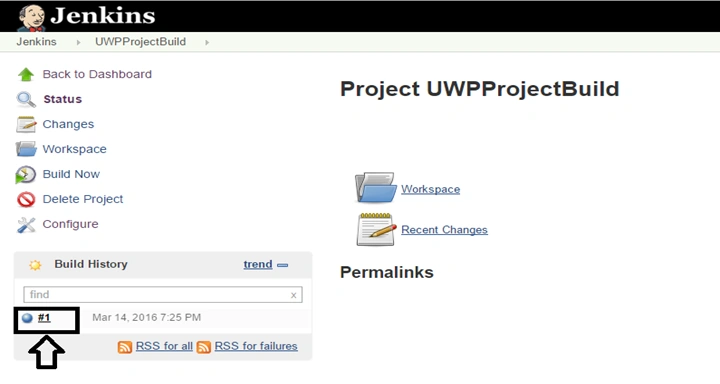
If it’s a Sunny day out and you have always done good deeds, the build is successful just like in my case. If the ball is red in color, build failed.
Step 12:
Click on the Build number (#1 in my case). Now click on Console output to see the build process.

Step 13: As we can see from the Console output the build was successful. We can also infer other important information from the Console output.

Step 2: Select Freestyle Project and give a Item Name and then click on OK.
Step 3:
This is the place where you do the configuration stuff e.g. Source Code Management, etc.
Give a Description if you want.
Step 4:
This is where the fun begins. Scroll down to Build and click on Add Build Step -> Execute Windows Batch Command.
Step 5:
This step is basically for restoring Nuget packages before the project is actually built. Enter the following in the Command box:
NuGet.exe restore "Path_To_Solution" -ConfigFile "path_To_Nuget_ConfigFile" –NoCache
In my case it looks like:
Step 6:
Again click on Add Build Step and click on Windows PowerShell [Please Note: For this you should have PowerShell plugin for Jenkins Installed].
Step 7:
This step is basically for the building of the UWP Project. Add the following code to the Windows PowerShell Command box:
#############################################################################
# Path to Msbuild tool
# $msbuild = "[Path to MsBuild.exe. See below for reference]"
$msbuild = "C:\Program Files (x86)\MSBuild\14.0\bin\MSBuild.exe"
set-alias msbuild $msbuild
# solution settings
# $sln_name = "[Path to Solution File. See below for reference]"
$sln_name = "C:\Users\Saurabh\Documents\Visual Studio 2015\Projects\uwptry\uwptry.sln"
$vs_config = "Release"
$vs_platfom = "ARM"
# call the build method
Write-Host "Building solution`n" -foregroundcolor Green
msbuild $sln_name /t:Build /p:Configuration=$vs_config /p:Platform=$vs_platfom /v:q /nologo
#############################################################################
This is how it looks:
Step 8: Click on Save.
Step 9: Now click on Build Now on the left side.
Step 10: The build process starts. The build is in progress.
Step 11:
If it’s a Sunny day out and you have always done good deeds, the build is successful just like in my case. If the ball is red in color, build failed.
Step 12:
Click on the Build number (#1 in my case). Now click on Console output to see the build process.
Step 13: As we can see from the Console output the build was successful. We can also infer other important information from the Console output.
Read more articles on UWP:
Nandajit NathPosted Jun 25, 2018, 9:19 PM
Can you share some information on how to generate the build from repository and upload the package to a app store from Jenkins.
arun rawatPosted Mar 28, 2018, 2:54 AM
I got success message but unable to find build (.appx) at my Job folder C:\Program Files (x86)\Jenkins\jobs. Help me to find it. if support .appx (uwp application) and also i want to read parameter in application which I put during build time.
Kishor Bikram OliPosted Oct 17, 2016, 2:49 AM
I couldn't find this path in my PC. "C:\Users\ITH-143\.nuget\nuget\nuget.exe" .. Any idea? I have only "C:\Users\ITH-143\.nuget\packages"
Asfend YarPosted Mar 31, 2016, 3:01 AM
nice
Saurabh RaiPosted Mar 30, 2016, 11:25 AM
Thanks all for your appreciation. :)
Debasis SahaPosted Mar 30, 2016, 9:05 AM
Good One..
Mohammed IbrahimPosted Mar 30, 2016, 6:26 AM
nice
Vignesh ManiPosted Mar 30, 2016, 5:41 AM
nice
Rajitha AlluriPosted Mar 30, 2016, 3:18 AM
Nice one..
Kashif SohailPosted Mar 30, 2016, 3:16 AM
nice tip