

Introduction
Migrating to the M365 cloud is an ongoing task, and most organizations are moving forward with an online approach for the following benefits.
- No need to maintain physical infrastructure
- No need to configure and update the security and cumulative updates
- Take advantage of pay per use/subscription model
- And for other obvious reasons 😊
There are some organizations that want to stick with on-prem for obvious reasons such as GDPR, local security, governance, etc.
This article focuses on migrating to SharePoint online using the Sharegate Desktop tool. Sharegate is an industry-standard licensed tool to migrate to the M365 cloud from an on-premises environment.
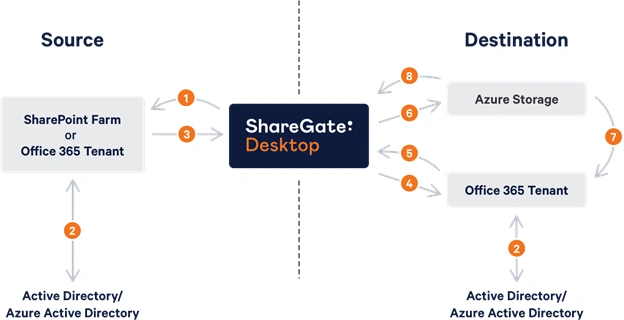
Sharegate Desktop gives rich and intuitive UI for migrating to the M365 cloud. It also has a built-in PowerShell module, aka Sharegate Desktop Shell (PowerShell with Sharegate Desktop libraries loaded), which helps automate the migration jobs using PowerShell.
Advantages
There are a few advantages, such as
- The source and destination sites can be loaded from CSV. Following is the screen capture of the template.

- If you are trying to migrate more than one site collection, you can automate the migration using the Sharegate PowerShell module.
- No need to navigate to Sharegate UI screens for multiple times.
Points to Note
- Microsoft recommends performing the migration to the M365 cloud during business hours and on weekends.
- There is no option to set the migration speed and mode in Sharegate PowerShell. However, the settings from the UI will be applied to Sharegate PowerShell scripts too.
- Throttling is normal when performing migrations to the cloud. Though the Sharegate tool intelligently handles the throttling, below are the recommendations from the Sharegate SME team
Have the migration performance settings from the Sharegate tool to ‘Normal’ mode.
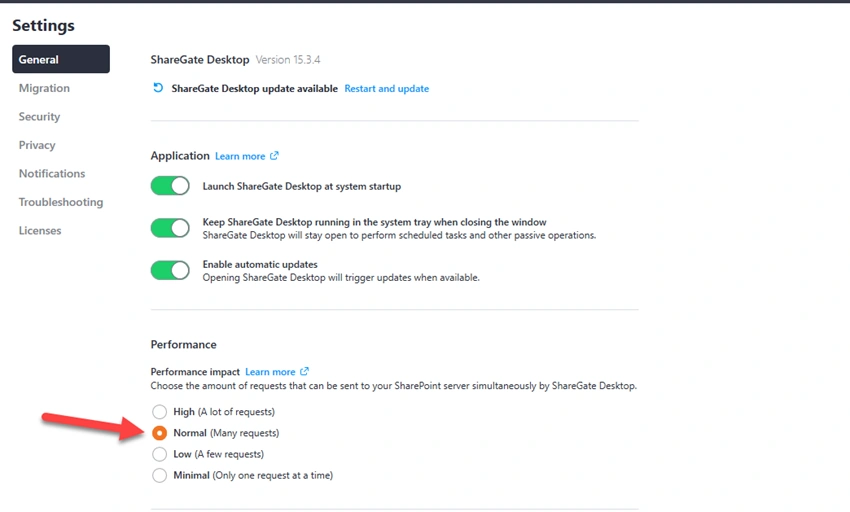
You may need to switch between ‘Normal’ and ‘Low’ modes if you are getting throttled frequently and try using ‘Low’ mode. Even though it takes time, the success rate is much better.
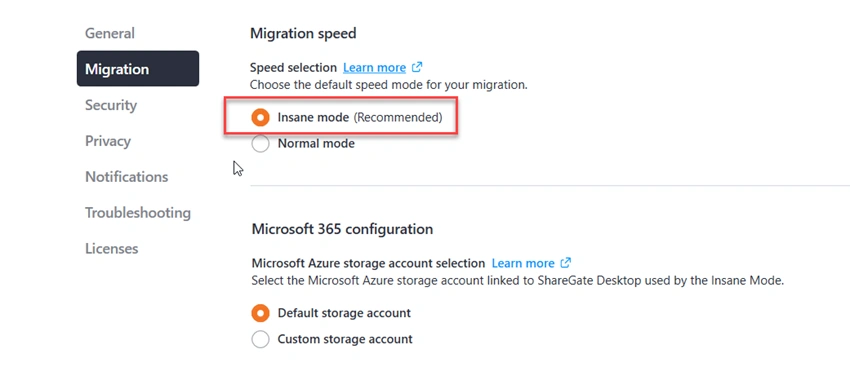
In the migration tab, set the migration speed to ‘Insane Mode’.
- Microsoft encourages a flat structure of sites in SharePoint online. For that reason, it recently deprecated the subsite creation in the newly created tenants. MSFT recommends using hub site features to connect the various sites under particular category.
- The detailed logging is available in Sharegate UI. You can observe the migration status from the tool UI once the PowerShell script starts executing.
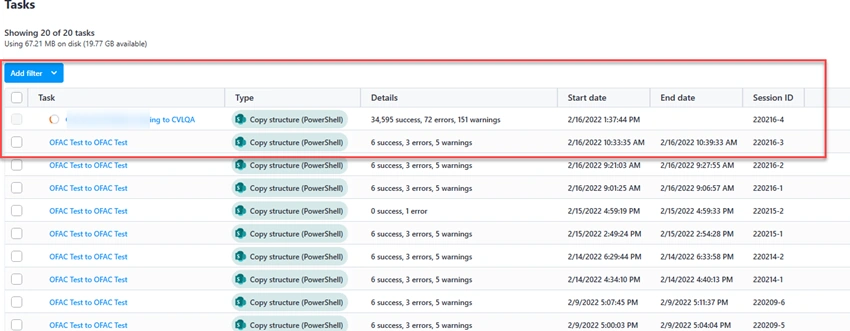
More information about migration speeds and observations can be found in the references section.
Steps
Below are the steps at a glance
- At first, the source and destination sites are imported from the CSV file
- The script checks the destination file, if it is already created and active
- If a destination file exists, it performs the incremental migration
- Once the migration is completed, it logs the message in the console as well as in the log file.
PowerShell Script
As a pre-requisite, the Sharegate Desktop needs to be purchased and installed on the Windows server or client machine with valid production keys. The Trial key may not support the larger migrations.
Step 1. Load the CSV files from the local folder.
$SiteInfo=Import-Csv-Path"C:\M365Migration\ToBeMigrated.csv"
Step 2. Update the copy settings to Incremental mode. I selected incremental mode since it can be reused for doing incremental migration. For the incremental, it checks if the content exists in the destination; if not it copies the content from the source.
$copySettings=New-CopySettings-OnContentItemExistsIncrementalUpdate
Step 3. For each record, check if the destination site is active; if so then perform the migration.
foreach($recordin$SiteInfo) {
    $SiteCheck = CheckUrl($record.DestinationSite)
    if ($SiteCheck - contains "Success") {
        $srcSite = Connect - Site - Url$record.SourceSite
        $dstSite = Connect - Site - Url$record.DestinationSite
        $MigrationResult = Copy - Site - Site$srcSite - DestinationSite$dstSite - Merge - NoCustomizedListForms - CopySettings$copySettings - ErrorActionStop
    }
}
Please note that ‘CheckUrl’ is the custom function that is integrated in this Migration Script, this function is to check whether the destination site is active and has proper permissions to the account that is running the migration.
- Merge: to merge the source site into the destination site
- NoCustomizedListForms: since SharePoint online comes with modern UI by default, using this option will have the lists and libraries that are migrated from the source to have modern look and feel.
- CopySettings: this is used to tell the migration to be done in an incremental model
- ErrorAction: this parameter is used here to stop the migration and log the error when some unexpected error occurs.
- Update: Updated the below 'Complete Script' to use the existing connection.
Complete Script
# Load the sites from CSV
# check for incremental - Completed
# check for migration speed control - Need to check with SG team
# check for monitoring the running jobs, if gets throttled, is there option to pause
#Script Updated to use existing connection
# The script is based on moving On-Prem SP2013 to SharePoint online
function CheckUrl($urlparam) {
  <#
    .Description
    This function checks the destination URL after loaded from CSV
  #>
    try {
        Write-Host "verifying the url $urlparam" -ForegroundColor Yellow
        $CheckConnection = Invoke-WebRequest -Uri $urlparam
        if($CheckConnection.StatusCode -eq 200) {
        Write-Host "Connection Verified" -ForegroundColor Green
        $status="Success"
    }
}
catch [System.Net.WebException] {
    $ExceptionMessage = $Error[0].Exception
    if ($ExceptionMessage -match "403") {
    Write-Host "URL exists, but you are not authorized" -ForegroundColor Yellow
    Write-LogWarning -Message "URL $urlparam exists, but you are not authorized" -TimeStamp -LogPath $ErrorLogFile
    }
    elseif ($ExceptionMessage -match "503"){
    Write-Host "Error: Server Busy" -ForegroundColor Red
    Write-LogWarning -Message "URL $urlparam exists, but server is busy" -TimeStamp -LogPath $ErrorLogFile
    }
    elseif ($ExceptionMessage -match "404"){
    Write-Host "Error: URL doesn't exists" -ForegroundColor Red
    Write-LogError -Message "URL $urlparam doesn't exists" -TimeStamp -LogPath $ErrorLogFile

    }
    else{
    Write-Host "Error: There is an unknown error" -ForegroundColor Red
    Write-LogError -Message "URL $urlparam unknown error" -TimeStamp -LogPath $ErrorLogFile
    }
    $status="Error Occured"
}
return $status
}


Import-Module PSLogging
$CurrentDate = Get-Date
$DateFormat = $CurrentDate.ToString('MM-dd-yyyy_hh-mm-ss')
#Update the path to the operation logs.
$LogPath = "C:\Users\tuser10\Temp\OpsLogs"
#update the path to error logs
$ErrorLogFile= "C:\Users\tuser10\Temp\ErrorLogs\MigraionError_" + $DateFormat + ".txt"
$LogName = "MigraionLogs_" + $DateFormat + ".log"
$LogFullPath = $LogPath + "\" + $LogName
#Change the path to CSV file where the source and destination sites are updated according to template.
$SitesInfo = Import-Csv -Path "C:\Users\tuser10\Desktop\VinayWorkingDocs\Migration\ToBeMigrated3.csv"

Start-Log -LogPath $LogPath -LogName $LogName -ScriptVersion "1.0" | Out-Null
# setting to incremental update.
$copySettings = New-CopySettings -OnContentItemExists IncrementalUpdate
#use any of existing site where the account has Site Collection Admin rights and store in variable to use it for btach migrations
$m365Connection = Connect-Site -Url "https://contoso.sharepoint.com/teams/qavinay" -Browser -DisableSSO

foreach($record in $SitesInfo){

    $SiteCheck = CheckUrl($record.DestinationSite)
    if($SiteCheck -contains "Success") {
        try {
            $srcSite = Connect-Site -Url $record.SourceSite
            # for destination to connect use cached credentials from the previous connection $m365Connection.
            $dstSite = Connect-Site -Url $record.DestinationSite -UseCredentialsFrom $m365Connection
            Write-Host "Migration started from $srcSite to $dstSite" -ForegroundColor Yellow
            Write-LogInfo -Message "**************************************************************************************************************" -LogPath $LogFullPath
            Write-LogInfo -Message "Source Site: $srcSite" -LogPath $LogFullPath
            Write-LogInfo -Message "Destination Site: $dstSite" -LogPath $LogFullPath
            $MigrationResult = Copy-Site -Site $srcSite -DestinationSite $dstSite -Merge -NoCustomizedListForms  -CopySettings $copySettings -ErrorAction Stop
            Write-Host $MigrationResult.Errors
            Write-Host $MigrationResult.Result


            if($MigrationResult.Errors -ne $null){
                Write-Host "The migration completed with errors" -ForegroundColor Yellow

                Write-LogInfo -Message $MigrationResult.Result -TimeStamp -LogPath $LogFullPath
                Write-LogInfo -Message "**************************************************************************************************************`r`n" -LogPath $LogFullPath
            }

        }
        catch {
            $ErrorMessage = $_
            Write-Host "An Exception occured...$ErrorMessage"
            Write-LogError -Message $ErrorMessage -TimeStamp -LogPath $ErrorLogFile
        }
    }
    else {
    Write-Host "Error Occured... $SiteCheck" -ForegroundColor Red

    }
}
Conclusion
Thus, in this article, we have seen how to perform the migration for multiple sites in one shot using Sharegate Desktop Shell.
References
- Migration Tools For Office 365 Cloud
- Lessons Learnt Using Sharegate Migration Tool In The Trials Made
- https://migration-tool.sharegate.com/hc/en-us/articles/115000641488
- https://migration-tool.sharegate.com/hc/en-us/articles/115000597467-Copy-Site
- https://docs.microsoft.com/en-us/sharepoint/planning-hub-sites
- https://github.com/vayinapurapu/SharePointOnlineMigration/blob/main/SharegateMigration.ps1
Alexander HolmesetPosted Oct 12, 2022, 10:04 AM
Thanks for posting this script Vinay, looks really good. This will save me some work, as I'm about to do a SharePoint migration, and i dont need to script it my self :-) Once again, thanks for sharing. Doing it through the GUI in ShareGate is painful.
Vinay AyinapurapuPosted Jun 24, 2022, 8:46 PM
In order to use cached creds the code needs to be modified. I have this in my list. Meanwhile can you try https://migration-tool.sharegate.com/hc/en-us/articles/115000731047 from ShareGate? Please let me know how it goes.
Brian BulvaPosted Jun 24, 2022, 6:20 PM
Hi Vinay, hopefully a simple answer to this question. After each row in the CSV the code is prompting me to sign into each tenant again. Anyway to prevent this and use the cached credentials?
Vinay AyinapurapuPosted Jun 9, 2022, 2:46 PM
Hi Ashish.. at very first time the credentials need to be entered. On successful validation, you will be having an Access token and that token is used for next set of migrations. Since i have done the demo for only couple of sites, the Access Token is valid for the timeframe. The life time of the tokens are configurable and usually each organization have their own settings. To your question, how we can pass the connection incase we have shorter token life time please check the article from Sharegate https://migration-tool.sharegate.com/hc/en-us/articles/115000731047. Hope this helps.
Avian DecostaPosted Jun 4, 2022, 1:27 PM
Hello Vinay, One thing is not clear to me for each source and destination site you are using connect-site function. How are you passing the credentials for each site. I am new to ShareGate, so please ignore If I asked silly question?
Avian DecostaPosted Jun 4, 2022, 1:25 PM
Hello Vinay,