

ASP.NET Web API is a framework for building Web API’s, i.e. HTTP based services on top of the .NET Framework. The most common use case for using a Web API is for building RESTful services.
Description
In this application I will show you the steps to get data from a Web api using Jquery. Before going through this session visit my Part One session.
Way To Source Code
Important steps to be followed for the previous session.
Create New Project for WebApi
Go to File > New > Project > Select asp.net MVC web application > Entry Application Name > Click OK > Select Web API > Select view engine Razor > OK
Add a new Api Controller.
Go to Solution Explorer > Right Click on Controllers folder form Solution Explorer > Add > Controller > Enter Controller name > Select Templete "empty API Controller"> Add.
Add Application_BeginRequest event in the Global.asax.cs file for allow Cross-origin resource sharing.
- protected void Application_BeginRequest()
- {
- string[] allowedOrigin = new string[] { "http://localhost:12477" };
- var origin = HttpContext.Current.Request.Headers["Origin"];
- if (origin != null && allowedOrigin.Contains(origin))
- {
- HttpContext.Current.Response.AddHeader("Access-Control-Allow-Origin", origin);
- HttpContext.Current.Response.AddHeader("Access-Control-Allow-Methods", "GET,POST");
- }
- }
Here I will write code for "Allow Origin" which will allow the client application to consume the application services, which allows cross domain ajax calls. CORS support was released with ASP.NET Web API 2.T o provide support for CORS in ASP.Net Web API 2, you would need to use the Microsoft.AspNet.WebApi.Cors NuGet package. To install this package, you can execute the below command from the NuGet Package Manager Console.
I will discuss about CORS support later.
Install-Package Microsoft.AspNet.WebApi.CorsI will discuss about CORS support later.
Steps To Be Followed For This Session
These below mentioned steps will be the continuation of previous Part One session. So, first you must follow my Part One session.
Step 1
Add another new project for consuming Web API services. Here I have created an MVC web application for our client application.
Go to Solution Explorer > Add > New Project > Select asp.net MVC web application > Entry Application Name > Click OK > Select Internet Application > Select view engine Razor > OK
Step 2
Add a new MVC Controller.
Go to Solution Explorer > Right Click on Controllers folder form Solution Explorer > Add > Controller > Enter Controller name > Select Templete "empty MVC Controller"> Add.
Step 3
Here I have added "Part1" Action into "Home" Controller. Please write the following code:
- using System;
- using System.Collections.Generic;
- using System.Linq;
- using System.Net.Http;
- using System.Web;
- using System.Web.Mvc;
- namespace SatyaConsumingApi.Controllers
- {
- public class HomeController : Controller
- {
- public ActionResult Part1()
- {
- return View();
- }
- }
- }
Step 4
Add view for the action & design. Right Click on Action Method (here right click on form action) > Add View... > Enter View Name > Select View Engine (Razor) > Add.
Code Ref
- @{
- ViewBag.Title = "Satyaprakash - Fetch data from WebApi using jquery";
- }
- <style>
- table {
- font-family: arial, sans-serif;
- border-collapse: collapse;
- width: 100%;
- }
- td, th {
- border: 1px solid #dddddd;
- text-align: left;
- padding: 8px;
- }
- tr:nth-child(even) {
- background-color: #dddddd;
- }
- </style>
- <div>
- <div style="padding:10px ; align-content:center">
- <fieldset>
- <legend style="font-family:Arial Black;color:blue">Get Data From Web API Using JQuery As Per Selection</legend>
- <input id="rad1GetData" type="radio" name="Full Name" class="btn btn-default" />
- <label style="color:green">
- Get Full Name
- </label>
- <input id="rad2GetData" type="radio" name="Full Name" class="btn btn-default" />
- <label style="color:orangered">
- Get First Name
- </label>
- <input id="rad3GetData" type="radio" name="Full Name" class="btn btn-default" />
- <label style="color:red">
- Get Last Name
- </label>
- </fieldset>
- </div>
- <div id="updatePanel" style="width:90%; margin:0 auto; padding:10px">
- </div>
- </div>
- @section Scripts{
- <script>
- $(document).ready(function () {
- var apiBaseUrl = "http://localhost:47250/";
- $('#rad1GetData').click(function () {
- $.ajax({
- url: apiBaseUrl + 'api/satya',
- type: 'GET',
- dataType: 'json',
- success: function (data) {
- var $table = $('<table/>').addClass('table table-responsive table-striped table-bordered');
- var $header = $('<thead/>').html('<tr><th style="background-color: Yellow;color: blue">Full Name</th><th style="background-color: Yellow;color: blue">Email</th><th style="background-color: Yellow;color: blue">City</th><th style="background-color: Yellow;color: blue">Country</th></tr>');
- $table.append($header);
- $.each(data, function (i, val) {
- var $row = $('<tr/>');
- $row.append($('<td/>').html(val.FirstName + ' ' + val.LastName));
- $row.append($('<td/>').html(val.EmailID));
- $row.append($('<td/>').html(val.City));
- $row.append($('<td/>').html(val.Country));
- $table.append($row);
- });
- $('#updatePanel').html($table);
- },
- error: function () {
- alert('Error!');
- }
- });
- });
- $('#rad2GetData').click(function () {
- $.ajax({
- url: apiBaseUrl + 'api/satya',
- type: 'GET',
- dataType: 'json',
- success: function (data) {
- var $table = $('<table/>').addClass('table table-responsive table-striped table-bordered');
- var $header = $('<thead/>').html('<tr><th style="background-color: Yellow;color: blue">First Name</th><th style="background-color: Yellow;color: blue">Email</th><th style="background-color: Yellow;color: blue">City</th><th style="background-color: Yellow;color: blue">Country</th></tr>');
- $table.append($header);
- $.each(data, function (i, val) {
- var $row = $('<tr/>');
- $row.append($('<td/>').html(val.FirstName));
- $row.append($('<td/>').html(val.EmailID));
- $row.append($('<td/>').html(val.City));
- $row.append($('<td/>').html(val.Country));
- $table.append($row);
- });
- $('#updatePanel').html($table);
- },
- error: function () {
- alert('Error!');
- }
- });
- });
- $('#rad3GetData').click(function () {
- $.ajax({
- url: apiBaseUrl + 'api/satya',
- type: 'GET',
- dataType: 'json',
- success: function (data) {
- var $table = $('<table/>').addClass('table table-responsive table-striped table-bordered');
- var $header = $('<thead/>').html('<tr><th style="background-color: Yellow;color: blue">Last Name</th><th style="background-color: Yellow;color: blue">Email</th><th style="background-color: Yellow;color: blue">City</th><th style="background-color: Yellow;color: blue">Country</th></tr>');
- $table.append($header);
- $.each(data, function (i, val) {
- var $row = $('<tr/>');
- $row.append($('<td/>').html(val.LastName));
- $row.append($('<td/>').html(val.EmailID));
- $row.append($('<td/>').html(val.City));
- $row.append($('<td/>').html(val.Country));
- $table.append($row);
- });
- $('#updatePanel').html($table);
- },
- error: function () {
- alert('Error!');
- }
- });
- });
- });
- </script>
- }
Code Description
For radio buttons.
- <input id="rad1GetData" type="radio" name="Full Name" class="btn btn-default" />
- <label style="color:green">
- Get Full Name
- </label>
- <input id="rad2GetData" type="radio" name="Full Name" class="btn btn-default" />
- <label style="color:orangered">
- Get First Name
- </label>
- <input id="rad3GetData" type="radio" name="Full Name" class="btn btn-default" />
- <label style="color:red">
- Get Last Name
- </label>
Here I added jquery code for getting data from the backend which means SQLserver using web API. I added three radio buttons with different Ids.
- <script>
- $(document).ready(function () {
- var apiBaseUrl = "http://localhost:47250/";
- $('#rad1GetData').click(function () {
- $.ajax({
- url: apiBaseUrl + 'api/satya',
- type: 'GET',
- dataType: 'json',
- success: function (data) {
- var $table = $('<table/>').addClass('table table-responsive table-striped table-bordered');
- var $header = $('<thead/>').html('<tr><th style="background-color: Yellow;color: blue">Full Name</th><th style="background-color: Yellow;color: blue">Email</th><th style="background-color: Yellow;color: blue">City</th><th style="background-color: Yellow;color: blue">Country</th></tr>');
- $table.append($header);
- $.each(data, function (i, val) {
- var $row = $('<tr/>');
- $row.append($('<td/>').html(val.FirstName + ' ' + val.LastName));
- $row.append($('<td/>').html(val.EmailID));
- $row.append($('<td/>').html(val.City));
- $row.append($('<td/>').html(val.Country));
- $table.append($row);
- });
- $('#updatePanel').html($table);
- },
- error: function () {
- alert('Error!');
- }
- });
- });
- $('#rad2GetData').click(function () {
- $.ajax({
- url: apiBaseUrl + 'api/satya',
- type: 'GET',
- dataType: 'json',
- success: function (data) {
- var $table = $('<table/>').addClass('table table-responsive table-striped table-bordered');
- var $header = $('<thead/>').html('<tr><th style="background-color: Yellow;color: blue">First Name</th><th style="background-color: Yellow;color: blue">Email</th><th style="background-color: Yellow;color: blue">City</th><th style="background-color: Yellow;color: blue">Country</th></tr>');
- $table.append($header);
- $.each(data, function (i, val) {
- var $row = $('<tr/>');
- $row.append($('<td/>').html(val.FirstName));
- $row.append($('<td/>').html(val.EmailID));
- $row.append($('<td/>').html(val.City));
- $row.append($('<td/>').html(val.Country));
- $table.append($row);
- });
- $('#updatePanel').html($table);
- },
- error: function () {
- alert('Error!');
- }
- });
- });
- $('#rad3GetData').click(function () {
- $.ajax({
- url: apiBaseUrl + 'api/satya',
- type: 'GET',
- dataType: 'json',
- success: function (data) {
- var $table = $('<table/>').addClass('table table-responsive table-striped table-bordered');
- var $header = $('<thead/>').html('<tr><th style="background-color: Yellow;color: blue">Last Name</th><th style="background-color: Yellow;color: blue">Email</th><th style="background-color: Yellow;color: blue">City</th><th style="background-color: Yellow;color: blue">Country</th></tr>');
- $table.append($header);
- $.each(data, function (i, val) {
- var $row = $('<tr/>');
- $row.append($('<td/>').html(val.LastName));
- $row.append($('<td/>').html(val.EmailID));
- $row.append($('<td/>').html(val.City));
- $row.append($('<td/>').html(val.Country));
- $table.append($row);
- });
- $('#updatePanel').html($table);
- },
- error: function () {
- alert('Error!');
- }
- });
- });
- });
- </script>
- var apiBaseUrl = "http://localhost:47250/";
In the radio button click event I added url with controller name as created in the web API section.
- $('#rad1GetData').click(function () {
- $.ajax({
- url: apiBaseUrl + 'api/satya',
You will get this url path from WebApiConfig.cs file from App_Start folder of SatyaWebApi project.
- config.Routes.MapHttpRoute(
- name: "DefaultApi",
- routeTemplate: "api/{controller}/{id}",
- defaults: new { id = RouteParameter.Optional }
- );
After sucessful execution, the data will be shown in a table for corresponding column header.
- success: function (data) {
- var $table = $('<table/>').addClass('table table-responsive table-striped table-bordered');
- var $header = $('<thead/>').html('<tr><th style="background-color: Yellow;color: blue">First Name</th><th style="background-color: Yellow;color: blue">Email</th><th style="background-color: Yellow;color: blue">City</th><th style="background-color: Yellow;color: blue">Country</th></tr>');
- $table.append($header);
- $.each(data, function (i, val) {
- var $row = $('<tr/>');
- $row.append($('<td/>').html(val.FirstName));
- $row.append($('<td/>').html(val.EmailID));
- $row.append($('<td/>').html(val.City));
- $row.append($('<td/>').html(val.Country));
- $table.append($row);
- });
- $('#updatePanel').html($table);
- }
- error: function () {
- alert('Error!');
- }
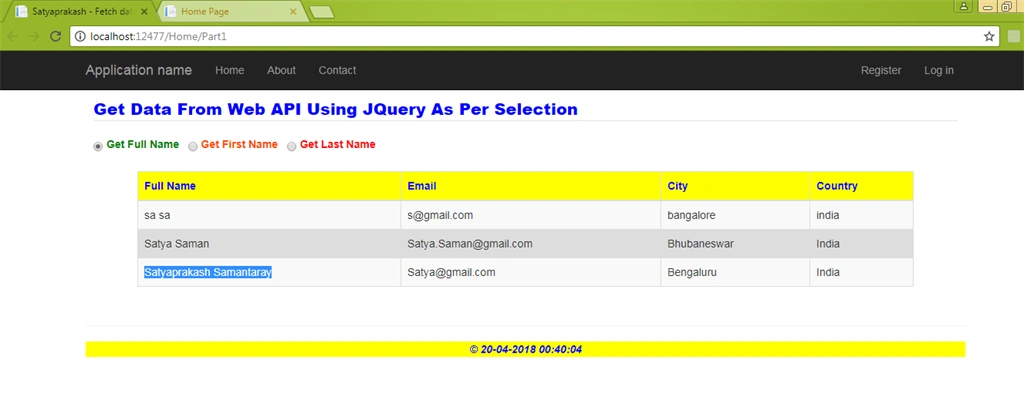
- Using the First radio button id (#rad1GetData) the full name of the employee will be shown.
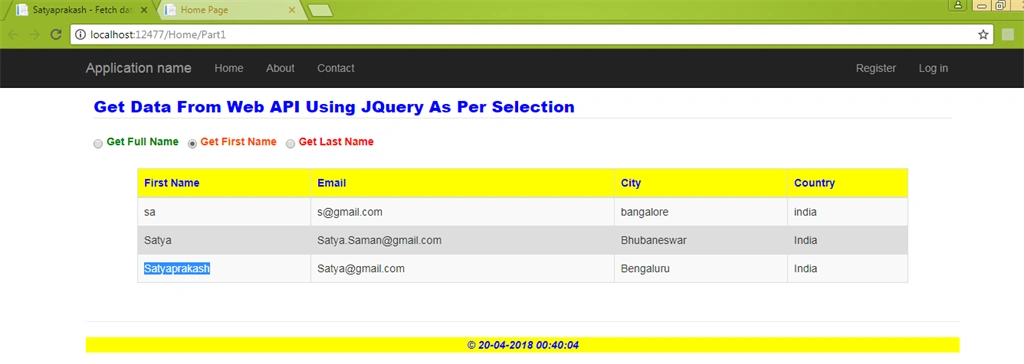
- Using the Second radio button id (#rad2GetData) the first name of the employee will be shown.
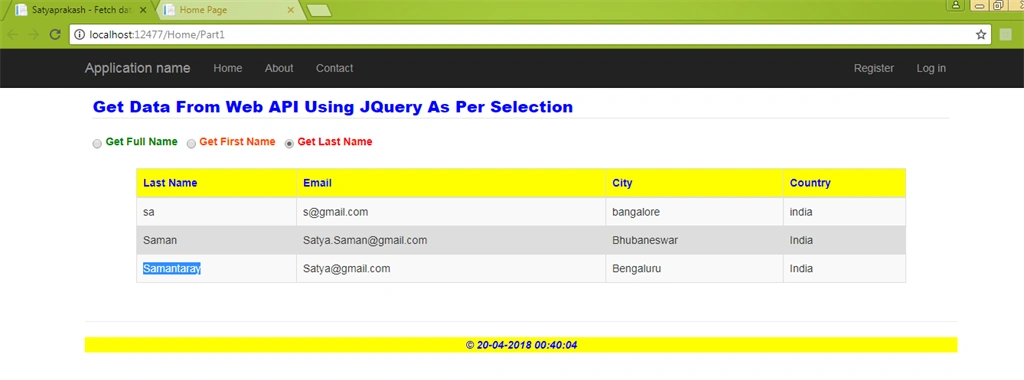
- Using the Third radio button id (#rad3GetData) the last name of the employee will be shown.
Step 5
In _Layout.cshtml file I have customized the footer section as shown below.
- <footer>
- <p style="background-color: Yellow; font-weight: bold; color:blue; text-align: center; font-style: oblique">© @DateTime.Now.ToLocalTime()</p> @*Add Date Time*@
- </footer>
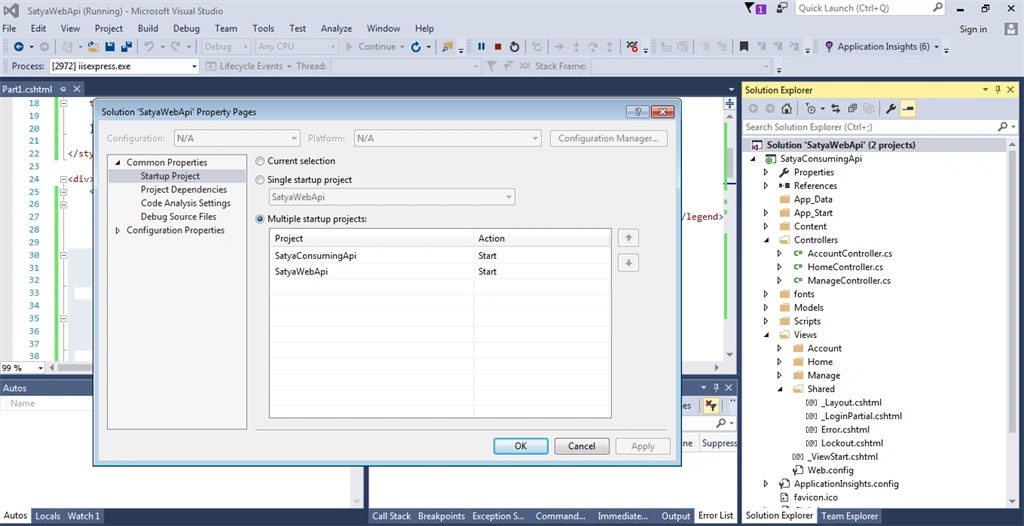
Here we need to start both applications as the client application will consume services from the web API application. Right click on the solution > Properties > Select "Multiple startup projects" > Change Action of both Projects to Start > Apply > Ok
OUTPUT
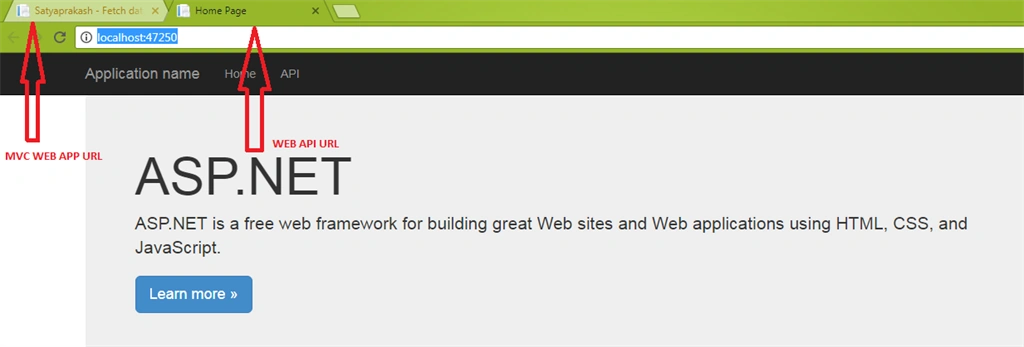
The url of the MVC web aplication to consume Web API. Here both MVC web app and web APIurl will run simultaneously side by side.
http://localhost:12477/Home/Part1 >> url of MVC web aplication
http://localhost:47250/ >> Web Api url
For Full Name Radio Button.
For First Name Radio Button.
For Last Name Radio Button.
SUMMARY
- How a MVC web application consumes Web API services.
- How to implement Web API services in JQuery.
First LastPosted Jun 22, 2018, 4:03 PM
How does it know to use jQuery? Where is the script reference?
Thomas TufugaPosted Jun 4, 2018, 11:00 PM
Awesome article, Im just started reading your 10 part series, and just wondering if youre able to touch on, working with retrieving next ID value in a MVC EF model web app?
Jothimani ElumalaiPosted Apr 23, 2018, 12:32 PM
In this article very useful for all the developers ..... Greate job....