

I am here to continue the discussion around AngularJS 2.0. So far, we have discussed about data binding, input properties, output properties, pipes, viewchild, Directives, Services including routes and template based form binding, using ngForms in Angular 2.0. Now, in this article, I will discuss how to create model based form, using Angular form module in Angular 2.0. In case you did not have a look at the previous articles of this series, go through the links mentioned below.
- AngularJS 2.0 From Beginning Introduction of AngularJS 2.0 (Day 1)
- AngularJS 2.0 From Beginning Component (Day 2)
- AngularJS 2.0 From Beginning Data Binding (Day 3)
- AngularJS 2.0 From Beginning Input Data Binding (Day 4)
- AngularJS 2.0 From Beginning - Output Property Binding (Day 5)
- AngularJS 2.0 From Beginning - Attribute Directive (Day 6)
- AngularJS 2.0 From Beginning - Structural Directives (Day 7)
- AngularJs 2.0 From Beginning - Pipes (Day 8)
- AngularJS 2.0 From Beginning - Viewchild (Day 9)
- AngularJS 2.0 From Beginning - Dynamic Grid (Day 10)
- AngularJS 2.0 From Beginning - Service (Day 11)
- AngularJs 2.0 From Beginning - ngContent (Day 12)
- AngularJS 2.0 From Beginning - Route Part I (Day 13)
- AngularJs 2.0 From Beginning - Route Part 2 (Day 14)
- AngularJs 2.0 From Beginning - ngForm Part 1 (Day 15)
In my previous article, I already discussed about the template driven form binding in Angular 2.0. Now, in this article, we will discuss about the Model Driven or Reactive Form binding in the Angular 2.0.
While using Directives in our templates, it gives us the power of rapid prototyping without too much boilerplate. We are restricted in what we can do. Reactive Forms on the other hand lets us define our form through code and gives us much more flexibility and control over the data validation.
Advantages of Model Driven Forms
- UNIT TESTABLE
Since we have the form model defined in our code, we can unit test it.
- LISTEN TO FORM AND CONTROLS CHANGES
With Reactive Forms, we can listen to form or control the changes easily. Each form group or form control exposes few events, which we can subscribe to (e.g. statusChanges, valuesChanges, etc).
To begin, we must first ensure that we are working with the right Directives and the right classes in order to take advantage of procedural forms. For this, we need to ensure that ReactiveFormsModule was imported in Bootstrap phase of the Application module. This will give us an access to the components, Directives and providers like FormBuilder, FormGroup and FormControl.
FormControl
Note that the FormControl class is assigned to similarly named fields, both on this and in the FormBuilder#group({ }) method. This is mostly for ease of access. By saving the references to the FormControl instances on this, you can access the inputs in the template without having to reference the form itself. The form fields can otherwise be reached in the template by using loginForm.controls.username and loginForm.controls.password. Likewise, any instance of FormControl in this situation can access its parent group by using its .root property (e.g. username.root.controls.password). A FormControl requires two properties: an initial value and a list of validators. Right now, we have no validation.
Validating Reactive Forms
Building from the previous login form, we can quickly and easily add the validation. Angular provides many validators out of the box. They can be imported along with the rest of dependencies for the procedural forms. We are using .valid and .untouched to determine, if we need to show the errors - while the field is required, there is no reason to tell the user that the value is wrong, if the field hasn't been visited yet. For built-in validation, we are calling .hasError() on the form element and we are passing a string, which represents the validator function , which we included. The error message only displays, if this test returns true.
Reactive Forms Custom Validation
As useful as the built-in validators are, it is very useful to be able to include your own. Angular allows you to do just that with minimal effort. A simple function takes the FormControl instance and returns null, if everything is fine. If the test fails, it returns an object with an arbitrarily named property. The property name is what will be used for the .hasError() test.- <div [hidden]="!password.hasError('needsExclamation')">
- Your password must have an exclamation mark!
- </div>
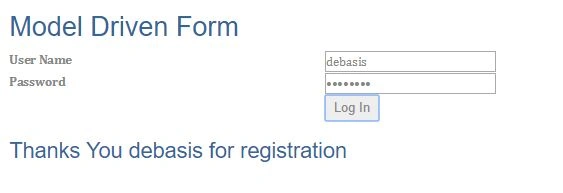
- <h2>Model Driven Form</h2>
- <div>
- <form [formGroup]="loginForm" (ngSubmit)="registerUser()">
- <table style="width:60%;" cellpadding="5" cellspacing="5">
- <tr>
- <td style="width :40%;">
- <label for="username">User Name</label>
- </td>
- <td style="width :60%;">
- <input type="text" name="username" id="username" [formControl]="username">
- <div [hidden]="username.valid || username.untouched">
- <div>
- The following problems have been found with the username:
- </div>
- <div [hidden]="!username.hasError('minlength')">
- Username can not be shorter than 5 characters.
- </div>
- <div [hidden]="!username.hasError('required')">
- Username is required.
- </div>
- </div>
- </td>
- </tr>
- <tr>
- <td style="width :40%;">
- <label for="password">Password</label>
- </td>
- <td style="width :60%;">
- <input type="password" name="password" id="password" [formControl]="password">
- <div [hidden]="password.valid || password.untouched">
- <div>
- The following problems have been found with the password:
- </div>
- <div [hidden]="!password.hasError('required')">
- The password is required.
- </div>
- <div [hidden]="!password.hasError('needsExclamation')">
- Your password must have an exclamation mark!
- </div>
- </div>
- </td>
- </tr>
- <tr>
- <td style="width :40%;"></td>
- <td style="width :60%;">
- <button type="submit" [disabled]="!loginForm.valid">Log In</button>
- </td>
- </tr>
- </table>
- </form>
- <div *ngIf="showMessage">
- <h3>Thanks You {{formData.username}} for registration</h3>
- </div>
- </div>
- import { Component, OnInit, ViewChild } from '@angular/core';
- import { Validators, FormBuilder, FormControl, FormGroup } from '@angular/forms';
- @Component({
- moduleId: module.id,
- selector: 'home-page',
- templateUrl: 'app.component.homepage.html'
- })
- export class HomePageComponent implements OnInit {
- private formData: any = {};
- username = new FormControl('', [
- Validators.required,
- Validators.minLength(5)
- ]);
- password = new FormControl('', [
- Validators.required,
- hasExclamationMark
- ]);
- loginForm: FormGroup = this.builder.group({
- username: this.username,
- password: this.password
- });
- private showMessage: boolean = false;
- constructor(private builder: FormBuilder) {
- }
- ngOnInit(): void {
- }
- registerUser() {
- thisthis.formData = this.loginForm.value;
- this.showMessage = true;
- }
- }
- function hasExclamationMark(input: FormControl) {
- const hasExclamation = input.value.indexOf('!') >= 0;
- return hasExclamation ? null : { needsExclamation: true };
- }
- import { NgModule, NO_ERRORS_SCHEMA } from '@angular/core';
- import { BrowserModule } from '@angular/platform-browser';
- import { ReactiveFormsModule } from "@angular/forms";
- import { HomePageComponent } from './src/app.component.homepage';
- @NgModule({
- imports: [BrowserModule, ReactiveFormsModule],
- declarations: [HomePageComponent],
- bootstrap: [HomePageComponent]
- })
- export class AppModule { }
- <!DOCTYPE html>
- <html>
- <head>
- <title>Angular2 - Model Driven Form </title>
- <meta charset="UTF-8">
- <meta name="viewport" content="width=device-width, initial-scale=1">
- <link href="../resources/style/bootstrap.css" rel="stylesheet" />
- <link href="../resources/style/style1.css" rel="stylesheet" />
- <!-- Polyfill(s) for older browsers -->
- <script src="../resources/js/jquery-2.1.1.js"></script>
- <script src="../resources/js/bootstrap.js"></script>
- <script src="../node_modules/core-js/client/shim.min.js"></script>
- <script src="../node_modules/zone.js/dist/zone.js"></script>
- <script src="../node_modules/reflect-metadata/Reflect.js"></script>
- <script src="../node_modules/systemjs/dist/system.src.js"></script>
- <script src="../systemjs.config.js"></script>
- <script>
- System.import('app').catch(function (err) { console.error(err); });
- </script>
- <!-- Set the base href, demo only! In your app: <base href="/"> -->
- <script>document.write('<base href="' + document.location + '" />');</script>
- </head>
- <body>
- <home-page>Loading</home-page>
- </body>
- </html>
- import { platformBrowserDynamic } from '@angular/platform-browser-dynamic';
- import { AppModule } from './app.module';
- const platform = platformBrowserDynamic();
- platform.bootstrapModule(AppModule);
omprakash aPosted May 15, 2017, 2:19 AM
I am a little bit of confusion with driven which one is the best approach .would you please suggest me.